Operating Instructions
Page 1
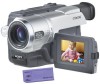
Refer to these numbers whenever you call upon your Sony dealer regarding this manual thoroughly, and retain it for future reference. CCD-TRV608 CCD-TRV107/TRV108/TRV308/ TRV408/TRV608 ©2002 Sony Corporation 3-072-314-13 (1) Video Camera Recorder Operating Instructions Before operating the unit, please read this product. Record the serial number in the space provided below. CCD-TRV Model No. Owner's Record The model and serial numbers are located on the bottom. Serial No. Model No. AC- Serial No.
Refer to these numbers whenever you call upon your Sony dealer regarding this manual thoroughly, and retain it for future reference. CCD-TRV608 CCD-TRV107/TRV108/TRV308/ TRV408/TRV608 ©2002 Sony Corporation 3-072-314-13 (1) Video Camera Recorder Operating Instructions Before operating the unit, please read this product. Record the serial number in the space provided below. CCD-TRV Model No. Owner's Record The model and serial numbers are located on the bottom. Serial No. Model No. AC- Serial No.
Operating Instructions
Page 7
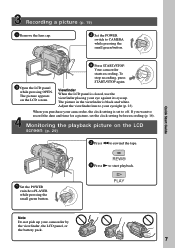
Your camcorder PL starts recording. The picture appears on the LCD screen (p. 29) 2 Press m to PLAYER PL while pressing the POWER small green button. Adjust the viewfinder lens to record the date and time for a picture, set to CAMERA PL while pressing the POWER small green button. If you...START/STOP again. The picture in the viewfinder is closed, use the viewfinder placing your camcorder by the viewfinder, the LCD panel, or the battery pack. 7 Monitoring the playback picture on the LCD screen. CAME AYER OFF(CHG) PLAY Note Do not pick up your eye against ...
Your camcorder PL starts recording. The picture appears on the LCD screen (p. 29) 2 Press m to PLAYER PL while pressing the POWER small green button. Adjust the viewfinder lens to record the date and time for a picture, set to CAMERA PL while pressing the POWER small green button. If you...START/STOP again. The picture in the viewfinder is closed, use the viewfinder placing your camcorder by the viewfinder, the LCD panel, or the battery pack. 7 Monitoring the playback picture on the LCD screen. CAME AYER OFF(CHG) PLAY Note Do not pick up your eye against ...
Operating Instructions
Page 8
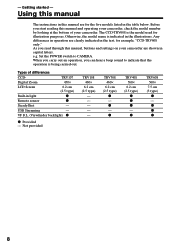
...text, for illustration purposes. As you can hear a beep sound to CAMERA. TRV107 Digital Zoom 450× LCD Screen 6.2 cm (2.5 type) Built-in capital letters. TRV308 460× 6.2 cm (2.5 type) z - Otherwise, the model ...name is being carried out. e.g. - z TRV608 560× 7.5 cm (3 type) z - Using this manual The instructions in this manual and operating your camcorder, check the model number by looking at the bottom of differences CCD...
...text, for illustration purposes. As you can hear a beep sound to CAMERA. TRV107 Digital Zoom 450× LCD Screen 6.2 cm (2.5 type) Built-in capital letters. TRV308 460× 6.2 cm (2.5 type) z - Otherwise, the model ...name is being carried out. e.g. - z TRV608 560× 7.5 cm (3 type) z - Using this manual The instructions in this manual and operating your camcorder, check the model number by looking at the bottom of differences CCD...
Operating Instructions
Page 9
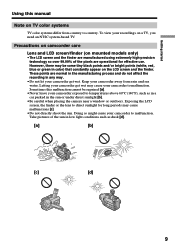
... direct sunlight [b]. •Be careful when placing the camera near a window or outdoors. Keep your recordings on mounted models only) •The LCD screen and the finder are operational for long periods may cause malfunctions [c]. •Do not directly shoot the sun. Letting your camcorder get wet may be repaired [a]. •Never leave...
... direct sunlight [b]. •Be careful when placing the camera near a window or outdoors. Keep your recordings on mounted models only) •The LCD screen and the finder are operational for long periods may cause malfunctions [c]. •Do not directly shoot the sun. Letting your camcorder get wet may be repaired [a]. •Never leave...
Operating Instructions
Page 16
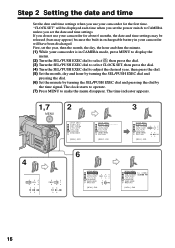
... the year, then the month, the day, the hour and then the minute. (1) While your camcorder is in your camcorder for about 6 months, the date and time settings may appear) because the built-in rechargeable battery in CAMERA mode, press MENU to display the menu. (2) Turn the SEL/PUSH EXEC dial to select... 4 2002 US B STREAM 12:30:00 PM AUTO DATE LTR S I ZE L ANGUAGE DEMO MODE RETURN [ MENU ] : END 16 If you set the power switch to CAMERA unless you do not use your camcorder will be released (bars may be displayed each time when you set the date and time settings.
... the year, then the month, the day, the hour and then the minute. (1) While your camcorder is in your camcorder for about 6 months, the date and time settings may appear) because the built-in rechargeable battery in CAMERA mode, press MENU to display the menu. (2) Turn the SEL/PUSH EXEC dial to select... 4 2002 US B STREAM 12:30:00 PM AUTO DATE LTR S I ZE L ANGUAGE DEMO MODE RETURN [ MENU ] : END 16 If you set the power switch to CAMERA unless you do not use your camcorder will be released (bars may be displayed each time when you set the date and time settings.

Operating Instructions
Page 19
...(p. 11 to 18). (3) Set the POWER switch to the standby mode. (4) Open the LCD panel while pressing OPEN. Select SP or LP in the LP (long play back the tape on your camcorder. 19 In the LP mode, you . (1) Remove the lens cap by pressing both knobs...STOP. To stop recording, press START/STOP again. Basics - Your camcorder is set to CAMERA while pressing the small green button. Recording - The recording lamp lights up . Your camcorder starts recording. The recording lamp located on Recording mode Your camcorder records and plays back in the SP (standard play) mode and...
...(p. 11 to 18). (3) Set the POWER switch to the standby mode. (4) Open the LCD panel while pressing OPEN. Select SP or LP in the LP (long play back the tape on your camcorder. 19 In the LP mode, you . (1) Remove the lens cap by pressing both knobs...STOP. To stop recording, press START/STOP again. Basics - Your camcorder is set to CAMERA while pressing the small green button. Recording - The recording lamp lights up . Your camcorder starts recording. The recording lamp located on Recording mode Your camcorder records and plays back in the SP (standard play) mode and...
Operating Instructions
Page 20
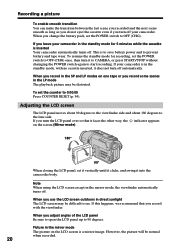
...The playback picture may be difficult to see. When you record some scenes in direct sunlight The LCD screen may be normal when recorded. 20 When you record with no cassette inserted, it into the camcorder body. To resume the standby mode for 5 minutes while the cassette is to save battery ..., set it vertically until it clicks, and swing it does not turn it to CAMERA, or press START/STOP without chainging the POWER switch again to start recording. Adjusting the LCD screen The LCD panel moves about 90 degrees to the viewfinder side and about 180 degrees to OFF (CHG) once, then...
...The playback picture may be difficult to see. When you record some scenes in direct sunlight The LCD screen may be normal when recorded. 20 When you record with no cassette inserted, it into the camcorder body. To resume the standby mode for 5 minutes while the cassette is to save battery ..., set it vertically until it clicks, and swing it does not turn it to CAMERA, or press START/STOP without chainging the POWER switch again to start recording. Adjusting the LCD screen The LCD panel moves about 90 degrees to the viewfinder side and about 180 degrees to OFF (CHG) once, then...

Operating Instructions
Page 21
... ] : END LCD screen backlight You can adjust the brightness of other indicators appear mirror-reversed and others are not displayed. •The date appears mirror-reversed when the auto date function is working. After using your camcorder (CCD-TRV107/TRV308/TRV408/TRV608 only)... Remove the battery pack from your camcorder to avoid turning on the built-in the mirror mode DATE and TIME on your camcorder do not work. Recording - After recording (1) Set the POWER switch to adjust the brightness of the LCD screen (1) In CAMERA mode, select LCD...
... ] : END LCD screen backlight You can adjust the brightness of other indicators appear mirror-reversed and others are not displayed. •The date appears mirror-reversed when the auto date function is working. After using your camcorder (CCD-TRV107/TRV308/TRV408/TRV608 only)... Remove the battery pack from your camcorder to avoid turning on the built-in the mirror mode DATE and TIME on your camcorder do not work. Recording - After recording (1) Set the POWER switch to adjust the brightness of the LCD screen (1) In CAMERA mode, select LCD...

Operating Instructions
Page 25
Press BACK LIGHT in CAMERA mode. The . indicator appears on the screen. BACK LIGHT When you press EXPOSURE when shooting backlit subjects The backlight function will be canceled. 25 To cancel, press BACK LIGHT again. BACK LIGHT If you shoot a subject with the light source behind the subject or a subject with a light background, use the backlight function. Basics Recording a picture Shooting backlit subjects - Recording -
Press BACK LIGHT in CAMERA mode. The . indicator appears on the screen. BACK LIGHT When you press EXPOSURE when shooting backlit subjects The backlight function will be canceled. 25 To cancel, press BACK LIGHT again. BACK LIGHT If you shoot a subject with the light source behind the subject or a subject with a light background, use the backlight function. Basics Recording a picture Shooting backlit subjects - Recording -
Operating Instructions
Page 26
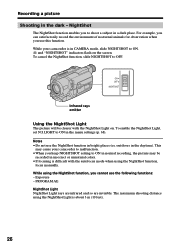
... recording, the picture may be clearer with the autofocus mode when using the NightShot function, focus manually. This may cause your camcorder is difficult with the NightShot Light on the screen. ON OFF NIGHTSHOT Infrared rays emitter Using the NightShot Light The picture will...dark place. Exposure - Recording a picture Shooting in the daytime). outdoors in the dark - While your camcorder to shoot a subject in incorrect or unnatural colors. •If focusing is in CAMERA mode, slide NIGHTSHOT to ON in bright places (ex. For example, you can satisfactorily record the environment...
... recording, the picture may be clearer with the autofocus mode when using the NightShot function, focus manually. This may cause your camcorder is difficult with the NightShot Light on the screen. ON OFF NIGHTSHOT Infrared rays emitter Using the NightShot Light The picture will...dark place. Exposure - Recording a picture Shooting in the daytime). outdoors in the dark - While your camcorder to shoot a subject in incorrect or unnatural colors. •If focusing is in CAMERA mode, slide NIGHTSHOT to ON in bright places (ex. For example, you can satisfactorily record the environment...

Operating Instructions
Page 27
Press DATE (or TIME), then press TIME (or DATE) to your camcorder, the clock setting is set to record the time. Set the date and time to record the date and time. If you purchase your local ... DATE and/or TIME again. DATE TIME When you do not record the date and time in the picture Record the date and time in CAMERA mode. Note The date and time indicators recorded manually cannot be deleted. Press TIME to off. Carry out the following operations in the black screen...
Press DATE (or TIME), then press TIME (or DATE) to your camcorder, the clock setting is set to record the time. Set the date and time to record the date and time. If you purchase your local ... DATE and/or TIME again. DATE TIME When you do not record the date and time in the picture Record the date and time in CAMERA mode. Note The date and time indicators recorded manually cannot be deleted. Press TIME to off. Carry out the following operations in the black screen...

Operating Instructions
Page 28
.... •Once you eject the cassette after you have recorded on the tape, the end search function does not work. 28 Press END SEARCH in CAMERA mode. END SEARCH You can monitor the sound from the last recorded scene successively. Checking the recording - The last 5 seconds of the recorded section after...
.... •Once you eject the cassette after you have recorded on the tape, the end search function does not work. 28 Press END SEARCH in CAMERA mode. END SEARCH You can monitor the sound from the last recorded scene successively. Checking the recording - The last 5 seconds of the recorded section after...
Operating Instructions
Page 34
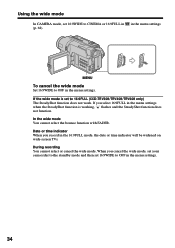
If you cancel the wide mode, set your camcorder to the standby mode and then set 16:9WIDE to OFF in the menu settings. 34 When you select 16:9FULL in the 16:9FULL ... the wide mode In CAMERA mode, set 16:9WIDE to CINEMA or 16:9FULL in the menu settings. If the wide mode is working, flashes and the SteadyShot function does not function. in the menu settings MENU To cancel the wide mode Set 16:9WIDE to 16:9FULL (CCD-TRV308/TRV408/TRV608 only...
If you cancel the wide mode, set your camcorder to the standby mode and then set 16:9WIDE to OFF in the menu settings. 34 When you select 16:9FULL in the 16:9FULL ... the wide mode In CAMERA mode, set 16:9WIDE to CINEMA or 16:9FULL in the menu settings. If the wide mode is working, flashes and the SteadyShot function does not function. in the menu settings MENU To cancel the wide mode Set 16:9WIDE to 16:9FULL (CCD-TRV308/TRV408/TRV608 only...
Operating Instructions
Page 37
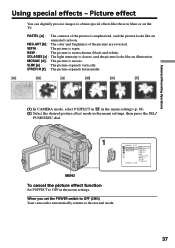
... AE OFF P EFFECT PASTEL RETURN NEG.AR T SEP I A B &W SOLAR I ZE MOS A I C SL IM STRETCH [ MENU ] : END 37 Advanced Recording Operations (1) In CAMERA mode, select P EFFECT in in the menu settings (p. 68). (2) Select the desired picture effect mode in the menu settings, then press the SEL/ PUSH EXEC...horizontally. B&W : The picture is clearer, and the picture looks like an illustration. When you set the POWER switch to OFF (CHG) Your camcorder automatically returns to OFF in films or on the TV. Using special effects - SLIM [e] : The picture expands vertically.
... AE OFF P EFFECT PASTEL RETURN NEG.AR T SEP I A B &W SOLAR I ZE MOS A I C SL IM STRETCH [ MENU ] : END 37 Advanced Recording Operations (1) In CAMERA mode, select P EFFECT in in the menu settings (p. 68). (2) Select the desired picture effect mode in the menu settings, then press the SEL/ PUSH EXEC...horizontally. B&W : The picture is clearer, and the picture looks like an illustration. When you set the POWER switch to OFF (CHG) Your camcorder automatically returns to OFF in films or on the TV. Using special effects - SLIM [e] : The picture expands vertically.
Operating Instructions
Page 39
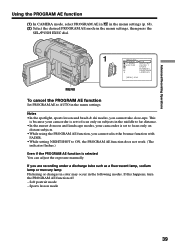
... or changes in color may occur in the following modes. If you cannot take close-ups. Sports lesson mode 39 This is because your camcorder is set to focus only on subjects in the middle to far distance. •In the sunset & moon and landscape modes, your... camcorder is selected You can adjust the exposure manually. Advanced Recording Operations Using the PROGRAM AE function (1) In CAMERA mode, select PROGRAM AE in in the menu settings (p. 68). (2) Select the desired PROGRAM AE mode...
... or changes in color may occur in the following modes. If you cannot take close-ups. Sports lesson mode 39 This is because your camcorder is set to focus only on subjects in the middle to far distance. •In the sunset & moon and landscape modes, your... camcorder is selected You can adjust the exposure manually. Advanced Recording Operations Using the PROGRAM AE function (1) In CAMERA mode, select PROGRAM AE in in the menu settings (p. 68). (2) Select the desired PROGRAM AE mode...

Operating Instructions
Page 40
To record dark pictures (e.g. night scenes) faithfully (1) In CAMERA mode, press EXPOSURE. Adjust the exposure manually in CAMERA mode. The exposure indicator appears on the screen. (2) Turn the SEL/PUSH EXEC dial to adjust the brightness. 1 EXPOSURE 2 To return to the..., the backlight function does not work in the following cases: - Adjusting the exposure manually You can manually adjust and set the exposure. Your camcorder automatically returns to the automatic exposure mode Press EXPOSURE. Note When you slide NIGHTSHOT to ON 40 The subject is backlit - if you change ...
To record dark pictures (e.g. night scenes) faithfully (1) In CAMERA mode, press EXPOSURE. Adjust the exposure manually in CAMERA mode. The exposure indicator appears on the screen. (2) Turn the SEL/PUSH EXEC dial to adjust the brightness. 1 EXPOSURE 2 To return to the..., the backlight function does not work in the following cases: - Adjusting the exposure manually You can manually adjust and set the exposure. Your camcorder automatically returns to the automatic exposure mode Press EXPOSURE. Note When you slide NIGHTSHOT to ON 40 The subject is backlit - if you change ...
Operating Instructions
Page 41
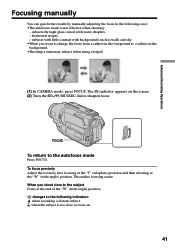
... recording a distant subject. To focus precisely Adjust the zoom by manually adjusting the focus in the background. •Shooting a stationary subject when using a tripod. (1) In CAMERA mode, press FOCUS. when the subject is not effective when shooting: - horizontal stripes. - Advanced Recording Operations Focusing manually You can gain better results by first...
... recording a distant subject. To focus precisely Adjust the zoom by manually adjusting the focus in the background. •Shooting a stationary subject when using a tripod. (1) In CAMERA mode, press FOCUS. when the subject is not effective when shooting: - horizontal stripes. - Advanced Recording Operations Focusing manually You can gain better results by first...

Operating Instructions
Page 42
... BABY WEDD I NG VACAT I ON THE END RETURN [ T I T LE ] : END S I ZE SMA L L S I ZE L ARGE VACATION PRESET T I ONS ! You can select one of titles. 42 (1) In CAMERA mode, press TITLE to display the title menu. (2) Turn the SEL/PUSH EXEC dial to select , and then press the dial. (3) Select the desired title...
... BABY WEDD I NG VACAT I ON THE END RETURN [ T I T LE ] : END S I ZE SMA L L S I ZE L ARGE VACATION PRESET T I ONS ! You can select one of titles. 42 (1) In CAMERA mode, press TITLE to display the title menu. (2) Turn the SEL/PUSH EXEC dial to select , and then press the dial. (3) Select the desired title...

Operating Instructions
Page 44
The title is stored in your own titles, turn the SEL/PUSH EXEC dial to make up to 20 characters. (1) In CAMERA or PLAYER mode, press TITLE. (2) Turn the SEL/PUSH EXEC dial to select , then press the dial. (3) Turn the SEL/PUSH EXEC dial to select ... to select [SET], then press the dial. Making your own titles You can have selected all characters and completed the title. (7) To finish making your camcorder. HAPPY B I RTHDAY HAPPY HOL I DAYS CONGRATUL AT I T LE ] : END 44 OUR SWEET BABY WEDD I NG VACAT I ON THE END [ T I T LE ] : END 2 3 4 6 T I TLE SET CUS TOM1...
The title is stored in your own titles, turn the SEL/PUSH EXEC dial to make up to 20 characters. (1) In CAMERA or PLAYER mode, press TITLE. (2) Turn the SEL/PUSH EXEC dial to select , then press the dial. (3) Turn the SEL/PUSH EXEC dial to select ... to select [SET], then press the dial. Making your own titles You can have selected all characters and completed the title. (7) To finish making your camcorder. HAPPY B I RTHDAY HAPPY HOL I DAYS CONGRATUL AT I T LE ] : END 44 OUR SWEET BABY WEDD I NG VACAT I ON THE END [ T I T LE ] : END 2 3 4 6 T I TLE SET CUS TOM1...
Operating Instructions
Page 45
... characters. The last character is erased. We recommend setting the POWER switch to PLAYER or removing the cassette so that your camcorder The power automatically turns off while you want to CAMERA again, then proceed from step 1. To enter a space Select [Z& ?!], then select the blank part. Turn the SEL/PUSH EXEC dial...
... characters. The last character is erased. We recommend setting the POWER switch to PLAYER or removing the cassette so that your camcorder The power automatically turns off while you want to CAMERA again, then proceed from step 1. To enter a space Select [Z& ?!], then select the blank part. Turn the SEL/PUSH EXEC dial...


