Operating Instructions
Page 4
... a picture (p. 19) •Playing back a tape (p. 29) Capturing images on your computer*1) •Viewing images recorded on a tape (p. 59) •Viewing images live from your camcorder (p. 59) Others Functions to adjust exposure in the recording mode •BACK LIGHT (p. 25) •NightShot (p. 26) •PROGRAM AE (p. 38) • Built-in light... and time (p. 16) •ORC [MENU] (p. 70) Function to use after recording •Easy Dubbing (p. 51) Function to make transition smooth •END SEARCH (P.28) *1) CCD-TRV608 only 4 *2) CCD-TRV107/TRV308/TRV408/TRV608 only
... a picture (p. 19) •Playing back a tape (p. 29) Capturing images on your computer*1) •Viewing images recorded on a tape (p. 59) •Viewing images live from your camcorder (p. 59) Others Functions to adjust exposure in the recording mode •BACK LIGHT (p. 25) •NightShot (p. 26) •PROGRAM AE (p. 38) • Built-in light... and time (p. 16) •ORC [MENU] (p. 70) Function to use after recording •Easy Dubbing (p. 51) Function to make transition smooth •END SEARCH (P.28) *1) CCD-TRV608 only 4 *2) CCD-TRV107/TRV308/TRV408/TRV608 only
Operating Instructions
Page 5
...camcorder abroad 83 Maintenance information and precautions 84 Specifications 89 Advanced Recording Operations Using the wide mode 33 Using the fader function 35 Quick Reference Identifying the parts and controls ...... 91 Index 98 Using special effects - BACK LIGHT 25 Shooting in light (CCD-TRV107/TRV308... a tape 49 Dubbing a tape easily - END SEARCH 28 Playback - USB Streaming (Windows users only 59 Customizing Your Camcorder Changing the menu settings 67 Recording - Table of trouble and their solutions 73 Self-diagnosis display 77 Warning indicators and messages...
...camcorder abroad 83 Maintenance information and precautions 84 Specifications 89 Advanced Recording Operations Using the wide mode 33 Using the fader function 35 Quick Reference Identifying the parts and controls ...... 91 Index 98 Using special effects - BACK LIGHT 25 Shooting in light (CCD-TRV107/TRV308... a tape 49 Dubbing a tape easily - END SEARCH 28 Playback - USB Streaming (Windows users only 59 Customizing Your Camcorder Changing the menu settings 67 Recording - Table of trouble and their solutions 73 Self-diagnosis display 77 Warning indicators and messages...

Operating Instructions
Page 6
...Close the lid of the cassette compartment, and press Z EJECT. Connecting the power cord (p. 15) Use the battery pack when using your camcorder. AC power adaptor (supplied) Inserting a cassette (p. 18) 1 Open the lid of the cassette compartment. Quick Start Guide This chapter introduces ...you to the basic features of your camcorder outdoors (p. 11). Connect the plug with its v mark facing up . 3 Close the cassette compartment by pressing the mark on the cassette ...
...Close the lid of the cassette compartment, and press Z EJECT. Connecting the power cord (p. 15) Use the battery pack when using your camcorder. AC power adaptor (supplied) Inserting a cassette (p. 18) 1 Open the lid of the cassette compartment. Quick Start Guide This chapter introduces ...you to the basic features of your camcorder outdoors (p. 11). Connect the plug with its v mark facing up . 3 Close the cassette compartment by pressing the mark on the cassette ...
Operating Instructions
Page 7
... starts recording. Adjust the viewfinder lens to rewind the tape. If you purchase your camcorder, the clock setting is closed, use the viewfinder placing your camcorder by the viewfinder, the LCD panel, or the battery pack. 7 RA RA RA Quick Start Guide Recording a picture (p. 19) 1 Remove the ...lens cap. 2 Set the POWER switch to PLAYER PL while pressing the POWER small green button. CAME 3 Open the LCD panel while ...
... starts recording. Adjust the viewfinder lens to rewind the tape. If you purchase your camcorder, the clock setting is closed, use the viewfinder placing your camcorder by the viewfinder, the LCD panel, or the battery pack. 7 RA RA RA Quick Start Guide Recording a picture (p. 19) 1 Remove the ...lens cap. 2 Set the POWER switch to PLAYER PL while pressing the POWER small green button. CAME 3 Open the LCD panel while ...
Operating Instructions
Page 8
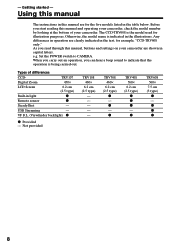
...reading this manual and operating your camcorder, check the model number by looking at the bottom of differences CCD- TRV107 Digital Zoom 450× LCD Screen 6.2 cm (2.5 type) ...camcorder are shown in the table below. z TRV608 560× 7.5 cm (3 type) z - The CCD-TRV608 is indicated in the illustrations. z z z 8 Using this manual The instructions in this manual, buttons and settings on your camcorder.... Getting started - Any differences in operation are for example, "CCD-TRV608 only." - Before you can hear ...
...reading this manual and operating your camcorder, check the model number by looking at the bottom of differences CCD- TRV107 Digital Zoom 450× LCD Screen 6.2 cm (2.5 type) ...camcorder are shown in the table below. z TRV608 560× 7.5 cm (3 type) z - The CCD-TRV608 is indicated in the illustrations. z z z 8 Using this manual The instructions in this manual, buttons and settings on your camcorder.... Getting started - Any differences in operation are for example, "CCD-TRV608 only." - Before you can hear ...
Operating Instructions
Page 9
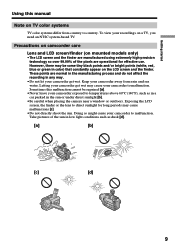
..., the finder or the lens to direct sunlight for effective use. Precautions on camcorder care Lens and LCD screen/finder (on the LCD screen and the finder. These points are operational for long periods may cause your camcorder to malfunction. Take pictures of the pixels are normal in the manufacturing process and do not...
..., the finder or the lens to direct sunlight for effective use. Precautions on camcorder care Lens and LCD screen/finder (on the LCD screen and the finder. These points are operational for long periods may cause your camcorder to malfunction. Take pictures of the pixels are normal in the manufacturing process and do not...
Operating Instructions
Page 10
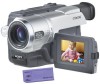
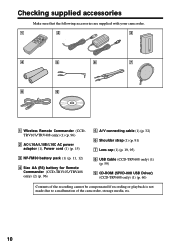
... Make sure that the following accessories are supplied with your camcorder. 1 2 3 4 5 6 7 8 9 1 Wireless Remote Commander (CCDTRV107/TRV408 only) (1) (p. 96) 2 AC-L10A/L10B/L10C AC power adaptor (1), Power cord (1) (p. 15) 3 NP-FM30 battery pack (1) (p. 11, 12) 4 Size AA (R6) battery for Remote Commander (CCD-TRV107/TRV408 only) (2) (p. 96) 5 A/V connecting cable (1) (p. 32) 6 Shoulder strap (1) (p. 91...
... Make sure that the following accessories are supplied with your camcorder. 1 2 3 4 5 6 7 8 9 1 Wireless Remote Commander (CCDTRV107/TRV408 only) (1) (p. 96) 2 AC-L10A/L10B/L10C AC power adaptor (1), Power cord (1) (p. 15) 3 NP-FM30 battery pack (1) (p. 11, 12) 4 Size AA (R6) battery for Remote Commander (CCD-TRV107/TRV408 only) (2) (p. 96) 5 A/V connecting cable (1) (p. 32) 6 Shoulder strap (1) (p. 91...
Operating Instructions
Page 12
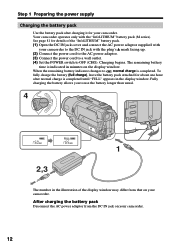
... use the battery longer than usual. Step 1 Preparing the power supply Charging the battery pack Use the battery pack after normal charge is completed. Your camcorder operates only with the plug's v mark facing up. (2) Connect the power cord to the AC power adaptor. (3) Connect the power cord to a wall... in the illustration of the "InfoLITHIUM" battery pack. (1) Open the DC IN jack cover and connect the AC power adaptor supplied with your camcorder. To fully charge the battery (full charge), leave the battery pack attached for about one hour after charging it for details of the display ...
... use the battery longer than usual. Step 1 Preparing the power supply Charging the battery pack Use the battery pack after normal charge is completed. Your camcorder operates only with the plug's v mark facing up. (2) Connect the power cord to the AC power adaptor. (3) Connect the power cord to a wall... in the illustration of the "InfoLITHIUM" battery pack. (1) Open the DC IN jack cover and connect the AC power adaptor supplied with your camcorder. To fully charge the battery (full charge), leave the battery pack attached for about one hour after charging it for details of the display ...

Operating Instructions
Page 13
Until your camcorder calculates the actual remaining battery time "- - - - The battery pack is correct. If...to 30°C (50°F to charge an empty battery pack at 25°C (77°F) Recording time CCD-TRV107/TRV108/TRV308/TRV408 Battery pack Recording with the viewfinder Continuous* Typical** NP-FM30 (supplied) 165 90 NP-FM50 265 145 ...Getting started Step 1 Preparing the power supply Note Prevent metallic objects from coming into contact with the LCD screen Continuous* Typical** 120 65 195 105 400 220 465 255 600 330 695 380 13 min" appears in the...
Until your camcorder calculates the actual remaining battery time "- - - - The battery pack is correct. If...to 30°C (50°F to charge an empty battery pack at 25°C (77°F) Recording time CCD-TRV107/TRV108/TRV308/TRV408 Battery pack Recording with the viewfinder Continuous* Typical** NP-FM30 (supplied) 165 90 NP-FM50 265 145 ...Getting started Step 1 Preparing the power supply Note Prevent metallic objects from coming into contact with the LCD screen Continuous* Typical** 120 65 195 105 400 220 465 255 600 330 695 380 13 min" appears in the...

Operating Instructions
Page 14
...CCD-TRV107/TRV108/TRV308/TRV408 Battery pack Playing time on LCD screen NP-FM30 (supplied) 120 NP-FM50 195 NP-FM70 400 NP-QM71 465 NP-FM90 600 NP-FM91/QM91 695 Playing time with LCD...your camcorder in a cold environment. The recording and playing time of a normally charged battery are about 90% of those of Sony ...camcorder operates only with the "InfoLITHIUM" battery pack (M series). The battery life will be shorter. This unit is the "InfoLITHIUM"? Step 1 Preparing the power supply CCD-TRV608 Battery pack Recording with the viewfinder Recording with the LCD...
...CCD-TRV107/TRV108/TRV308/TRV408 Battery pack Playing time on LCD screen NP-FM30 (supplied) 120 NP-FM50 195 NP-FM70 400 NP-QM71 465 NP-FM90 600 NP-FM91/QM91 695 Playing time with LCD...your camcorder in a cold environment. The recording and playing time of a normally charged battery are about 90% of those of Sony ...camcorder operates only with the "InfoLITHIUM" battery pack (M series). The battery life will be shorter. This unit is the "InfoLITHIUM"? Step 1 Preparing the power supply CCD-TRV608 Battery pack Recording with the viewfinder Recording with the LCD...

Operating Instructions
Page 15
Using a car battery Use Sony DC Adaptor/Charger (optional). Refer to the wall outlet, even if the set is not disconnected from the AC power source (wall outlet) as long as it from the wall outlet as soon as possible to your camcorder for further information. 15 Notes •The AC power adaptor.... While using the AC power adaptor. (1) Open the DC IN jack cover, and connect the AC power adaptor to the DC IN jack on your camcorder with this unit, disconnect the plug from a wall outlet using the AC power adaptor, if any power if the power cord is connected to the...
Using a car battery Use Sony DC Adaptor/Charger (optional). Refer to the wall outlet, even if the set is not disconnected from the AC power source (wall outlet) as long as it from the wall outlet as soon as possible to your camcorder for further information. 15 Notes •The AC power adaptor.... While using the AC power adaptor. (1) Open the DC IN jack cover, and connect the AC power adaptor to the DC IN jack on your camcorder with this unit, disconnect the plug from a wall outlet using the AC power adaptor, if any power if the power cord is connected to the...
Operating Instructions
Page 16
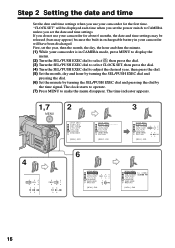
... J UL 4 2002 US B STREAM 12:30:00 PM AUTO DATE LTR S I ZE L ANGUAGE DEMO MODE RETURN [ MENU ] : END 16 If you do not use your camcorder for about 6 months, the date and time settings may appear) because the built-in rechargeable battery in CAMERA mode, press MENU to display the menu... time Set the date and time settings when you set the year, then the month, the day, the hour and then the minute. (1) While your camcorder is in your camcorder will be released (bars may be displayed each time when you set the power switch to CAMERA unless you use your...
... J UL 4 2002 US B STREAM 12:30:00 PM AUTO DATE LTR S I ZE L ANGUAGE DEMO MODE RETURN [ MENU ] : END 16 If you do not use your camcorder for about 6 months, the date and time settings may appear) because the built-in rechargeable battery in CAMERA mode, press MENU to display the menu... time Set the date and time settings when you set the year, then the month, the day, the hour and then the minute. (1) While your camcorder is in your camcorder will be released (bars may be displayed each time when you set the power switch to CAMERA unless you use your...
Operating Instructions
Page 17
...settings. The date is automatically recorded for 10 seconds after you start recording (p. 16). Note on the time indicator The internal clock of your camcorder operates on a 12-hour cycle. •12:00 AM stands for midnight. •12:00 PM stands for the first time, turn it... T . . . . This function works only once a day. The date and/or time indicator disappears. Note on and set the date and time to your camcorder for noon. you stop recording within 10 seconds. - However, the date may automatically appear more than once a day if: - The auto date function automatically displays...
...settings. The date is automatically recorded for 10 seconds after you start recording (p. 16). Note on the time indicator The internal clock of your camcorder operates on a 12-hour cycle. •12:00 AM stands for midnight. •12:00 PM stands for the first time, turn it... T . . . . This function works only once a day. The date and/or time indicator disappears. Note on and set the date and time to your camcorder for noon. you stop recording within 10 seconds. - However, the date may automatically appear more than once a day if: - The auto date function automatically displays...
Operating Instructions
Page 18
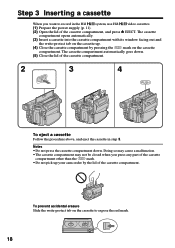
...(3) Insert a cassette into the cassette compartment with its window facing out and the write-protect tab on the cassette up your camcorder by pressing the mark on the cassette compartment. Doing so may cause a malfunction. •The cassette compartment may not be closed... Close the lid of the cassette compartment. 2 3 4 EJECT To eject a cassette Follow the procedure above, and eject the cassette in the Hi8 system, use Hi8 video cassettes. (1) Prepare the power supply (p. 11). (2) Open the lid of the cassette compartment, and press Z EJECT. The cassette compartment automatically...
...(3) Insert a cassette into the cassette compartment with its window facing out and the write-protect tab on the cassette up your camcorder by pressing the mark on the cassette compartment. Doing so may cause a malfunction. •The cassette compartment may not be closed... Close the lid of the cassette compartment. 2 3 4 EJECT To eject a cassette Follow the procedure above, and eject the cassette in the Hi8 system, use Hi8 video cassettes. (1) Prepare the power supply (p. 11). (2) Open the lid of the cassette compartment, and press Z EJECT. The cassette compartment automatically...

Operating Instructions
Page 19
... recording. When you can record twice as long as in the LP (long play) mode. Recording - Your camcorder is set to the standby mode. (4) Open the LCD panel while pressing OPEN. The REC indicator appears. To stop recording, press START/STOP again. In the LP mode, you record a tape in ...microphone during recording. Note on Recording mode Your camcorder records and plays back in the SP (standard play back...
... recording. When you can record twice as long as in the LP (long play) mode. Recording - Your camcorder is set to the standby mode. (4) Open the LCD panel while pressing OPEN. The REC indicator appears. To stop recording, press START/STOP again. In the LP mode, you record a tape in ...microphone during recording. Note on Recording mode Your camcorder records and plays back in the SP (standard play back...
Operating Instructions
Page 20
... the battery pack, set the counter to start recording. This is a mirror-image. If your camcorder is inserted Your camcorder automatically turns off. When you adjust angles of the LCD panel Be sure to open the LCD panel up to the lens side. To resume the standby mode for 5 minutes while the cassette... cassette even if you turn off automatically. When you record in the SP and LP modes on one tape or you leave your camcorder. Note When using the LCD screen except in the standby mode for recording, set it vertically until it clicks, and swing it to CAMERA, or press START/...
... the battery pack, set the counter to start recording. This is a mirror-image. If your camcorder is inserted Your camcorder automatically turns off. When you adjust angles of the LCD panel Be sure to open the LCD panel up to the lens side. To resume the standby mode for 5 minutes while the cassette... cassette even if you turn off automatically. When you record in the SP and LP modes on one tape or you leave your camcorder. Note When using the LCD screen except in the standby mode for recording, set it vertically until it clicks, and swing it to CAMERA, or press START/...

Operating Instructions
Page 21
... normal when recorded. MENU 1 LCD/VF SET LCD BR I G HT LCD B. RETURN [ MENU ] : END LCD screen backlight You can adjust the brightness of other indicators appear mirror-reversed and others are not displayed. •The date appears mirror-reversed when the auto date function is working. After using your camcorder (CCD-TRV107/TRV308/TRV408/TRV608 only) Remove...
... normal when recorded. MENU 1 LCD/VF SET LCD BR I G HT LCD B. RETURN [ MENU ] : END LCD screen backlight You can adjust the brightness of other indicators appear mirror-reversed and others are not displayed. •The date appears mirror-reversed when the auto date function is working. After using your camcorder (CCD-TRV107/TRV308/TRV408/TRV608 only) Remove...
Operating Instructions
Page 26
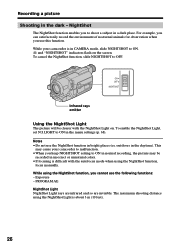
... the NightShot function in incorrect or unnatural colors. •If focusing is difficult with the NightShot Light on the screen. While your camcorder to malfunction. •When you to ON in a dark place. PROGRAM AE NightShot Light NightShot Light rays are infrared and so are... places (ex. NightShot The NightShot function enables you keep NIGHTSHOT setting to shoot a subject in normal recording, the picture may cause your camcorder is about 3 m (10 feet). 26 The maximum shooting distance using the NightShot function, focus manually. To cancel the NightShot function, ...
... the NightShot function in incorrect or unnatural colors. •If focusing is difficult with the NightShot Light on the screen. While your camcorder to malfunction. •When you to ON in a dark place. PROGRAM AE NightShot Light NightShot Light rays are infrared and so are... places (ex. NightShot The NightShot function enables you keep NIGHTSHOT setting to shoot a subject in normal recording, the picture may cause your camcorder is about 3 m (10 feet). 26 The maximum shooting distance using the NightShot function, focus manually. To cancel the NightShot function, ...

Operating Instructions
Page 27
Press TIME to your camcorder, the clock setting is set to record the date. Press DATE and/or TIME again. Set the date and time to record the time. If ...
Press TIME to your camcorder, the clock setting is set to record the date. Press DATE and/or TIME again. Set the date and time to record the time. If ...
Operating Instructions
Page 29
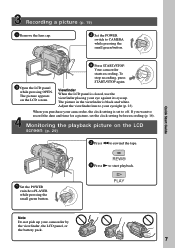
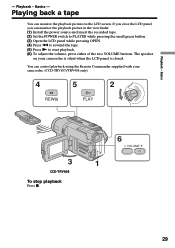
Playback - Basics - Basics - Playing back a tape You can monitor the playback picture on your camcorder. (CCD-TRV107/TRV408 only) AYER OFF(CHG) 4 REW 5 2 PL POWER PLAY RA CAME 3 CCD-TRV408 To stop playback Press x. 6 VOLUME 1 29 You can monitor the playback picture in the viewfinder. ... N to start playback. (6) To adjust the volume, press either of the two VOLUME buttons. Playback - The speaker on the LCD screen. If you close the LCD panel, you can control playback using the Remote Commander supplied with your camcorder is silent when the LCD panel is closed.
Playback - Basics - Basics - Playing back a tape You can monitor the playback picture on your camcorder. (CCD-TRV107/TRV408 only) AYER OFF(CHG) 4 REW 5 2 PL POWER PLAY RA CAME 3 CCD-TRV408 To stop playback Press x. 6 VOLUME 1 29 You can monitor the playback picture in the viewfinder. ... N to start playback. (6) To adjust the volume, press either of the two VOLUME buttons. Playback - The speaker on the LCD screen. If you close the LCD panel, you can control playback using the Remote Commander supplied with your camcorder is silent when the LCD panel is closed.


