Operating Instructions
Page 2
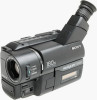
... TO WIDE SLOT, FULLY INSERT. Note: This equipment has been tested and found to comply with advanced features, but at the same time it is connected. - For the Sony Service Center nearest you call 416-499-SONY (Canada only) Caution: Do not handle damaged or leaking lithium 2 ion battery. Congratulations on , the user... of the FCC Rules. You will not occur in the literature accompanying the appliance. Increase the separation between the equipment and receiver. - Welcome! If this Sony Handycam VisionTM camcorder. For the customers in the U.S.A.
... TO WIDE SLOT, FULLY INSERT. Note: This equipment has been tested and found to comply with advanced features, but at the same time it is connected. - For the Sony Service Center nearest you call 416-499-SONY (Canada only) Caution: Do not handle damaged or leaking lithium 2 ion battery. Congratulations on , the user... of the FCC Rules. You will not occur in the literature accompanying the appliance. Increase the separation between the equipment and receiver. - Welcome! If this Sony Handycam VisionTM camcorder. For the customers in the U.S.A.
Operating Instructions
Page 3
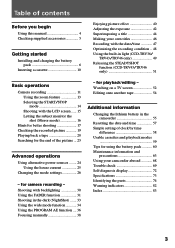
...TRV46 only 49 Releasing the STEADYSHOT function (CCD-TRV43/TRV46 only 51 Basic operations Camera recording 11 Using the zoom feature 13 Selecting the START/STOP mode 14 Shooting with backlighting 30 Using the FADER function 31 Shooting in the camcorder 55 Resetting the date and time 57 ... charging the battery pack 6 Inserting a cassette 10 Enjoying picture effect 40 Adjusting the exposure 42 Superimposing a title 44 Making your camcorder abroad 68 Trouble check 69 Self-diagnosis display 72 Specifications 73 Identifying the parts 74 Warning indicators 82 Index 83 3
...TRV46 only 49 Releasing the STEADYSHOT function (CCD-TRV43/TRV46 only 51 Basic operations Camera recording 11 Using the zoom feature 13 Selecting the START/STOP mode 14 Shooting with backlighting 30 Using the FADER function 31 Shooting in the camcorder 55 Resetting the date and time 57 ... charging the battery pack 6 Inserting a cassette 10 Enjoying picture effect 40 Adjusting the exposure 42 Superimposing a title 44 Making your camcorder abroad 68 Trouble check 69 Self-diagnosis display 72 Specifications 73 Identifying the parts 74 Warning indicators 82 Index 83 3
Operating Instructions
Page 11
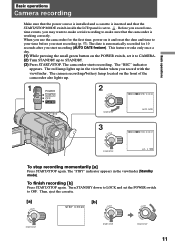
...the first time, power on the POWER switch, set it and reset the date and time to your time before you start recording (AUTO DATE feature). This feature works only once a day. (1) While pressing the small green button on it to CAMERA. (2) Turn STANDBY up to make sure that the ...STOP [b] STBY 0:35:20 LOCK STA NDBY START/STOP LOCK NDBY START/STOP 11 The camera recording/battery lamp located on the front of the camcorder also lights up in the viewfinder (Standby mode). The date is working correctly. Before you record onetime events, you record with the viewfinder. The...
...the first time, power on the POWER switch, set it and reset the date and time to your time before you start recording (AUTO DATE feature). This feature works only once a day. (1) While pressing the small green button on it to CAMERA. (2) Turn STANDBY up to make sure that the ...STOP [b] STBY 0:35:20 LOCK STA NDBY START/STOP LOCK NDBY START/STOP 11 The camera recording/battery lamp located on the front of the camcorder also lights up in the viewfinder (Standby mode). The date is working correctly. Before you record onetime events, you record with the viewfinder. The...
Operating Instructions
Page 12
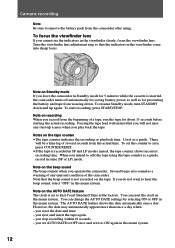
... warning of several seconds from the comcorder after using the tape counter as a guide. When you leave the camcorder in Standby mode for 5 minutes while the cassette is recorded in SP and LP modes mixed, the tape counter...start recording, press START/STOP. If you play back the tape. The AUTO DATE feature shows the date automatically once a day. you cannot see the indicators in the menu system. Note on the ...AUTO DATE feature The clock is not recorded on recording When you record from wearing down and up scenes...
... warning of several seconds from the comcorder after using the tape counter as a guide. When you leave the camcorder in Standby mode for 5 minutes while the cassette is recorded in SP and LP modes mixed, the tape counter...start recording, press START/STOP. If you play back the tape. The AUTO DATE feature shows the date automatically once a day. you cannot see the indicators in the menu system. Note on the ...AUTO DATE feature The clock is not recorded on recording When you record from wearing down and up scenes...
Operating Instructions
Page 13
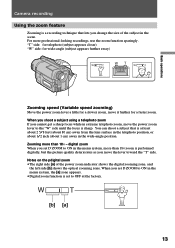
... Zooming speed (Variable speed zooming) Move the power zoom lever a little for a slower zoom, move the lever toward the "T" side. Camera recording Using the zoom feature Zooming is at the factory. When you set D ZOOM to ON in the scene.
... Zooming speed (Variable speed zooming) Move the power zoom lever a little for a slower zoom, move the lever toward the "T" side. Camera recording Using the zoom feature Zooming is at the factory. When you set D ZOOM to ON in the scene.
Operating Instructions
Page 16
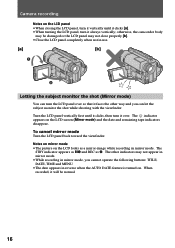
... shot while shooting with the viewfinder. When recorded, it over so that it always vertically; otherwise, the camcorder body may not appear in mirror mode. •While recording in reverse when the AUTO DATE feature is turned on the LCD screen (Mirror mode) and the date and remaining tape indicators disappear. To...
... shot while shooting with the viewfinder. When recorded, it over so that it always vertically; otherwise, the camcorder body may not appear in mirror mode. •While recording in reverse when the AUTO DATE feature is turned on the LCD screen (Mirror mode) and the date and remaining tape indicators disappear. To...
Operating Instructions
Page 26
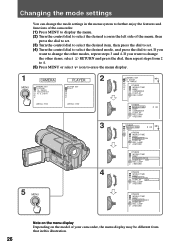
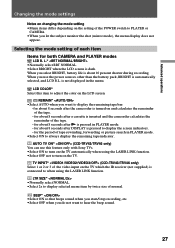
... mode settings You can change the other items, select RETURN and press the dial, then repeat steps from that in the left side of your camcorder, the menu display may be different from 2 to 4. (5) Press MENU or select icon to erase the menu display. 1 MENU CAMERA CAMERA SET D ZOOM 16 : ...9WIDE STEADYSHOT N. If you want to change the mode settings in the menu system to further enjoy the features and functions of the camcorder. (1) Press MENU to display the menu. (2) Turn the control dial to select the desired icon in this illustration. 26 If you want to...
... mode settings You can change the other items, select RETURN and press the dial, then repeat steps from that in the left side of your camcorder, the menu display may be different from 2 to 4. (5) Press MENU or select icon to erase the menu display. 1 MENU CAMERA CAMERA SET D ZOOM 16 : ...9WIDE STEADYSHOT N. If you want to change the mode settings in the menu system to further enjoy the features and functions of the camcorder. (1) Press MENU to display the menu. (2) Turn the control dial to select the desired icon in this illustration. 26 If you want to...
Operating Instructions
Page 27
... than the battery pack, BRIGHT is connected to always display the remaining tape indicator. TV INPUT* (CCD-TRV43/TRV46 only) Select 1 or 2 or 3 of tape rewinding, forwarding or picture search in .... •Select OFF not to hear the beep sound. 27 LCD COLOR* Select this feature only with Sony TVs. •Select ON to turn on the TV automatically when using the LASER LINK function...monitor the shot (mirror mode), the menu display does not appear. is about 8 seconds after the camcorder is turned on and calculates the remainder of normal. BEEP* •Select ON so that beeps ...
... than the battery pack, BRIGHT is connected to always display the remaining tape indicator. TV INPUT* (CCD-TRV43/TRV46 only) Select 1 or 2 or 3 of tape rewinding, forwarding or picture search in .... •Select OFF not to hear the beep sound. 27 LCD COLOR* Select this feature only with Sony TVs. •Select ON to turn on the TV automatically when using the LASER LINK function...monitor the shot (mirror mode), the menu display does not appear. is about 8 seconds after the camcorder is turned on and calculates the remainder of normal. BEEP* •Select ON so that beeps ...
Operating Instructions
Page 48
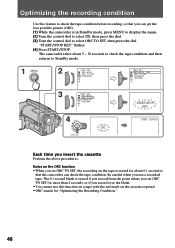
Be careful when you can check the tape condition. The camcorder takes about 0.1 second so that you use a recorded tape. The 0.1 second blank is erased if you ...then press the dial. (3) Turn the control dial to check the tape condition before recording, so that the camcorder can get the best possible picture (ORC). (1) While the camcorder is erased for about 5 - 10 seconds to check the tape condition and then returns to Standby mode. 1... SET for more than 2 seconds, or if you record over the blank. •You cannot use this feature to select ORC TO SET, then press the dial.
Be careful when you can check the tape condition. The camcorder takes about 0.1 second so that you use a recorded tape. The 0.1 second blank is erased if you ...then press the dial. (3) Turn the control dial to check the tape condition before recording, so that the camcorder can get the best possible picture (ORC). (1) While the camcorder is erased for about 5 - 10 seconds to check the tape condition and then returns to Standby mode. 1... SET for more than 2 seconds, or if you record over the blank. •You cannot use this feature to select ORC TO SET, then press the dial.
Operating Instructions
Page 53
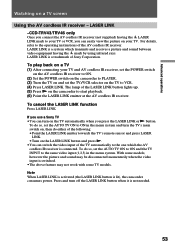
... is activated (the LASER LINK button is switched. •The above feature may be disconnected momentarily when the video input is lit), the camcorder consumes power. To play back on a TV (1) After connecting your ...up. (5) Press ( on a TV screen Using the AV cordless IR receiver - If you use a Sony TV •You can easily view the picture on the TV automatically when you connect the AV cordless IR...at the AV cordless IR receiver. To cancel the LASER LINK function Press LASER LINK. LASER LINK -CCD-TRV43/TRV46 only Once you press the LASER LINK or ( button. Press and turn on your ...
... is activated (the LASER LINK button is switched. •The above feature may be disconnected momentarily when the video input is lit), the camcorder consumes power. To play back on a TV (1) After connecting your ...up. (5) Press ( on a TV screen Using the AV cordless IR receiver - If you use a Sony TV •You can easily view the picture on the TV automatically when you connect the AV cordless IR...at the AV cordless IR receiver. To cancel the LASER LINK function Press LASER LINK. LASER LINK -CCD-TRV43/TRV46 only Once you press the LASER LINK or ( button. Press and turn on your ...

Operating Instructions
Page 54
... with any other h 8 mm, H Hi8, mini DV, DV, j VHS, k S-VHS, VHSC, K S-VHSC, l Betamax or ¬ ED Betamax VCR that has the Fine Synchro Edit feature to 4. Set the input selector on the VCR to ON in recording pause mode. (4) First press P on the camcorder, and after a few seconds press P ...on both the camcorder and the VCR. To edit more precise. 54 Set EDIT to LINE...
... with any other h 8 mm, H Hi8, mini DV, DV, j VHS, k S-VHS, VHSC, K S-VHSC, l Betamax or ¬ ED Betamax VCR that has the Fine Synchro Edit feature to 4. Set the input selector on the VCR to ON in recording pause mode. (4) First press P on the camcorder, and after a few seconds press P ...on both the camcorder and the VCR. To edit more precise. 54 Set EDIT to LINE...
