

Primary User Manual
Page 1
AC-V Serial No Photo: CCD-FX430 Video8 Handycam ©1994 by Sony Corporation Model No. Refer to these numbers whenever you call upon your Sony dealer regarding this manual thoroughly and retain it for future reference. Model No. Owner's Record The model and serial numbers are located on the bottom. Record the serial number in the space provided below. SONY® 3-758-676-23 (1) Video Camera Recorder 8 CCD-FX430/FX435/FX530/FX630 Operation Manual Before operating the unit, please read this product. CCD-Fx Serial No.
AC-V Serial No Photo: CCD-FX430 Video8 Handycam ©1994 by Sony Corporation Model No. Refer to these numbers whenever you call upon your Sony dealer regarding this manual thoroughly and retain it for future reference. Model No. Owner's Record The model and serial numbers are located on the bottom. Record the serial number in the space provided below. SONY® 3-758-676-23 (1) Video Camera Recorder 8 CCD-FX430/FX435/FX530/FX630 Operation Manual Before operating the unit, please read this product. CCD-Fx Serial No.

Primary User Manual
Page 2
... installed and used in Radio Interference Regulations. For the Sony Service Center nearest you call 416499-SONY (Canada only) Caution: Do not handle damaged or leaking nickekadmium batteries. pursuant to rain or moisture. the user is intended to alert the user to the presence of important operating and maintenance (servicing) instructions in CANADA - -- - --This apparatus complies with the instructions, may be producing home video...
... installed and used in Radio Interference Regulations. For the Sony Service Center nearest you call 416499-SONY (Canada only) Caution: Do not handle damaged or leaking nickekadmium batteries. pursuant to rain or moisture. the user is intended to alert the user to the presence of important operating and maintenance (servicing) instructions in CANADA - -- - --This apparatus complies with the instructions, may be producing home video...

Primary User Manual
Page 3
... Begin Checking Your Model Number 4 Checking Supplied Accessories 5 Getting Started Charging and Installing the Battery Pack 6 Inserting a Cassette 9 Adjusting the Viewfinder Lens 10 Basic Operations Camera Recording II Using the Zoom Feature 13 Hints for Better Shooting 14 Checking the Recorded Picture 15 Connections for Playback 16 Connecting to a TV without Audio/Video Input Jacks 16 Connecting to a TV or a VCR with Audio/Video Input Jacks 16 Playing Back a Tape 18 Advanced Operations Using Alternative Power Sources 20 Using House Current 20 Recording with the Date or Time 21 Recording...
... Begin Checking Your Model Number 4 Checking Supplied Accessories 5 Getting Started Charging and Installing the Battery Pack 6 Inserting a Cassette 9 Adjusting the Viewfinder Lens 10 Basic Operations Camera Recording II Using the Zoom Feature 13 Hints for Better Shooting 14 Checking the Recorded Picture 15 Connections for Playback 16 Connecting to a TV without Audio/Video Input Jacks 16 Connecting to a TV or a VCR with Audio/Video Input Jacks 16 Playing Back a Tape 18 Advanced Operations Using Alternative Power Sources 20 Using House Current 20 Recording with the Date or Time 21 Recording...

Primary User Manual
Page 4
... repaired. Types of the copyright laws. Television programs, films, video tapes. When you need an NTSC/PAL-M transcoder (as in a car parked in capital letters. Before you start reading this manual and operating the unit, check your model number by looking at the bottom of your recordings on a TV, you use a PAL-M system-based TV, you will need an NTSC system-based TV. Otherwise, the model...
... repaired. Types of the copyright laws. Television programs, films, video tapes. When you need an NTSC/PAL-M transcoder (as in a car parked in capital letters. Before you start reading this manual and operating the unit, check your model number by looking at the bottom of your recordings on a TV, you use a PAL-M system-based TV, you will need an NTSC system-based TV. Otherwise, the model...
Primary User Manual
Page 6
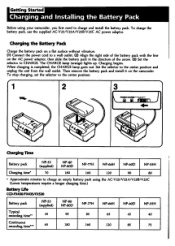
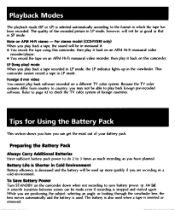
.../V25A/V25B/V25C AC power adaptor. Charging the Battery Pack Charge the battery pack on a flat surface without vibration. (1) Connect the power cord to CHARGE. The CHARGE lamp (orange) lights up. Set the selector to charge and install the battery pack. Getting Started Charging and Installing the Battery Pack Before using the AC-V25/V25A/V25B/V25C (Lower temperatures require a longer charging time.) Battery Life CCD-FX430/FX435/FX530 Battery pack Typical recording time' NP-55 (supplied...
.../V25A/V25B/V25C AC power adaptor. Charging the Battery Pack Charge the battery pack on a flat surface without vibration. (1) Connect the power cord to CHARGE. The CHARGE lamp (orange) lights up. Set the selector to charge and install the battery pack. Getting Started Charging and Installing the Battery Pack Before using the AC-V25/V25A/V25B/V25C (Lower temperatures require a longer charging time.) Battery Life CCD-FX430/FX435/FX530 Battery pack Typical recording time' NP-55 (supplied...
Primary User Manual
Page 7
... light, set the selector to CAMERA with the battery pack attached, and leave the camcorder until the 4 indicator flashes and the red lamp flashes rapidly in the direction of battery capacity. Important! Note on /off. Before you recharge the battery pack, make sure the battery has been used up the battery, remove the cassette and slide the POWER switch to CHARGE again. • You cannot operate the camcorder using the AC power adaptor while charging...
... light, set the selector to CAMERA with the battery pack attached, and leave the camcorder until the 4 indicator flashes and the red lamp flashes rapidly in the direction of battery capacity. Important! Note on /off. Before you recharge the battery pack, make sure the battery has been used up the battery, remove the cassette and slide the POWER switch to CHARGE again. • You cannot operate the camcorder using the AC power adaptor while charging...
Primary User Manual
Page 11
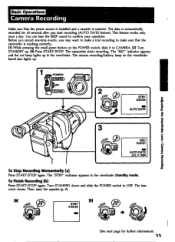
... recording to make sure that the power source is installed and a cassette is inserted. The date is automatically recorded for further information) 11 The camera recording/battery lamp on the POWER switch, slide it to CAMERA. (2) Turn STANDBY up. (3) Press START/STOP. Basic Operations Camera Recording Make sure that the camcorder is working correctly. (1) While pressing the small green button on the viewfinder barrel also lights up in the viewfinder (Standby mode...
... recording to make sure that the power source is installed and a cassette is inserted. The date is automatically recorded for further information) 11 The camera recording/battery lamp on the POWER switch, slide it to CAMERA. (2) Turn STANDBY up. (3) Press START/STOP. Basic Operations Camera Recording Make sure that the camcorder is working correctly. (1) While pressing the small green button on the viewfinder barrel also lights up in the viewfinder (Standby mode...
Primary User Manual
Page 12
... after the start recording. This prevents wearing down once and turn the power on or when you start -up again. select "OFF" in Standby mode for 5 minutes while the cassette is displayed. - Note on recording When you leave the camcorder in the menu system. you set AUTO DATE to OFF once and set to up scenes when you stop recording, confirming the operation. you reset the date and time. -
... after the start recording. This prevents wearing down once and turn the power on or when you start -up again. select "OFF" in Standby mode for 5 minutes while the cassette is displayed. - Note on recording When you leave the camcorder in the menu system. you set AUTO DATE to OFF once and set to up scenes when you stop recording, confirming the operation. you reset the date and time. -
Primary User Manual
Page 15
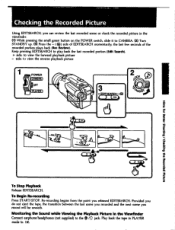
... reverse playback picture POWER •0FF 0 'PLAYIER NOS tC Hints for Better Shooting / Checking the Recorded Picture To Stop Playback Release EDITSEARCH. Play back the tape in PLAYER mode (o. 18). Checking the Recorded Picture Using EDITSEARCH, you can review the last recorded scene or check the recorded picture in the viewfinder. (1) While pressing the small green button on the POWER switch, slide it to CAMERA. (2) Turn STANDBY up. (3) Press the - ( IR) side of the recorded portion plays back (Rec Review).
... reverse playback picture POWER •0FF 0 'PLAYIER NOS tC Hints for Better Shooting / Checking the Recorded Picture To Stop Playback Release EDITSEARCH. Play back the tape in PLAYER mode (o. 18). Checking the Recorded Picture Using EDITSEARCH, you can review the last recorded scene or check the recorded picture in the viewfinder. (1) While pressing the small green button on the POWER switch, slide it to CAMERA. (2) Turn STANDBY up. (3) Press the - ( IR) side of the recorded portion plays back (Rec Review).
Primary User Manual
Page 16
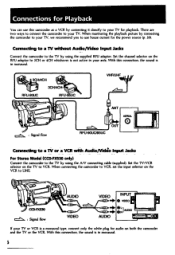
... Model (CCD-FXS30 only) Connect the camcorder to 3CH or 4CH whichever is in monaural. Set the channel selector on both the camcorder and the TV or the VCR. With this connection, the sound is a monaural type, connect only the white plug for playback. When connecting the camcorder to VCR, set the input selector on the TV to your TV or VCR is in monaural. When monitoring the playback picture by using the A/V connecting cable...
... Model (CCD-FXS30 only) Connect the camcorder to 3CH or 4CH whichever is in monaural. Set the channel selector on both the camcorder and the TV or the VCR. With this connection, the sound is a monaural type, connect only the white plug for playback. When connecting the camcorder to VCR, set the input selector on the TV to your TV or VCR is in monaural. When monitoring the playback picture by using the A/V connecting cable...
Primary User Manual
Page 18
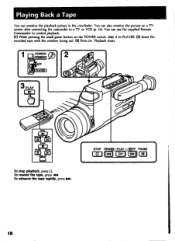
... the recorded tape with the window facing out. (3) Press Playback starts. • • 1 POWER c..) CAMERA OFF „..oirpk PLAYER I • PLAY (c).0 N PLAY ME= slop MEE PAUSE SLOW 11 E] 0GRAY To stop playback, press 0. Playing Back a Tape You can monitor the playback picture in the viewfinder. STOP REW(B-PLAY - (eFF PAUSE 0 C>. To advance the tape rapidly, press No.. slide it to control playback. (1) While pressing the small green button on a TV screen, after connecting the camcorder to...
... the recorded tape with the window facing out. (3) Press Playback starts. • • 1 POWER c..) CAMERA OFF „..oirpk PLAYER I • PLAY (c).0 N PLAY ME= slop MEE PAUSE SLOW 11 E] 0GRAY To stop playback, press 0. Playing Back a Tape You can monitor the playback picture in the viewfinder. STOP REW(B-PLAY - (eFF PAUSE 0 C>. To advance the tape rapidly, press No.. slide it to control playback. (1) While pressing the small green button on a TV screen, after connecting the camcorder to...
Primary User Manual
Page 19
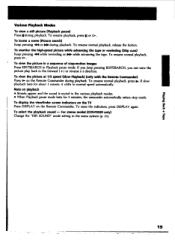
... view the picture in a sequence of stop mode. To view the picture at 1/5 speed (Slow Playback) (only with the Remote Commander) Press on the Remote Commander. To monitor the high-speed picture while advancing the tape or rewinding (Skip scan) Keep pressing 414 while rewinding or while advancing the tape. To erase the indicators, press DISPLAY again. For stereo model (CCD-FX530 only) Change the "HiFi SOUND" mode setting in the various playback modes. • When Playback pause mode...
... view the picture in a sequence of stop mode. To view the picture at 1/5 speed (Slow Playback) (only with the Remote Commander) Press on the Remote Commander. To monitor the high-speed picture while advancing the tape or rewinding (Skip scan) Keep pressing 414 while rewinding or while advancing the tape. To erase the indicators, press DISPLAY again. For stereo model (CCD-FX530 only) Change the "HiFi SOUND" mode setting in the various playback modes. • When Playback pause mode...
Primary User Manual
Page 33
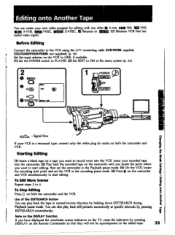
... the camcorder to the VCR using the AN connecting cable (CCD-FX530: supplied, CCD-FX1130/FX435/FX630: not supplied). (p. 16) Set the input selector on the camcorder and VCR simultaneously to start point and set the VCR in normal/reverse direction by pressing EDITSEARCH intermittently. You can also play back the tape in the recording pause mode. (4) Press on the VCR to LINE, if available. (1) Set the POWER switch to PLAYER. (2) Set EDIT to 4. To Stop...
... the camcorder to the VCR using the AN connecting cable (CCD-FX530: supplied, CCD-FX1130/FX435/FX630: not supplied). (p. 16) Set the input selector on the camcorder and VCR simultaneously to start point and set the VCR in normal/reverse direction by pressing EDITSEARCH intermittently. You can also play back the tape in the recording pause mode. (4) Press on the VCR to LINE, if available. (1) Set the POWER switch to PLAYER. (2) Set EDIT to 4. To Stop...
Primary User Manual
Page 36
... through the viewfinder lens, the lens moves automatically and the battery is stopped and started again. The quality of the recorded picture in LP mode. LP (long play) mode When you have planned. Foreign 8 mm video You cannot play back a tape, the sound will not be made even if recording is used up in Cold Environment Battery efficiency is inserted or removed. For stereo model (CCD"FX530 only) When you...
... through the viewfinder lens, the lens moves automatically and the battery is stopped and started again. The quality of the recorded picture in LP mode. LP (long play) mode When you have planned. Foreign 8 mm video You cannot play back a tape, the sound will not be made even if recording is used up in Cold Environment Battery efficiency is inserted or removed. For stereo model (CCD"FX530 only) When you...
Primary User Manual
Page 41
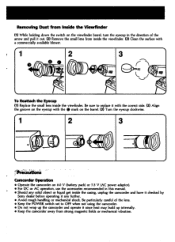
... Sony dealer before operating it since heat may build up internally. • Keep the camcorder away from strong magnetic fields or mechanical vibration. e 1 2 3 Camcorder Operation • Operate the camcorder on 6.0 V (battery pack) or 7.5 V (AC power adaptor). • For DC or AC operation, use the accessories recommended in the direction of the lens. • Keep the POWER switch set to replace it out. (2) Remove the small lens from inside the viewfinder. (3) Clean...
... Sony dealer before operating it since heat may build up internally. • Keep the camcorder away from strong magnetic fields or mechanical vibration. e 1 2 3 Camcorder Operation • Operate the camcorder on 6.0 V (battery pack) or 7.5 V (AC power adaptor). • For DC or AC operation, use the accessories recommended in the direction of the lens. • Keep the POWER switch set to replace it out. (2) Remove the small lens from inside the viewfinder. (3) Clean...
Primary User Manual
Page 42
... of the connecting plate. Others • Model for about 3 minutes. • Clean the lens with the metal parts of the cassette. Very humid - operate the camera and player sections and play back a tape for the USA and Canada: One blade of battery capacity. This is wider than the other for a long time. Camcorder Care • When the camcorder is in use the battery completely and charge it...
... of the connecting plate. Others • Model for about 3 minutes. • Clean the lens with the metal parts of the cassette. Very humid - operate the camera and player sections and play back a tape for the USA and Canada: One blade of battery capacity. This is wider than the other for a long time. Camcorder Care • When the camcorder is in use the battery completely and charge it...
Primary User Manual
Page 44
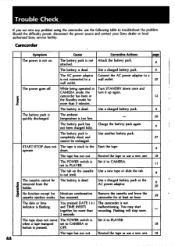
... problem using the camcorder, use a new one . 18 The POWER switch is Use another battery pack. I removed from the holder. Use a charged battery pack or the 6 AC power adaptor. 20 & No function except for at least an hour. 39 The date or time indicator is not and TIME (NEXT) malfunctioning. camcorder for Moisture condensation Remove the cassette and leave the cassette ejection works. You pressed DATE (+) The camcorder is flashing. The tape does not move The POWER switch is Set...
... problem using the camcorder, use a new one . 18 The POWER switch is Use another battery pack. I removed from the holder. Use a charged battery pack or the 6 AC power adaptor. 20 & No function except for at least an hour. 39 The date or time indicator is not and TIME (NEXT) malfunctioning. camcorder for Moisture condensation Remove the cassette and leave the cassette ejection works. You pressed DATE (+) The camcorder is flashing. The tape does not move The POWER switch is Set...

Primary User Manual
Page 45
..., set the sound is heard. (CCD-FX530 only) recorded with WIND selector to ON in the menu system. Change locations. Picture The menu is not DISPLAY on the Press DISPLAY on the Remote displayed on the The viewfinder lens is Adjust the viewfinder lens. The battery is not not adjusted. 10 clear. clean the viewfinder screen or 41 viewfinder lens. function does not activate. The image on the TV. The batteries are dead. viewfinder screen...
..., set the sound is heard. (CCD-FX530 only) recorded with WIND selector to ON in the menu system. Change locations. Picture The menu is not DISPLAY on the Press DISPLAY on the Remote displayed on the The viewfinder lens is Adjust the viewfinder lens. The battery is not not adjusted. 10 clear. clean the viewfinder screen or 41 viewfinder lens. function does not activate. The image on the TV. The batteries are dead. viewfinder screen...
Primary User Manual
Page 47
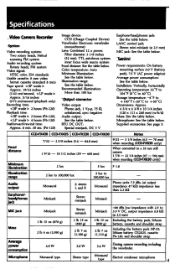
... Audio recording system: Rotary heads, FM system Video signal: NTSC color, EIA standards Usable cassette: 8 mm video format cassette (standard 8 mm) Tape speed: Approx. 19/32 inches (1.43 cm)/second, Approx. 5/16 inches (0.72 cm)/second (playback only) Recording time: 2 hours (P6-120) Playback time: 2 hours (P6-I20), < LP mode> 4 hours (P6-120) Fastforward/rewind time: Approx. 6 min. 30 sec. (P6-120) Image device: CCD (Charge Coupled Device) Viewfinder: Electronic viewfinder (monochrome) Lens: Combined 12 x power...
... Audio recording system: Rotary heads, FM system Video signal: NTSC color, EIA standards Usable cassette: 8 mm video format cassette (standard 8 mm) Tape speed: Approx. 19/32 inches (1.43 cm)/second, Approx. 5/16 inches (0.72 cm)/second (playback only) Recording time: 2 hours (P6-120) Playback time: 2 hours (P6-I20), < LP mode> 4 hours (P6-120) Fastforward/rewind time: Approx. 6 min. 30 sec. (P6-120) Image device: CCD (Charge Coupled Device) Viewfinder: Electronic viewfinder (monochrome) Lens: Combined 12 x power...

Primary User Manual
Page 56
... or write to: Sony Customer Information Center One Sony Drive Park Ridge, New Jersey 07656-8003 Sony Corporation Printed in /Fade-out 27 FADER 27 Fastforward 18 High-speed shutter mode 26 I, 1, K, L LANC 51 Lithium battery 34 M, N, 0, P Manual focus 28 Menu system 31 M. Index A AC power adaptor Adjusting viewfinder AFM Hi-Fi Sound AGE/EVENT AUTO DATE Auto focus A/V connecting cable B BACK LIGHT Battery pack BEEP C Camera recording Car battery Charging battery Cleaning video heads Clock set Connection COUNTER RESET F, G, H Q, R 6, 20 10 36...
... or write to: Sony Customer Information Center One Sony Drive Park Ridge, New Jersey 07656-8003 Sony Corporation Printed in /Fade-out 27 FADER 27 Fastforward 18 High-speed shutter mode 26 I, 1, K, L LANC 51 Lithium battery 34 M, N, 0, P Manual focus 28 Menu system 31 M. Index A AC power adaptor Adjusting viewfinder AFM Hi-Fi Sound AGE/EVENT AUTO DATE Auto focus A/V connecting cable B BACK LIGHT Battery pack BEEP C Camera recording Car battery Charging battery Cleaning video heads Clock set Connection COUNTER RESET F, G, H Q, R 6, 20 10 36...


