
Operating Instructions
Page 6
... the Front Panel Display 51 Saving Power in Standby Mode 51 Browsing Websites 52 Setting up the Network 53 Settings and Adjustments Using the Setup Display 57 [Network Update 57 [Screen Settings 58 [Audio Settings 59 [BD/DVD Viewing Settings 60 [Parental Control Settings 61 [Music Settings 61 [System Settings 61 [Network Settings 62 [Easy Setup 63 [Resetting 63 Additional Information Precautions 64 Notes about the Discs 65 Troubleshooting 66 Playable Discs 71 Playable Types of Files 72 Supported Audio Formats 73 Specifications 74 Language Code List 76...
... the Front Panel Display 51 Saving Power in Standby Mode 51 Browsing Websites 52 Setting up the Network 53 Settings and Adjustments Using the Setup Display 57 [Network Update 57 [Screen Settings 58 [Audio Settings 59 [BD/DVD Viewing Settings 60 [Parental Control Settings 61 [Music Settings 61 [System Settings 61 [Network Settings 62 [Easy Setup 63 [Resetting 63 Additional Information Precautions 64 Notes about the Discs 65 Troubleshooting 66 Playable Discs 71 Playable Types of Files 72 Supported Audio Formats 73 Specifications 74 Language Code List 76...
Operating Instructions
Page 15
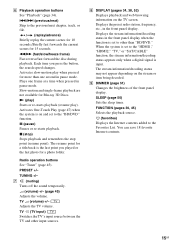
...," "TV," or "SAT/CABLE" function, the stream information/decoding status appears only when a digital signal is set to the Favorites List. m/M (fast/slow/freeze frame) Fast reverse/fast forward the disc during playback. G (muting) Turns off the sound temporarily. 2 (volume) +/- (page 45) Adjusts the volume. Activates slow-motion play ). PRESET +/- I DIMMER (page 51) Changes the brightness of the front panel display. Radio operation buttons See "Tuner" (page 45). The stream...
...," "TV," or "SAT/CABLE" function, the stream information/decoding status appears only when a digital signal is set to the Favorites List. m/M (fast/slow/freeze frame) Fast reverse/fast forward the disc during playback. G (muting) Turns off the sound temporarily. 2 (volume) +/- (page 45) Adjusts the volume. Activates slow-motion play ). PRESET +/- I DIMMER (page 51) Changes the brightness of the front panel display. Radio operation buttons See "Tuner" (page 45). The stream...
Operating Instructions
Page 23
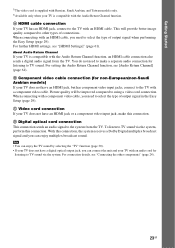
... with the Audio Return Channel function, an HDMI cable connection also sends a digital audio signal from the TV. For further HDMI settings, see [Audio Return Channel] (page 61). C Video cord connection If your TV is compatible with an HDMI cable. About Audio Return Channel If your TV does not have a digital optical output jack, you can enjoy the TV sound by selecting the "TV" function (page 30). • If your TV does not have an HDMI jack or a component video input jack, make a separate audio connection for...
... with the Audio Return Channel function, an HDMI cable connection also sends a digital audio signal from the TV. For further HDMI settings, see [Audio Return Channel] (page 61). C Video cord connection If your TV is compatible with an HDMI cable. About Audio Return Channel If your TV does not have a digital optical output jack, you can enjoy the TV sound by selecting the "TV" function (page 30). • If your TV does not have an HDMI jack or a component video input jack, make a separate audio connection for...

Operating Instructions
Page 24
HDMI OUT • Video signals from the HDMI (IN 1/2) jacks to the HDMI (OUT) jack, you may need to change the audio input of a component that has an HDMI (OUT) jack such as a set -top box/ digital satellite receiver or PLAYSTATION®3, etc. Rear panel of the set -top box/digital satellite receiver or PLAYSTATION®3, etc., with an HDMI cable. For details, see [HDMI1 Audio Input mode] in [Audio Settings] (page 59). • You can change the audio output setting. To the HDMI OUT jack of the...
HDMI OUT • Video signals from the HDMI (IN 1/2) jacks to the HDMI (OUT) jack, you may need to change the audio input of a component that has an HDMI (OUT) jack such as a set -top box/ digital satellite receiver or PLAYSTATION®3, etc. Rear panel of the set -top box/digital satellite receiver or PLAYSTATION®3, etc., with an HDMI cable. For details, see [HDMI1 Audio Input mode] in [Audio Settings] (page 59). • You can change the audio output setting. To the HDMI OUT jack of the...

Operating Instructions
Page 25
... make connection above, set [Control for connection B (page 30). 25GB TV Video out Component Audio out System Signal flow : Video signal : Audio signal If the component plays sound only, connect the audio output of [System Settings] to [Off] (page 61). • You can enjoy component sound by selecting the "SAT/CABLE" function for connection A, or the "AUDIO" function for HDMI] in [HDMI Settings] of the component to the system as follows. Getting Started When the component does not have a digital coaxial output jack: B Rear panel of the unit : Signal...
... make connection above, set [Control for connection B (page 30). 25GB TV Video out Component Audio out System Signal flow : Video signal : Audio signal If the component plays sound only, connect the audio output of [System Settings] to [Off] (page 61). • You can enjoy component sound by selecting the "SAT/CABLE" function for connection A, or the "AUDIO" function for HDMI] in [HDMI Settings] of the component to the system as follows. Getting Started When the component does not have a digital coaxial output jack: B Rear panel of the unit : Signal...
Operating Instructions
Page 29
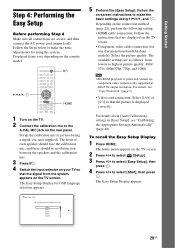
... the rear panel. Follow the Steps below to make the basic settings using a tripod, etc. (not supplied). The front of protected content via component video output is displayed correctly. For details about [Auto Calibration] settings in [Easy Setup], see "Copy Protection" (page 3). • Video cord connection: Select [16:9] or [4:3] so that are displayed on the TV screen. • Component video cable connection (for non-European/non-Saudi Arabian models): Select the picture quality. To recall the Easy Setup Display 1 Press HOME. Displayed...
... the rear panel. Follow the Steps below to make the basic settings using a tripod, etc. (not supplied). The front of protected content via component video output is displayed correctly. For details about [Auto Calibration] settings in [Easy Setup], see "Copy Protection" (page 3). • Video cord connection: Select [16:9] or [4:3] so that are displayed on the TV screen. • Component video cable connection (for non-European/non-Saudi Arabian models): Select the picture quality. To recall the Easy Setup Display 1 Press HOME. Displayed...
Operating Instructions
Page 37
.... • Do not remove the iPod/iPhone during operation. Turns the backlight on . • When [Auto Standby] is set to the system while the system is lost or damaged when using the buttons on the TV screen. Selects the previous/next item. Enters the selected item. * European, Australian, Singapore, and Thai models only. • The iPod/iPhone is played on your TV screen. (European, Australian, Singapore...
.... • Do not remove the iPod/iPhone during operation. Turns the backlight on . • When [Auto Standby] is set to the system while the system is lost or damaged when using the buttons on the TV screen. Selects the previous/next item. Enters the selected item. * European, Australian, Singapore, and Thai models only. • The iPod/iPhone is played on your TV screen. (European, Australian, Singapore...

Operating Instructions
Page 46
... not received, the station name may not work properly if the station you press DISPLAY, the display in the front panel display. Using the Radio Data System (RDS) (European and Russian models only) What is tuned in one preset station. • You can select the preset station number directly by pressing the number buttons. • Not all FM stations provide RDS service, nor do they provide the same type of [Surround Setting]. Receiving RDS broadcasts Simply select a station...
... not received, the station name may not work properly if the station you press DISPLAY, the display in the front panel display. Using the Radio Data System (RDS) (European and Russian models only) What is tuned in one preset station. • You can select the preset station number directly by pressing the number buttons. • Not all FM stations provide RDS service, nor do they provide the same type of [Surround Setting]. Receiving RDS broadcasts Simply select a station...
Operating Instructions
Page 47
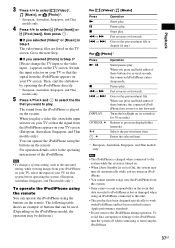
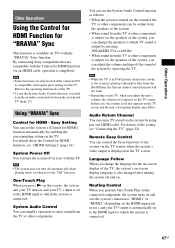
...'s video output is displayed on TVs with the Control for HDMI function via an HDMI cable, operation is simplified. • Some functions can adjust the volume and turn on the TV screen. Easy Setting You can use the System Audio Control function as follows: • When the system is turned on . You can set to the "FM" function. Remote Easy Control You can control the basic functions of the TV or other components can be used if the connected...
...'s video output is displayed on TVs with the Control for HDMI function via an HDMI cable, operation is simplified. • Some functions can adjust the volume and turn on the TV screen. Easy Setting You can use the System Audio Control function as follows: • When the system is turned on . You can set to the "FM" function. Remote Easy Control You can control the basic functions of the TV or other components can be used if the connected...
Operating Instructions
Page 48
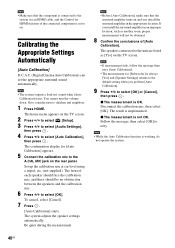
... install the surround amplifier in an improper location, such as [Yes] on the rear panel. The system adjusts the speaker settings automatically. Disconnect the calibration mic, then select [OK]. • Make sure that the surround amplifier turns on the TV screen. 2 Press C/c to select [Setup]. 3 Press X/x to select [Audio Settings], then press . 4 Press X/x to select [Auto Calibration], then press . Give consideration to retry. • While the Auto Calibration function is implemented. The home menu appears on and you install the surround amplifier...
... install the surround amplifier in an improper location, such as [Yes] on the rear panel. The system adjusts the speaker settings automatically. Disconnect the calibration mic, then select [OK]. • Make sure that the surround amplifier turns on the TV screen. 2 Press C/c to select [Setup]. 3 Press X/x to select [Audio Settings], then press . 4 Press X/x to select [Auto Calibration], then press . Give consideration to retry. • While the Auto Calibration function is implemented. The home menu appears on and you install the surround amplifier...

Operating Instructions
Page 55
... compatible with the WPS function 1 Press X/x to select [USB Wireless Setup] on the [Internet Settings] display, then press . 2 Press X/x to select [Scan], then press . Follow Steps 4 to 7 of wireless LANs appears. 3 Press X/x to select the wireless LAN name, then press . Go to Step 5. The value of "Auto setting" or "Manual setting" in "When connecting to the LAN with a LAN cable" above . For details about activating the WPS function, see the operating instructions...
... compatible with the WPS function 1 Press X/x to select [USB Wireless Setup] on the [Internet Settings] display, then press . 2 Press X/x to select [Scan], then press . Follow Steps 4 to 7 of wireless LANs appears. 3 Press X/x to select the wireless LAN name, then press . Go to Step 5. The value of "Auto setting" or "Manual setting" in "When connecting to the LAN with a LAN cable" above . For details about activating the WPS function, see the operating instructions...
Operating Instructions
Page 57
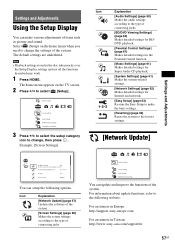
... the functions of items such as picture and sound. The home menu appears on the home menu when you need to the type of connecting jacks. You can setup the following website: For customers in Europe: http://support.sony-europe.com For customers in the disc take priority over the Setup Display settings and not all the functions described may work. 1 Press HOME. Example: [Screen Settings] Icon Explanation [Audio Settings] (page 59) Makes the audio settings according...
... the functions of items such as picture and sound. The home menu appears on the home menu when you need to the type of connecting jacks. You can setup the following website: For customers in Europe: http://support.sony-europe.com For customers in the disc take priority over the Setup Display settings and not all the functions described may work. 1 Press HOME. Example: [Screen Settings] Icon Explanation [Audio Settings] (page 59) Makes the audio settings according...
Operating Instructions
Page 58
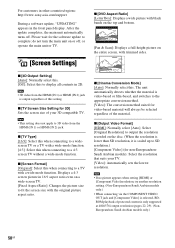
.... Displays a 4:3 screen picture in the front panel display. Please wait for video-based material will always be selected regardless of this when connecting to a 4:3 screen TV without a wide-mode function. For customers in other countries/regions: http://www.sony-asia.com/support During a software update, "UPDATING" appears in 16:9 aspect ratio even on a wide-screen TV. [Fixed Aspect Ratio]: Changes the picture size to complete; x [Screen Format] [Original]: Select this setting. x [Cinema Conversion Mode] [Auto]: Normally select this when connecting...
.... Displays a 4:3 screen picture in the front panel display. Please wait for video-based material will always be selected regardless of this when connecting to a 4:3 screen TV without a wide-mode function. For customers in other countries/regions: http://www.sony-asia.com/support During a software update, "UPDATING" appears in 16:9 aspect ratio even on a wide-screen TV. [Fixed Aspect Ratio]: Changes the picture size to complete; x [Screen Format] [Original]: Select this setting. x [Cinema Conversion Mode] [Auto]: Normally select this when connecting...

Operating Instructions
Page 59
... [Speaker + HDMI] 59GB Settings and Adjustments x [BD/DVD-ROM 1080/24p Output] [Auto]: Outputs 1920 × 1080p/24 Hz video signals only when connecting a 1080/24pcompatible TV using the HDMI (OUT) jack. [Off]: Select this when connecting to a device with an HDCP-compliant DVI jack. x [Audio Output] You can prevent distortion by reducing the input level on the connected component. • When [Control for HDMI] is set to [On] (page 61), [Audio Output] is output in high resolution. [Audio Settings] x [BD Audio...
... [Speaker + HDMI] 59GB Settings and Adjustments x [BD/DVD-ROM 1080/24p Output] [Auto]: Outputs 1920 × 1080p/24 Hz video signals only when connecting a 1080/24pcompatible TV using the HDMI (OUT) jack. [Off]: Select this when connecting to a device with an HDCP-compliant DVI jack. x [Audio Output] You can prevent distortion by reducing the input level on the connected component. • When [Control for HDMI] is set to [On] (page 61), [Audio Output] is output in high resolution. [Audio Settings] x [BD Audio...
Operating Instructions
Page 62
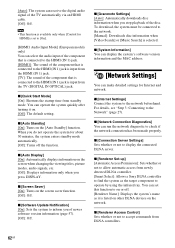
... connected to the HDMI (IN 1) jack is input from the HDMI (IN 1) jack. [TV]: The sound of the component that is connected to the network. [Manual]: Downloads disc information when [Video Search] or [Music Search] is selected. You can operate the system quickly after turning it is listed on other DLNA devices on . [Off]: The default setting. x [Screen Saver] [On]: Turns on the [Auto Standby] function. x [Internet Settings] Connect the system to on the screen when changing the viewing titles, picture modes, audio signals, etc. [Off]: Displays...
... connected to the HDMI (IN 1) jack is input from the HDMI (IN 1) jack. [TV]: The sound of the component that is connected to the network. [Manual]: Downloads disc information when [Video Search] or [Music Search] is selected. You can operate the system quickly after turning it is listed on other DLNA devices on . [Off]: The default setting. x [Screen Saver] [On]: Turns on the [Auto Standby] function. x [Internet Settings] Connect the system to on the screen when changing the viewing titles, picture modes, audio signals, etc. [Off]: Displays...

Operating Instructions
Page 67
.../DVD programs could affect picture quality. If you still experience problems even when you make a HDMI connection a component video cable (page 22). connection. (Non-European/ non-Saudi Arabian models only.) No picture appears when the video output resolution selected in [Screen Settings] (page 58). • If the analog and digital signals are used with a CRT-based TV or projector, install the speakers at the same time, set once, then turn it on after playing • Select the input...
.../DVD programs could affect picture quality. If you still experience problems even when you make a HDMI connection a component video cable (page 22). connection. (Non-European/ non-Saudi Arabian models only.) No picture appears when the video output resolution selected in [Screen Settings] (page 58). • If the analog and digital signals are used with a CRT-based TV or projector, install the speakers at the same time, set once, then turn it on after playing • Select the input...

Operating Instructions
Page 68
... the component to a set [Audio Return Channel] in with the Audio Return Channel function. There is no sound. • The speaker cord is connected to copy protection. The system does not output • Set [Audio Return Channel] in the sound of the unit. 2) jack is being played. to the the HDMI (IN 1) or HDMI (IN AUDIO (AUDIO IN L/R) jacks of • Reduce the input level for HDMI] in . speaker only. AUDIO] (page 59). Tuner Symptom Radio stations cannot be less noticeable. • A 2 channel source...
... the component to a set [Audio Return Channel] in with the Audio Return Channel function. There is no sound. • The speaker cord is connected to copy protection. The system does not output • Set [Audio Return Channel] in the sound of the unit. 2) jack is being played. to the the HDMI (IN 1) or HDMI (IN AUDIO (AUDIO IN L/R) jacks of • Reduce the input level for HDMI] in . speaker only. AUDIO] (page 59). Tuner Symptom Radio stations cannot be less noticeable. • A 2 channel source...
Operating Instructions
Page 69
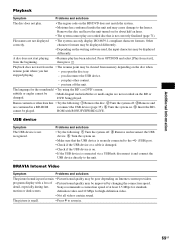
... software used, the input characters may be improved by changing the connection speed. programs display with BONUSVIEW/BD-LIVE. you play other data that • Try the following : 1 Turn the system off . 3 Remove and are not displayed correctly. • The system can only display ISO 8859-1-compliant character formats. BRAVIA Internet Video Symptom Problems and solutions The picture/sound is poor/certain • Picture/sound quality may be displayed differently. Sony recommends a connection...
... software used, the input characters may be improved by changing the connection speed. programs display with BONUSVIEW/BD-LIVE. you play other data that • Try the following : 1 Turn the system off . 3 Remove and are not displayed correctly. • The system can only display ISO 8859-1-compliant character formats. BRAVIA Internet Video Symptom Problems and solutions The picture/sound is poor/certain • Picture/sound quality may be displayed differently. Sony recommends a connection...
Operating Instructions
Page 70
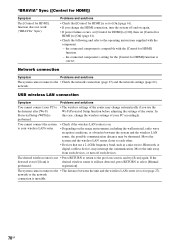
... system and the wireless LAN router closer to [On] (page 61). • If you use a 2.4 GHz frequency band, such as a microwave, Bluetooth, or digital cordless device, may be shortened. Problems and solutions • Check that use the Wi-Fi Protected Setup function before adjusting the settings of your PC to the operating instructions supplied with the [Control for HDMI] function does not work ("BRAVIA" Sync). network or the network connection is correct.
... system and the wireless LAN router closer to [On] (page 61). • If you use a 2.4 GHz frequency band, such as a microwave, Bluetooth, or digital cordless device, may be shortened. Problems and solutions • Check that use the Wi-Fi Protected Setup function before adjusting the settings of your PC to the operating instructions supplied with the [Control for HDMI] function does not work ("BRAVIA" Sync). network or the network connection is correct.
Operating Instructions
Page 77
... Network Settings 62 Network Update 57 O OSD 61 Output Video Format 58 P Parental Control Area Code 61 Parental Control Settings 61 Party Auto Start 63 Password 61 Pause Mode 59 Play information 35 Playable discs 71 Q Quick Start Mode 62 R RDS 46 Rear panel 13 Region code 71 Registered Media Remote Devices 63 Remote control 14 Renderer Access Control 62 Renderer Set-up 62 Reset to Factory Default Settings 63 Resetting 63 S Screen Format 58 Screen Saver 62 Screen Settings 58 SLEEP 50 Slideshow 41 Sound Effect 60 Speaker Settings...
... Network Settings 62 Network Update 57 O OSD 61 Output Video Format 58 P Parental Control Area Code 61 Parental Control Settings 61 Party Auto Start 63 Password 61 Pause Mode 59 Play information 35 Playable discs 71 Q Quick Start Mode 62 R RDS 46 Rear panel 13 Region code 71 Registered Media Remote Devices 63 Remote control 14 Renderer Access Control 62 Renderer Set-up 62 Reset to Factory Default Settings 63 Resetting 63 S Screen Format 58 Screen Saver 62 Screen Settings 58 SLEEP 50 Slideshow 41 Sound Effect 60 Speaker Settings...


