
Blu-ray Disc™ Home Theatre System Owners: What You Need to Know
Page 1
... in [Network Update] under [Setup]. On your computer go to www.esupport.sony.com and enter in making sure that your system works with an HDMI™ cable. Certain circumstances may limit/prevent Blu-ray Disc media or DVD playback. © 2009 Sony Corporation Printed in the front panel...and exclusive special features, live events, peer-to-peer interactions, ring-tone/wallpaper downloads, and more. 4-151-512-11(1) (1) Blu-ray Disc™ Home Theatre System Owners: What You Need to Know Keeping Your Firmware Up-to-Date: Three Easy Steps Did you can update the firmware in ...
... in [Network Update] under [Setup]. On your computer go to www.esupport.sony.com and enter in making sure that your system works with an HDMI™ cable. Certain circumstances may limit/prevent Blu-ray Disc media or DVD playback. © 2009 Sony Corporation Printed in the front panel...and exclusive special features, live events, peer-to-peer interactions, ring-tone/wallpaper downloads, and more. 4-151-512-11(1) (1) Blu-ray Disc™ Home Theatre System Owners: What You Need to Know Keeping Your Firmware Up-to-Date: Three Easy Steps Did you can update the firmware in ...
Operating Instructions
Page 6
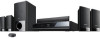
... Settings 78 [BD/DVD Viewing Settings 80 [Photo Settings 82 [HDMI Settings 82 [System Settings 83 [Network Settings 84 [Easy Setup 85 [Resetting 86 Additional Information Precautions 87 Notes about the Discs 88 Troubleshooting 89 Self-diagnosis Function 95 Playable Discs 96 Supported Audio Formats 98 Video Output Resolution 99 Specifications 100 Language Code...
... Settings 78 [BD/DVD Viewing Settings 80 [Photo Settings 82 [HDMI Settings 82 [System Settings 83 [Network Settings 84 [Easy Setup 85 [Resetting 86 Additional Information Precautions 87 Notes about the Discs 88 Troubleshooting 89 Self-diagnosis Function 95 Playable Discs 96 Supported Audio Formats 98 Video Output Resolution 99 Specifications 100 Language Code...
Operating Instructions
Page 7
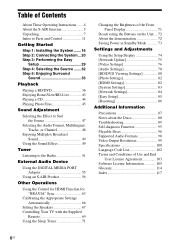
Unpacking BDV-T10 • Front speakers (2) • Surround speakers (2) • Center speaker (1) • FM wire antenna (aerial) (1) • Foot pads (1 set) or • Speaker cords (5, white/red/ blue/gray/green) • Operating Instructions • Speaker and TV Connections guide • Setup Disc (DVD) • DIGITAL MEDIA PORT adapter (TDM-iP20) (1) • Video cord (1) •...
Unpacking BDV-T10 • Front speakers (2) • Surround speakers (2) • Center speaker (1) • FM wire antenna (aerial) (1) • Foot pads (1 set) or • Speaker cords (5, white/red/ blue/gray/green) • Operating Instructions • Speaker and TV Connections guide • Setup Disc (DVD) • DIGITAL MEDIA PORT adapter (TDM-iP20) (1) • Video cord (1) •...
Operating Instructions
Page 8
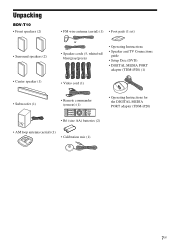
BDV-T11 • Front speakers (2) • Surround speakers (2) • Center speaker (1) • FM wire antenna (aerial) (1) • Foot pads (1 set) or • Speaker cords (5, white/red/ blue/gray/green) • Operating Instructions • Speaker and TV Connections guide • Setup Disc (DVD) • DIGITAL MEDIA PORT adapter (TDM-iP20) (1) • Video cord (1) • Subwoofer...
BDV-T11 • Front speakers (2) • Surround speakers (2) • Center speaker (1) • FM wire antenna (aerial) (1) • Foot pads (1 set) or • Speaker cords (5, white/red/ blue/gray/green) • Operating Instructions • Speaker and TV Connections guide • Setup Disc (DVD) • DIGITAL MEDIA PORT adapter (TDM-iP20) (1) • Video cord (1) • Subwoofer...
Operating Instructions
Page 9
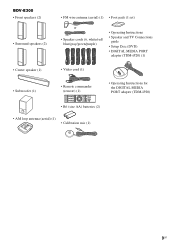
BDV-E300 • Front speakers (2) • Surround speakers (2) • Center speaker (1) • Subwoofer (1) • FM wire antenna (aerial) (1) • Foot pads (1 set) or • Speaker cords (6, white/red/ blue/gray/green/purple) • Operating Instructions • Speaker and TV Connections guide • Setup Disc (DVD) • DIGITAL MEDIA PORT adapter (TDM-iP20) (1) • Video cord...
BDV-E300 • Front speakers (2) • Surround speakers (2) • Center speaker (1) • Subwoofer (1) • FM wire antenna (aerial) (1) • Foot pads (1 set) or • Speaker cords (6, white/red/ blue/gray/green/purple) • Operating Instructions • Speaker and TV Connections guide • Setup Disc (DVD) • DIGITAL MEDIA PORT adapter (TDM-iP20) (1) • Video cord...
Operating Instructions
Page 29
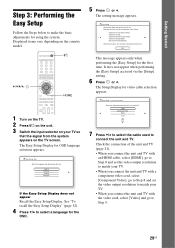
... connecting this unit and the TV. OSD Select the language to be changed later under "Setup." - Select the Standby Mode - Displayed items vary depending on the country model. 123 456 789 0 "/1 C/X/x/c, HOME 1 Turn on the TV. 2 Press [/1 on the unit. 3 Switch the input selector...not appear when performing the [Easy Setup] accessed via the [Setup] setting. 6 Press or c. Select the BD Internet Connection - Getting Started Step 3: Performing the Easy Setup Follow the Steps below required to use this unit. The Easy Setup Display for using the system. English Français Espa&#...
... connecting this unit and the TV. OSD Select the language to be changed later under "Setup." - Select the Standby Mode - Displayed items vary depending on the country model. 123 456 789 0 "/1 C/X/x/c, HOME 1 Turn on the TV. 2 Press [/1 on the unit. 3 Switch the input selector...not appear when performing the [Easy Setup] accessed via the [Setup] setting. 6 Press or c. Select the BD Internet Connection - Getting Started Step 3: Performing the Easy Setup Follow the Steps below required to use this unit. The Easy Setup Display for using the system. English Français Espa&#...
Operating Instructions
Page 30
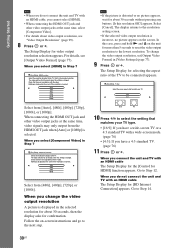
... [Component Video] in [Video Settings] (page 77). 9 Press or c. Select [Cancel]. To change the video output resolution A picture is changed . Easy Setup - Select from [480i], [480p], [720p], or [1080i]. When connecting the HDMI OUT jack and other video output jacks at the same time, video signals...to the lowest resolution. HDMI Resolution Select the resolution to output to Step 14. 30US In this setting is displayed in Step 7 Easy Setup - Nothing is displayed on -screen instructions and go to the next step. 10 Press X/x to select the setting that matches your TV....
... [Component Video] in [Video Settings] (page 77). 9 Press or c. Select [Cancel]. To change the video output resolution A picture is changed . Easy Setup - Select from [480i], [480p], [720p], or [1080i]. When connecting the HDMI OUT jack and other video output jacks at the same time, video signals...to the lowest resolution. HDMI Resolution Select the resolution to output to Step 14. 30US In this setting is displayed in Step 7 Easy Setup - Nothing is displayed on -screen instructions and go to the next step. 10 Press X/x to select the setting that matches your TV....
Operating Instructions
Page 31
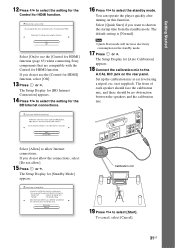
...[Quick Start] if you do not use the [Control for HDMI] function (page 63) when connecting Sony components that are compatible with a TV connected by HDMI. The Setup Display for HDMI function. The Setup Display for HDMI] function, select [Off]. 13 Press or c. Note • Quick Start mode will... calibration mic at ear level using this function. Control for HDMI You can operate the player quickly after turning on the rear panel. On Select [On] to select the setting for HDMI function. The Setup Display for [BD Internet Connection] appears. 14 Press X/x to use the [Control for...
...[Quick Start] if you do not use the [Control for HDMI] function (page 63) when connecting Sony components that are compatible with a TV connected by HDMI. The Setup Display for HDMI function. The Setup Display for HDMI] function, select [Off]. 13 Press or c. Note • Quick Start mode will... calibration mic at ear level using this function. Control for HDMI You can operate the player quickly after turning on the rear panel. On Select [On] to select the setting for HDMI function. The Setup Display for [BD Internet Connection] appears. 14 Press X/x to use the [Control for...
Operating Instructions
Page 32
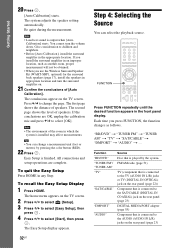
...The second page shows the level of speakers. Easy Setup is output when [Auto Calibration] starts. To recall the Easy Setup Display 1 Press HOME. The Easy Setup display appears. 32US Step 4: Selecting the Source You can change the page. The system adjusts the speaker setting automatically. Give consideration to select...appears in the appropriate location. Function "BD/DVD" "TUNER FM"/ "TUNER AM" "TV" "SAT/CABLE" "DMPORT" "AUDIO" Source Disc that is played by pressing the color button (RED). 22 Press . Getting Started 20 Press . [Auto Calibration] starts. To quit the Easy...
...The second page shows the level of speakers. Easy Setup is output when [Auto Calibration] starts. To recall the Easy Setup Display 1 Press HOME. The Easy Setup display appears. 32US Step 4: Selecting the Source You can change the page. The system adjusts the speaker setting automatically. Give consideration to select...appears in the appropriate location. Function "BD/DVD" "TUNER FM"/ "TUNER AM" "TV" "SAT/CABLE" "DMPORT" "AUDIO" Source Disc that is played by pressing the color button (RED). 22 Press . Getting Started 20 Press . [Auto Calibration] starts. To quit the Easy...
Operating Instructions
Page 64
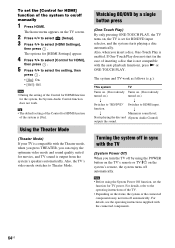
..., and the system starts playing a disc automatically. To set the [Control for the system, the System Audio Control function does not work as follows (e.g.): This system TV Turns on... TV screen. 2 Press C/c to select [Setup]. 3 Press X/x to HDMI input. Using the Theater Mode (Theater Mode) If your TV is output from the system's speakers automatically. Also, the TV's video mode... sound level. The home menu appears on the system's remote, the system turns off manually 1 Press HOME. If One-Touch Play does not start (in sync with the connected components. 64US The system and TV work ....
..., and the system starts playing a disc automatically. To set the [Control for the system, the System Audio Control function does not work as follows (e.g.): This system TV Turns on... TV screen. 2 Press C/c to select [Setup]. 3 Press X/x to HDMI input. Using the Theater Mode (Theater Mode) If your TV is output from the system's speakers automatically. Also, the TV's video mode... sound level. The home menu appears on the system's remote, the system turns off manually 1 Press HOME. If One-Touch Play does not start (in sync with the connected components. 64US The system and TV work ....
Operating Instructions
Page 66
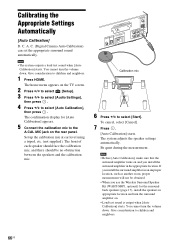
... and the calibration mic. You cannot turn the volume down . Give consideration to children and neighbors. 1 Press HOME. Note • The system outputs a loud test sound when [Auto Calibration] starts. Calibrating the Appropriate Settings Automatically [Auto Calibration] D. C.... Note • Before [Auto Calibration], make sure that the surround amplifier turns on the TV screen. 2 Press C/c to select [Setup]. 3 Press X/x to...
... and the calibration mic. You cannot turn the volume down . Give consideration to children and neighbors. 1 Press HOME. Note • The system outputs a loud test sound when [Auto Calibration] starts. Calibrating the Appropriate Settings Automatically [Auto Calibration] D. C.... Note • Before [Auto Calibration], make sure that the surround amplifier turns on the TV screen. 2 Press C/c to select [Setup]. 3 Press X/x to...
Operating Instructions
Page 67
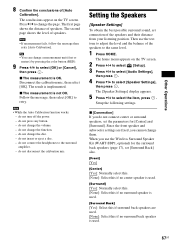
... The measurement is OK. do not change the volume. - Note • While the Auto Calibration function works: - do not change the disc. - Setting the Speakers [Speaker Settings] To obtain the best possible surround sound, set connection of speakers. x [Connection] If you use the... not disconnect the calibration mic. do not press any button. - The home menu appears on the TV screen. The [Speaker Settings] display appears. 5 Press X/x to select [OK] or [Cancel], then press . Setup the following settings. Since the front speaker and subwoofer settings are used ....
... The measurement is OK. do not change the volume. - Note • While the Auto Calibration function works: - do not change the disc. - Setting the Speakers [Speaker Settings] To obtain the best possible surround sound, set connection of speakers. x [Connection] If you use the... not disconnect the calibration mic. do not press any button. - The home menu appears on the TV screen. The [Speaker Settings] display appears. 5 Press X/x to select [OK] or [Cancel], then press . Setup the following settings. Since the front speaker and subwoofer settings are used ....
Operating Instructions
Page 74
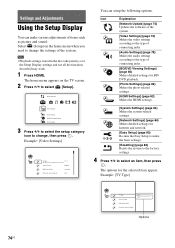
.... 4 Press X/x to change the settings of the system. Settings and Adjustments Using the Setup Display You can setup the following options. Note • Playback settings stored in the disc take priority over the Setup Display settings and not all the functions described may work. 1 Press HOME. Network Update Setup Video Settings Audio Settings BD/DVD Viewing Settings...
.... 4 Press X/x to change the settings of the system. Settings and Adjustments Using the Setup Display You can setup the following options. Note • Playback settings stored in the disc take priority over the Setup Display settings and not all the functions described may work. 1 Press HOME. Network Update Setup Video Settings Audio Settings BD/DVD Viewing Settings...

Operating Instructions
Page 75
... then press . For information about update functions, refer to the following website: http://esupport.sony.com Note • Do not disconnect the AC power cord (mains lead) or network cable... while downloading or updating software. • All operations, including opening the disc tray, are disabled while updating. • Downloading times may differ depending on the... 5 Press X/x to select [OK], then press . Example: [4:3] Setup TV Type 4 : 3 Set the screen aspect ratio of the system. Screen Format Original DVD Aspect Ratio Letter Box Cinema Conversion Mode Auto ...
... then press . For information about update functions, refer to the following website: http://esupport.sony.com Note • Do not disconnect the AC power cord (mains lead) or network cable... while downloading or updating software. • All operations, including opening the disc tray, are disabled while updating. • Downloading times may differ depending on the... 5 Press X/x to select [OK], then press . Example: [4:3] Setup TV Type 4 : 3 Set the screen aspect ratio of the system. Screen Format Original DVD Aspect Ratio Letter Box Cinema Conversion Mode Auto ...

Operating Instructions
Page 79
...and will depend on the component connected. [On]: Attenuates the input level. AUDIO] Distortion may change automatically. x [BD/DVD Audio Output] The system cannot output multi-channel sound from the HDMI OUT jack depends on /off. [On]: Enables all of sampling frequency. Note • When you...is activated, this when you set the upper limit of the system's sound effects. Settings and Adjustments x [Attenuate - Sound format from both the HDMI OUT jack and system's speakers simultaneously. Press C/c to select [OK] to complete the setup. • When you do not want to set [BD/...
...and will depend on the component connected. [On]: Attenuates the input level. AUDIO] Distortion may change automatically. x [BD/DVD Audio Output] The system cannot output multi-channel sound from the HDMI OUT jack depends on /off. [On]: Enables all of sampling frequency. Note • When you...is activated, this when you set the upper limit of the system's sound effects. Settings and Adjustments x [Attenuate - Sound format from both the HDMI OUT jack and system's speakers simultaneously. Press C/c to select [OK] to complete the setup. • When you do not want to set [BD/...
Operating Instructions
Page 84
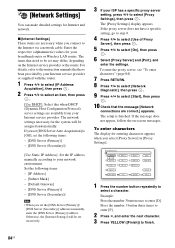
... character. 3 Press YELLOW ([Finish]) to select a character. [Network Settings] You can make detailed settings for the system will be assigned automatically. Otherwise, the [Internet Settings] will be set may differ, depending on -screen messages. The setup is finished. If the message does not appear, follow the on the Internet service provider or...
... character. 3 Press YELLOW ([Finish]) to select a character. [Network Settings] You can make detailed settings for the system will be assigned automatically. Otherwise, the [Internet Settings] will be set may differ, depending on -screen messages. The setup is finished. If the message does not appear, follow the on the Internet service provider or...

Operating Instructions
Page 85
... can use the following buttons to select [Start], then press . 2 Follow the instructions for "Step 3: Performing the Easy Setup" (page 29) from step 4. Settings and Adjustments 85US You can recall the Easy Setup to make the basic settings. 1 Press C/c to enter characters. RETURN [Cancel] Returns to the right [Clear]/[Clear All] of... CLEAR for symbols. Buttons Details RED [Letter Type] Switches the keyboard between upper case and lower case. YELLOW [Finish] The input is entered, and the system returns to the previous display.
... can use the following buttons to select [Start], then press . 2 Follow the instructions for "Step 3: Performing the Easy Setup" (page 29) from step 4. Settings and Adjustments 85US You can recall the Easy Setup to make the basic settings. 1 Press C/c to enter characters. RETURN [Cancel] Returns to the right [Clear]/[Clear All] of... CLEAR for symbols. Buttons Details RED [Letter Type] Switches the keyboard between upper case and lower case. YELLOW [Finish] The input is entered, and the system returns to the previous display.
Operating Instructions
Page 92
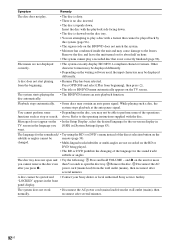
above. Refer to the lenses. The language for more you want. • In the Setup Display, select the desired language for the sound track/ subtitle or angles. and Z on the unit for the soundtrack/ • Try using the BD.... • You are attempting to play a recorded disc that cannot be ejected and • Contact your Sony dealer or local authorized Sony service facility. changed. • Multi-lingual tracks/subtitles or multi-angles are not displayed correctly. • The system can only display ISO 8859-1-compliant character formats. You cannot perform some &#...
above. Refer to the lenses. The language for more you want. • In the Setup Display, select the desired language for the sound track/ subtitle or angles. and Z on the unit for the soundtrack/ • Try using the BD.... • You are attempting to play a recorded disc that cannot be ejected and • Contact your Sony dealer or local authorized Sony service facility. changed. • Multi-lingual tracks/subtitles or multi-angles are not displayed correctly. • The system can only display ISO 8859-1-compliant character formats. You cannot perform some &#...

Operating Instructions
Page 117
... BD/DVD Menu 80 BD/DVD Viewing Settings 80 BDAV 96 BD-Live 43 BDMV 96 BD-R 114 BD-RE 114 Blu-ray Disc 114 C CD 44, 96 Child Lock 72 Cinema Conversion Mode 77 Control for HDMI 38, 63, 82 D D. ..., 115 DTS-HD 115 DVD 36, 96 DVD Aspect Ratio 76 DVD Parental Control 80 DYNAMIC BASS 49 E Easy Setup 29, 85 F FM MODE 51 Front panel 13 Front panel display 14 H HDMI YCbCr/RGB (HDMI) 78 HDMI...Sound Effect 79 Speaker Settings 67, 79 Connection 67 Distance 68 Level 68 Standby Mode 83 Subtitle 80 Surround amplifier 56 System Information 83 SYSTEM MENU 33, 42, 50, 57, 58, 59, 60, 61, 71, 72 T Test Tone 68 TONE ...
... BD/DVD Menu 80 BD/DVD Viewing Settings 80 BDAV 96 BD-Live 43 BDMV 96 BD-R 114 BD-RE 114 Blu-ray Disc 114 C CD 44, 96 Child Lock 72 Cinema Conversion Mode 77 Control for HDMI 38, 63, 82 D D. ..., 115 DTS-HD 115 DVD 36, 96 DVD Aspect Ratio 76 DVD Parental Control 80 DYNAMIC BASS 49 E Easy Setup 29, 85 F FM MODE 51 Front panel 13 Front panel display 14 H HDMI YCbCr/RGB (HDMI) 78 HDMI...Sound Effect 79 Speaker Settings 67, 79 Connection 67 Distance 68 Level 68 Standby Mode 83 Subtitle 80 Surround amplifier 56 System Information 83 SYSTEM MENU 33, 42, 50, 57, 58, 59, 60, 61, 71, 72 T Test Tone 68 TONE ...

