
Operating Instructions
Page 2
...No. BDP-S360 Serial No For customers in a residential installation. Batteries or batteries installed apparatus shall not be used in this Blu-ray Disc/DVD player is encouraged to try to correct the interference by one or more of electric shock to which can be determined by turning the... that any changes or modifications not expressly approved in this manual could void your Sony dealer regarding this apparatus to disassemble the cabinet. If this unit so that the AC power cord can be unplugged from that interference will increase eye hazard. Consult the dealer or...
...No. BDP-S360 Serial No For customers in a residential installation. Batteries or batteries installed apparatus shall not be used in this Blu-ray Disc/DVD player is encouraged to try to correct the interference by one or more of electric shock to which can be determined by turning the... that any changes or modifications not expressly approved in this manual could void your Sony dealer regarding this apparatus to disassemble the cabinet. If this unit so that the AC power cord can be unplugged from that interference will increase eye hazard. Consult the dealer or...
Operating Instructions
Page 3
... on the AC power cord itself. ,continued 3 never pull the cord. • Observe following discs. - A lens cleaning disc. - Precautions The power requirements and power consumption of this occur, the player may cause an electric shock. Doing so may not operate properly. Should this player are not going to use the AC power cord if it . - On power sources • The player is not...
... on the AC power cord itself. ,continued 3 never pull the cord. • Observe following discs. - A lens cleaning disc. - Precautions The power requirements and power consumption of this occur, the player may cause an electric shock. Doing so may not operate properly. Should this player are not going to use the AC power cord if it . - On power sources • The player is not...
Operating Instructions
Page 4
... Blu-ray Disc Association. • "x.v.Color" and "x.v.Color" logo are trademarks of Sony Corporation. • "BRAVIA Sync" and "BRAVIA Sync" logo are trademarks of Sony Corporation. • "PhotoTV HD" and the "PhotoTV HD" logo are trademarks of Sony Corporation. • This product meets ENERGY STAR® guidelines for replacement of the obsolete outlet. 10)Protect the power cord...
... Blu-ray Disc Association. • "x.v.Color" and "x.v.Color" logo are trademarks of Sony Corporation. • "BRAVIA Sync" and "BRAVIA Sync" logo are trademarks of Sony Corporation. • "PhotoTV HD" and the "PhotoTV HD" logo are trademarks of Sony Corporation. • This product meets ENERGY STAR® guidelines for replacement of the obsolete outlet. 10)Protect the power cord...
Operating Instructions
Page 5
... incorrect operation) is damaged, liquid has been spilled or objects have the similar symbols as power-supply cord or plug is listed under the z icon. 13)Unplug this manual describe the controls on...unless otherwise specified by the manufacturer, or sold with the function being explained. For details, see "Playable Discs" (page 59). • Instructions in any way, such as those on the remote. •... general reference for long periods of media can also use the controls on the player if they have fallen into the apparatus, the apparatus has been exposed to qualified service personnel....
... incorrect operation) is damaged, liquid has been spilled or objects have the similar symbols as power-supply cord or plug is listed under the z icon. 13)Unplug this manual describe the controls on...unless otherwise specified by the manufacturer, or sold with the function being explained. For details, see "Playable Discs" (page 59). • Instructions in any way, such as those on the remote. •... general reference for long periods of media can also use the controls on the player if they have fallen into the apparatus, the apparatus has been exposed to qualified service personnel....
Operating Instructions
Page 6
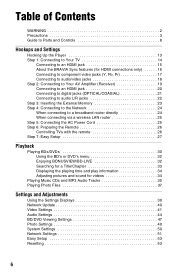
Table of Contents WARNING 2 Precautions 3 Guide to Parts and Controls 8 Hookups and Settings Hooking Up the Player 13 Step 1: Connecting to Your TV 14 Connecting to an HDMI jack 15 About the BRAVIA Sync features (for HDMI connections only 16 Connecting to ... 23 Step 4: Connecting to the Network 24 When connecting to a broadband router directly 24 When connecting via a wireless LAN router 25 Step 5: Connecting the AC Power Cord 25 Step 6: Preparing the Remote 26 Controlling TVs with the remote 26 Step 7: Easy Setup 27 Playback Playing BDs/DVDs 30 Using the BD's or...
Table of Contents WARNING 2 Precautions 3 Guide to Parts and Controls 8 Hookups and Settings Hooking Up the Player 13 Step 1: Connecting to Your TV 14 Connecting to an HDMI jack 15 About the BRAVIA Sync features (for HDMI connections only 16 Connecting to ... 23 Step 4: Connecting to the Network 24 When connecting to a broadband router directly 24 When connecting via a wireless LAN router 25 Step 5: Connecting the AC Power Cord 25 Step 6: Preparing the Remote 26 Controlling TVs with the remote 26 Step 7: Easy Setup 27 Playback Playing BDs/DVDs 30 Using the BD's or...

Operating Instructions
Page 13
Do not connect the AC power cord until you have the following items. • Audio/video cable (phono plug ×3) (1) • AC power cord (1) • Remote commander (remote) (1) • Size AA (R6) batteries (2) Follow steps 1 through 7 to hook up and adjust the settings of the player. Hookups and Settings 13 Hookups and Settings Hooking Up the Player Check that you reach "Step 5: Connecting the AC Power Cord" (page 25).
Do not connect the AC power cord until you have the following items. • Audio/video cable (phono plug ×3) (1) • AC power cord (1) • Remote commander (remote) (1) • Size AA (R6) batteries (2) Follow steps 1 through 7 to hook up and adjust the settings of the player. Hookups and Settings 13 Hookups and Settings Hooking Up the Player Check that you reach "Step 5: Connecting the AC Power Cord" (page 25).
Operating Instructions
Page 25
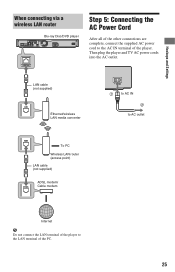
Then plug the player and TV AC power cords into the AC outlet. LAN cable (not supplied) Ethernet/wireless LAN media converter 1 to AC IN 2 to AC outlet To PC Wireless LAN router (access point) LAN cable (not supplied) ADSL modem/ Cable modem Internet b Do not connect the LAN terminal of the player to the AC IN terminal of the PC. 25 Hookups and Settings When connecting via a wireless LAN router Blu-ray Disc/DVD player Step 5: Connecting the AC Power Cord After all of the other connections are complete, connect the supplied AC power cord to the LAN terminal of the player.
Then plug the player and TV AC power cords into the AC outlet. LAN cable (not supplied) Ethernet/wireless LAN media converter 1 to AC IN 2 to AC outlet To PC Wireless LAN router (access point) LAN cable (not supplied) ADSL modem/ Cable modem Internet b Do not connect the LAN terminal of the player to the AC IN terminal of the PC. 25 Hookups and Settings When connecting via a wireless LAN router Blu-ray Disc/DVD player Step 5: Connecting the AC Power Cord After all of the other connections are complete, connect the supplied AC power cord to the LAN terminal of the player.
Operating Instructions
Page 40
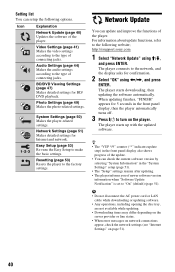
... network. Network Settings (page 51) Makes detailed settings for BD/ DVD playback. http://esupport.sony.com 1 Select "Network Update" using Icon Explanation Network Update (page 40) Updates the software of connecting jacks. Resetting (page 53) Resets the player to make the basic settings. Video Settings (page 41) Makes the video settings according...
... network. Network Settings (page 51) Makes detailed settings for BD/ DVD playback. http://esupport.sony.com 1 Select "Network Update" using Icon Explanation Network Update (page 40) Updates the software of connecting jacks. Resetting (page 53) Resets the player to make the basic settings. Video Settings (page 41) Makes the video settings according...
Operating Instructions
Page 41
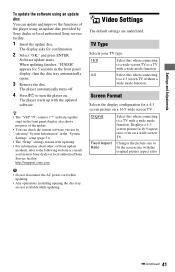
...and improve the functions of the player using an update disc You can check the current software version by Sony dealer or local authorized Sony service facility. 1 Insert the update disc. TV Type Selects your nearest Sony dealer or local authorized Sony Service facility; Original Fixed Aspect ...4:3 screen picture in 16:9 aspect ratio even on a wide-screen TV. http://esupport.sony.com b • Do not disconnect the AC power cord while updating. • Any operations, including opening the disc tray, are underlined. Changes the picture size to a TV with the updated software....
...and improve the functions of the player using an update disc You can check the current software version by Sony dealer or local authorized Sony service facility. 1 Insert the update disc. TV Type Selects your nearest Sony dealer or local authorized Sony Service facility; Original Fixed Aspect ...4:3 screen picture in 16:9 aspect ratio even on a wide-screen TV. http://esupport.sony.com b • Do not disconnect the AC power cord while updating. • Any operations, including opening the disc tray, are underlined. Changes the picture size to a TV with the updated software....
Operating Instructions
Page 54
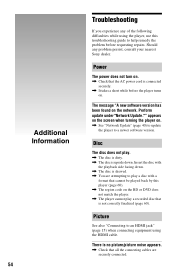
... player to play a disc with a format that all the connecting cables are securely connected. Additional Information 54 Troubleshooting If you experience any problem persist, consult your nearest Sony dealer. Disc The disc does not play a recorded disc that is skewed. , You are attempting to a newer software version. Power The power does not turn on. , Check that the AC power cord...
... player to play a disc with a format that all the connecting cables are securely connected. Additional Information 54 Troubleshooting If you experience any problem persist, consult your nearest Sony dealer. Disc The disc does not play a recorded disc that is skewed. , You are attempting to a newer software version. Power The power does not turn on. , Check that the AC power cord...
Operating Instructions
Page 56
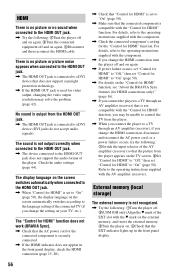
... 50). , For details on your TV, etc.). The "Control for HDMI" function does not work (BRAVIA Sync). , Check that the AC power cord of the player. There is no sound when connected to a DVI device (DVI jacks do not accept audio signals). External memory (local storage) The external memory ...supplied with the "Control for HDMI" function, you change the HDMI connection, disconnect and reconnect the AC power cord, or a power failure occurs, try the following : 1Turn the player off and on again. , If power failure occurs, set "Control for HDMI" to "Off," then set to "On" (page 50), the...
... 50). , For details on your TV, etc.). The "Control for HDMI" function does not work (BRAVIA Sync). , Check that the AC power cord of the player. There is no sound when connected to a DVI device (DVI jacks do not accept audio signals). External memory (local storage) The external memory ...supplied with the "Control for HDMI" function, you change the HDMI connection, disconnect and reconnect the AC power cord, or a power failure occurs, try the following : 1Turn the player off and on again. , If power failure occurs, set "Control for HDMI" to "Off," then set to "On" (page 50), the...
Operating Instructions
Page 57
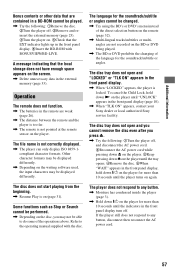
...following : 1Remove the disc. 2Turn the player off. 3Remove and reinsert the external memory (page 23). 4Turn the player on the player until "UNLOCK" appears in the front panel display (page 10). , When "TLK ON" appears, contact your Sony dealer or local authorized Sony service facility. The ...ROM cannot be played. , Try the following : 1Turn the player off, and disconnect the AC power cord. 2Reconnect the AC power cord while pressing down Z on the player. 3Keep pressing down Z on the player until the tray opens. 4Remove the disc. 5When "WAIT" appears in the front panel display, hold down...
...following : 1Remove the disc. 2Turn the player off. 3Remove and reinsert the external memory (page 23). 4Turn the player on the player until "UNLOCK" appears in the front panel display (page 10). , When "TLK ON" appears, contact your Sony dealer or local authorized Sony service facility. The ...ROM cannot be played. , Try the following : 1Turn the player off, and disconnect the AC power cord. 2Reconnect the AC power cord while pressing down Z on the player. 3Keep pressing down Z on the player until the tray opens. 4Remove the disc. 5When "WAIT" appears in the front panel display, hold down...

