
Operating Instructions
Page 11
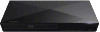
D (USB) jack Connect a USB device to avoid accidental opening of the tray. E Power indicator Lights up when the player is turned on, press x STOP, HOME, and then TOP MENU button on the remote to standby mode. F Remote sensor To lock the disc tray (Child Lock) You can lock the disc tray to this jack. Getting Started Getting Started Guide to Parts and Controls Front panel 1 2 34 6 5 A Disc tray B Z (open/close) C [/1 (on/standby) Turns on the player, or sets to lock or unlock the tray. 11 While the player is turned on.
D (USB) jack Connect a USB device to avoid accidental opening of the tray. E Power indicator Lights up when the player is turned on, press x STOP, HOME, and then TOP MENU button on the remote to standby mode. F Remote sensor To lock the disc tray (Child Lock) You can lock the disc tray to this jack. Getting Started Getting Started Guide to Parts and Controls Front panel 1 2 34 6 5 A Disc tray B Z (open/close) C [/1 (on/standby) Turns on the player, or sets to lock or unlock the tray. 11 While the player is turned on.

Operating Instructions
Page 13
... between TV and other input sources. -TV- [/1 (on/standby) Turns on the TV, or sets to standby mode. [/1 (on/standby) Turns on the player or remote is not pressed for interactive functions. POP UP/MENU Opens or closes the BD-ROM's Pop-up Menu, or the DVD's menu. z N PLAY, VOL +, and... operating the player. B Color buttons (YELLOW/ BLUE/RED/GREEN) Shortcut keys for more than 20 minutes, the player automatically returns to standby mode. Getting Started Remote The available functions of the remote are different depending on the screen.
... between TV and other input sources. -TV- [/1 (on/standby) Turns on the TV, or sets to standby mode. [/1 (on/standby) Turns on the player or remote is not pressed for interactive functions. POP UP/MENU Opens or closes the BD-ROM's Pop-up Menu, or the DVD's menu. z N PLAY, VOL +, and... operating the player. B Color buttons (YELLOW/ BLUE/RED/GREEN) Shortcut keys for more than 20 minutes, the player automatically returns to standby mode. Getting Started Remote The available functions of the remote are different depending on the screen.
Operating Instructions
Page 17
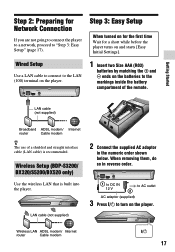
... by matching the 3 and # ends on the player. When removing them, do so in the numeric order shown below. Wireless Setup (BDP-S3200/ BX320/S5200/BX520 only) Use the wireless LAN that is recommended. Getting Started LAN cable (not supplied) Broadband ADSL modem/ Internet router Cable modem... z The use of the remote. Step 3: Easy Setup When turned on for the first time Wait for Network Connection If you...
... by matching the 3 and # ends on the player. When removing them, do so in the numeric order shown below. Wireless Setup (BDP-S3200/ BX320/S5200/BX520 only) Use the wireless LAN that is recommended. Getting Started LAN cable (not supplied) Broadband ADSL modem/ Internet router Cable modem... z The use of the remote. Step 3: Easy Setup When turned on for the first time Wait for Network Connection If you...

Operating Instructions
Page 18
This will show the signal from the player on your TV. Follow the on-screen instructions to make the basic settings using 4 Turn on the TV and set the input selector on your TV screen. 5 Perform [Easy Initial Settings].
This will show the signal from the player on your TV. Follow the on-screen instructions to make the basic settings using 4 Turn on the TV and set the input selector on your TV screen. 5 Perform [Easy Initial Settings].
Operating Instructions
Page 21
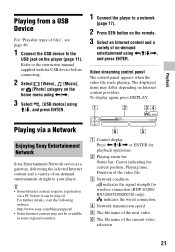
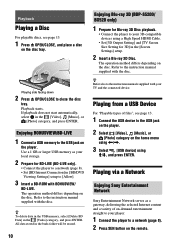
Refer to the USB jack on the home menu using Playing from a USB Device For "Playable types of files", see page 40. 1 Connect the USB device to the instruction manual supplied with the USB device before connecting. 2 Select [Video], [Music], or [Photo] category on the player (page 11).
Refer to the USB jack on the home menu using Playing from a USB Device For "Playable types of files", see page 40. 1 Connect the USB device to the instruction manual supplied with the USB device before connecting. 2 Select [Video], [Music], or [Photo] category on the player (page 11).
Operating Instructions
Page 23
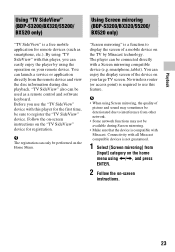
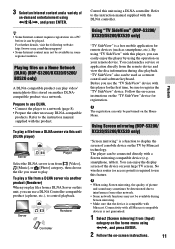
...for the first time, be connected directly with all Miracast compatible devices is not guaranteed. 1 Select [Screen mirroring] from the remote device and view the disc information during Screen mirroring. • Make sure that the device is compatible with Miracast. smartphone,...TV SideView" device for registration. Playback Using "TV SideView" (BDP-S3200/BX320/S5200/ BX520 only) Using Screen mirroring (BDP-S3200/BX320/S5200/ BX520 only) "TV SideView" is a free mobile application for remote devices (such as a remote control and software keyboard. b The registration can be sure to ...
...for the first time, be connected directly with all Miracast compatible devices is not guaranteed. 1 Select [Screen mirroring] from the remote device and view the disc information during Screen mirroring. • Make sure that the device is compatible with Miracast. smartphone,...TV SideView" device for registration. Playback Using "TV SideView" (BDP-S3200/BX320/S5200/ BX520 only) Using Screen mirroring (BDP-S3200/BX320/S5200/ BX520 only) "TV SideView" is a free mobile application for remote devices (such as a remote control and software keyboard. b The registration can be sure to ...
Operating Instructions
Page 24
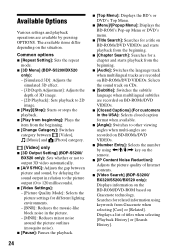
...'s Top Menu. x [Closed Captions] (For customers in the picture. - [MNR]: Reduces minor noise around the picture outlines (mosquito noise). x [3D Menu] (BDP-S5200/BX520 only): - [Simulated 3D]: Adjusts the simulated 3D effect. - [3D Depth Adjustment]: Adjusts the depth of 3D image. - [2D Playback]: Sets playback to...[Repeat Setting]: Sets the repeat mode. x [A/V SYNC]: Adjusts the gap between [Video], [Music] and [Photo] category. [Video] only x [3D Output Setting] (BDP-S5200/ BX520 only): Sets whether or not to 2D image. x [Chapter Search]: Searches for a title on BD-ROMs/DVD VIDEOs.
...'s Top Menu. x [Closed Captions] (For customers in the picture. - [MNR]: Reduces minor noise around the picture outlines (mosquito noise). x [3D Menu] (BDP-S5200/BX520 only): - [Simulated 3D]: Adjusts the simulated 3D effect. - [3D Depth Adjustment]: Adjusts the depth of 3D image. - [2D Playback]: Sets playback to...[Repeat Setting]: Sets the repeat mode. x [A/V SYNC]: Adjusts the gap between [Video], [Music] and [Photo] category. [Video] only x [3D Output Setting] (BDP-S5200/ BX520 only): Sets whether or not to 2D image. x [Chapter Search]: Searches for a title on BD-ROMs/DVD VIDEOs.
Operating Instructions
Page 33
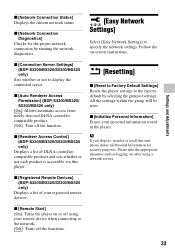
...[Easy Network Settings] Select [Easy Network Settings] to display the connected server. x [Remote Start] [On]: Turns the player on -screen instructions. x [Renderer Access Control] (BDP-S3200/BX320/S5200/BX520 only) Displays a list of DLNA controllercompatible products and sets whether or not each... connection by selecting the group of your registered remote devices. Please take the appropriate measures such as logging out after using your personal information stored in the player. x [Auto Renderer Access Permission] (BDP-S3200/BX320/ S5200/BX520 only) [On]: Allows automatic...
...[Easy Network Settings] Select [Easy Network Settings] to display the connected server. x [Remote Start] [On]: Turns the player on -screen instructions. x [Renderer Access Control] (BDP-S3200/BX320/S5200/BX520 only) Displays a list of DLNA controllercompatible products and sets whether or not each... connection by selecting the group of your registered remote devices. Please take the appropriate measures such as logging out after using your personal information stored in the player. x [Auto Renderer Access Permission] (BDP-S3200/BX320/ S5200/BX520 only) [On]: Allows automatic...
Operating Instructions
Page 34
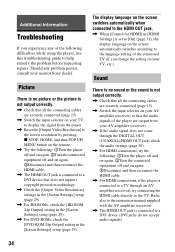
... signal from the player. , Reset the [Output Video Resolution] to the lowest resolution by pressing x STOP, HOME, and then POP UP/ MENU button on the remote. , Try the following difficulties while using the player, use this troubleshooting guide to the HDMI OUT jack. , When [Control for HDMI] in the [Screen Settings... the screen switches automatically when connected to help remedy the problem before requesting repairs. Additional Information Troubleshooting If you change the setting on your nearest Sony dealer.
... signal from the player. , Reset the [Output Video Resolution] to the lowest resolution by pressing x STOP, HOME, and then POP UP/ MENU button on the remote. , Try the following difficulties while using the player, use this troubleshooting guide to the HDMI OUT jack. , When [Control for HDMI] in the [Screen Settings... the screen switches automatically when connected to help remedy the problem before requesting repairs. Additional Information Troubleshooting If you change the setting on your nearest Sony dealer.
Operating Instructions
Page 38
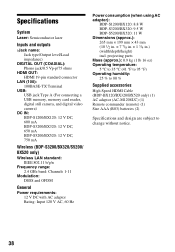
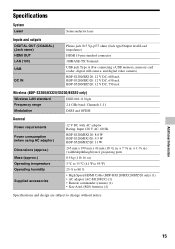
...DSSS and OFDM General Power requirements: 12 V DC with AC adaptor Rating: Input 120 V AC, 60 Hz Power consumption (when using AC adaptor): BDP-S1200/BX120: 8.8 W BDP-S3200/BX320: 9.5 W BDP-S5200/BX520: 11 W Dimensions (approx.): 265 mm × 199 mm × 43 mm (10 1/2 in. × 7 7/8 in. &#... 35 ºC (41 °F to 95 °F) Operating humidity: 25 % to 80 % Supplied accessories High Speed HDMI Cable (BDP-BX120/BX320/BX520 only) (1) AC adaptor (AC-M1208UC) (1) Remote commander (remote) (1) Size AAA (R03) batteries (2) Specifications and design are subject to change without notice. 38
...DSSS and OFDM General Power requirements: 12 V DC with AC adaptor Rating: Input 120 V AC, 60 Hz Power consumption (when using AC adaptor): BDP-S1200/BX120: 8.8 W BDP-S3200/BX320: 9.5 W BDP-S5200/BX520: 11 W Dimensions (approx.): 265 mm × 199 mm × 43 mm (10 1/2 in. × 7 7/8 in. &#... 35 ºC (41 °F to 95 °F) Operating humidity: 25 % to 80 % Supplied accessories High Speed HDMI Cable (BDP-BX120/BX320/BX520 only) (1) AC adaptor (AC-M1208UC) (1) Remote commander (remote) (1) Size AAA (R03) batteries (2) Specifications and design are subject to change without notice. 38
Operating Instructions
Page 43
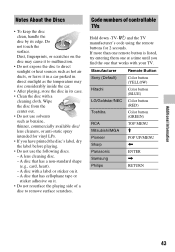
... Do not use solvents such as the temperature may cause it to malfunction. • Do not expose the disc to remove surface scratches. Manufacturer Remote Button Sony (Default) Color button (YELLOW) Hitachi LG/Goldstar/NEC Color button (BLUE) Color button (RED) Toshiba Color button (GREEN) RCA TOP MENU Mitsubishi...it . • Do not resurface the playing side of controllable TVs Hold down -TV- [/1 and the TV manufacturer's code using the remote buttons for vinyl LPs. • If you find the one that has a non-standard shape (e.g., card, heart). - A disc with your TV.
... Do not use solvents such as the temperature may cause it to malfunction. • Do not expose the disc to remove surface scratches. Manufacturer Remote Button Sony (Default) Color button (YELLOW) Hitachi LG/Goldstar/NEC Color button (BLUE) Color button (RED) Toshiba Color button (GREEN) RCA TOP MENU Mitsubishi...it . • Do not resurface the playing side of controllable TVs Hold down -TV- [/1 and the TV manufacturer's code using the remote buttons for vinyl LPs. • If you find the one that has a non-standard shape (e.g., card, heart). - A disc with your TV.
Simple Manual
Page 1
... features, please download the Operating Instructions on the following website: http://www.sony.com/bluraysupport/ 2 WARNING Getting Started 5 Remote 7 Step 1: Connecting the Player 8 Step 2: Preparing for Network Connection ...8 Step 3: Easy Setup Playback 10 Playing a Disc 10 Playing from a USB Device 10 Playing via a Network Internet 12 Browsing Websites 12 Software Update Additional Information 13 Playable discs 13 Playable types of files 15 Specifications BDP-S1200/BDP-BX120/BDP-S3200/BDP-BX320/BDP-S5200/BDP...
... features, please download the Operating Instructions on the following website: http://www.sony.com/bluraysupport/ 2 WARNING Getting Started 5 Remote 7 Step 1: Connecting the Player 8 Step 2: Preparing for Network Connection ...8 Step 3: Easy Setup Playback 10 Playing a Disc 10 Playing from a USB Device 10 Playing via a Network Internet 12 Browsing Websites 12 Software Update Additional Information 13 Playable discs 13 Playable types of files 15 Specifications BDP-S1200/BDP-BX120/BDP-S3200/BDP-BX320/BDP-S5200/BDP...

Simple Manual
Page 5
... buttons (YELLOW/BLUE/RED/ GREEN) Shortcut keys for more than 20 minutes, the player automatically returns to standby mode. Getting Started Getting Started Remote The available functions of the remote are different depending on the screen. RETURN Returns to standby mode. [/1 (on/standby) Turns on the player or... remote is not pressed for interactive functions. z N PLAY, VOL +, and AUDIO buttons have a tactile dot. INPUT Switches between TV and other input sources. -TV- [/1...
... buttons (YELLOW/BLUE/RED/ GREEN) Shortcut keys for more than 20 minutes, the player automatically returns to standby mode. Getting Started Getting Started Remote The available functions of the remote are different depending on the screen. RETURN Returns to standby mode. [/1 (on/standby) Turns on the player or... remote is not pressed for interactive functions. z N PLAY, VOL +, and AUDIO buttons have a tactile dot. INPUT Switches between TV and other input sources. -TV- [/1...
Simple Manual
Page 8
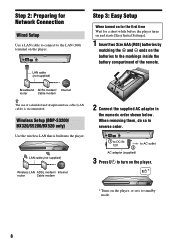
... for the first time Wait for Network Connection Wired Setup Use a LAN cable to connect to the LAN (100) terminal on the player. Wireless Setup (BDP-S3200/ BX320/S5200/BX520 only) Use the wireless LAN that is recommended. LAN cable (not supplied) Wireless LAN ADSL modem/ Internet router Cable modem 2 Connect the... compartment of a shielded and straight interface cable (LAN cable) is built into the player. Broadband ADSL modem/ Internet router Cable modem z The use of the remote.
... for the first time Wait for Network Connection Wired Setup Use a LAN cable to connect to the LAN (100) terminal on the player. Wireless Setup (BDP-S3200/ BX320/S5200/BX520 only) Use the wireless LAN that is recommended. LAN cable (not supplied) Wireless LAN ADSL modem/ Internet router Cable modem 2 Connect the... compartment of a shielded and straight interface cable (LAN cable) is built into the player. Broadband ADSL modem/ Internet router Cable modem z The use of the remote.

Simple Manual
Page 9
This will show the signal from the player on -screen instructions to make the basic settings using Follow the on your TV. Getting Started 4 Turn on the TV and set the input selector on your TV screen. 5 Perform [Easy Initial Settings].
This will show the signal from the player on -screen instructions to make the basic settings using Follow the on your TV. Getting Started 4 Turn on the TV and set the input selector on your TV screen. 5 Perform [Easy Initial Settings].
Simple Manual
Page 10
... [Allow]. 3 Insert a BD-ROM with your 3D-compatible devices using All data stored in the buda folder will be erased. 10 Enjoying Blu-ray 3D (BDP-S5200/ BX520 only) 1 Prepare for 3D] in the [Video] category, and press ENTER. z To delete data in the USB memory, select [Delete BD Data] in...
... [Allow]. 3 Insert a BD-ROM with your 3D-compatible devices using All data stored in the buda folder will be erased. 10 Enjoying Blu-ray 3D (BDP-S5200/ BX520 only) 1 Prepare for 3D] in the [Video] category, and press ENTER. z To delete data in the USB memory, select [Delete BD Data] in...
Simple Manual
Page 11
3 Select an Internet content and a variety of on-demand entertainment using
3 Select an Internet content and a variety of on-demand entertainment using
Simple Manual
Page 15
...adaptor) Dimensions (approx.) Mass (approx.) Operating temperature Operating humidity Supplied accessories 12 V DC with AC adaptor Rating: Input 120 V AC, 60 Hz BDP-S1200/BX120: 8.8 W BDP-S3200/BX320: 9.5 W BDP-S5200/BX520: 11 W 265 mm x 199 mm x 43 mm (10 1/2 in. × 7 7/8 in. × 1 3/4 in.) ...186;C to 35 ºC (41 ºF to 95 ºF) 25 % to 80 % • High Speed HDMI Cable (BDP-BX120/BX320/BX520 only) (1) • AC adaptor (AC-M1208UC) (1) • Remote commander (remote) (1) • Size AAA (R03) batteries (2) Specifications and design are subject to change without notice.
...adaptor) Dimensions (approx.) Mass (approx.) Operating temperature Operating humidity Supplied accessories 12 V DC with AC adaptor Rating: Input 120 V AC, 60 Hz BDP-S1200/BX120: 8.8 W BDP-S3200/BX320: 9.5 W BDP-S5200/BX520: 11 W 265 mm x 199 mm x 43 mm (10 1/2 in. × 7 7/8 in. × 1 3/4 in.) ...186;C to 35 ºC (41 ºF to 95 ºF) 25 % to 80 % • High Speed HDMI Cable (BDP-BX120/BX320/BX520 only) (1) • AC adaptor (AC-M1208UC) (1) • Remote commander (remote) (1) • Size AAA (R03) batteries (2) Specifications and design are subject to change without notice.

Marketing Specifications
Page 4
... output HD (24Hz) (24p True Cinema) HD (60Hz) HD 24Hz to 60Hz conversion HDMI Video Output - 2nd Display (Media Remote) Device Multiple Language Display Convenience Features Software Keyboard 2nd Display (Media Remote) GUI Video Features Noise Reduction Video Features Noise Reduction Video Features Video DVD BD Video Output - DVD R/RW BD R/RE...
... output HD (24Hz) (24p True Cinema) HD (60Hz) HD 24Hz to 60Hz conversion HDMI Video Output - 2nd Display (Media Remote) Device Multiple Language Display Convenience Features Software Keyboard 2nd Display (Media Remote) GUI Video Features Noise Reduction Video Features Noise Reduction Video Features Video DVD BD Video Output - DVD R/RW BD R/RE...

Marketing Specifications
Page 6
... Video Features Weights and Measurements Weights and Measurements Supplied Accessories Power Requirements (frequency) Power Requirements (voltage) PhotoTV HD x.v.Color™ Technology Dimensions (Approx.) Weight (Approx.) Remote Control (RMT-B126A) HDMI Cable Batteries (2 x AAA type) Instruction Manual Warranty Card Customer Registration Card 60Hz 120V Yes Yes 10.44 x 1.70 x 7.84 in (265...
... Video Features Weights and Measurements Weights and Measurements Supplied Accessories Power Requirements (frequency) Power Requirements (voltage) PhotoTV HD x.v.Color™ Technology Dimensions (Approx.) Weight (Approx.) Remote Control (RMT-B126A) HDMI Cable Batteries (2 x AAA type) Instruction Manual Warranty Card Customer Registration Card 60Hz 120V Yes Yes 10.44 x 1.70 x 7.84 in (265...


