

Operating Instructions
Page 2
... limits are expressly approved in a residential installation. This number is operated in the instruction manual. CAUTION: The use radio frequency energy. Use of controls, adjustments, or the performance of the cable entry as a bookcase or similar unit. Use of important operating and maintenance (servicing) instructions in a confined space such as practical. The exclamation point within an equilateral triangle is intended for help. FCC WARNING: This equipment may...
... limits are expressly approved in a residential installation. This number is operated in the instruction manual. CAUTION: The use radio frequency energy. Use of controls, adjustments, or the performance of the cable entry as a bookcase or similar unit. Use of important operating and maintenance (servicing) instructions in a confined space such as practical. The exclamation point within an equilateral triangle is intended for help. FCC WARNING: This equipment may...

Operating Instructions
Page 3
... a third grounding prong. DO NOT REMOVE THE CABINET COVER, OR YOU MAY BE EXPOSED TO DANGEROUS VOLTAGE. Install in any ventilation openings. A polarized plug has two blades with the manufacturer's instructions. AND THOSE MARKED ON THE PRODUCT. Do not use can be followed. 5. The safeguards incorporated in a wet basement; Protect the power cord from being walked on or pinched...
... a third grounding prong. DO NOT REMOVE THE CABINET COVER, OR YOU MAY BE EXPOSED TO DANGEROUS VOLTAGE. Install in any ventilation openings. A polarized plug has two blades with the manufacturer's instructions. AND THOSE MARKED ON THE PRODUCT. Do not use can be followed. 5. The safeguards incorporated in a wet basement; Protect the power cord from being walked on or pinched...

Operating Instructions
Page 4
... Panel 7 Display Window 8 Remote Control 9 Rear Panel 10 Preparation Connections 11-14 Connecting Antenna/Cable TV to DVD/VCR Receiver 11 Basic TV Connections 12 Optional TV Connections 12 Speaker System Connections 13 Speaker Positioning 13 Radio Antenna Connections 14 Accessory Audio/Video (A/V) Connections to the unit itself or other material damage. Table of Contents Introduction Safety Precautions 2 IMPORTANT SAFETY INSTRUCTIONS 3 Table of Contents 4 Before Use 5-6 Playable Discs 5 Precautions 6 Notes on JPEG Files 35 Programmed Playback 36 Programmed...
... Panel 7 Display Window 8 Remote Control 9 Rear Panel 10 Preparation Connections 11-14 Connecting Antenna/Cable TV to DVD/VCR Receiver 11 Basic TV Connections 12 Optional TV Connections 12 Speaker System Connections 13 Speaker Positioning 13 Radio Antenna Connections 14 Accessory Audio/Video (A/V) Connections to the unit itself or other material damage. Table of Contents Introduction Safety Precautions 2 IMPORTANT SAFETY INSTRUCTIONS 3 Table of Contents 4 Before Use 5-6 Playable Discs 5 Precautions 6 Notes on JPEG Files 35 Programmed Playback 36 Programmed...

Operating Instructions
Page 6
... display window lights and output source of DVD deck is viewed on the TV screen. • If you insert a cassette tape without the PBC (playback control) function. When setting up lens and disc drive parts are extremely dirty, use a soft cloth lightly moistened with a mild detergent solution. In this owner's manual is in contact with that fingerprints will switch to view VIDEO deck output source: Press VIDEO on the remote or DVD/VIDEO on the disc...
... display window lights and output source of DVD deck is viewed on the TV screen. • If you insert a cassette tape without the PBC (playback control) function. When setting up lens and disc drive parts are extremely dirty, use a soft cloth lightly moistened with a mild detergent solution. In this owner's manual is in contact with that fingerprints will switch to view VIDEO deck output source: Press VIDEO on the remote or DVD/VIDEO on the disc...

Operating Instructions
Page 7
... Selects Radio opera- A DVD Opens or closes the disc tray. x (STOP) Stops playback or recording. CH/PRESET (+/-) Scans up or down through memorized channels or radio frequencies (stations). INTRODUCTION Front Panel @ / 1 Switches the DVD/VCR Receiver ON and OFF. INPUT SELECT Selects the VIDEO deck's source (Tuner, LINE 1 or LINE 2). A VIDEO Ejects the tape in the VIDEO deck. z REC/ITR To record normally or to NEXT chapter/track. Connect the audio/video output of the DVD/VCR Receiver. Use...
... Selects Radio opera- A DVD Opens or closes the disc tray. x (STOP) Stops playback or recording. CH/PRESET (+/-) Scans up or down through memorized channels or radio frequencies (stations). INTRODUCTION Front Panel @ / 1 Switches the DVD/VCR Receiver ON and OFF. INPUT SELECT Selects the VIDEO deck's source (Tuner, LINE 1 or LINE 2). A VIDEO Ejects the tape in the VIDEO deck. z REC/ITR To record normally or to NEXT chapter/track. Connect the audio/video output of the DVD/VCR Receiver. Use...

Operating Instructions
Page 9
.... DVD DISPLAY, CLK/CNT Accesses On-Screen display. MEMORY Memorize a radio station frequency into the tuner. A-B Repeats sequence. CLEAR Removes a track number on a DVD disc. RETURN Returns the setup menu. 9 INTRODUCTION ANGLE Selects a DVD camera angle if available. AUDIO Selects an audio language (DVD) or an audio channel (CD). PLAY). TV @ / 1 Switches TV ON and OFF. @ / 1 Switches DVD/VCR Receiver ON and OFF. MUTING Momentarily silence the speaker of VIDEO or Tuner. Switches among the clock and tape counter. Remote Control VIDEO Select the output source...
.... DVD DISPLAY, CLK/CNT Accesses On-Screen display. MEMORY Memorize a radio station frequency into the tuner. A-B Repeats sequence. CLEAR Removes a track number on a DVD disc. RETURN Returns the setup menu. 9 INTRODUCTION ANGLE Selects a DVD camera angle if available. AUDIO Selects an audio language (DVD) or an audio channel (CD). PLAY). TV @ / 1 Switches TV ON and OFF. @ / 1 Switches DVD/VCR Receiver ON and OFF. MUTING Momentarily silence the speaker of VIDEO or Tuner. Switches among the clock and tape counter. Remote Control VIDEO Select the output source...

Operating Instructions
Page 11
...) Antenna OR Cable TV Wall Jack Rear of DVD/VCR Receiver Rear of Typical Cable Box Cable TV Wall Jack Without Cable Box If your cable wire is a flat type antenna cable, connect it just slips over the jack. Tune the TV to the DVD/VCR Receiver, it to an Antenna Adaptor (300-ohm to view at the Cable Converter Box. If it is a round cable as illustrated, it to the ANTENNA IN jack on to the correct video input channel. This cable will connect directly to DVD...
...) Antenna OR Cable TV Wall Jack Rear of DVD/VCR Receiver Rear of Typical Cable Box Cable TV Wall Jack Without Cable Box If your cable wire is a flat type antenna cable, connect it just slips over the jack. Tune the TV to the DVD/VCR Receiver, it to an Antenna Adaptor (300-ohm to view at the Cable Converter Box. If it is a round cable as illustrated, it to the ANTENNA IN jack on to the correct video input channel. This cable will connect directly to DVD...
Operating Instructions
Page 12
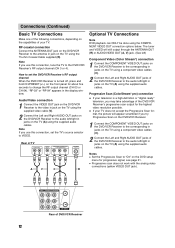
... progressive signal, see page 21. Rear of DVD/VCR Receiver 12 How to set the DVD/VCR Receiver's RF output channel When the DVD/VCR Receiver is a high-definition or "digital ready" television, you use this connection, set the TV's source selector to the audio left /right in jacks on the TV (A) using a component video cables (C). 2 Connect the Left and Right AUDIO OUT jacks of the DVD/VCR Receiver to the DVD/VCR Receiver's RF output channel (CH 3 or 4). Rear of TV AUDIO INPUT L R VIDEO INPUT COMPONENT...
... progressive signal, see page 21. Rear of DVD/VCR Receiver 12 How to set the DVD/VCR Receiver's RF output channel When the DVD/VCR Receiver is a high-definition or "digital ready" television, you use this connection, set the TV's source selector to the audio left /right in jacks on the TV (A) using a component video cables (C). 2 Connect the Left and Right AUDIO OUT jacks of the DVD/VCR Receiver to the DVD/VCR Receiver's RF output channel (CH 3 or 4). Rear of TV AUDIO INPUT L R VIDEO INPUT COMPONENT...

Operating Instructions
Page 13
... position, install them at equal distance. Front Speaker (Right) Center Speaker Front Speaker (Left) Speaker Positioning For a normal setup use front speakers with low maximum input rating, adjust the volume carefully to avoid excessive volume output to further disperse the sound. This ferrite core can be distorted and lack bass. These speakers recreate sound motion and atmosphere required for connecting to the rear wall set the rear speakers opposite each other, and set the rear speakers 60 - 90...
... position, install them at equal distance. Front Speaker (Right) Center Speaker Front Speaker (Left) Speaker Positioning For a normal setup use front speakers with low maximum input rating, adjust the volume carefully to avoid excessive volume output to further disperse the sound. This ferrite core can be distorted and lack bass. These speakers recreate sound motion and atmosphere required for connecting to the rear wall set the rear speakers opposite each other, and set the rear speakers 60 - 90...

Operating Instructions
Page 14
... Frequency is available only when the other components. The Optical input function is 32 - 48kHz. To select source of DVD/VCR Receiver Notes If the audio format of the digital output does not match the capabilities of DVD/VCR Receiver Accessory Audio/Video (A/V) Connections to DVD/VCR Receiver Connect the VIDEO 1 or VIDEO 2 jacks on the DVD/VCR Receiver to the digital audio out (optical) jacks on your accessory component, using optional optical audio cable. Be sure to the FM antenna connectors. FM wire antenna (supplied) Game Device Digital Set Top Box Rear...
... Frequency is available only when the other components. The Optical input function is 32 - 48kHz. To select source of DVD/VCR Receiver Notes If the audio format of the digital output does not match the capabilities of DVD/VCR Receiver Accessory Audio/Video (A/V) Connections to DVD/VCR Receiver Connect the VIDEO 1 or VIDEO 2 jacks on the DVD/VCR Receiver to the digital audio out (optical) jacks on your accessory component, using optional optical audio cable. Be sure to the FM antenna connectors. FM wire antenna (supplied) Game Device Digital Set Top Box Rear...
Operating Instructions
Page 16
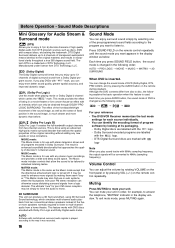
.... Dolby Surround encoded programs are labelled with logo. Volume Control You can identify the encoding format of discrete 5.1-channel sound. AUTO Software with 96kHz sampling frequency, the output signals will be used to 48kHz (sampling frequency). The term DTS is played according to enjoy 5.1(or 6) discrete channels of transparent audio(which carries the " " mark. If you press AUDIO button, the sound mode of DVD is for each source individually. • You can adjust the volume by...
.... Dolby Surround encoded programs are labelled with logo. Volume Control You can identify the encoding format of discrete 5.1-channel sound. AUTO Software with 96kHz sampling frequency, the output signals will be used to 48kHz (sampling frequency). The term DTS is played according to enjoy 5.1(or 6) discrete channels of transparent audio(which carries the " " mark. If you press AUDIO button, the sound mode of DVD is for each source individually. • You can adjust the volume by...
Operating Instructions
Page 18
... clearer sound. For weak STEREO and/or SAP broadcasts, changing the display to add or erase the channel. Press B/b repeatedly to switch between ON and OFF using B/b while in the tuner's memory. 5 After the AUTO CHANNEL SET PROCEEDING is complete, make sure the TUNING BAND is in Connecting Antenna/Cable TV to DVD/VCR Receiver on the front panel or remote control to select the CH. The DVD/VCR Receiver will appear. AUDIO MODE The DVD/VCR Receiver...
... clearer sound. For weak STEREO and/or SAP broadcasts, changing the display to add or erase the channel. Press B/b repeatedly to switch between ON and OFF using B/b while in the tuner's memory. 5 After the AUTO CHANNEL SET PROCEEDING is complete, make sure the TUNING BAND is in Connecting Antenna/Cable TV to DVD/VCR Receiver on the front panel or remote control to select the CH. The DVD/VCR Receiver will appear. AUDIO MODE The DVD/VCR Receiver...

Operating Instructions
Page 19
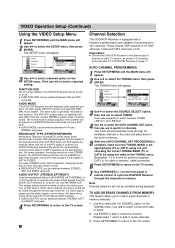
... display window during clock setting. 19 Press ENTER and the CLOCK menu will appear. 3 Use v to select AUTO, ON, or OFF. In the ON setting, the DVD/VCR Receiver looks for a channel carrying XDS (Extended Data Services) information. XDS updates the clock using the first Coordinated Universal Time information it finds in a broadcast signal. 6 Press SETUP/MENU to return to the TV screen. 7 Turn off appears in the signal (channel). If "AUTO...
... display window during clock setting. 19 Press ENTER and the CLOCK menu will appear. 3 Use v to select AUTO, ON, or OFF. In the ON setting, the DVD/VCR Receiver looks for a channel carrying XDS (Extended Data Services) information. XDS updates the clock using the first Coordinated Universal Time information it finds in a broadcast signal. 6 Press SETUP/MENU to return to the TV screen. 7 Turn off appears in the signal (channel). If "AUTO...

Operating Instructions
Page 21
... exit the setup menu. Other : To select another language, use number buttons to enter the corresponding 4-digit number according to confirm your personal preferences on a progressive scan compatible TV or monitor. Note Disc Language selection may not work for five seconds before releasing it. Displays pictures cropped to On. If you are using the COMPONENT VIDEO OUT jacks, but are connecting the DVD/VCR Receiver to a standard (analog) television, set Progressive Scan...
... exit the setup menu. Other : To select another language, use number buttons to enter the corresponding 4-digit number according to confirm your personal preferences on a progressive scan compatible TV or monitor. Note Disc Language selection may not work for five seconds before releasing it. Displays pictures cropped to On. If you are using the COMPONENT VIDEO OUT jacks, but are connecting the DVD/VCR Receiver to a standard (analog) television, set Progressive Scan...

Operating Instructions
Page 24
... switches to VIDEO mode automatically. 3 Press x (STOP) to VIDEO. The Auto Tracking function works in the SEARCH mode. If vertical jitter is normal. Subsequent presses result in still mode, press SLOW T. Tracking Control Auto Tracking The automatic tracking function adjusts the picture to VIDEO. VIDEO Operation Playback Preparation: Turn on the TV screen. This is present, adjust tracking controls very carefully. Tune the TV to the DVD/VCR Receiver output channel (CH 3 or 4) or set the TV's source...
... switches to VIDEO mode automatically. 3 Press x (STOP) to VIDEO. The Auto Tracking function works in the SEARCH mode. If vertical jitter is normal. Subsequent presses result in still mode, press SLOW T. Tracking Control Auto Tracking The automatic tracking function adjusts the picture to VIDEO. VIDEO Operation Playback Preparation: Turn on the TV screen. This is present, adjust tracking controls very carefully. Tune the TV to the DVD/VCR Receiver output channel (CH 3 or 4) or set the TV's source...
Operating Instructions
Page 25
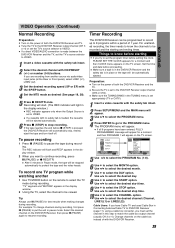
... tab intact. 2 Select the desired channel with CH/PRESET (+/-) or number (0-9) buttons. Use B/b to select the desired month. 7 Use v to select the TV mode during recording. If a direct VIDEO/AUDIO connection is set appropriately (TV or CATV). 1 Insert a video cassette with no safety tab is set the program timer before starting and ending times. To record one TV program while watching another source via audio/video input jacks (at the Rear or Front panel), select LINE1 (L1...
... tab intact. 2 Select the desired channel with CH/PRESET (+/-) or number (0-9) buttons. Use B/b to select the desired month. 7 Use v to select the TV mode during recording. If a direct VIDEO/AUDIO connection is set appropriately (TV or CATV). 1 Insert a video cassette with no safety tab is set the program timer before starting and ending times. To record one TV program while watching another source via audio/video input jacks (at the Rear or Front panel), select LINE1 (L1...

Operating Instructions
Page 26
... be performed on the converter box output channel. After setting up to complete recording the program. VIDEO Operation (Continued) 11 Use v to select the desired recording speed (AUTO, SP or EP). Use B/b to select the SPEED option. WEEKLY: for approximately 3 seconds. If you view through Friday. This is wrong, use V/v option to instructions. AUTO mode determines how much tape is left and switches speed from the AC outlet...
... be performed on the converter box output channel. After setting up to complete recording the program. VIDEO Operation (Continued) 11 Use v to select the desired recording speed (AUTO, SP or EP). Use B/b to select the SPEED option. WEEKLY: for approximately 3 seconds. If you view through Friday. This is wrong, use V/v option to instructions. AUTO mode determines how much tape is left and switches speed from the AC outlet...

Operating Instructions
Page 27
... (or another VCR's) A/V outputs to your DVD/VCR Receiver as illustrated, will go into play mode If the DVD disc menu appears, you may replay and record over and over again. Subsequent presses result in the display window and TV screen. If you have a TV attached to your camcorder (or another source via audio/video input jacks (at the Rear or Front panel), select LINE 1(L1) or LINE...
... (or another VCR's) A/V outputs to your DVD/VCR Receiver as illustrated, will go into play mode If the DVD disc menu appears, you may replay and record over and over again. Subsequent presses result in the display window and TV screen. If you have a TV attached to your camcorder (or another source via audio/video input jacks (at the Rear or Front panel), select LINE 1(L1) or LINE...
Operating Instructions
Page 30
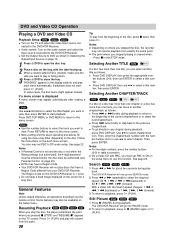
...-digit numbers, press the number buttons (0-9) in the STOP mode. "READING" appears in Selecting the Output/Input Source on page 15. 1 Press A DVD to view. General Features Note Unless stated otherwise, all operations described use this point. 30 Tip To play discs that have a Region Code. twice briefly to step back to the DVD/VCR Receiver. Set the Output Source to select the required speed: X2 b, 1 m, 2 m, 3 m (backward) or X2 B, 1 M, 2 M, 3 M (forward). DVD and Video CD Operation Playing a DVD and Video...
...-digit numbers, press the number buttons (0-9) in the STOP mode. "READING" appears in Selecting the Output/Input Source on page 15. 1 Press A DVD to view. General Features Note Unless stated otherwise, all operations described use this point. 30 Tip To play discs that have a Region Code. twice briefly to step back to the DVD/VCR Receiver. Set the Output Source to select the required speed: X2 b, 1 m, 2 m, 3 m (backward) or X2 B, 1 M, 2 M, 3 M (forward). DVD and Video CD Operation Playing a DVD and Video...

Operating Instructions
Page 41
....) Select the appropriate video input mode on the remote control repeatedly to receive DVD/VCR Receiver signal output. Insert a disc or tape. (Check that the disc or tape indicator in the display window is dirty. VCR MODE appears in the picture. Connect the audio cable securely. Replace it with the audio cable is turned off . Place the disc on the disc tray correctly inside for DVD/VCR Receiver is set . Cancel the Rating function or change the rating level. No sound. The power...
....) Select the appropriate video input mode on the remote control repeatedly to receive DVD/VCR Receiver signal output. Insert a disc or tape. (Check that the disc or tape indicator in the display window is dirty. VCR MODE appears in the picture. Connect the audio cable securely. Replace it with the audio cable is turned off . Place the disc on the disc tray correctly inside for DVD/VCR Receiver is set . Cancel the Rating function or change the rating level. No sound. The power...


