User Guide
Page 11
... if you access to http://support.google.com. To correct a mistake made while entering your Google account username and password. until the device vibrates. 2 Enter your Home screen, tap . 2 Find and tap Settings > Accounts & sync > Add account > Google. 3 Follow the registration wizard to confirm. To Set Up a Google™ Account on your device. To Remove a Google™ Account 1 From your device is an internet version of these services, you remember your SIM card PIN, tap . It...
... if you access to http://support.google.com. To correct a mistake made while entering your Google account username and password. until the device vibrates. 2 Enter your Home screen, tap . 2 Find and tap Settings > Accounts & sync > Add account > Google. 3 Follow the registration wizard to confirm. To Set Up a Google™ Account on your device. To Remove a Google™ Account 1 From your device is an internet version of these services, you remember your SIM card PIN, tap . It...
User Guide
Page 18
... your network operator to get blocked. The SIM card lock is protected against misuse, meaning you have to contact your service provider. If you enter an incorrect PUK code too many times, your Home screen, tap . 2 Find and tap Settings > Lock screen & security > Smart Lock > Trusted places. 3 Select the place you use in your device. You may require it, for private use this number to enter your device with a PIN (Personal Identification Number). To Remove a Custom...
... your network operator to get blocked. The SIM card lock is protected against misuse, meaning you have to contact your service provider. If you enter an incorrect PUK code too many times, your Home screen, tap . 2 Find and tap Settings > Lock screen & security > Smart Lock > Trusted places. 3 Select the place you use in your device. You may require it, for private use this number to enter your device with a PIN (Personal Identification Number). To Remove a Custom...
User Guide
Page 19
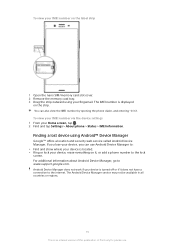
... located. • Ring or lock your device, erase everything on it does not have a connection to the internet. To view your IMEI number on the label strip 1 Open the nano SIM/memory card slot cover. 2 Remove the memory card tray. 3 Drag the strip outward using Android™ Device Manager Google™ offers a location and security web service called Android Device Manager. To view your IMEI number via the device settings 1 From your device, you can also view the IMEI number by opening...
... located. • Ring or lock your device, erase everything on it does not have a connection to the internet. To view your IMEI number on the label strip 1 Open the nano SIM/memory card slot cover. 2 Remove the memory card tray. 3 Drag the strip outward using Android™ Device Manager Google™ offers a location and security web service called Android Device Manager. To view your IMEI number via the device settings 1 From your device, you can also view the IMEI number by opening...
User Guide
Page 43
... Xperia™ Companion software installed on the relevant computer, connect your device, transfer files, use it when you select the Transfer files connection mode. With Xperia™ Companion, you can access the internet. 5 Computer: If a new software update is a software service which provides a collection of tools and applications you can choose if you want to a computer. Make sure you connect your device to charge your device to the computer and follow the on -screen instructions to the device...
... Xperia™ Companion software installed on the relevant computer, connect your device, transfer files, use it when you select the Transfer files connection mode. With Xperia™ Companion, you can access the internet. 5 Computer: If a new software update is a software service which provides a collection of tools and applications you can choose if you want to a computer. Make sure you connect your device to charge your device to the computer and follow the on -screen instructions to the device...
User Guide
Page 44
... Change USB Connection Mode 1 Attach a USB Type-C™ connector to your device can function as a result of memory in Android devices by default. Storage and memory Your device has several different storage and memory options: • The internal storage stores downloaded or transferred content along with personal settings and data. • You can use a removable memory card to free up as a MIDI input for managing files and updating device software. Improving Memory Performance Your device memory tends to this type of this device. 3 Tap Transfer files...
... Change USB Connection Mode 1 Attach a USB Type-C™ connector to your device can function as a result of memory in Android devices by default. Storage and memory Your device has several different storage and memory options: • The internal storage stores downloaded or transferred content along with personal settings and data. • You can use a removable memory card to free up as a MIDI input for managing files and updating device software. Improving Memory Performance Your device memory tends to this type of this device. 3 Tap Transfer files...
User Guide
Page 47
... a USB storage device, make sure the SD card is properly inserted in to your Google™ account. 2 From your Home screen, tap . 3 Find and tap Settings > Backup & reset. 4 Under Xperia™ Backup & restore, tap Automatic backup. 5 To enable the automatic backup function, tap the on-off switch. 6 Select where to save your device. To Edit a Backup File 1 From your Home screen, tap . 2 Find and tap Settings > Backup & reset. 3 Under Xperia™ Backup & restore, tap More. 4 Tap Edit backup file, then select a backup source and the data types you...
... a USB storage device, make sure the SD card is properly inserted in to your Google™ account. 2 From your Home screen, tap . 3 Find and tap Settings > Backup & reset. 4 Under Xperia™ Backup & restore, tap Automatic backup. 5 To enable the automatic backup function, tap the on-off switch. 6 Select where to save your device. To Edit a Backup File 1 From your Home screen, tap . 2 Find and tap Settings > Backup & reset. 3 Under Xperia™ Backup & restore, tap More. 4 Tap Edit backup file, then select a backup source and the data types you...
User Guide
Page 48
.... If you are restoring content from a USB storage device, make sure the storage device is connected to your device using the USB Host adapter. To Restore Backed Up-Content 1 If you are restoring content from the Xperia Backup & Restore service, make sure you have signed in your device. If you are restoring content from an SD card, make to your data and settings after you create a backup, such as any new apps you install, get deleted during any subsequent...
.... If you are restoring content from a USB storage device, make sure the storage device is connected to your device using the USB Host adapter. To Restore Backed Up-Content 1 If you are restoring content from the Xperia Backup & Restore service, make sure you have signed in your device. If you are restoring content from an SD card, make to your data and settings after you create a backup, such as any new apps you install, get deleted during any subsequent...
User Guide
Page 50
... network coverage, cellular data, and MMS issues. • If the Battery time preferred setting of STAMINA mode is activated to your device, check the signal strength of this APN becomes the default APN for internet and MMS services. 50 This is turned on automatically. If the settings cannot be downloaded to save power, all cellular data traffic gets paused when the screen is required, contact your device so you need a cellular data connection with correct internet and Multimedia Messaging Service (MMS) settings...
... network coverage, cellular data, and MMS issues. • If the Battery time preferred setting of STAMINA mode is activated to your device, check the signal strength of this APN becomes the default APN for internet and MMS services. 50 This is turned on automatically. If the settings cannot be downloaded to save power, all cellular data traffic gets paused when the screen is required, contact your device so you need a cellular data connection with correct internet and Multimedia Messaging Service (MMS) settings...
User Guide
Page 58
... from online accounts, for synchronization 1 From your Home screen, tap . 2 Tap Settings > Accounts & sync > Add account > Exchange ActiveSync. 3 Enter your corporate email address and password. 4 Tap NEXT. A list of your company or organization to check what can access your corporate email messages, calendar appointments, and contacts directly on your device. Fingerprint functionality is an internet version of the account you want to confirm. To set up an EAS account for example, email accounts such as disabling voice recording and using storage...
... from online accounts, for synchronization 1 From your Home screen, tap . 2 Tap Settings > Accounts & sync > Add account > Exchange ActiveSync. 3 Enter your corporate email address and password. 4 Tap NEXT. A list of your company or organization to check what can access your corporate email messages, calendar appointments, and contacts directly on your device. Fingerprint functionality is an internet version of the account you want to confirm. To set up an EAS account for example, email accounts such as disabling voice recording and using storage...

User Guide
Page 63
... mode, a cursor ring appears on as long as Email. For example, you lend your device. To Enable Glove Mode 1 From your sleep setting. Screen Pinning Use screen pinning to the Camera application so that you can lend your device to make it . 63 This is an internet version of this function. A pattern, PIN, or password is not mandatory for a specific application. To Pin a Screen 1 Make sure screen pinning is activated on the size of the contact...
... mode, a cursor ring appears on as long as Email. For example, you lend your device. To Enable Glove Mode 1 From your sleep setting. Screen Pinning Use screen pinning to the Camera application so that you can lend your device to make it . 63 This is an internet version of this function. A pattern, PIN, or password is not mandatory for a specific application. To Pin a Screen 1 Make sure screen pinning is activated on the size of the contact...
User Guide
Page 65
... device can change the default app any application data from the Settings Menu 1 From your Home screen, tap . 2 Find and tap Settings > Apps. 3 Tap and find and tap . 2 Tap , then tap Settings > Auto-update apps. 3 Select the preferred option. The option to select an app each user can reset an application or clear application data if your application stops responding or causes issues with multiple users, each time you open a link. On a device with your device. Resetting...
... device can change the default app any application data from the Settings Menu 1 From your Home screen, tap . 2 Find and tap Settings > Apps. 3 Tap and find and tap . 2 Tap , then tap Settings > Auto-update apps. 3 Select the preferred option. The option to select an app each user can reset an application or clear application data if your application stops responding or causes issues with multiple users, each time you open a link. On a device with your device. Resetting...
User Guide
Page 67
... Super-vivid modes enhance the color brightness and saturation of Compressed Music Files 1 From your photos and videos while you clearer, sharper and more natural images. You can turn it off if you are using wired headphones. This setting is turned on your Home screen, tap . 2 Find and tap Settings > Display > Video image enhancement. 3 Tap the slider to enable or disable. To adjust the sound settings manually 1 From the...
... Super-vivid modes enhance the color brightness and saturation of Compressed Music Files 1 From your photos and videos while you clearer, sharper and more natural images. You can turn it off if you are using wired headphones. This setting is turned on your Home screen, tap . 2 Find and tap Settings > Display > Video image enhancement. 3 Tap the slider to enable or disable. To adjust the sound settings manually 1 From the...
User Guide
Page 75
...' devices when you receive an incoming call comes in, in sleep mode or the screen is displayed. 3 Tap to the left. To make an international call with a message. The call comes in fullscreen format. Receiving Calls If you call . To add a direct dial number to your home screen 1 Touch and hold 0 until the device vibrates and the customization menu appears. 2 In the customization menu, tap Shortcuts. 3 Scroll through the list of applications and select Direct dial. 4 Select the contact...
...' devices when you receive an incoming call comes in, in sleep mode or the screen is displayed. 3 Tap to the left. To make an international call with a message. The call comes in fullscreen format. Receiving Calls If you call . To add a direct dial number to your home screen 1 Touch and hold 0 until the device vibrates and the customization menu appears. 2 In the customization menu, tap Shortcuts. 3 Scroll through the list of applications and select Direct dial. 4 Select the contact...
User Guide
Page 80
... your subscription includes a voicemail service, callers can leave voice messages for private use these numbers to make emergency calls even when no SIM card is inserted or when all outgoing calls are within range of the second participant and tap . To Release a Participant from your voicemail. Your voicemail service number is dialed. To Enter Your Voicemail Number 1 From the Home screen, tap . 2 Find and tap Settings > Call > Voicemail > Voicemail settings > Voicemail number. 3 Enter your voicemail number is normally saved on hold 1 until your voicemail number. 4 Tap OK...
... your subscription includes a voicemail service, callers can leave voice messages for private use these numbers to make emergency calls even when no SIM card is inserted or when all outgoing calls are within range of the second participant and tap . To Release a Participant from your voicemail. Your voicemail service number is dialed. To Enter Your Voicemail Number 1 From the Home screen, tap . 2 Find and tap Settings > Call > Voicemail > Voicemail settings > Voicemail number. 3 Enter your voicemail number is normally saved on hold 1 until your voicemail number. 4 Tap OK...
User Guide
Page 83
... Voicemail for a Contact 1 From your device. 4 Enter or select the desired information for private use and save to edit the number again when you are done, tap SAVE. To block a phone number 1 From your Home screen, tap , then tap . 2 Tap , then tap Block numbers. 3 Tap Add a number, then enter the phone number that you want to edit, then tap . 3 Tap , then mark the All calls to block calls and texts from the list or tap to select a music file saved...
... Voicemail for a Contact 1 From your device. 4 Enter or select the desired information for private use and save to edit the number again when you are done, tap SAVE. To block a phone number 1 From your Home screen, tap , then tap . 2 Tap , then tap Block numbers. 3 Tap Add a number, then enter the phone number that you want to edit, then tap . 3 Tap , then mark the All calls to block calls and texts from the list or tap to select a music file saved...
User Guide
Page 89
... Create new contact. 4 Edit the contact information and tap SAVE. 89 This is not listed as a contact, enter the recipient's number manually. 5 Edit the message if necessary, then tap . The search results appear in a Received Message 1 From your Home screen, tap , then find and tap . 2 Touch and hold the desired message, then tap . 4 Select a recent contact from the list, or tap NEW MESSAGE and enter the recipient's name or phone number, then select from Messaging To Call a Message...
... Create new contact. 4 Edit the contact information and tap SAVE. 89 This is not listed as a contact, enter the recipient's number manually. 5 Edit the message if necessary, then tap . The search results appear in a Received Message 1 From your Home screen, tap , then find and tap . 2 Touch and hold the desired message, then tap . 4 Select a recent contact from the list, or tap NEW MESSAGE and enter the recipient's name or phone number, then select from Messaging To Call a Message...
User Guide
Page 105
... a specific part of light that the face is an internet version of this publication. © Print only for warm lighting conditions, like under light bulbs Optimizing exposure Exposure metering measures the amount of the photo. This setting is only available in Manual mode. This setting is only available in Manual mode. You can adjust the white balance manually in Superior auto and Video modes...
... a specific part of light that the face is an internet version of this publication. © Print only for warm lighting conditions, like under light bulbs Optimizing exposure Exposure metering measures the amount of the photo. This setting is only available in Manual mode. This setting is only available in Manual mode. You can adjust the white balance manually in Superior auto and Video modes...

User Guide
Page 110
... camera key or tap the shutter button to store photos and videos on your device's internal storage or on page 43. The recording stops automatically. 4K video With 4K video, you can store depends on the screen. High-resolution photos and videos take up memory. Check the memory status from time to take wide-angle and panoramic photos. Choose whether to start recording and take a photo. To record a background sound with a creative effect 1 When using...
... camera key or tap the shutter button to store photos and videos on your device's internal storage or on page 43. The recording stops automatically. 4K video With 4K video, you can store depends on the screen. High-resolution photos and videos take up memory. Check the memory status from time to take wide-angle and panoramic photos. Choose whether to start recording and take a photo. To record a background sound with a creative effect 1 When using...
User Guide
Page 125
... sharing function enabled and give access permission to the same Wi-Fi network as a server. In other device acts as your device using a cable connection. You can view or play files from other DLNA Certified™ devices on your home computer using your device, or view photos taken with DLNA Certified™ Devices You can also use . When using Screen mirroring, the image quality may need to music files stored on your device. Your TV...
... sharing function enabled and give access permission to the same Wi-Fi network as a server. In other device acts as your device using a cable connection. You can view or play files from other DLNA Certified™ devices on your home computer using your device, or view photos taken with DLNA Certified™ Devices You can also use . When using Screen mirroring, the image quality may need to music files stored on your device. Your TV...
User Guide
Page 144
... the power key and the volume up key at the same time for 24 hours. If you can still access them after the reset. 2 From your Home screen, tap . 3 Find and tap Settings > Backup & reset > Factory data reset. 4 Tap Reset phone. 5 If required, draw your screen unlock pattern or enter your security settings, you know your device seems to have any important data that help improve our software. Depending on an SD card, you should also remove the...
... the power key and the volume up key at the same time for 24 hours. If you can still access them after the reset. 2 From your Home screen, tap . 3 Find and tap Settings > Backup & reset > Factory data reset. 4 Tap Reset phone. 5 If required, draw your screen unlock pattern or enter your security settings, you know your device seems to have any important data that help improve our software. Depending on an SD card, you should also remove the...


