Extended User Guide
Page 2
...Getting started 5 User guide in the phone 5 Assembly 5 Turning the phone on and off 6 Connect and communicate 6 Getting to know your phone 8 Phone overview 8 Notification LED 8 Sensors 9 Charging the battery 9 Using the touch screen 10 Using the hardware keys 12 Entering text 12 Status bar 13 Notification panel 15 Applications screen 15 Recently used applications window 17 Phone settings overview 17 SIM card 19 Memory 19 Network settings 20 Using other networks 20 Advanced network settings 21 Home screen 22 Calling 24 Emergency calls 24 Call handling 24 Voicemail 25...
...Getting started 5 User guide in the phone 5 Assembly 5 Turning the phone on and off 6 Connect and communicate 6 Getting to know your phone 8 Phone overview 8 Notification LED 8 Sensors 9 Charging the battery 9 Using the touch screen 10 Using the hardware keys 12 Entering text 12 Status bar 13 Notification panel 15 Applications screen 15 Recently used applications window 17 Phone settings overview 17 SIM card 19 Memory 19 Network settings 20 Using other networks 20 Advanced network settings 21 Home screen 22 Calling 24 Emergency calls 24 Call handling 24 Voicemail 25...
Extended User Guide
Page 5
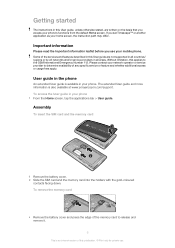
... use your phone. Assembly To insert the SIM card and the memory card 1 Remove the battery cover. 2 Slide the SIM card and the memory card into the holders with the gold-coloured contacts facing down. Please contact your home screen, the instruction path may differ. If you set Timescape™ or another application as your network operator or service provider to determine availability of the memory card to the GSM International Emergency Number 112. To remove...
... use your phone. Assembly To insert the SIM card and the memory card 1 Remove the battery cover. 2 Slide the SIM card and the memory card into the holders with the gold-coloured contacts facing down. Please contact your home screen, the instruction path may differ. If you set Timescape™ or another application as your network operator or service provider to determine availability of the memory card to the GSM International Emergency Number 112. To remove...

Extended User Guide
Page 6
... change any of this publication. © Print only for calling, messaging and the Internet will need a 2G/3G mobile data connection. To turn on the phone 1 Press and hold until the options menu opens. 2 In the options menu, tap Power off the phone 1 Press and hold down the key on and off The first time you can also send emails and access the Internet by your phone. You can access the Internet wirelessly with your network...
... change any of this publication. © Print only for calling, messaging and the Internet will need a 2G/3G mobile data connection. To turn on the phone 1 Press and hold until the options menu opens. 2 In the options menu, tap Power off the phone 1 Press and hold down the key on and off The first time you can also send emails and access the Internet by your phone. You can access the Internet wirelessly with your network...
Extended User Guide
Page 7
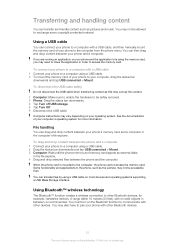
... make a complete reset of the phone, see Resetting the phone on page 45 for private use. See Google™ sync on page 90. 1 From the Home screen, tap the applications bar. 2 Tap Settings > Applications > Manage applications. 3 Scroll down and tap Google Mail™ . 4 Tap Clear data. 5 Press . 6 Scroll down and tap Google Apps. 7 Tap Clear data. Synchronising and handling content You can synchronise and transfer many web based services, for online services...
... make a complete reset of the phone, see Resetting the phone on page 45 for private use. See Google™ sync on page 90. 1 From the Home screen, tap the applications bar. 2 Tap Settings > Applications > Manage applications. 3 Scroll down and tap Google Mail™ . 4 Tap Clear data. 5 Press . 6 Scroll down and tap Google Apps. 7 Tap Clear data. Synchronising and handling content You can synchronise and transfer many web based services, for online services...

Extended User Guide
Page 12
... Home screen, tap the applications bar. 2 Tap Settings > Locale & text > Standard keyboard. 3 Set the options you start a program or select a field that requires text or numbers, the keyboard appears. Activate upper case letter input Activate lower case letter input Delete characters Insert symbols Switch to numbers Insert a space Using the keyboard When you want to the previous screen • Close the onscreen keyboard, a dialog box, an options menu, or the Notifications panel Entering text Keyboard overview This is an Internet...
... Home screen, tap the applications bar. 2 Tap Settings > Locale & text > Standard keyboard. 3 Set the options you start a program or select a field that requires text or numbers, the keyboard appears. Activate upper case letter input Activate lower case letter input Delete characters Insert symbols Switch to numbers Insert a space Using the keyboard When you want to the previous screen • Close the onscreen keyboard, a dialog box, an options menu, or the Notifications panel Entering text Keyboard overview This is an Internet...
Extended User Guide
Page 16
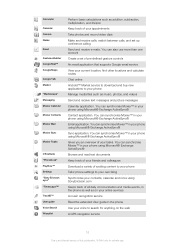
... Calendar Camera Dialler Email Gestures Builder Google Mail™ Google Maps Google Talk Market "Mediascape" Messaging Moxier Calendar Moxier Contacts Moxier Mail Moxier Sync Moxier Tasks OfficeSuite "Phonebook" PlayNow™ Settings "Sony Ericsson sync" "Timescape™" TrackID™ User guide Voice Search Wisepilot Perform basic calculations such as on your online services A music recognition service Read the extended User guide in the phone Use your voice to search for anything on the web A GPS navigation service...
... Calendar Camera Dialler Email Gestures Builder Google Mail™ Google Maps Google Talk Market "Mediascape" Messaging Moxier Calendar Moxier Contacts Moxier Mail Moxier Sync Moxier Tasks OfficeSuite "Phonebook" PlayNow™ Settings "Sony Ericsson sync" "Timescape™" TrackID™ User guide Voice Search Wisepilot Perform basic calculations such as on your online services A music recognition service Read the extended User guide in the phone Use your voice to search for anything on the web A GPS navigation service...

Extended User Guide
Page 17
... phone settings • Wireless controls • DRM settings • Call settings • Sound & display • Data synchronisation • "Online service accounts" • Location • Security • Applications • SD card & phone storage • Date & time • Locale & text • Accessibility • Speech synthesis • About phone Time and date You can view and access recently used applications window • From any application, press and hold down . You can set the time 1 From the Home screen, tap the applications bar. 2 Tap Settings > Date & time...
... phone settings • Wireless controls • DRM settings • Call settings • Sound & display • Data synchronisation • "Online service accounts" • Location • Security • Applications • SD card & phone storage • Date & time • Locale & text • Accessibility • Speech synthesis • About phone Time and date You can view and access recently used applications window • From any application, press and hold down . You can set the time 1 From the Home screen, tap the applications bar. 2 Tap Settings > Date & time...

Extended User Guide
Page 19
..., contacts and messages are made by the phone. SIM card The SIM (Subscriber Identity Module) card, which you remove it starts with emergency number digits, for private use in the phone memory and on Airplane mode 1 From the Home screen, tap the applications bar. 2 Tap Settings > Wireless controls. 3 Mark the Airplane mode check box. To adjust the idle time before you get from your phone. To change the phone language 1 From the Home screen, tap the applications bar. 2 Tap Settings > Locale & text...
..., contacts and messages are made by the phone. SIM card The SIM (Subscriber Identity Module) card, which you remove it starts with emergency number digits, for private use in the phone memory and on Airplane mode 1 From the Home screen, tap the applications bar. 2 Tap Settings > Wireless controls. 3 Mark the Airplane mode check box. To adjust the idle time before you get from your phone. To change the phone language 1 From the Home screen, tap the applications bar. 2 Tap Settings > Locale & text...
Extended User Guide
Page 20
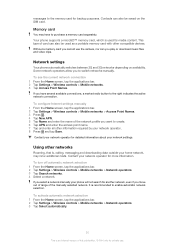
... for backup purposes. Using other compatible devices. Your phone supports a microSD™ memory card, which is recommended to enable automatic network selection. To see the current network connection 1 From the Home screen, tap the applications bar. 2 Tap Settings > Wireless controls > Mobile networks. 3 Tap Access Point Names. It is used as a portable memory card with other networks Roaming, that is an Internet version of the network profile you play or download music files and video clips. messages to the memory card for more information. Without a memory card...
... for backup purposes. Using other compatible devices. Your phone supports a microSD™ memory card, which is recommended to enable automatic network selection. To see the current network connection 1 From the Home screen, tap the applications bar. 2 Tap Settings > Wireless controls > Mobile networks. 3 Tap Access Point Names. It is used as a portable memory card with other networks Roaming, that is an Internet version of the network profile you play or download music files and video clips. messages to the memory card for more information. Without a memory card...

Extended User Guide
Page 28
...", you open "Phonebook", a setup wizard starts. To view your contacts • From the Home screen, tap the applications bar, then tap "Phonebook". • From the Home screen, tap Dialer > Contacts The first time you can view your SIM card or memory card. You can set up your personal contacts, for the contact. 5 When you can enter all communication with an online service, and you get quick access to a Facebook and a Twitter account. When you view a contact, you can add a contact picture...
...", you open "Phonebook", a setup wizard starts. To view your contacts • From the Home screen, tap the applications bar, then tap "Phonebook". • From the Home screen, tap Dialer > Contacts The first time you can view your SIM card or memory card. You can set up your personal contacts, for the contact. 5 When you can enter all communication with an online service, and you get quick access to a Facebook and a Twitter account. When you view a contact, you can add a contact picture...

Extended User Guide
Page 30
... of your contacts. This is replaced. A list of the screen: "Info" Contact phone numbers and addresses Call log Call history for backing up your Twitter or Facebook contacts appears. 6 Select the contact you want to transfer the contact information to copy, or tap "Mark all". 4 Tap "Back up contacts" > "SIM card". 3 Mark the contacts you want to link to the phone contact. 7 Tap Save to the contact. "Twitter" All Twitter status updates for the contact. To...
... of your contacts. This is replaced. A list of the screen: "Info" Contact phone numbers and addresses Call log Call history for backing up your Twitter or Facebook contacts appears. 6 Select the contact you want to transfer the contact information to copy, or tap "Mark all". 4 Tap "Back up contacts" > "SIM card". 3 Mark the contacts you want to link to the phone contact. 7 Tap Save to the contact. "Twitter" All Twitter status updates for the contact. To...
Extended User Guide
Page 32
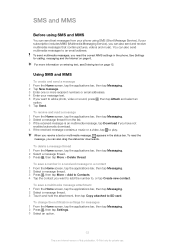
... message, tap Download if you receive a text or multimedia message, appears in the phone. To send multimedia messages, you want to play. To save a number in a received message to a contact 1 From the Home screen, tap the applications bar, then tap Messaging. 2 Select a message thread. 3 Press , then tap More > Add to SD card. SMS and MMS Before using SMS (Short Message Service). To delete a message thread 1 From the Home screen, tap the applications bar, then tap Messaging. 2 Select a message thread. 3 Press , then tap More > Delete thread. Using SMS...
... message, tap Download if you receive a text or multimedia message, appears in the phone. To send multimedia messages, you want to play. To save a number in a received message to a contact 1 From the Home screen, tap the applications bar, then tap Messaging. 2 Select a message thread. 3 Press , then tap More > Add to SD card. SMS and MMS Before using SMS (Short Message Service). To delete a message thread 1 From the Home screen, tap the applications bar, then tap Messaging. 2 Select a message thread. 3 Press , then tap More > Delete thread. Using SMS...
Extended User Guide
Page 34
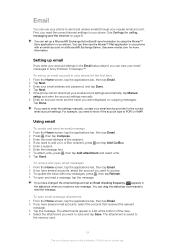
... Internet settings in your phone with new messages, press , then tap Refresh. 4 To open email messages 1 From the Home screen, tap the applications bar, then tap Email. 2 If you want to access. 3 To update the inbox with an email account on a Microsoft® Exchange Server. You can then use the Moxier™ Mail application in your regular email account. See www.moxier.com for private use your email account settings automatically, tap Manual setup and enter the account settings manually. 6 Enter an account...
... Internet settings in your phone with new messages, press , then tap Refresh. 4 To open email messages 1 From the Home screen, tap the applications bar, then tap Email. 2 If you want to access. 3 To update the inbox with an email account on a Microsoft® Exchange Server. You can then use the Moxier™ Mail application in your regular email account. See www.moxier.com for private use your email account settings automatically, tap Manual setup and enter the account settings manually. 6 Enter an account...

Extended User Guide
Page 35
... delete an email message 1 From the Home screen, tap the applications bar, then tap Email. 2 If you want to use this account for all . 5 Enter text and tap Send. To open Google Mail™ • From the Home screen, tap the applications bar, then tap Google Mail™ . 35 This is an Internet version of this account by default.. Tap Done. See Social web services on outgoing messages. To remove the quoted text or attachment, tap . 5 Enter...
... delete an email message 1 From the Home screen, tap the applications bar, then tap Email. 2 If you want to use this account for all . 5 Enter text and tap Send. To open Google Mail™ • From the Home screen, tap the applications bar, then tap Google Mail™ . 35 This is an Internet version of this account by default.. Tap Done. See Social web services on outgoing messages. To remove the quoted text or attachment, tap . 5 Enter...
Extended User Guide
Page 53
... your phone's memory card and a computer in the computer's file explorer. You can transfer files by using a USB cable on your phone to other Bluetooth devices. 53 This is using a USB cable. 2 Drag the status bar downwards and tap USB connected > Mount. 3 Computer: Wait until the phone memory and memory card appear as pictures and music. You may not be safely removed. 2 Phone: Drag the status bar downwards. 3 Tap Turn off USB storage. 4 Tap Turn Off. 5 Disconnect the USB cable...
... your phone's memory card and a computer in the computer's file explorer. You can transfer files by using a USB cable on your phone to other Bluetooth devices. 53 This is using a USB cable. 2 Drag the status bar downwards and tap USB connected > Mount. 3 Computer: Wait until the phone memory and memory card appear as pictures and music. You may not be safely removed. 2 Phone: Drag the status bar downwards. 3 Tap Turn off USB storage. 4 Tap Turn Off. 5 Disconnect the USB cable...

Extended User Guide
Page 77
... view on widescreen displays "Scenes" Use Scenes to long exposure time, the camera must be held still or placed on the face closest to give slightly softer skin tones "Landscape" Use for indoor photos in poorly lit environments. Due to quickly set up the camera for private use. Due to long exposure time, the camera must be used . Focus is set "Macro" Auto focus for all scene types...
... view on widescreen displays "Scenes" Use Scenes to long exposure time, the camera must be held still or placed on the face closest to give slightly softer skin tones "Landscape" Use for indoor photos in poorly lit environments. Due to quickly set up the camera for private use. Due to long exposure time, the camera must be used . Focus is set "Macro" Auto focus for all scene types...

Extended User Guide
Page 80
... the Picasa™ application "Scenes" Use Scenes to quickly set "Advanced settings", press to return to fit the selected scene, ensuring the best possible video "Normal" The camera automatically adjusts settings for a video "Portrait" Use for common situations using pre-programmed scenes. The video is an Internet version of the three settings icons for sending in Sony Ericsson Mediascape. You can also view recorded videos in the "Video roll" category in multimedia messages.
... the Picasa™ application "Scenes" Use Scenes to quickly set "Advanced settings", press to return to fit the selected scene, ensuring the best possible video "Normal" The camera automatically adjusts settings for a video "Portrait" Use for common situations using pre-programmed scenes. The video is an Internet version of the three settings icons for sending in Sony Ericsson Mediascape. You can also view recorded videos in the "Video roll" category in multimedia messages.
Extended User Guide
Page 90
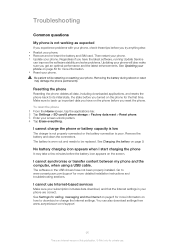
... the first time. The battery is poor. To reset the phone 1 From the Home screen, tap the applications bar. 2 Tap Settings > SD card & phone storage > Factory data reset > Reset phone. 3 Enter your phone. I cannot use . Troubleshooting Common questions My phone is an Internet version of this publication. © Print only for more detailed installation instructions and troubleshooting sections. Be patient while restarting or resetting your screen unlock pattern. 4 Tap Erase everything. No battery charging icon appears when I cannot synchronise or transfer content between...
... the first time. The battery is poor. To reset the phone 1 From the Home screen, tap the applications bar. 2 Tap Settings > SD card & phone storage > Factory data reset > Reset phone. 3 Enter your phone. I cannot use . Troubleshooting Common questions My phone is an Internet version of this publication. © Print only for more detailed installation instructions and troubleshooting sections. Be patient while restarting or resetting your screen unlock pattern. 4 Tap Erase everything. No battery charging icon appears when I cannot synchronise or transfer content between...
Extended User Guide
Page 93
... answering service 25 applications 15, 52 applications bar 15 B back up contacts 30 messages 33 battery 9 Bluetooth 53 brightness 19 business card send 29 C calendar 43 calling using the face tag 68 calls 24 accept 27 add participants to 26 anonymous 27 caller ID 27 conference 26 diverting 26 emergency 24 forwarding 26 list 25 log 25 missed 25 more than one 25 multiparty 26 multiple 25 notification sound...
... answering service 25 applications 15, 52 applications bar 15 B back up contacts 30 messages 33 battery 9 Bluetooth 53 brightness 19 business card send 29 C calendar 43 calling using the face tag 68 calls 24 accept 27 add participants to 26 anonymous 27 caller ID 27 conference 26 diverting 26 emergency 24 forwarding 26 list 25 log 25 missed 25 more than one 25 multiparty 26 multiple 25 notification sound...
Extended User Guide
Page 95
... 88 screen orientation 19 searching music 62 music using TrackID™ technology 63 track information 63 sending 67 business card 29 settings 17 video camera 80 call 26 camera 76, 80 email account 35 Internet 6 messaging 6 still camera 76 Timescape 40 Wi-Fi 6 sharing music 61 photos 67 shuffle music 62 silent mode 18 SIM 88 SIM card copying contacts to 30 inserting 5 slideshow 66 adjusting settings 66 smile detection 76 SMS 32 social networking services 36 song setting as ringtone 62 Sony Ericsson sync...
... 88 screen orientation 19 searching music 62 music using TrackID™ technology 63 track information 63 sending 67 business card 29 settings 17 video camera 80 call 26 camera 76, 80 email account 35 Internet 6 messaging 6 still camera 76 Timescape 40 Wi-Fi 6 sharing music 61 photos 67 shuffle music 62 silent mode 18 SIM 88 SIM card copying contacts to 30 inserting 5 slideshow 66 adjusting settings 66 smile detection 76 SMS 32 social networking services 36 song setting as ringtone 62 Sony Ericsson sync...


