
User Guide
Page 1
... Entering text 15 Calling 16 Making and receiving calls 16 Contacts 18 Speed dial 21 More calling features 21 Cyber-shot 25 Using the camera 25 More camera features 27 Viewing and tagging photos............28 Working with photos 29 Sending content to a Web site.........30 Printing photos 31 Music 32 Stereo portable...
... Entering text 15 Calling 16 Making and receiving calls 16 Contacts 18 Speed dial 21 More calling features 21 Cyber-shot 25 Using the camera 25 More camera features 27 Viewing and tagging photos............28 Working with photos 29 Sending content to a Web site.........30 Printing photos 31 Music 32 Stereo portable...

User Guide
Page 9
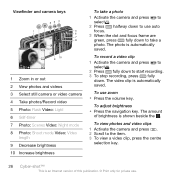
Phone overview 1 Ear speaker 2 Screen 3 Selection keys 4 Call key 5 Activity menu key 6 Navigation key 7 Keylock key 8 Volume, digital zoom keys 9 Camera view key 10 Camera mode key 11 End, On/off key 12 Camera key 13 C key (Clear) 14 Silent key 1 2 8 3 4 9 5 10 6 11 12 7 13 14 Getting started 9 This is an Internet version of this publication. © Print only for private use.
Phone overview 1 Ear speaker 2 Screen 3 Selection keys 4 Call key 5 Activity menu key 6 Navigation key 7 Keylock key 8 Volume, digital zoom keys 9 Camera view key 10 Camera mode key 11 End, On/off key 12 Camera key 13 C key (Clear) 14 Silent key 1 2 8 3 4 9 5 10 6 11 12 7 13 14 Getting started 9 This is an Internet version of this publication. © Print only for private use.

User Guide
Page 10
15 Flash 18 16 Camera lens 17 Retractable lens cover 15 18 Memory card slot (under the cover) 16 19 Connector for charger, handsfree and USB cable 17 20 Loudspeaker 21 Strap holder 19 20 21 10 Getting started This is an Internet version of this publication. © Print only for private use.
15 Flash 18 16 Camera lens 17 Retractable lens cover 15 18 Memory card slot (under the cover) 16 19 Connector for charger, handsfree and USB cable 17 20 Loudspeaker 21 Strap holder 19 20 21 10 Getting started This is an Internet version of this publication. © Print only for private use.

User Guide
Page 18
... options • During the call • Press or . Contacts You can synchronise your camera. You can save them to on your contacts show all the information saved in the phone memory or on your contacts using the Sony Ericsson PC Suite. Default contacts You can view information about recent calls. The other person...
... options • During the call • Press or . Contacts You can synchronise your camera. You can save them to on your contacts show all the information saved in the phone memory or on your contacts using the Sony Ericsson PC Suite. Default contacts You can view information about recent calls. The other person...

User Guide
Page 25
... have been talking. Cyber-shot™ You can also check on the duration of this publication. © Print only for private use. Using the camera To activate the camera • Open the retractable lens cover. 2 Select an option. 3 Select Activate. 4 Enter your phone number 1 Select Menu > Settings > Calls > Show/ hide my no...
... have been talking. Cyber-shot™ You can also check on the duration of this publication. © Print only for private use. Using the camera To activate the camera • Open the retractable lens cover. 2 Select an option. 3 Select Activate. 4 Enter your phone number 1 Select Menu > Settings > Calls > Show/ hide my no...
User Guide
Page 26
... Increase brightness To take a photo. The video clip is an Internet version of brightness is automatically saved. To view photos and video clips 1 Activate the camera and press . 2 Scroll to use zoom • Press the volume key. The photo is shown beside the . To record a video clip 1 Activate the... camera and press to select . 2 Press fully down to start recording. 3 To stop recording, press fully down to the item. 3 To view a video clip, press the ...
... Increase brightness To take a photo. The video clip is an Internet version of brightness is automatically saved. To view photos and video clips 1 Activate the camera and press . 2 Scroll to use zoom • Press the volume key. The photo is shown beside the . To record a video clip 1 Activate the... camera and press to select . 2 Press fully down to start recording. 3 To stop recording, press fully down to the item. 3 To view a video clip, press the ...
User Guide
Page 27
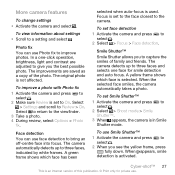
... takes a photo. Cyber-shot™ 27 This is in Smile Shutter mode. The original photo is activated. The camera detects up to select . 2 When you the best possible photo. Select to return to three faces and selects one -click operation, brightness, light and contrast ... publication. © Print only for smile detection and auto focus. The improvements are adjusted to improve photos. To improve a photo with Photo fix 1 Activate the camera and press to select . 2 Make sure Review is set to the face closest to capture the smiles of family and friends. To set face detection...
... takes a photo. Cyber-shot™ 27 This is in Smile Shutter mode. The original photo is activated. The camera detects up to select . 2 When you the best possible photo. Select to return to three faces and selects one -click operation, brightness, light and contrast ... publication. © Print only for smile detection and auto focus. The improvements are adjusted to improve photos. To improve a photo with Photo fix 1 Activate the camera and press to select . 2 Make sure Review is set to the face closest to capture the smiles of family and friends. To set face detection...

User Guide
Page 28
...Internet settings in your vacation photos. 28 Cyber-shot™ This is detected, press fully down again. To change the geo tagging setting 1 Activate the camera and press to a photo and select View. 4 Select Options > View on a map, you can take a series of photos with in Media. ...the best photo and select Save. For example, you can download Internet settings using the setup wizard or from www.sonyericsson.com/support. 3 The camera automatically takes the photo when the subject smiles. 4 To take a photo although no smile is an Internet version of this publication. © Print...
...Internet settings in your vacation photos. 28 Cyber-shot™ This is detected, press fully down again. To change the geo tagging setting 1 Activate the camera and press to a photo and select View. 4 Select Options > View on a map, you can take a series of photos with in Media. ...the best photo and select Save. For example, you can download Internet settings using the setup wizard or from www.sonyericsson.com/support. 3 The camera automatically takes the photo when the subject smiles. 4 To take a photo although no smile is an Internet version of this publication. © Print...
User Guide
Page 29
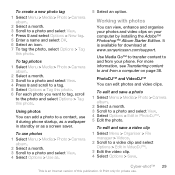
...installing the Adobe™ Photoshop™ Album Starter Edition. Using photos You can add a photo to a contact, use photos 1 Select Menu > Media > Photo > Camera album. 2 Select a month. 3 Scroll to a photo and select View. 4 Select Options > Use as a screen saver. To use it during phone startup, as... a wallpaper in PhotoDJ™. 5 Edit the photo. To edit and save a photo 1 Select Menu > Media > Photo > Camera album. 2 Select a month. 3 Scroll to a photo and select View. 4 Select Options > Edit in standby or as . 5 Select an option. It is an...
...installing the Adobe™ Photoshop™ Album Starter Edition. Using photos You can add a photo to a contact, use photos 1 Select Menu > Media > Photo > Camera album. 2 Select a month. 3 Scroll to a photo and select View. 4 Select Options > Use as a screen saver. To use it during phone startup, as... a wallpaper in PhotoDJ™. 5 Edit the photo. To edit and save a photo 1 Select Menu > Media > Photo > Camera album. 2 Select a month. 3 Scroll to a photo and select View. 4 Select Options > Edit in standby or as . 5 Select an option. It is an...

User Guide
Page 30
... clip 1 Select Menu > Organiser > File manager > Videos. 2 Scroll to a video clip and select Options > Edit in your phone to a Web site 1 Select Menu > Media > Photo > Camera album. 2 Select a month. 3 Scroll to a photo and select View. 4 Select Options > Send > To Web site. 5 Select a Web site from the list or select New Web...
... clip 1 Select Menu > Organiser > File manager > Videos. 2 Scroll to a video clip and select Options > Edit in your phone to a Web site 1 Select Menu > Media > Photo > Camera album. 2 Select a month. 3 Scroll to a photo and select View. 4 Select Options > Send > To Web site. 5 Select a Web site from the list or select New Web...
User Guide
Page 31
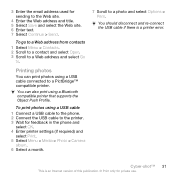
.... 3 Enter the email address used for feedback in the phone and select OK. 4 Enter printer settings (if required) and select Print. 5 Select Menu > Media > Photo > Camera album. 6 Select a month. 7 Scroll to a photo and select Options > Print. You can print photos using a USB cable 1 Connect a USB cable to the phone. 2 Connect the...
.... 3 Enter the email address used for feedback in the phone and select OK. 4 Enter printer settings (if required) and select Print. 5 Select Menu > Media > Photo > Camera album. 6 Select a month. 7 Scroll to a photo and select Options > Print. You can print photos using a USB cable 1 Connect a USB cable to the phone. 2 Connect the...
User Guide
Page 65
... and rejecting 17 emergency 17 handling two calls 23 international 16 making and receiving 16 putting on hold 22 recording 36 video 18 camera 25 overview 26 printing 31 camera shortcuts 26 code memo 63 conference calls 23 contacts adding phone contacts 19 default contacts 18 groups 21 Smart search 19 costs...
... and rejecting 17 emergency 17 handling two calls 23 international 16 making and receiving 16 putting on hold 22 recording 36 video 18 camera 25 overview 26 printing 31 camera shortcuts 26 code memo 63 conference calls 23 contacts adding phone contacts 19 default contacts 18 groups 21 Smart search 19 costs...


