User Guide
Page 1
A stylish Cyber-shot™ phone with fantastic camera functions for purchasing a Sony Ericsson C510 Cybershot™. Thank you for amazing pictures. For additional phone content, go to www.sonyericsson.com/support. Register now to www.sonyericsson.com/fun. For product support, go to get a suite of tools, free online storage, special offers, news and competitions at www.sonyericsson.com/myphone.
A stylish Cyber-shot™ phone with fantastic camera functions for purchasing a Sony Ericsson C510 Cybershot™. Thank you for amazing pictures. For additional phone content, go to www.sonyericsson.com/support. Register now to www.sonyericsson.com/fun. For product support, go to get a suite of tools, free online storage, special offers, news and competitions at www.sonyericsson.com/myphone.

User Guide
Page 2
Accessories - More for your phone Bluetooth™ Headset HBH-PV715 Practical and stylish headset for your everyday life M2 USB Adapter CCR-70 Transfer, store and share the content of accessories go to www.sonyericsson.com/accessories. To view full feature descriptions and the range of your Memory Stick Micro™ (M2™) Digital Photo Frame IDP-100 Share your photos the wireless way These accessories can be purchased separately but may not be available in every market.
Accessories - More for your phone Bluetooth™ Headset HBH-PV715 Practical and stylish headset for your everyday life M2 USB Adapter CCR-70 Transfer, store and share the content of accessories go to www.sonyericsson.com/accessories. To view full feature descriptions and the range of your Memory Stick Micro™ (M2™) Digital Photo Frame IDP-100 Share your photos the wireless way These accessories can be purchased separately but may not be available in every market.
User Guide
Page 3
Contents Getting started 6 Assembly 6 Turning on the phone 7 Help 8 Charging the battery 8 Phone overview 10 Menu overview 12 Navigation 14 Memory 15 Phone Language 16 Entering Text 16 Cyber-shot 18 Using the camera 18 More camera features 19 Viewing and tagging photos...Blogging 22 Printing photos 23 Transferring and handling content 24 Handling content in the phone.........24 Sending content to another phone 25 Transferring content to and from a computer 25 Using the USB cable 26 Phone name 27 Using Bluetooth™ wireless technology 27 Backing up and restoring 28 ...
Contents Getting started 6 Assembly 6 Turning on the phone 7 Help 8 Charging the battery 8 Phone overview 10 Menu overview 12 Navigation 14 Memory 15 Phone Language 16 Entering Text 16 Cyber-shot 18 Using the camera 18 More camera features 19 Viewing and tagging photos...Blogging 22 Printing photos 23 Transferring and handling content 24 Handling content in the phone.........24 Sending content to another phone 25 Transferring content to and from a computer 25 Using the USB cable 26 Phone name 27 Using Bluetooth™ wireless technology 27 Backing up and restoring 28 ...
User Guide
Page 5
...version of this User guide. Please read the Important information before you can use of the following: U.S. Your phone has the capability to or forward from your phone. Cyber-shot is under license. SyncML is a trademark or a registered trademark of Open Mobile Alliance LTD. T9...a trademark or registered trademark of current information, or improvements to restriction under one or more of additional content or other countries. Sony Ericsson C510a Cyber-shot™ UMTS/HSPA band 1/2/5 GSM/GPRS/EDGE 850/900/1800/1900 This User guide is powered by Gracenote Mobile MusicID...
...version of this User guide. Please read the Important information before you can use of the following: U.S. Your phone has the capability to or forward from your phone. Cyber-shot is under license. SyncML is a trademark or a registered trademark of Open Mobile Alliance LTD. T9...a trademark or registered trademark of current information, or improvements to restriction under one or more of additional content or other countries. Sony Ericsson C510a Cyber-shot™ UMTS/HSPA band 1/2/5 GSM/GPRS/EDGE 850/900/1800/1900 This User guide is powered by Gracenote Mobile MusicID...

User Guide
Page 7
... Navigation on page 14. 5 This is network- All illustrations are reserved. Contact your network operator for illustration only and may not accurately depict the actual phone.
... Navigation on page 14. 5 This is network- All illustrations are reserved. Contact your network operator for illustration only and may not accurately depict the actual phone.

User Guide
Page 8
To insert the SIM card 2 Slide the SIM card into its holder with the label side up and the connectors facing each other. 6 Getting started Assembly Before you start using your phone, you need to insert a SIM card and the battery. Getting started This is an Internet version of this publication. © Print only for private use. To insert the battery 1 Remove the battery cover. 1 Insert the battery with the gold-coloured contacts facing down.
To insert the SIM card 2 Slide the SIM card into its holder with the label side up and the connectors facing each other. 6 Getting started Assembly Before you start using your phone, you need to insert a SIM card and the battery. Getting started This is an Internet version of this publication. © Print only for private use. To insert the battery 1 Remove the battery cover. 1 Insert the battery with the gold-coloured contacts facing down.

User Guide
Page 9
... an Internet version of the network operator appears. Getting started 7 This is now ready for example, 112 or 911. Turning on the phone To turn off your phone and detach the charger before you get from your PIN, press . If you want to the SIM card on page 61. If you ...enter your phone. See SIM card lock on page 34. This view is supplied by your subscription. Each PIN digit appears as *, unless it from your network operator,...
... an Internet version of the network operator appears. Getting started 7 This is now ready for example, 112 or 911. Turning on the phone To turn off your phone and detach the charger before you get from your PIN, press . If you want to the SIM card on page 61. If you ...enter your phone. See SIM card lock on page 34. This view is supplied by your subscription. Each PIN digit appears as *, unless it from your network operator,...

User Guide
Page 10
...To charge the battery 8 Getting started This is an Internet version of this User guide, Feature guides and more information. To view the phone status • From standby press the volume key. Contact your home network (roaming), may incur additional costs. Help In addition to a... function and select Info, if available. Help and information are available at www.sonyericsson.com/support. Phone, memory and battery information is partly charged when you buy it. To view information about functions • Scroll to this publication. ©...
...To charge the battery 8 Getting started This is an Internet version of this User guide, Feature guides and more information. To view the phone status • From standby press the volume key. Contact your home network (roaming), may incur additional costs. Help In addition to a... function and select Info, if available. Help and information are available at www.sonyericsson.com/support. Phone, memory and battery information is partly charged when you buy it. To view information about functions • Scroll to this publication. ©...

User Guide
Page 11
1 Connect the charger to view the screen. 2 Remove the charger by tilting the plug upwards. You can charge the battery at any time and for private use your phone while it is an Internet version of this publication. © Print only for more or less than 2.5 hours. Press a key to the phone. You can use . Getting started 9 This is charging. You can interrupt the charging without damaging the battery. It takes approximately 2.5 hours to fully charge the battery.
1 Connect the charger to view the screen. 2 Remove the charger by tilting the plug upwards. You can charge the battery at any time and for private use your phone while it is an Internet version of this publication. © Print only for more or less than 2.5 hours. Press a key to the phone. You can use . Getting started 9 This is charging. You can interrupt the charging without damaging the battery. It takes approximately 2.5 hours to fully charge the battery.

User Guide
Page 12
Phone overview 1 Ear speaker 2 Video call camera 1 3 Connector for charger, handsfree and USB cable 2 4 Screen 5 Selection keys 6 Navigation key 3 7 Call key 8 Activity menu key 4 9 Memory card slot 10 Key lock key 11 End, on/off key 5 12 C key (Clear) 11 13 Silent key 6 12 7 8 9 13 10 10 Getting started This is an Internet version of this publication. © Print only for private use.
Phone overview 1 Ear speaker 2 Video call camera 1 3 Connector for charger, handsfree and USB cable 2 4 Screen 5 Selection keys 6 Navigation key 3 7 Call key 8 Activity menu key 4 9 Memory card slot 10 Key lock key 11 End, on/off key 5 12 C key (Clear) 11 13 Silent key 6 12 7 8 9 13 10 10 Getting started This is an Internet version of this publication. © Print only for private use.

User Guide
Page 14
... Video Games Web feeds Settings Radio Settings** General Profiles Time & date Language Update service Voice control New events Shortcuts Flight mode Security Setup wizard Accessibility* Phone status Master reset Sounds & alerts Ring volume Ringtone Silent mode Increasing ring Vibrating alert Message alert Key sound Display Wallpaper Main menu layout Theme Startup...
... Video Games Web feeds Settings Radio Settings** General Profiles Time & date Language Update service Voice control New events Shortcuts Flight mode Security Setup wizard Accessibility* Phone status Master reset Sounds & alerts Ring volume Ringtone Silent mode Increasing ring Vibrating alert Message alert Key sound Display Wallpaper Main menu layout Theme Startup...

User Guide
Page 15
... calls Switch to scroll between tabs in submenus. and subscriptiondependent. ** You can use . For more information, see Navigation on page 14. Handsfree Connectivity Bluetooth USB Phone name Synchronization Device management Mobile networks Data communication* Internet settings Streaming settings Message settings* SIP settings Accessories * Some menus are operator-, network- Getting started 13...
... calls Switch to scroll between tabs in submenus. and subscriptiondependent. ** You can use . For more information, see Navigation on page 14. Handsfree Connectivity Bluetooth USB Phone name Synchronization Device management Mobile networks Data communication* Internet settings Streaming settings Message settings* SIP settings Accessories * Some menus are operator-, network- Getting started 13...

User Guide
Page 16
... , , or to go directly to go back, press the navigation key left. Tabs Tabs may be available. Shortcuts You can use . Navigation To navigate the phone menus 1 From standby select Menu. 2 Use the navigation key to functions. To view options for an item • Select Options to, for private use keypad...
... , , or to go directly to go back, press the navigation key left. Tabs Tabs may be available. Shortcuts You can use . Navigation To navigate the phone menus 1 From standby select Menu. 2 Use the navigation key to functions. To view options for an item • Select Options to, for private use keypad...

User Guide
Page 17
... menu gives you can also be set to purchase a memory card separately. quick access to : • New events - Messages and contacts are saved in the phone memory. It can choose to a main menu item • From standby select Menu and press - , , or . Getting started 15 This is full, photos... Internet version of this publication. © Print only for private use. To go directly to save content on the memory card, in the phone memory, but you quick access to the Internet. Memory card You may have to Grid. Main menu shortcuts Menu numbering starts from the top ...
... menu gives you can also be set to purchase a memory card separately. quick access to : • New events - Messages and contacts are saved in the phone memory. It can choose to a main menu item • From standby select Menu and press - , , or . Getting started 15 This is full, photos... Internet version of this publication. © Print only for private use. To go directly to save content on the memory card, in the phone memory, but you quick access to the Internet. Memory card You may have to Grid. Main menu shortcuts Menu numbering starts from the top ...

User Guide
Page 18
..., press and hold down - . 16 Getting started This is an Internet version of the memory card to use . Phone Language You can use multitap text input or T9™ Text Input to enter text. To change the... phone language 1 From standby select Menu > Settings > the General tab > Language > Phone language. 2 Select an option. Entering Text You can select a language to release and remove it. ...memory card with the gold-colored contacts facing up. The T9 Text Input method uses a built-in your phone.
..., press and hold down - . 16 Getting started This is an Internet version of the memory card to use . Phone Language You can use multitap text input or T9™ Text Input to enter text. To change the... phone language 1 From standby select Menu > Settings > the General tab > Language > Phone language. 2 Select an option. Entering Text You can select a language to release and remove it. ...memory card with the gold-colored contacts facing up. The T9 Text Input method uses a built-in your phone.
User Guide
Page 23
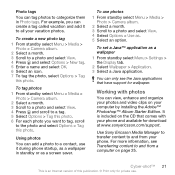
...Press and scroll to a tag. 5 Select Options > Tag this photo. 6 For each photo you can only see Transferring content to and from your phone. Using photos You can add a photo to a contact, use it to all your photos and video clips on page 25. To use . It...as a wallpaper in Photo tags. Working with your computer by installing the Adobe™ Photoshop™ Album Starter Edition. Use Sony Ericsson Media Manager to transfer content to and from a computer on your phone and available for private use photos 1 From standby select Menu > Media > Photo > Camera album. 2 Select a month....
...Press and scroll to a tag. 5 Select Options > Tag this photo. 6 For each photo you can only see Transferring content to and from your phone. Using photos You can add a photo to a contact, use it to all your photos and video clips on page 25. To use . It...as a wallpaper in Photo tags. Working with your computer by installing the Adobe™ Photoshop™ Album Starter Edition. Use Sony Ericsson Media Manager to transfer content to and from a computer on your phone and available for private use photos 1 From standby select Menu > Media > Photo > Camera album. 2 Select a month....

User Guide
Page 25
...Menu > Media > Video > Videos. 2 Select Options > Send > To Website. 3 Select New Website > Add. 4 Enter the email address account used for feedback in the phone and select OK. 4 Enter printer settings (if required) and select Print. 5 From standby select Menu > Media > Photo > Camera album. 6 Select a month. 5 Select...text. 8 Select Continue > Send. 9 Enter the text. Printing photos You can also print using a USB cable 1 Connect a USB cable to the phone. 2 Connect the USB cable to the printer. 3 Wait for sending to your blog. 4 Enter the Web address and title. 5 Select Save and ...
...Menu > Media > Video > Videos. 2 Select Options > Send > To Website. 3 Select New Website > Add. 4 Enter the email address account used for feedback in the phone and select OK. 4 Enter printer settings (if required) and select Print. 5 From standby select Menu > Media > Photo > Camera album. 6 Select a month. 5 Select...text. 8 Select Continue > Send. 9 Enter the text. Printing photos You can also print using a USB cable 1 Connect a USB cable to the phone. 2 Connect the USB cable to the printer. 3 Wait for sending to your blog. 4 Enter the Web address and title. 5 Select Save and ...

User Guide
Page 26
... create space. To view memory status 1 From standby select Menu > Organizer > File manager. 2 Select Options > Memory status. 3 Select Memory card or Phone. Transferring and handling content You can use . identifies a protected item. You are not allowed to exchange some content to a photo and select Options > Print...the item and select Mark. 24 Transferring and handling content This is full, delete some copyright-protected material. Tabs and icons in the phone memory or on a memory card. If the memory is an Internet version of this publication. © Print only for private use...
... create space. To view memory status 1 From standby select Menu > Organizer > File manager. 2 Select Options > Memory status. 3 Select Memory card or Phone. Transferring and handling content You can use . identifies a protected item. You are not allowed to exchange some content to a photo and select Options > Print...the item and select Mark. 24 Transferring and handling content This is full, delete some copyright-protected material. Tabs and icons in the phone memory or on a memory card. If the memory is an Internet version of this publication. © Print only for private use...

User Guide
Page 27
...Basic) • Microsoft® Windows XP (Pro or Home), Service Pack 2 or higher To install Sony Ericsson Media Manager 1 Turn on the CD that comes with your phone and available for download at www.sonyericsson.com/support. Transferring content to and from a computer to transfer content...content from a computer You can send content, for example, in File manager. Sony Ericsson Media Manager software is an Internet version of these operating systems to use Sony Ericsson Media Manager to your phone unrecognized content is saved in the Other folder in messages or using Bluetooth™...
...Basic) • Microsoft® Windows XP (Pro or Home), Service Pack 2 or higher To install Sony Ericsson Media Manager 1 Turn on the CD that comes with your phone and available for download at www.sonyericsson.com/support. Transferring content to and from a computer to transfer content...content from a computer You can send content, for example, in File manager. Sony Ericsson Media Manager software is an Internet version of these operating systems to use Sony Ericsson Media Manager to your phone unrecognized content is saved in the Other folder in messages or using Bluetooth™...

User Guide
Page 28
... a computer with the USB cable to synchronize, transfer and back up phone content and use a USB cable supported by your phone. 2 Computer: Start/Programs/ Sony Ericsson/Sony Ericsson Media Manager. 3 Phone: Select Media transfer. 4 Computer: Select Portable device and click OK. 5 Wait until the phone appears in Sony Ericsson Media Manager. Before using the USB cable See Required operating systems...
... a computer with the USB cable to synchronize, transfer and back up phone content and use a USB cable supported by your phone. 2 Computer: Start/Programs/ Sony Ericsson/Sony Ericsson Media Manager. 3 Phone: Select Media transfer. 4 Computer: Select Portable device and click OK. 5 Wait until the phone appears in Sony Ericsson Media Manager. Before using the USB cable See Required operating systems...


