
Instruction Manual and Troubleshooting Guide
Page 2
...and before cleaning, removing covers or when making any adjustment in the needle area, such as described in this household sewing machine. e Important Safety Instructions This household sewing machine is not working properly, if it has been dropped or damaged, or dropped into any opening. • Do... designed to comply with the foot control is damaged, it must be followed, including the following: Read all moving parts. Return the sewing machine to break. • Do not use as threading needle, changing needle, threading bobbin, changing presser foot, etc. • Never ...
...and before cleaning, removing covers or when making any adjustment in the needle area, such as described in this household sewing machine. e Important Safety Instructions This household sewing machine is not working properly, if it has been dropped or damaged, or dropped into any opening. • Do... designed to comply with the foot control is damaged, it must be followed, including the following: Read all moving parts. Return the sewing machine to break. • Do not use as threading needle, changing needle, threading bobbin, changing presser foot, etc. • Never ...

Instruction Manual and Troubleshooting Guide
Page 3
...be performed by an authorized service representative. The noise level under normal operating conditions is less than 70db. FOR OUTSIDE EUROPE: This sewing machine is less than 70db. Important Safety Instructions a FOR EUROPE ONLY: This appliance can be used by children aged from 8 years... sensory or mental capabilities or lack of experience and knowledge if they have been given supervision or instruction concerning use of the sewing machine by a person responsible for their safety. Children should be done only by qualified service personnel. Replacement parts for a double-...
...be performed by an authorized service representative. The noise level under normal operating conditions is less than 70db. FOR OUTSIDE EUROPE: This sewing machine is less than 70db. Important Safety Instructions a FOR EUROPE ONLY: This appliance can be used by children aged from 8 years... sensory or mental capabilities or lack of experience and knowledge if they have been given supervision or instruction concerning use of the sewing machine by a person responsible for their safety. Children should be done only by qualified service personnel. Replacement parts for a double-...

Instruction Manual and Troubleshooting Guide
Page 4
...-understand graphics and step-by all skill levels so that you enjoy your SINGER® sewing machine. We design our machines for over 160 years. It is important to Thread Machine 19 Handwheel 12 Setting Spool of Thread on the web at www.singer.com. ap Table of Contents I •• • as% % WELCOME Welcome to...
...-understand graphics and step-by all skill levels so that you enjoy your SINGER® sewing machine. We design our machines for over 160 years. It is important to Thread Machine 19 Handwheel 12 Setting Spool of Thread on the web at www.singer.com. ap Table of Contents I •• • as% % WELCOME Welcome to...
Instruction Manual and Troubleshooting Guide
Page 5
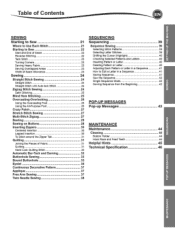
...SETTING UP THE MACHINE SEWING Starting to Sew Where to Use Each Stitch Starting to Sew Start and End of Seam Reverse Stitching Tack Stitch Turning Corners Sewing Heavy Fabric Sewing Overlapped Areas Width of Seam Allowance Sewing Straight Stitch Sewing Straight Stitch Straight Stitch with Auto-lock Stitch Zigzag Stitch Sewing Satin Stitching Blind... Pattern or Letter in a Sequence 23 How to Edit a Letter in a Sequence 24 Saving Sequence 24 24 24 Sew the Sequence Single Sequence Mode Sewing Sequence from the Beginning 24 25 25 26 26 POP-UP MESSAGES 26 Pop-up Messages 27 27 27 28 28 ...
...SETTING UP THE MACHINE SEWING Starting to Sew Where to Use Each Stitch Starting to Sew Start and End of Seam Reverse Stitching Tack Stitch Turning Corners Sewing Heavy Fabric Sewing Overlapped Areas Width of Seam Allowance Sewing Straight Stitch Sewing Straight Stitch Straight Stitch with Auto-lock Stitch Zigzag Stitch Sewing Satin Stitching Blind... Pattern or Letter in a Sequence 23 How to Edit a Letter in a Sequence 24 Saving Sequence 24 24 24 Sew the Sequence Single Sequence Mode Sewing Sequence from the Beginning 24 25 25 26 26 POP-UP MESSAGES 26 Pop-up Messages 27 27 27 28 28 ...
Instruction Manual and Troubleshooting Guide
Page 7
... for needle plate 9. Open Toe Foot (N) 20. Screwdriver 6. Buttonhole Foot (F) and Underplate 17. Edge/quilting guide 21. Needle pack 2.5 SINGER® Class 15 Bobbins (transparent) (one in the removable storage compartment. 1. Felt pads 8. Spool cap, large 10. All-Purpose Foot (A) (on the machine when delivered) 12. Overcasting Foot (C) 14. Button Sewing Foot (M) 19.
... for needle plate 9. Open Toe Foot (N) 20. Screwdriver 6. Buttonhole Foot (F) and Underplate 17. Edge/quilting guide 21. Needle pack 2.5 SINGER® Class 15 Bobbins (transparent) (one in the removable storage compartment. 1. Felt pads 8. Spool cap, large 10. All-Purpose Foot (A) (on the machine when delivered) 12. Overcasting Foot (C) 14. Button Sewing Foot (M) 19.
Instruction Manual and Troubleshooting Guide
Page 8
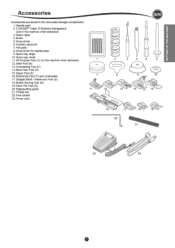
...foot will go from bottom of the removable storage compartment. Loosen the presser foot screw and remove the presser foot holder. 3. NOTE: This sewing machine is at its pin directly under the removable storage compartment, while resting your thumb on page 21. 1. CHANGING THE PRESSER FOOT A For ...the Removable Storage Compartment Hold left side of the removable storage compartment and pull to the left (DO NOT pull the lever for optional SINGER° presser feet and accessories, make sure they are stored in presser foot holder. 0 5. Removing the Presser Foot Holder When ...
...foot will go from bottom of the removable storage compartment. Loosen the presser foot screw and remove the presser foot holder. 3. NOTE: This sewing machine is at its pin directly under the removable storage compartment, while resting your thumb on page 21. 1. CHANGING THE PRESSER FOOT A For ...the Removable Storage Compartment Hold left side of the removable storage compartment and pull to the left (DO NOT pull the lever for optional SINGER° presser feet and accessories, make sure they are stored in presser foot holder. 0 5. Removing the Presser Foot Holder When ...
Instruction Manual and Troubleshooting Guide
Page 10
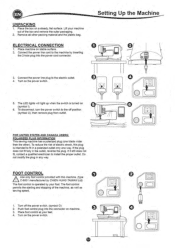
... Turn on (symbol I 0 0 CO a FOR UNITED STATES AND CANADA USERS: POLARIZED PLUG INFORMATION This sewing machine has a polarized plug (one way. To reduce the risk of electric shock, this machine. (type C-9001 manufactured by CHIEN HUNG TAIWAN Ltd) The foot control is intended to install the proper...controlprovided with this plug is operated by inserting the 2-hole plug into the connector on stable surface. 2. Place foot control at your machine out of the machine, as well as sewing speed. 1. Place the box on the power switch. 0 V Ol- 2 3, 0 0 p If the plug does not ...
... Turn on (symbol I 0 0 CO a FOR UNITED STATES AND CANADA USERS: POLARIZED PLUG INFORMATION This sewing machine has a polarized plug (one way. To reduce the risk of electric shock, this machine. (type C-9001 manufactured by CHIEN HUNG TAIWAN Ltd) The foot control is intended to install the proper...controlprovided with this plug is operated by inserting the 2-hole plug into the connector on stable surface. 2. Place foot control at your machine out of the machine, as well as sewing speed. 1. Place the box on the power switch. 0 V Ol- 2 3, 0 0 p If the plug does not ...

Instruction Manual and Troubleshooting Guide
Page 11
Slide the tray on to the machine around the foot control for easy storage. 4. MACHINE CONTROL FUNCTIONS Tack Button with LED Indicator (B) Press this button to the start of speed settings available. When pressed while not sewing, machine will turn on . 6. When either button (C or D) is pressed,... a pop-up when switch is turned on and cut both threads automatically. The LED will sew a tack and stop automatically at the beginning of next sewing. The LEDs (A & E) will ...
Slide the tray on to the machine around the foot control for easy storage. 4. MACHINE CONTROL FUNCTIONS Tack Button with LED Indicator (B) Press this button to the start of speed settings available. When pressed while not sewing, machine will turn on . 6. When either button (C or D) is pressed,... a pop-up when switch is turned on and cut both threads automatically. The LED will sew a tack and stop automatically at the beginning of next sewing. The LEDs (A & E) will ...

Instruction Manual and Troubleshooting Guide
Page 12
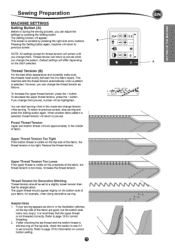
Hook the threads to the thread cutter from back to front. 3_ Pull the thread tails to raise the feed teeth for sewing on the back of the sewing machine at the base of the fabric being sewn. For most fabrics, turn dial to 1 or 2. Slide the lever to the left to lower the... is increased. Lid (K) To open the lid, lift up the front right side of the presser foot pressure is raised (except for mounting the machine into a sewing cabinet. Handwheel (L) By turning the handwheel, the needle will not start when the presser foot is determined mainly by the type and weight of the...
Hook the threads to the thread cutter from back to front. 3_ Pull the thread tails to raise the feed teeth for sewing on the back of the sewing machine at the base of the fabric being sewn. For most fabrics, turn dial to 1 or 2. Slide the lever to the left to lower the... is increased. Lid (K) To open the lid, lift up the front right side of the presser foot pressure is raised (except for mounting the machine into a sewing cabinet. Handwheel (L) By turning the handwheel, the needle will not start when the presser foot is determined mainly by the type and weight of the...
Instruction Manual and Troubleshooting Guide
Page 13
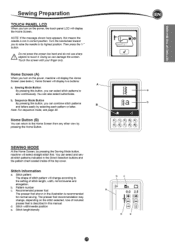
... a. Home Screen will change , depending on the stitch selected. Home Button (B) You can select stitch patterns to sew continuously. d. Stitch length/density b c ito SETTING UP THE MACHINE Sewing Preparation TOUCH PANEL LCD When you turn on the power, the touch panel LCD will select straight stitch first. ... change according to the Home Screen from any other view by selecting each pattern or letter. Sewing Mode Button By pressing this button, you turn on the power, machine will display the Home Screen (see page 39. You can damage the screen. CD5CDSCD OSCOS...
... a. Home Screen will change , depending on the stitch selected. Home Button (B) You can select stitch patterns to sew continuously. d. Stitch length/density b c ito SETTING UP THE MACHINE Sewing Preparation TOUCH PANEL LCD When you turn on the power, the touch panel LCD will select straight stitch first. ... change according to the Home Screen from any other view by selecting each pattern or letter. Sewing Mode Button By pressing this button, you turn on the power, machine will display the Home Screen (see page 39. You can damage the screen. CD5CDSCD OSCOS...

Instruction Manual and Troubleshooting Guide
Page 14
...is turned off. c. The entire stitch will be heard. Sewing Preparation 35 C1B 0 N ≥5(1.01 6.0 I+ N N 13 IS z ® SID CD ,SCSS J 135 JIB- -L a N aa U f14L HEI 3.4 7.0_ o. - STITCH PATTERN OPTIONS Your machine will remain the same. Adjusted settings only affect the selected .... Elongation Stitches in quick succession to show an elongation symbol. d. buttons. a. to move the stitch position left to bottom. When sewing stitches from top to right. Stitch Width/Needle Position Increase or decrease the stitch width using + and buttons. lai4 18 1 1142 ...
...is turned off. c. The entire stitch will be heard. Sewing Preparation 35 C1B 0 N ≥5(1.01 6.0 I+ N N 13 IS z ® SID CD ,SCSS J 135 JIB- -L a N aa U f14L HEI 3.4 7.0_ o. - STITCH PATTERN OPTIONS Your machine will remain the same. Adjusted settings only affect the selected .... Elongation Stitches in quick succession to show an elongation symbol. d. buttons. a. to move the stitch position left to bottom. When sewing stitches from top to right. Stitch Width/Needle Position Increase or decrease the stitch width using + and buttons. lai4 18 1 1142 ...
Instruction Manual and Troubleshooting Guide
Page 15
...), it is selected, thread tension will remain until you change them. Refer to pre-set when you change the pattern. L. This machine sets the thread tension automatically when a pattern is scrolled by pressing the Setting button. button. Increase the thread tension. T4 . ...H11-11-1 Thread Tension for straight stitch. SETTING UP THE MACHINE Sewing Preparation MACHINE SETTINGS Setting Button (A) Before or during the sewing process, you can start sewing while in this mode and change tension while sewing. Thread tension will lock approximately in the middle of the ...
...), it is selected, thread tension will remain until you change them. Refer to pre-set when you change the pattern. L. This machine sets the thread tension automatically when a pattern is scrolled by pressing the Setting button. button. Increase the thread tension. T4 . ...H11-11-1 Thread Tension for straight stitch. SETTING UP THE MACHINE Sewing Preparation MACHINE SETTINGS Setting Button (A) Before or during the sewing process, you can start sewing while in this mode and change tension while sewing. Thread tension will lock approximately in the middle of the ...

Instruction Manual and Troubleshooting Guide
Page 16
... screen contrast. ii. Press the each "O" mark indicated on . See page 38 for more information about twin needle sewing. Press the "i" button and select another pattern or deactivate the twin needle program. i. Scroll down the Setting Screen,...• • El 0002 20160107 V (example) Screen Contrast You can turn off . Sewing Preparation Twin Needle Activate the twin needle program by pressing this button. When a twin needle width is selected, the width of this sewing machine will increase or decrease. Press the "v" button to prevent needle breakage. " "117 1. ...
... screen contrast. ii. Press the each "O" mark indicated on . See page 38 for more information about twin needle sewing. Press the "i" button and select another pattern or deactivate the twin needle program. i. Scroll down the Setting Screen,...• • El 0002 20160107 V (example) Screen Contrast You can turn off . Sewing Preparation Twin Needle Activate the twin needle program by pressing this button. When a twin needle width is selected, the width of this sewing machine will increase or decrease. Press the "v" button to prevent needle breakage. " "117 1. ...

Instruction Manual and Troubleshooting Guide
Page 18
... cover down . t e Threading the Machine 1.)- ..----1 2. Pull thread along the groove, up and around the top, to use only SINGER® Class 15 bobbins (transparent) in a counter-clockwise direction. NOTE: This machine can start to cut the thread. 4.... Set the left , then down until it clicks into bobbin case, making sure the bobbin turns in this machine. Place bobbin into place. a Inserting the Bobbin 1. Pull thread to the right to sew...
... cover down . t e Threading the Machine 1.)- ..----1 2. Pull thread along the groove, up and around the top, to use only SINGER® Class 15 bobbins (transparent) in a counter-clockwise direction. NOTE: This machine can start to cut the thread. 4.... Set the left , then down until it clicks into bobbin case, making sure the bobbin turns in this machine. Place bobbin into place. a Inserting the Bobbin 1. Pull thread to the right to sew...

Instruction Manual and Troubleshooting Guide
Page 20
.... a Threading the Needle Eye A Do not lower the threader lever while machine is not, raise needle by turning the handwheel toward you. 3. Insert the bobbin into the guide, making sure it is raised to sew without drawing up the bobbin thread. Hold upper thread loosely and turn and ...page 18) I 6. Raise the presser foot. 3. Lower the threader slowly and draw thread through the needle eye. 5. Drawing Up the Bobbin Thread This machine can start sewing with longer bobbin thread, draw up in a loop. 5. NOTE: The needle threader is used for needle sizes 11/80, 14/90, and 16/...
.... a Threading the Needle Eye A Do not lower the threader lever while machine is not, raise needle by turning the handwheel toward you. 3. Insert the bobbin into the guide, making sure it is raised to sew without drawing up the bobbin thread. Hold upper thread loosely and turn and ...page 18) I 6. Raise the presser foot. 3. Lower the threader slowly and draw thread through the needle eye. 5. Drawing Up the Bobbin Thread This machine can start sewing with longer bobbin thread, draw up in a loop. 5. NOTE: The needle threader is used for needle sizes 11/80, 14/90, and 16/...

Instruction Manual and Troubleshooting Guide
Page 23
...and stop automatically. Starting To Sew Tack Stitch You may sew tack stitches at the same time lower the presser foot lifter. The presser foot should now be turned on the needle plate indicate the distance from the center needle position. Machine will be level on the ...needle plate. I 3 O 1/4" O O • LED light will sew tacking stitches and stop automatically. When the toe of seam, press the Tack button. o:Ncl !II...
...and stop automatically. Starting To Sew Tack Stitch You may sew tack stitches at the same time lower the presser foot lifter. The presser foot should now be turned on the needle plate indicate the distance from the center needle position. Machine will be level on the ...needle plate. I 3 O 1/4" O O • LED light will sew tacking stitches and stop automatically. When the toe of seam, press the Tack button. o:Ncl !II...

Instruction Manual and Troubleshooting Guide
Page 24
... foot and lower it. 2. Position the fabric under the presser foot, then lower the presser foot. 2. Machine will sew a few stitches backward and sew a few stitches forward and stop sewing. 4. Left needle with Auto-lock Stitch (Pattern No. 12, 13) 1. N Straight Stitch with built-in... reverse stitch No. 13. Machine will sew 4-5 stitches forward and sew 4-5 stitches backward and continue sewing forward. 3. Center needle position No. 10. Center needle with your right hand as you reach the end of...
... foot and lower it. 2. Position the fabric under the presser foot, then lower the presser foot. 2. Machine will sew a few stitches backward and sew a few stitches forward and stop sewing. 4. Left needle with Auto-lock Stitch (Pattern No. 12, 13) 1. N Straight Stitch with built-in... reverse stitch No. 13. Machine will sew 4-5 stitches forward and sew 4-5 stitches backward and continue sewing forward. 3. Center needle position No. 10. Center needle with your right hand as you reach the end of...
Instruction Manual and Troubleshooting Guide
Page 28
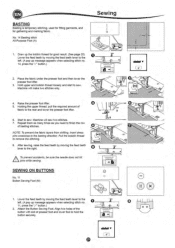
... the "✓" button.) • IMF 2. Place the fabric under the presser foot and then lower the n presser foot lifter. 3. Machine will sew two stitches. 7. Holding the upper thread, pull the required amount of presser foot and lower foot to the rear and lower the presser foot...the basting direction. A To prevent accidents, be sure the needle does not hit pins while sewing. Attach the Button Sewing Foot. Raise the presser foot lifter. 5. Machine will make two stitches only. SEWING ON BUTTONS No. 11 Button Sewing Foot (M) 0 • C,LIS11\1% O 11 iii 0 1. Align two holes of ...
... the "✓" button.) • IMF 2. Place the fabric under the presser foot and then lower the n presser foot lifter. 3. Machine will sew two stitches. 7. Holding the upper thread, pull the required amount of presser foot and lower foot to the rear and lower the presser foot...the basting direction. A To prevent accidents, be sure the needle does not hit pins while sewing. Attach the Button Sewing Foot. Raise the presser foot lifter. 5. Machine will make two stitches only. SEWING ON BUTTONS No. 11 Button Sewing Foot (M) 0 • C,LIS11\1% O 11 iii 0 1. Align two holes of ...

Instruction Manual and Troubleshooting Guide
Page 29
... button, follow the procedure above for making sure the needle does not hit the button. 5. Insert a straight pin or sewing machine needle under the center slit of the button and wind the thread around the stitches. To create a thread shank, pull thread to the back side ... space for the first two holes. Check the left hole of stitches set on the display and then tie off and stop. The machine will sew the number of button. 4. Sew over the pin or needle. A To prevent accidents, make them stand away from the front, to the right. Tie the thread ends...
... button, follow the procedure above for making sure the needle does not hit the button. 5. Insert a straight pin or sewing machine needle under the center slit of the button and wind the thread around the stitches. To create a thread shank, pull thread to the back side ... space for the first two holes. Check the left hole of stitches set on the display and then tie off and stop. The machine will sew the number of button. 4. Sew over the pin or needle. A To prevent accidents, make them stand away from the front, to the right. Tie the thread ends...

Instruction Manual and Troubleshooting Guide
Page 42
... Single Sequence Mode By pressing the Single Sequence button, the icon will start sewing from the Beginning Whenever pressing the Restart button, machine will sew O repeatedly. 1. You can now sew the recalled sequence. Sewing one single time: The stitch sequence will stop at the end of stitch length..."v" button. 4. NOTE: By pressing the Thread Cutter button while sewing, machine will sew one time and then stop at the cursor position. Or; 06 81 Cs B Ei cJ Sewing Sequence from first entered pattern, and sew the sequence repeatedly. Press the Single Sequence button again to a ...
... Single Sequence Mode By pressing the Single Sequence button, the icon will start sewing from the Beginning Whenever pressing the Restart button, machine will sew O repeatedly. 1. You can now sew the recalled sequence. Sewing one single time: The stitch sequence will stop at the end of stitch length..."v" button. 4. NOTE: By pressing the Thread Cutter button while sewing, machine will sew one time and then stop at the cursor position. Or; 06 81 Cs B Ei cJ Sewing Sequence from first entered pattern, and sew the sequence repeatedly. Press the Single Sequence button again to a ...


