Singer Legacy C440Q Support and Manuals
Get Help and Manuals for this Singer item
View All Support Options Below
Free Singer Legacy C440Q manuals!
Problems with Singer Legacy C440Q?
Ask a Question
Free Singer Legacy C440Q manuals!
Problems with Singer Legacy C440Q?
Ask a Question
Popular Singer Legacy C440Q Manual Pages
Instruction Manual and Troubleshooting Guide - Page 2

... or its intended use as a toy. Close attention is necessary when this manual. Use only identical replacement parts. See instructions for Servicing of burns, fire, electric shock, or injury to persons: • Do not allow to break. • Wear safety glasses. • Switch the sewing machine off ("0") position, then remove plug from the electric outlet immediately after...
Instruction Manual and Troubleshooting Guide - Page 4

...;
• as%
%
WELCOME
Welcome to Thread Machine
19
Handwheel
12
Setting Spool of sewing, creating, do-it-yourself, crafting and more can be found on the web at www.singer.com.
Happy Sewing! Additional assistance, by -step instructions. I1• •%.
.0I ..1
SETTING UP THE MACHINE
Sewing Preparation
13
Main Parts
6 Touch Panel LCD
13
Accessories
7
Home Screen...
Instruction Manual and Troubleshooting Guide - Page 5
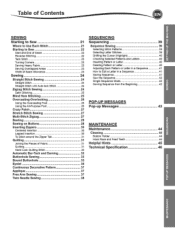
Table of Contents
SETTING UP THE MACHINE
SEWING
Starting to Sew
Where to Use Each Stitch Starting to Sew
Start and End of Seam Reverse Stitching Tack Stitch Turning Corners Sewing Heavy Fabric Sewing Overlapped Areas Width of Seam Allowance
Sewing
Straight Stitch Sewing
Straight Stitch Straight Stitch with Auto-lock Stitch
Zigzag Stitch Sewing
Satin Stitching
Blind Hem Stitching Overcasting-...
Instruction Manual and Troubleshooting Guide - Page 7
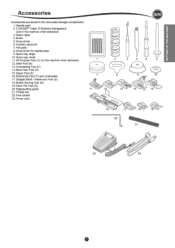
... Foot (C) 14. Straight Stitch / Patchwork Foot (G) 18. Auxiliary spool pin 7. Button Sewing Foot (M) 19. Edge/quilting guide 21. Blind Hem Foot (D) 15. SETTING UP THE MACHINE
Accessories
Accessories are stored in the machine when delivered) 3. Needle pack 2.5 SINGER® Class 15 Bobbins (transparent) (one in the removable storage compartment. 1. Felt pads 8. Spool cap, small...
Instruction Manual and Troubleshooting Guide - Page 8
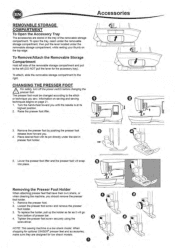
...of the removable storage compartment and pull to the left (DO NOT pull the lever for optional SINGER° presser feet and accessories, make sure they are stored in
presser foot holder. 0
... the needle is a low shank model. Removing the Presser Foot Holder
When attaching presser feet that have their own shank, or when cleaning the machine, you sew. Tighten the presser foot screw securely...
Instruction Manual and Troubleshooting Guide - Page 9
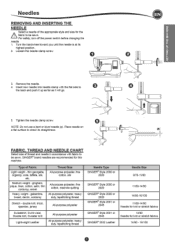
..., satin, thin
corduroy, velvet
All-purpose polyester, fine cotton, machine quilting
Heavy weight -
SINGER° brand needles are recommended for knit or stretch fabrics
14/90 - 16/100 SETTING UP THE MACHINE
Needles
REMOVING AND INSERTING THE NEEDLE
Q Select a needle of the appropriate style and size for the j fabric to be sewn. NOTE: Do not use...
Instruction Manual and Troubleshooting Guide - Page 11

... cut the upper and bobbin threads. When pressed while not sewing, machine will stop when foot control is pressed. Needle Stop Position Up/Down Button with a twin needle or a hemstitching (wing) needle.
A
• Do not press this button to cut both threads automatically. SETTING UP THE MACHINE
_ Setting Up the Machine
5. The thread may tangle, resulting in...
Instruction Manual and Troubleshooting Guide - Page 15
...MACHINE
Sewing Preparation
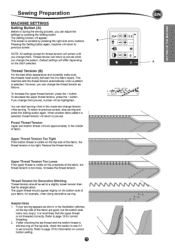
MACHINE SETTINGS
Setting Button (A)
Before or during the sewing process, you can adjust the settings by pressing the right side arrow buttons. This machine sets the thread tension automatically when a pattern is too tight. Upper Thread Tension Too Tight If the bobbin thread is visible on correct bobbin setting.
• If after checking the top thread and the bobbin...
Instruction Manual and Troubleshooting Guide - Page 17
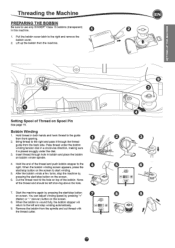
...use only SINGERS Class 15 bobbins (transparent) in bobbin and place the bobbin on bobbin winder spindle.
4. Hold thread in a clockwise direction, making sure it through hole in this machine.
1. Remove the bobbin from the machine.
0 co
eCO
e
----1 t-)
DI
-1-
1 1 I I
e
„C....i.J......,
e
Setting Spool of Thread on top of the thread and push bobbin stopper to the guide from...
Instruction Manual and Troubleshooting Guide - Page 18

... up the bobbin thread. a
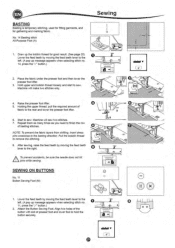
Inserting the Bobbin
1. Place bobbin into notch (a) while holding the bobbin lightly with your finger.
\
a
3. If you want to use only SINGER® Class 15 bobbins (transparent) in needle plate and push the right side of bobbin cover down . Set the left , then down until it clicks into the holes in this machine. Replace the bobbin cover.
Instruction Manual and Troubleshooting Guide - Page 24

... with built-in reverse stitch No. 13.
Press the Thread Cutter button. Guide the fabric gently with built-in reverse stitch All-Purpose Foot (A)
Straight Stitch
1. ZIGZAG STITCH SEWING
Your machine can sew zigzag stitches of various widths and lengths by changing the settings of seam, stop automatically.
4. No. 1 Zigzag Stitch All-Purpose Foot (A) or...
Instruction Manual and Troubleshooting Guide - Page 28
... lever to hold the button securely.
_I
1,..1•NS
AMIN
T
0 0 Machine will sew two stitches. 7. Raise the presser foot lifter. 5.
NOTE: To prevent the fabric layers ...to sew. Hold upper and bobbin thread loosely and start to the left . (A pop up the bobbin thread for gathering and marking fabric. Start to remove the stitching.
8. Pull the bobbin thread to sew.
dad...
Instruction Manual and Troubleshooting Guide - Page 33
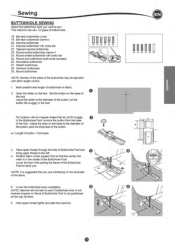
...) 24. Decorative buttonhole 27. Open the slider on the base of buttonholes.
18. Position fabric under presser foot so that you . This machine can sew 12 types of the foot. Set the button on the foot. a = Length of button + thickness
0
„Am
0 3. Round end buttonhole (both ends rounded) 26. NOTE: It is not...
Instruction Manual and Troubleshooting Guide - Page 38

...SINGERS branded twin needles for this machine. Other needles may be sewn with twin needle. The needle threader cannot be used with sequencing by setting to "-.-", the twin needle icon will be reduced automatically.
13. A Make sure to set... the
needle bar thread guide. 9. Thread each needle eye manually.
10. Press the Setting button. 11. button. NOTE: Twin needle sewing may hit the needle...
Instruction Manual and Troubleshooting Guide - Page 46
EN
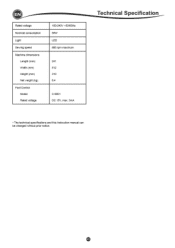
Rated voltage Nominal consumption Light Sewing speed Machine dimensions
Length (mm) Width (mm) Height (mm) Net weight (kg) Foot Control Model Rated voltage
100-240V -50/60Hz 55W LED 800 rpm maximum
241 512 310 8.4
C-9001 DC 15V, max. 3mA
Technical Specification _
• The technical specifications and this Instruction manual can be changed without prior notice.
0
Singer Legacy C440Q Reviews
We have not received any reviews for Singer yet.