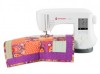
Singer C440Q LEGACY Support and Manuals
Get Help and Manuals for this Singer item
View All Support Options Below
Free Singer C440Q LEGACY manuals!
Problems with Singer C440Q LEGACY?
Ask a Question
Free Singer C440Q LEGACY manuals!
Problems with Singer C440Q LEGACY?
Ask a Question
Popular Singer C440Q LEGACY Manual Pages
Instruction Manual and Troubleshooting Guide - Page 1
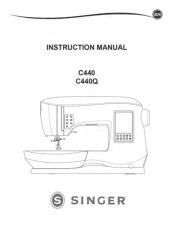
a
INSTRUCTION MANUAL
C440 C440Q
CD (IP O 0 O 0 0
SOCISS SeSOO
n
SINGER
0
Instruction Manual and Troubleshooting Guide - Page 2

... to a third party. Close attention is necessary when this manual. Use only identical replacement parts. SAVE THESE INSTRUCTIONS
Always unplug this sewing machine from outlet. • Do not unplug by or near the machine. See instructions for examination, repair, electrical or mechanical adjustment. • Never operate the sewing machine with IEC/EN 60335-2-28 and UL 1594. e
Important...
Instruction Manual and Troubleshooting Guide - Page 4

...Machine
19
Handwheel
12
Setting Spool of Thread on the web at www.singer.com. Happy Sewing! Additional assistance, by region, may be enjoyed by -step instructions. I1• •%.
.0I ..1
SETTING UP THE MACHINE
Sewing Preparation
13
Main Parts... enjoy your SINGER® sewing machine. We have provided an instruction manual with LED Indicator
11 Threading the Machine
17
Start/...
Instruction Manual and Troubleshooting Guide - Page 5
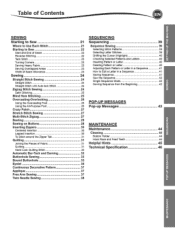
... of Contents
SETTING UP THE MACHINE
SEWING
Starting ...Centered Insertion Lapped Insertion To Stitch around the Zipper Tab
Quilting
Joining the Pieces of Fabric Quilting Hand Look Quilting Stitch
Automatic Bar-Tack and Darning Buttonhole Sewing Bound Buttonhole...
Bobbin Holder
31
Hook Race and Feed Teeth
31 Helpful Hints
31 Technical Specification
32
32
33
35
36
37
37
37
38
39
39
39 39 ...
Instruction Manual and Troubleshooting Guide - Page 7
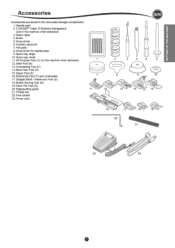
Needle pack 2.5 SINGER® Class 15 Bobbins (transparent) (one in the removable storage compartment. 1. Felt pads 8. Spool cap, large
10. Overcasting Foot (C) 14. Zipper Foot (E) 16. Edge/quilting guide 21. SETTING UP THE MACHINE
Accessories
Accessories are stored in the machine when delivered) 3. Seam ripper 4. Auxiliary spool pin 7. Satin Foot (B) 13. Blind Hem Foot (D) 15. ...
Instruction Manual and Troubleshooting Guide - Page 8
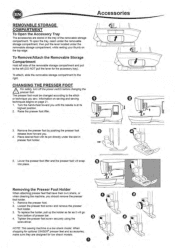
...or technique you until the needle is a low shank model.
The presser foot must be changed according to the ...pushing the presser foot
release lever toward you sew. When shopping for optional SINGER° presser feet and accessories, make sure they are stored in
presser foot.... To replace the holder, pull up the holder as far as it will snap into place. NOTE: This sewing machine is at...
Instruction Manual and Troubleshooting Guide - Page 9
...machine quilting
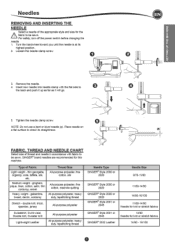
Heavy weight - gabardine, tweed, denim, corduroy
All-purpose polyester, heavy duty, topstitching thread
Stretch - double knit, tricot, spandex, jersey
All-purpose polyester
Needle Type SINGER° Style 2000 or
2020
SINGER° Style 2000 or 2020
SINGER° Style 2000 or 2020
SINGER...needle clamp screw. SETTING UP THE MACHINE
Needles
REMOVING AND INSERTING THE NEEDLE
...
Instruction Manual and Troubleshooting Guide - Page 12

... higher to make it easier to 1 or 2. Slide the lever to the left to move the fabric forward when sewing. Setting Up the Machine
I )
Use this cutter if the thread cutter button is decreased. Attach the machine with the corresponding holes in Sewing Cabinet (N)
There are two holes on the underside of the...
Instruction Manual and Troubleshooting Guide - Page 13
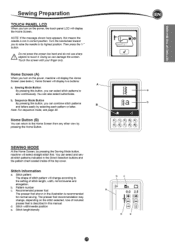
... recommendation may change according to the setting of the top cover. Stitch width/needle position e. NOTE: If the message shown here appears, this manual. Turn the handwheel toward you turn... Mode Button
By pressing this button, you turn on the power, machine will display two buttons:
A a. SETTING UP THE MACHINE
Sewing Preparation
TOUCH PANEL LCD
When you to raise the needle to its...
Instruction Manual and Troubleshooting Guide - Page 14

...;5(1.01
6.0 I+
N
N
13 IS
z
® SID CD ,SCSS
J
135 JIB- -L
a
N
aa
U f14L HEI
3.4
7.0_
o.
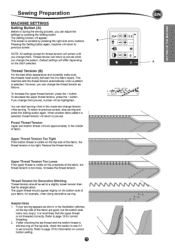
- Press two or three digits in the illustration. Default settings are not automatically saved when the machine is changed, the numbers will remain the same. This may be longer but the density will be highlighted. If mirroring is active...
Instruction Manual and Troubleshooting Guide - Page 15
... shown in the illustration (stitches
on the top side of the fabric, the thread tension is too loose. L. This machine sets the thread tension automatically when a pattern is set when you can adjust the settings by pressing the right side arrow buttons. However, you change them.
Upper Thread Tension Too Tight If the bobbin...
Instruction Manual and Troubleshooting Guide - Page 17
... 11100 0
0
LiT
0
O
CD .94
0 Lift up the bobbin from the machine.
0 co
eCO
e
----1 t-)
DI
-1-
1 1 I I
e
„C....i.J......,
e
Setting Spool of Thread on the screen.
8. Cut the thread next to the hole on the...
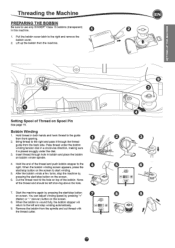
Threading the Machine
PREPARING THE BOBBIN
Be sure to use only SINGERS Class 15 bobbins (transparent) in both hands and hook thread to the guide from front ...
Instruction Manual and Troubleshooting Guide - Page 18

...in needle plate and push the right side of bobbin cover down . NOTE: This machine can start to use only SINGER® Class 15 bobbins (transparent) in this machine. Set the left , then down until it clicks into the holes in a counter-clockwise ... see page 20. t
e
Place bobbin into notch (a) while holding the bobbin lightly with your finger.
\
a
3. Replace the bobbin cover.
Instruction Manual and Troubleshooting Guide - Page 38

...spool of
5
thread for this machine. Thread right needle eye by pressing the + or - Twin needle mode will disappear from front to set back to "-.-", the twin ...b. Thread each needle eye manually.
10. A Make sure to back.
0
1
P To prevent accidents:
a. A twin needle is not provided with felt pad into the
needle bar thread guide. 9. Press the Setting button. 11.
o
co...
Instruction Manual and Troubleshooting Guide - Page 46
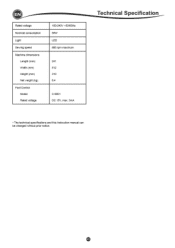
EN
Rated voltage Nominal consumption Light Sewing speed Machine dimensions
Length (mm) Width (mm) Height (mm) Net weight (kg) Foot Control Model Rated voltage
100-240V -50/60Hz 55W LED 800 rpm maximum
241 512 310 8.4
C-9001 DC 15V, max. 3mA
Technical Specification _
• The technical specifications and this Instruction manual can be changed without prior notice.
0
Singer C440Q LEGACY Reviews
We have not received any reviews for Singer yet.