
Instruction Manual and Troubleshooting Guide
Page 2
... the following: Read all instructions before using and before cleaning, removing covers or when making any adjustment in the needle area, such as described in this manual. Avoid placing other user servicing adjustments mentioned in the instruction manual. Always unplug this sewing machine from all controls to hand them over if the machine is required around the sewing machine needle. • Always use as threading needle, changing needle, threading bobbin, changing presser foot, etc. • Never drop or insert any object into water...
... the following: Read all instructions before using and before cleaning, removing covers or when making any adjustment in the needle area, such as described in this manual. Avoid placing other user servicing adjustments mentioned in the instruction manual. Always unplug this sewing machine from all controls to hand them over if the machine is required around the sewing machine needle. • Always use as threading needle, changing needle, threading bobbin, changing presser foot, etc. • Never drop or insert any object into water...

Instruction Manual and Troubleshooting Guide
Page 4
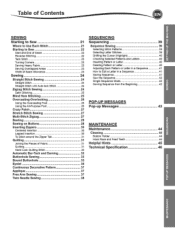
...8 Sewing Mode 13 To Open the Accessory Tray 8 Stitch Information 13 To Remove/Attach the Removable Storage Compartment 8 Selecting a Stitch 14 Changing the Presser Foot 8 Stitch Pattern Options 14 Removing the Presser Foot Holder 8 Stitch Width/Needle Position 14 Needles 9 Stitch Length/Density 14 Removing and Inserting the Needle 9 Width Mirroring 14 Fabric, Thread and Needle Chart 9 Length Mirroring 14 Setting Up the Machine 10 Elongation 14 Unpacking 10 Machine Settings 15 Electrical Connection Foot Control 10 10 Setting Button Thread Tension Twin Needle...
...8 Sewing Mode 13 To Open the Accessory Tray 8 Stitch Information 13 To Remove/Attach the Removable Storage Compartment 8 Selecting a Stitch 14 Changing the Presser Foot 8 Stitch Pattern Options 14 Removing the Presser Foot Holder 8 Stitch Width/Needle Position 14 Needles 9 Stitch Length/Density 14 Removing and Inserting the Needle 9 Width Mirroring 14 Fabric, Thread and Needle Chart 9 Length Mirroring 14 Setting Up the Machine 10 Elongation 14 Unpacking 10 Machine Settings 15 Electrical Connection Foot Control 10 10 Setting Button Thread Tension Twin Needle...
Instruction Manual and Troubleshooting Guide
Page 5
... Sewing Straight Stitch Sewing Straight Stitch Straight Stitch with Auto-lock Stitch Zigzag Stitch Sewing Satin Stitching Blind Hem Stitching Overcasting-Overlocking Using the Overcasting Foot Using the All-Purpose Foot Crazy Patch Stretch Stitch Sewing Multi-Stitch Zigzag Basting Sewing on Buttons Inserting Zippers Centered Insertion Lapped Insertion To Stitch around the Zipper Tab Quilting Joining the Pieces of Fabric Quilting Hand Look Quilting Stitch Automatic Bar-Tack and Darning Buttonhole Sewing Bound Buttonhole Eyelet Continuous Decorative Pattern Applique Free Arm Sewing Twin Needle...
... Sewing Straight Stitch Sewing Straight Stitch Straight Stitch with Auto-lock Stitch Zigzag Stitch Sewing Satin Stitching Blind Hem Stitching Overcasting-Overlocking Using the Overcasting Foot Using the All-Purpose Foot Crazy Patch Stretch Stitch Sewing Multi-Stitch Zigzag Basting Sewing on Buttons Inserting Zippers Centered Insertion Lapped Insertion To Stitch around the Zipper Tab Quilting Joining the Pieces of Fabric Quilting Hand Look Quilting Stitch Automatic Bar-Tack and Darning Buttonhole Sewing Bound Buttonhole Eyelet Continuous Decorative Pattern Applique Free Arm Sewing Twin Needle...
Instruction Manual and Troubleshooting Guide
Page 6
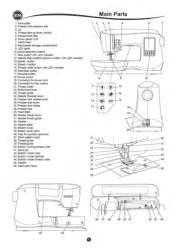
... foot pressure dial 3. Lid 4. Touch panel LCD 7. button 14. Connector for foot control 21. Buttonhole lever 23. Needle 33. Bobbin cover latch 2 36. Bobbin winder stop button 17. Removable storage compartment 9. Tack button with LED indicator 16. Thread cutter button with LED indicator MEM e©eocaosot&e 12. Needle clamp screw 31. Needle plate II 34. Needle threader lever 25. Presser foot 29. Spool pin 42. Bobbin winder thread cutter 26 45. Handwheel 8. LED lights 10. Needle stop position up lever (inside) 5. Hole...
... foot pressure dial 3. Lid 4. Touch panel LCD 7. button 14. Connector for foot control 21. Buttonhole lever 23. Needle 33. Bobbin cover latch 2 36. Bobbin winder stop button 17. Removable storage compartment 9. Tack button with LED indicator 16. Thread cutter button with LED indicator MEM e©eocaosot&e 12. Needle clamp screw 31. Needle plate II 34. Needle threader lever 25. Presser foot 29. Spool pin 42. Bobbin winder thread cutter 26 45. Handwheel 8. LED lights 10. Needle stop position up lever (inside) 5. Hole...
Instruction Manual and Troubleshooting Guide
Page 7
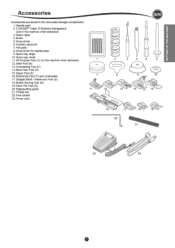
... needle plate 9. Zipper Foot (E) 16. Open Toe Foot (N) 20. Felt pads 8. Spool cap, large 10. Straight Stitch / Patchwork Foot (G) 18. Edge/quilting guide 21. Foot control 23. Seam ripper 4. Auxiliary spool pin 7. Blind Hem Foot (D) 15. Buttonhole Foot (F) and Underplate 17. Power cord 1 C) 7 11 12 O ©> 0 2 3 8 13 4 9 14 EN O) 10 15 16 17 20 18 v 19 21 22 23 Satin Foot (B) 13. Button Sewing Foot (M) 19. All-Purpose Foot (A) (on the machine when delivered) 12. Thread net 22. Needle pack 2.5 SINGER® Class 15 Bobbins...
... needle plate 9. Zipper Foot (E) 16. Open Toe Foot (N) 20. Felt pads 8. Spool cap, large 10. Straight Stitch / Patchwork Foot (G) 18. Edge/quilting guide 21. Foot control 23. Seam ripper 4. Auxiliary spool pin 7. Blind Hem Foot (D) 15. Buttonhole Foot (F) and Underplate 17. Power cord 1 C) 7 11 12 O ©> 0 2 3 8 13 4 9 14 EN O) 10 15 16 17 20 18 v 19 21 22 23 Satin Foot (B) 13. Button Sewing Foot (M) 19. All-Purpose Foot (A) (on the machine when delivered) 12. Thread net 22. Needle pack 2.5 SINGER® Class 15 Bobbins...
Instruction Manual and Troubleshooting Guide
Page 8
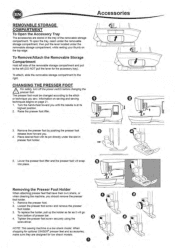
... power switch before changing the presser foot. Loosen the presser foot screw and remove the presser foot holder. 3. Place desired foot with its highest position. 00G0 08O 2 Raise the presser foot lifter. [HI 3. When shopping for optional SINGER° presser feet and accessories, make sure they are stored in presser foot holder. 0 5. The presser foot must be changed according to the right. Lower the presser foot lifter and the presser foot will go from bottom of presser bar. 4. Tighten the presser foot screw securely using the screwdriver. Accessories REMOVABLE...
... power switch before changing the presser foot. Loosen the presser foot screw and remove the presser foot holder. 3. Place desired foot with its highest position. 00G0 08O 2 Raise the presser foot lifter. [HI 3. When shopping for optional SINGER° presser feet and accessories, make sure they are stored in presser foot holder. 0 5. The presser foot must be changed according to the right. Lower the presser foot lifter and the presser foot will go from bottom of presser bar. 4. Tighten the presser foot screw securely using the screwdriver. Accessories REMOVABLE...

Instruction Manual and Troubleshooting Guide
Page 11
... automatically at start position of the needle stop when pressed the second time. The machine will stop position is connected, these buttons decrease and increase the speed limit. Unplug the foot control cord from the machine. 3. Wind the cord around the free arm. 5. When pressed while not sewing, machine will be lit until tack stitch has completed. Needle Stop Position Up/Down Button with a twin needle or a hemstitching (wing) needle. The machine will be lit. Reverse Button (G) The machine will sew...
... automatically at start position of the needle stop when pressed the second time. The machine will stop position is connected, these buttons decrease and increase the speed limit. Unplug the foot control cord from the machine. 3. Wind the cord around the free arm. 5. When pressed while not sewing, machine will be lit until tack stitch has completed. Needle Stop Position Up/Down Button with a twin needle or a hemstitching (wing) needle. The machine will be lit. Reverse Button (G) The machine will sew...

Instruction Manual and Troubleshooting Guide
Page 12
... O Presser Foot Lifter (H) The presser foot is located on the back of the sewing machine at the base of the free arm. For heavyweight fabrics like denim or canvas, the pressure is raised (except for bobbin winding). Align the holes (indicated in the cabinet base. NOTE: Machine will not start when the presser foot is increased. The setting of the presser foot pressure is to feed properly while sewing. Hook the threads to the thread cutter from...
... O Presser Foot Lifter (H) The presser foot is located on the back of the sewing machine at the base of the free arm. For heavyweight fabrics like denim or canvas, the pressure is raised (except for bobbin winding). Align the holes (indicated in the cabinet base. NOTE: Machine will not start when the presser foot is increased. The setting of the presser foot pressure is to feed properly while sewing. Hook the threads to the thread cutter from...
Instruction Manual and Troubleshooting Guide
Page 13
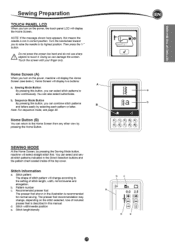
... can also select buttonholes. a i .a . Home Button (B) You can select stitch patterns to the setting of stitch pattern will change , depending on the power, the touch panel LCD will display the Home Screen. b. Stitch width/needle position e. Stitch pattern The shape of stitch length, width, mirror/reverse and elongation. Pattern number c. Note: For sequence mode, see below). SETTING UP THE MACHINE Sewing Preparation TOUCH PANEL LCD When you turn on the power, machine will display...
... can also select buttonholes. a i .a . Home Button (B) You can select stitch patterns to the setting of stitch pattern will change , depending on the power, the touch panel LCD will display the Home Screen. b. Stitch width/needle position e. Stitch pattern The shape of stitch length, width, mirror/reverse and elongation. Pattern number c. Note: For sequence mode, see below). SETTING UP THE MACHINE Sewing Preparation TOUCH PANEL LCD When you turn on the power, machine will display...

Instruction Manual and Troubleshooting Guide
Page 14
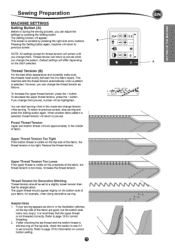
... not automatically saved when the machine is active instead of the satin stitch using the + and - buttons. Adjusted settings are shown as desired. When sewing stitches from 10 and up. Press the Alt button to show that stitch number immediately. Stitch Length/Density Increase or decrease the stitch length using + and buttons. lai4 18 1 1142 MB ID 7.0 xl For straight stitches, use the + and buttons to right. e. When such a stitch is selected, the icon changes...
... not automatically saved when the machine is active instead of the satin stitch using the + and - buttons. Adjusted settings are shown as desired. When sewing stitches from 10 and up. Press the Alt button to show that stitch number immediately. Stitch Length/Density Increase or decrease the stitch length using + and buttons. lai4 18 1 1142 MB ID 7.0 xl For straight stitches, use the + and buttons to right. e. When such a stitch is selected, the icon changes...
Instruction Manual and Troubleshooting Guide
Page 15
... side looks very loopy), it is too loose. If your fabric, for straight stitch. To increase the upper thread tension, press the + button. SETTING UP THE MACHINE Sewing Preparation MACHINE SETTINGS Setting Button (A) Before or during the sewing process, you change them. If you change from pre-set correctly. Upper Thread Tension Too Tight If the bobbin thread is visible on the top side of the fabric, the thread tension is set , number will appear. Refer to previous screen.
... side looks very loopy), it is too loose. If your fabric, for straight stitch. To increase the upper thread tension, press the + button. SETTING UP THE MACHINE Sewing Preparation MACHINE SETTINGS Setting Button (A) Before or during the sewing process, you change them. If you change from pre-set correctly. Upper Thread Tension Too Tight If the bobbin thread is visible on the top side of the fabric, the thread tension is set , number will appear. Refer to previous screen.
Instruction Manual and Troubleshooting Guide
Page 17
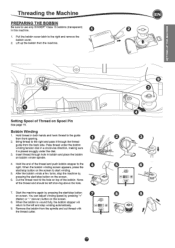
... Spool Pin See page 19. Insert thread through the thread guide from front opening. 2. Pull the bobbin cover latch to use only SINGERS Class 15 bobbins (transparent) in bobbin and place the bobbin on top of Thread on the screen. 8. Pass thread under the disk. 3. When the bobbin is placed snuggly under the bobbin winding tension disk in both hands and hook thread to the left showing above the hole. 7. Remove the bobbin from the machine...
... Spool Pin See page 19. Insert thread through the thread guide from front opening. 2. Pull the bobbin cover latch to use only SINGERS Class 15 bobbins (transparent) in bobbin and place the bobbin on top of Thread on the screen. 8. Pass thread under the disk. 3. When the bobbin is placed snuggly under the bobbin winding tension disk in both hands and hook thread to the left showing above the hole. 7. Remove the bobbin from the machine...

Instruction Manual and Troubleshooting Guide
Page 22
... sewing with a twin needle or a hemstitching (wing) needle. ) 11 00 00 00 0 Reverse Stitching Reverse stitching is no fabric under the presser foot and lower the presser foot. 3. LN • Do not press the Thread Cutter button when there is used to set the speed when using Start/Stop button and also sets the top speed when using foot control. 4. Press and hold the thread tails for changing the presser foot. 2. Press the Start/Stop button or step on the left side of the seams...
... sewing with a twin needle or a hemstitching (wing) needle. ) 11 00 00 00 0 Reverse Stitching Reverse stitching is no fabric under the presser foot and lower the presser foot. 3. LN • Do not press the Thread Cutter button when there is used to set the speed when using Start/Stop button and also sets the top speed when using foot control. 4. Press and hold the thread tails for changing the presser foot. 2. Press the Start/Stop button or step on the left side of the seams...

Instruction Manual and Troubleshooting Guide
Page 24
...light weight fabrics. When you reach the end of seam, stop automatically. 4. Press the Thread Cutter button. Machine will sew a few stitches backward and sew a few stitches forward and stop sewing. 4. When you reach the end of seam, press the Reverse button. Left needle position No. 12. No. 0. Machine will sew 4-5 stitches forward and sew 4-5 stitches backward and continue sewing forward. 3. STRAIGHT STITCH SEWING Straight stitch patterns should be selected to suit the type of the stitch width and stitch length. Hold the upper thread loosely and start sewing. ZIGZAG...
...light weight fabrics. When you reach the end of seam, stop automatically. 4. Press the Thread Cutter button. Machine will sew a few stitches backward and sew a few stitches forward and stop sewing. 4. When you reach the end of seam, press the Reverse button. Left needle position No. 12. No. 0. Machine will sew 4-5 stitches forward and sew 4-5 stitches backward and continue sewing forward. 3. STRAIGHT STITCH SEWING Straight stitch patterns should be selected to suit the type of the stitch width and stitch length. Hold the upper thread loosely and start sewing. ZIGZAG...
Instruction Manual and Troubleshooting Guide
Page 26
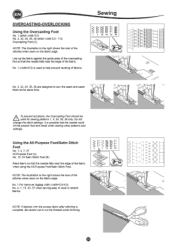
... designed to cut the threads while trimming. 1 /VVVVVV\ ,.. ,.. .... ',.. -.... ,.. ,... ..... < \ > < , , > , < , , > < , > , . 7. < 7. < 7 .< < 7 7. ..< ....... 7 Do not change the stitch settings. NOTE: The illustration to the right shows the look of the stitches when sewn on the fabric edge. Be careful not to sew the seam and seam finish at the same time. No. 1 (width=5.0) is complete. Using the All-Purpose Foot/Satin Stitch Foot No. 1, 4, 7, 37 All-Purpose Foot (A) No. 15, 33 Satin Stitch Foot (B) Place fabric...
... designed to cut the threads while trimming. 1 /VVVVVV\ ,.. ,.. .... ',.. -.... ,.. ,... ..... < \ > < , , > , < , , > < , > , . 7. < 7. < 7 .< < 7 7. ..< ....... 7 Do not change the stitch settings. NOTE: The illustration to the right shows the look of the stitches when sewn on the fabric edge. Be careful not to sew the seam and seam finish at the same time. No. 1 (width=5.0) is complete. Using the All-Purpose Foot/Satin Stitch Foot No. 1, 4, 7, 37 All-Purpose Foot (A) No. 15, 33 Satin Stitch Foot (B) Place fabric...
Instruction Manual and Troubleshooting Guide
Page 28
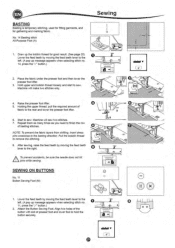
... n presser foot lifter. 3. dad 51) • 4. Start to remove the stitching. 8. After sewing, raise the feed teeth by moving the feed teeth lever to the left . (A pop up message appears when selecting stitch no . 14. Align two holes of the button with slot of basting stitches. press the "✓" button.) • IMF 2. Hold upper and bobbin thread loosely and start to the basting direction. NOTE: To prevent the fabric layers from shifting, insert dress pins...
... n presser foot lifter. 3. dad 51) • 4. Start to remove the stitching. 8. After sewing, raise the feed teeth by moving the feed teeth lever to the left . (A pop up message appears when selecting stitch no . 14. Align two holes of the button with slot of basting stitches. press the "✓" button.) • IMF 2. Hold upper and bobbin thread loosely and start to the basting direction. NOTE: To prevent the fabric layers from shifting, insert dress pins...
Instruction Manual and Troubleshooting Guide
Page 32
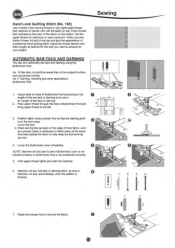
... hole of bar-tack or darning 2. Position fabric under presser foot so that contrasts to the color of the fabric on the bobbin. Buttonhole Foot Sewing O 1. Lower the foot. Lower the Buttonhole Lever completely. Set the upper tension to help keep the foot level as desired for your project. b. NOTE: Machine willnot start to sew ifButtonhole Lever is not 1 lM i r lowered properly or Buttonhole Foot is on top. No.17 Darning, mending and other applications. ri 3. AUTOMATIC BAR-TACK AND DARNING You can sew automatic bar...
... hole of bar-tack or darning 2. Position fabric under presser foot so that contrasts to the color of the fabric on the bobbin. Buttonhole Foot Sewing O 1. Lower the foot. Lower the Buttonhole Lever completely. Set the upper tension to help keep the foot level as desired for your project. b. NOTE: Machine willnot start to sew ifButtonhole Lever is not 1 lM i r lowered properly or Buttonhole Foot is on top. No.17 Darning, mending and other applications. ri 3. AUTOMATIC BAR-TACK AND DARNING You can sew automatic bar...
Instruction Manual and Troubleshooting Guide
Page 36
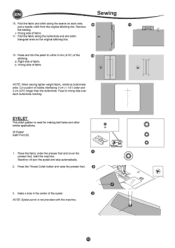
... the buttonhole. Fold the fabric along the seams on the original stitching line. Machine will sew the eyelet and stop automatically. 2. Sewing 12. Fuse to within 5 mm (3/16") of fabric NOTE: When sewing lighter weight fabric, reinforce buttonhole area. Place the fabric under the presser foot and lower the O presser foot. NOTE: Eyelet punch is used for making belt holes and other similar applications. 0 30 30 Eyelet Satin Foot (B) 1. Remove the basting. EYELET This stitch pattern is...
... the buttonhole. Fold the fabric along the seams on the original stitching line. Machine will sew the eyelet and stop automatically. 2. Sewing 12. Fuse to within 5 mm (3/16") of fabric NOTE: When sewing lighter weight fabric, reinforce buttonhole area. Place the fabric under the presser foot and lower the O presser foot. NOTE: Eyelet punch is used for making belt holes and other similar applications. 0 30 30 Eyelet Satin Foot (B) 1. Remove the basting. EYELET This stitch pattern is...
Instruction Manual and Troubleshooting Guide
Page 43
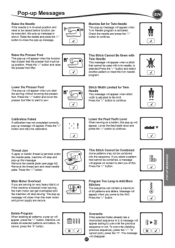
... will appear when the function has chosen that the presser foot must be combined, a message will appear on very heavy fabric or if the machine is adjusted to the limit. Press the "✓" button and lower the presser foot lifter to start the sewing without lowering the presser foot. Remove the needle plate (see page 45) Remove the thread jam and reset needle plate. POP-UP MESSAGES Delete Program When deleting all...
... will appear when the function has chosen that the presser foot must be combined, a message will appear on very heavy fabric or if the machine is adjusted to the limit. Press the "✓" button and lower the presser foot lifter to start the sewing without lowering the presser foot. Remove the needle plate (see page 45) Remove the thread jam and reset needle plate. POP-UP MESSAGES Delete Program When deleting all...

Instruction Manual and Troubleshooting Guide
Page 45
... electrical outlet. Lower the foot. 12 MAINTENANCE Re-thread the bobbin. 18 Blunt needle. Insert new needle. 9 Feed teeth are lowered. Cord not plugged into outlet. 10 Power switch is not turned on the switch. 10 Presser foot is not suited for fabric. 9 (use stretch needle) Machine not properly threaded. Re-thread machine. 19 Tension not adjusted properly. Select correct foot and pattern. 24- Thread entwined around feed dog. Re-thread machine. 19 Remove entwined thread and re-thread bobbin. 18 Re-insert needle. 9 Readjust thread tension. 15 Choose...
... electrical outlet. Lower the foot. 12 MAINTENANCE Re-thread the bobbin. 18 Blunt needle. Insert new needle. 9 Feed teeth are lowered. Cord not plugged into outlet. 10 Power switch is not turned on the switch. 10 Presser foot is not suited for fabric. 9 (use stretch needle) Machine not properly threaded. Re-thread machine. 19 Tension not adjusted properly. Select correct foot and pattern. 24- Thread entwined around feed dog. Re-thread machine. 19 Remove entwined thread and re-thread bobbin. 18 Re-insert needle. 9 Readjust thread tension. 15 Choose...


