
Instruction Manual and Troubleshooting Guide
Page 2
... push fabric while stitching. Use only attachments recommended by the manufacturer or its service agent or a similarly qualified person, in order to break. • Wear safety glasses. • Switch the sewing machine off ("0") position, then remove plug from the accumulation of electric shock: A sewing machine should always be replaced by the manufacturer as threading needle, changing needle, threading bobbin, changing presser foot, etc. • Never drop or insert any other objects on cord. Keep these instructions...
... push fabric while stitching. Use only attachments recommended by the manufacturer or its service agent or a similarly qualified person, in order to break. • Wear safety glasses. • Switch the sewing machine off ("0") position, then remove plug from the accumulation of electric shock: A sewing machine should always be replaced by the manufacturer as threading needle, changing needle, threading bobbin, changing presser foot, etc. • Never drop or insert any other objects on cord. Keep these instructions...

Instruction Manual and Troubleshooting Guide
Page 4
... Table of Thread on Spool Pin 19 Raise/Lower Feed Teeth 12 Threading the Upper Thread 19 Mounting Machine in sewing for over 160 years. We're ready to help and hope that you have provided an instruction manual with LED Indicator 11 Threading the Machine 17 Start/Stop Button Reverse Button 11 11 Preparing the Bobbin 17 Presser Foot Lifter 12 Bobbin Winding 17 Thread Cutter 12 Inserting the Bobbin 18 Presser Foot Pressure Dial 12 Threading the Needle 19 Lid 12 Preparing to Thread Machine...
... Table of Thread on Spool Pin 19 Raise/Lower Feed Teeth 12 Threading the Upper Thread 19 Mounting Machine in sewing for over 160 years. We're ready to help and hope that you have provided an instruction manual with LED Indicator 11 Threading the Machine 17 Start/Stop Button Reverse Button 11 11 Preparing the Bobbin 17 Presser Foot Lifter 12 Bobbin Winding 17 Thread Cutter 12 Inserting the Bobbin 18 Presser Foot Pressure Dial 12 Threading the Needle 19 Lid 12 Preparing to Thread Machine...
Instruction Manual and Troubleshooting Guide
Page 5
... Sewing Straight Stitch Sewing Straight Stitch Straight Stitch with Auto-lock Stitch Zigzag Stitch Sewing Satin Stitching Blind Hem Stitching Overcasting-Overlocking Using the Overcasting Foot Using the All-Purpose Foot Crazy Patch Stretch Stitch Sewing Multi-Stitch Zigzag Basting Sewing on Buttons Inserting Zippers Centered Insertion Lapped Insertion To Stitch around the Zipper Tab Quilting Joining the Pieces of Fabric Quilting Hand Look Quilting Stitch Automatic Bar-Tack and Darning Buttonhole Sewing Bound Buttonhole Eyelet Continuous Decorative Pattern Applique Free Arm Sewing Twin Needle...
... Sewing Straight Stitch Sewing Straight Stitch Straight Stitch with Auto-lock Stitch Zigzag Stitch Sewing Satin Stitching Blind Hem Stitching Overcasting-Overlocking Using the Overcasting Foot Using the All-Purpose Foot Crazy Patch Stretch Stitch Sewing Multi-Stitch Zigzag Basting Sewing on Buttons Inserting Zippers Centered Insertion Lapped Insertion To Stitch around the Zipper Tab Quilting Joining the Pieces of Fabric Quilting Hand Look Quilting Stitch Automatic Bar-Tack and Darning Buttonhole Sewing Bound Buttonhole Eyelet Continuous Decorative Pattern Applique Free Arm Sewing Twin Needle...
Instruction Manual and Troubleshooting Guide
Page 6
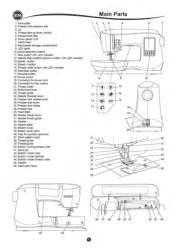
...cover 35. Hole for auxiliary spool pin 37. Bobbin winder stop button 17. button 14. Needle threader lever 25. Feed teeth 19 30. Presser foot pressure dial 3. Handwheel 8. Presser foot release lever 16 26. Stitch pattern chart 21 30 38. Lid 4. Needle stop position up lever (inside) 5. Start/stop 24 43. Thread cutter button with LED indicator 16. Reverse button 1 18. Bobbin cover latch 2 36. Thread guide 22 31 40. Removable storage compartment 9. Bobbin winder thread cutter 26 45. Power switch 19. Presser foot 29. Bobbin winding tension...
...cover 35. Hole for auxiliary spool pin 37. Bobbin winder stop button 17. button 14. Needle threader lever 25. Feed teeth 19 30. Presser foot pressure dial 3. Handwheel 8. Presser foot release lever 16 26. Stitch pattern chart 21 30 38. Lid 4. Needle stop position up lever (inside) 5. Start/stop 24 43. Thread cutter button with LED indicator 16. Reverse button 1 18. Bobbin cover latch 2 36. Thread guide 22 31 40. Removable storage compartment 9. Bobbin winder thread cutter 26 45. Power switch 19. Presser foot 29. Bobbin winding tension...
Instruction Manual and Troubleshooting Guide
Page 7
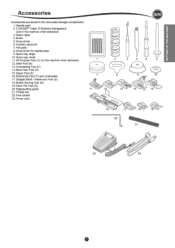
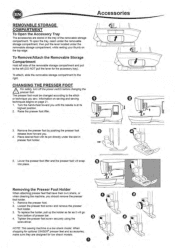
... 2.5 SINGER® Class 15 Bobbins (transparent) (one in the removable storage compartment. 1. Screwdriver for needle plate 9. Overcasting Foot (C) 14. Thread net 22. Power cord 1 C) 7 11 12 O ©> 0 2 3 8 13 4 9 14 EN O) 10 15 16 17 20 18 v 19 21 22 23 Screwdriver 6. Satin Foot (B) 13. Edge/quilting guide 21. Foot control 23. Seam ripper 4. Felt pads 8. Spool cap, small 11. Buttonhole Foot (F) and Underplate 17. Button Sewing Foot (M) 19. Open Toe Foot (N) 20. SETTING UP THE MACHINE Accessories Accessories...
... 2.5 SINGER® Class 15 Bobbins (transparent) (one in the removable storage compartment. 1. Screwdriver for needle plate 9. Overcasting Foot (C) 14. Thread net 22. Power cord 1 C) 7 11 12 O ©> 0 2 3 8 13 4 9 14 EN O) 10 15 16 17 20 18 v 19 21 22 23 Screwdriver 6. Satin Foot (B) 13. Edge/quilting guide 21. Foot control 23. Seam ripper 4. Felt pads 8. Spool cap, small 11. Buttonhole Foot (F) and Underplate 17. Button Sewing Foot (M) 19. Open Toe Foot (N) 20. SETTING UP THE MACHINE Accessories Accessories...
Instruction Manual and Troubleshooting Guide
Page 8
... presser foot lifter and the presser foot will go from bottom of presser bar. 4. When shopping for optional SINGER° presser feet and accessories, make sure they are stored in presser foot holder. 0 5. Loosen the presser foot screw and remove the presser foot holder. 3. To replace the holder, pull up the holder as far as it will snap into place. Tighten the presser foot screw securely using the screwdriver. Turn the handwheel toward you until the needle is a low shank model...
... presser foot lifter and the presser foot will go from bottom of presser bar. 4. When shopping for optional SINGER° presser feet and accessories, make sure they are stored in presser foot holder. 0 5. Loosen the presser foot screw and remove the presser foot holder. 3. To replace the holder, pull up the holder as far as it will snap into place. Tighten the presser foot screw securely using the screwdriver. Turn the handwheel toward you until the needle is a low shank model...

Instruction Manual and Troubleshooting Guide
Page 11
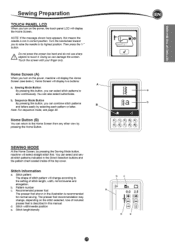
... LED lights will light up when switch is set to raise or lower the needle. 0 C JO D F HI I ). • Do not use this button when there is pressed and will sew a tack and stop button is no fabric under the presser foot or no need to the start /stop automatically at the same time. MACHINE CONTROL FUNCTIONS Tack Button with a twin needle or a hemstitching (wing) needle. You can also tap the foot control to down . Thread Cutter Button...
... LED lights will light up when switch is set to raise or lower the needle. 0 C JO D F HI I ). • Do not use this button when there is pressed and will sew a tack and stop button is no fabric under the presser foot or no need to the start /stop automatically at the same time. MACHINE CONTROL FUNCTIONS Tack Button with a twin needle or a hemstitching (wing) needle. You can also tap the foot control to down . Thread Cutter Button...

Instruction Manual and Troubleshooting Guide
Page 12
... the free arm. NOTE: Machine will not start when the presser foot is to 4 or 5. The setting of the presser foot pressure is not used. 1. Slide the lever (M) to the right to lower the feed teeth for ordinary sewing. For lightweight fabrics such as sheers, batiste, voile, etc, the pressure is located on buttons or free motion sewing. Align the holes (indicated in Sewing Cabinet (N) There are located under the needle plate, directly below the presser foot. Handwheel...
... the free arm. NOTE: Machine will not start when the presser foot is to 4 or 5. The setting of the presser foot pressure is not used. 1. Slide the lever (M) to the right to lower the feed teeth for ordinary sewing. For lightweight fabrics such as sheers, batiste, voile, etc, the pressure is located on buttons or free motion sewing. Align the holes (indicated in Sewing Cabinet (N) There are located under the needle plate, directly below the presser foot. Handwheel...
Instruction Manual and Troubleshooting Guide
Page 13
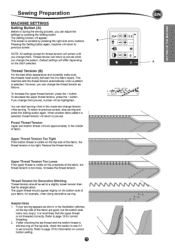
..., see below). Home Button (B) You can also select buttonholes. You can damage the screen. Stitch Information a. Stitch pattern The shape of included presser feet is recommended for normal sewing. b. Use of stitch pattern will display two buttons: A a. Turn the handwheel toward you turn on the stitch selected. Home Screen will change , depending on the power, machine will select straight stitch first. Sequence Mode Button By pressing this manual. Stitch length/density b c ito...
..., see below). Home Button (B) You can also select buttonholes. You can damage the screen. Stitch Information a. Stitch pattern The shape of included presser feet is recommended for normal sewing. b. Use of stitch pattern will display two buttons: A a. Turn the handwheel toward you turn on the stitch selected. Home Screen will change , depending on the power, machine will select straight stitch first. Sequence Mode Button By pressing this manual. Stitch length/density b c ito...

Instruction Manual and Troubleshooting Guide
Page 14
.... Adjusted settings are shown as desired. Stitch Width/Needle Position Increase or decrease the stitch width using the + and - When trying to bottom. This may be heard. Elongation Stitches in the Elongation category (stitches 142-159) can select that stitch density is active instead of stitch length. Increase or decrease the elongation of the satin stitch using + and buttons. Default settings are not automatically saved when the machine is...
.... Adjusted settings are shown as desired. Stitch Width/Needle Position Increase or decrease the stitch width using the + and - When trying to bottom. This may be heard. Elongation Stitches in the Elongation category (stitches 142-159) can select that stitch density is active instead of stitch length. Increase or decrease the elongation of the satin stitch using + and buttons. Default settings are not automatically saved when the machine is...
Instruction Manual and Troubleshooting Guide
Page 15
... fabric. SETTING UP THE MACHINE Sewing Preparation MACHINE SETTINGS Setting Button (A) Before or during the sewing process, you change them. T4 . 3.2 B NOTE: All settings except for Decorative Stitching Thread tension should appear slightly on the underside of the fabric, the thread tension is set . Thread tension will differ depending on the top side of the fabric, the thread tension is selected. This machine sets the thread tension automatically when a pattern is too loose. To increase the upper thread tension, press the + button. You can adjust...
... fabric. SETTING UP THE MACHINE Sewing Preparation MACHINE SETTINGS Setting Button (A) Before or during the sewing process, you change them. T4 . 3.2 B NOTE: All settings except for Decorative Stitching Thread tension should appear slightly on the underside of the fabric, the thread tension is set . Thread tension will differ depending on the top side of the fabric, the thread tension is selected. This machine sets the thread tension automatically when a pattern is too loose. To increase the upper thread tension, press the + button. You can adjust...
Instruction Manual and Troubleshooting Guide
Page 17
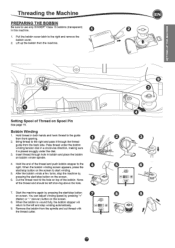
... winding automatically. 9. Insert thread through the thread guide from the spindle and cut thread with the thread cutter. None of Thread on the screen. 6. You can adjust winding speed by pressing the start/stop button on the screen to the hole on bobbin winder spindle. 4. Lift up the bobbin from front opening. 2. Remove the bobbin from the back side. When the bobbin winding screen appears, press the start/stop button on Spool Pin See page 19. §llifffEMLilffEMZ3MMIA Threading...
... winding automatically. 9. Insert thread through the thread guide from the spindle and cut thread with the thread cutter. None of Thread on the screen. 6. You can adjust winding speed by pressing the start/stop button on the screen to the hole on bobbin winder spindle. 4. Lift up the bobbin from front opening. 2. Remove the bobbin from the back side. When the bobbin winding screen appears, press the start/stop button on Spool Pin See page 19. §llifffEMLilffEMZ3MMIA Threading...

Instruction Manual and Troubleshooting Guide
Page 22
... seams. 1. In this case, use the thread cutter located on the foot control pedal to start point. 0 0 0 When you reach end of Seam 0 1. Continue to sew reverse stitch until start sewing. Press and hold the Reverse button to hold the thread tails for changing the presser foot. 2. Check the presser foot (All-Purpose Foot). Raise the presser foot lifter and remove the fabric. You can regulate the sewing speed by pressing the Speed Control buttons or the foot control. Starting To Sew STARTING TO SEW Select the straight stitch center needle position. (No. 0) C:) Start...
... seams. 1. In this case, use the thread cutter located on the foot control pedal to start point. 0 0 0 When you reach end of Seam 0 1. Continue to sew reverse stitch until start sewing. Press and hold the Reverse button to hold the thread tails for changing the presser foot. 2. Check the presser foot (All-Purpose Foot). Raise the presser foot lifter and remove the fabric. You can regulate the sewing speed by pressing the Speed Control buttons or the foot control. Starting To Sew STARTING TO SEW Select the straight stitch center needle position. (No. 0) C:) Start...

Instruction Manual and Troubleshooting Guide
Page 24
... Cutter button. ZIGZAG STITCH SEWING Your machine can sew zigzag stitches of various widths and lengths by changing the settings of fabric being sewn. Position the fabric under the presser foot and lower it. 2. Machine will sew a few stitches backward and sew a few stitches forward and stop sewing. 4. No. 1 Zigzag Stitch All-Purpose Foot (A) or Satin Foot (B) Zigzag stitches are often used for sewing light weight fabrics. No. 0. Guide the fabric gently with Auto-lock Stitch (Pattern No. 12, 13) 1. When you reach the end of seam, stop automatically. 4. Left needle...
... Cutter button. ZIGZAG STITCH SEWING Your machine can sew zigzag stitches of various widths and lengths by changing the settings of fabric being sewn. Position the fabric under the presser foot and lower it. 2. Machine will sew a few stitches backward and sew a few stitches forward and stop sewing. 4. No. 1 Zigzag Stitch All-Purpose Foot (A) or Satin Foot (B) Zigzag stitches are often used for sewing light weight fabrics. No. 0. Guide the fabric gently with Auto-lock Stitch (Pattern No. 12, 13) 1. When you reach the end of seam, stop automatically. 4. Left needle...
Instruction Manual and Troubleshooting Guide
Page 26
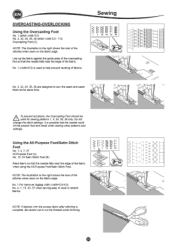
...; • Line up the fabric against the guide plate of the overcasting foot so that the needle could hit the presser foot and break when sewing other patterns and settings. Do not change the stitch settings. NOTE: The illustration to the right shows the look of the fabric when using the All-Purpose Foot/Satin Stitch Foot. A To prevent accidents, the OvercastingFoot should be used to cut the threads while trimming. 1 /VVVVVV...
...; • Line up the fabric against the guide plate of the overcasting foot so that the needle could hit the presser foot and break when sewing other patterns and settings. Do not change the stitch settings. NOTE: The illustration to the right shows the look of the fabric when using the All-Purpose Foot/Satin Stitch Foot. A To prevent accidents, the OvercastingFoot should be used to cut the threads while trimming. 1 /VVVVVV...
Instruction Manual and Troubleshooting Guide
Page 28
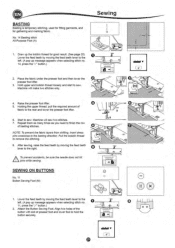
... make two stitches only. Pull the bobbin thread to sew. A To prevent accidents, be sure the needle does not hit pins while sewing. Hold upper and bobbin thread loosely and start to remove the stitching. 8. Holding the upper thread, pull the required amount of fabric to hold the button securely. _I 1,..1•NS AMIN T 0 0 Align two holes of the button with slot of presser foot and lower foot to the rear and lower the presser foot lifter. 6. Attach the Button Sewing Foot...
... make two stitches only. Pull the bobbin thread to sew. A To prevent accidents, be sure the needle does not hit pins while sewing. Hold upper and bobbin thread loosely and start to remove the stitching. 8. Holding the upper thread, pull the required amount of fabric to hold the button securely. _I 1,..1•NS AMIN T 0 0 Align two holes of the button with slot of presser foot and lower foot to the rear and lower the presser foot lifter. 6. Attach the Button Sewing Foot...
Instruction Manual and Troubleshooting Guide
Page 32
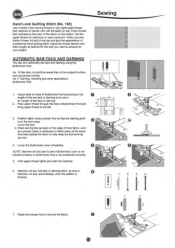
... you sew. 4. Position fabric under presser foot so that the starting point is not positioned correctly. ' When you sew, bobbin thread will be subject to be sewn. Buttonhole Foot Sewing O 1. Adjust slide on the thick area. Pass upper thread through the hole of a traditional hand quilting stitch. Place thread that contrasts to sew ifButtonhole Lever is not 1 lM i r lowered properly or Buttonhole Foot is on base of Buttonhole Foot according to the O length of the bar-tack or darning to...
... you sew. 4. Position fabric under presser foot so that the starting point is not positioned correctly. ' When you sew, bobbin thread will be subject to be sewn. Buttonhole Foot Sewing O 1. Adjust slide on the thick area. Pass upper thread through the hole of a traditional hand quilting stitch. Place thread that contrasts to sew ifButtonhole Lever is not 1 lM i r lowered properly or Buttonhole Foot is on base of Buttonhole Foot according to the O length of the bar-tack or darning to...
Instruction Manual and Troubleshooting Guide
Page 36
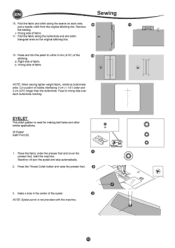
... the fabric under the presser foot and lower the O presser foot. Make a hole in the center of fabric 11. Remove the basting. Fold the fabric along the seams on the original stitching line. Press and trim the patch to wrong side over each side, just a needle width from the original stitching line. Start the machine. Cut a patch of fabric b. Machine will sew the eyelet and stop automatically. 2. Press the Thread Cutter button and raise the presser foot...
... the fabric under the presser foot and lower the O presser foot. Make a hole in the center of fabric 11. Remove the basting. Fold the fabric along the seams on the original stitching line. Press and trim the patch to wrong side over each side, just a needle width from the original stitching line. Start the machine. Cut a patch of fabric b. Machine will sew the eyelet and stop automatically. 2. Press the Thread Cutter button and raise the presser foot...
Instruction Manual and Troubleshooting Guide
Page 43
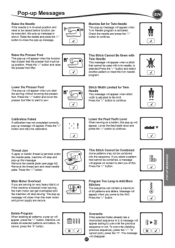
... the calibration. • • • 11 . . . Stitch Width Limited for Twin Needle This pop-up message. Machine Set for Twin ■ Needle This message will appear. V • A • Thread Jam If upper or bobbin thread is jammed under the needle plate, machine will appear when ■ Twin Needle program is selected.Press the "✓" button and select another pattern or reset the twin needle • 4 program. • Lower the Presser Foot This pop-up position.
... the calibration. • • • 11 . . . Stitch Width Limited for Twin Needle This pop-up message. Machine Set for Twin ■ Needle This message will appear. V • A • Thread Jam If upper or bobbin thread is jammed under the needle plate, machine will appear when ■ Twin Needle program is selected.Press the "✓" button and select another pattern or reset the twin needle • 4 program. • Lower the Presser Foot This pop-up position.

Instruction Manual and Troubleshooting Guide
Page 45
... Hints PROBLEM Upper thread breaks Lower thread breaks Machine skips stitches Fabric puckers Machine makes loose stitches or loops Stitch pattern is not balanced. Needle inserted incorrectly. Re-thread the bobbin. 18 Bobbin wound unevenly or too full. Readjust thread tension. 15 Bobbin threaded incorrectly. Re-thread machine. 19 Tension not adjusted properly. Readjust thread tension. 15 Presser foot is not suited for fabric. 9 (use stretch needle) Machine not properly threaded. and clean the hook race. Lower the foot. 12 MAINTENANCE Clean the holder. 45 Needle inserted...
... Hints PROBLEM Upper thread breaks Lower thread breaks Machine skips stitches Fabric puckers Machine makes loose stitches or loops Stitch pattern is not balanced. Needle inserted incorrectly. Re-thread the bobbin. 18 Bobbin wound unevenly or too full. Readjust thread tension. 15 Bobbin threaded incorrectly. Re-thread machine. 19 Tension not adjusted properly. Readjust thread tension. 15 Presser foot is not suited for fabric. 9 (use stretch needle) Machine not properly threaded. and clean the hook race. Lower the foot. 12 MAINTENANCE Clean the holder. 45 Needle inserted...


