Singer CE-350 Futura Support and Manuals
Get Help and Manuals for this Singer item
View All Support Options Below
Free Singer CE-350 Futura manuals!
Problems with Singer CE-350 Futura?
Ask a Question
Free Singer CE-350 Futura manuals!
Problems with Singer CE-350 Futura?
Ask a Question
Most Recent Singer CE-350 Futura Questions

My Thread Is Stuck
My thread is stuck in part of the thread guide. How can I remove it?
My thread is stuck in part of the thread guide. How can I remove it?
(Posted by diabeen 1 year ago)

Dropped Embroidery Unit Now Will Not Work 88shows On Machine
(Posted by patricklindadowney 9 years ago)
Popular Singer CE-350 Futura Manual Pages
Instruction Manual - Page 3
... 82 - 83 Attaching and removing embroidery hoop 82 - 83 Installation of software 84 - 87 Operation switches when embroidery unit is attached ------ 88 - 89 Operation switches, Thread tension control Troubleshooting 90 - 101
4. PREPARATION FOR EMBROIDERY SEWING Before attaching embroidery unit 70 - 73
Attaching embroidery foot, Inserting the bobbin, Setting top thread, Picking up bobbin...
Instruction Manual - Page 8
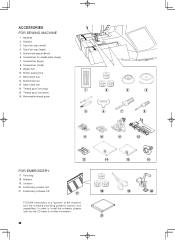
... 20. In order to install the software, please look into the CD insert for needle plate (large) 7. Spool pin cap (small) 4. Zipper foot 10. Thread spool net (long) 15. Removable thread guide
1
2
3
4
5
6
7
8
9
10
11
12
13
FOR EMBROIDERY
17. Embroidery software CD
17
FUTURA embroidery is a "system" of the machine and the software providing powerful options and capabilities...
Instruction Manual - Page 10
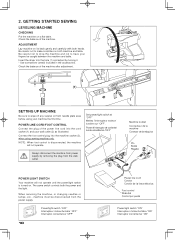
... the power line cord into the cord socket (1) and your machine the first time.
Check the balance of the machine after adjustment.
(1)
SETTING UP MACHINE
Be sure to have your fingers be disconnected from needle plate area before using sewing machine only. Insert the driver into the machine socket (3), when using your wall outlet (2) as illustrated. NOTE: When...
Instruction Manual - Page 26
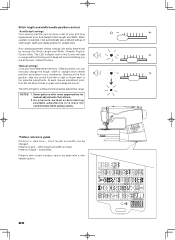
... move the control knobs while sewing slowly.
*Pattern reference guide
Patterns in orange without blinking and a beep will sound indicating you can be sewn with circled numbers cannot be changed. Some patterns offer more opportunities for straight stitch. Stitch length and width/needle position controls
*Auto/Default settings Your sewing machine will produce most of...
Instruction Manual - Page 34

... distance from the needle at its highest position, then raise the presser foot. Needle stop switch (For embroidery only) E. Stitch width control lever H. Draw the
6
fabric to the rear and cut off excess ... the material, stop the sewing machine.
6. The guide line on the needle plate. STRAIGHT STITCHING
The straight stitch is used . Let's set the machine for narrow seams, such as...
Instruction Manual - Page 40
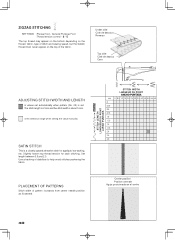
... is the selection range when setting the value manually. SATIN STITCH
This is set automatically when pattern (No. ...Set length between 0.5 and 2.0.
ZIGZAG STITCHING
SETTINGS :Presser foot - PLACEMENT OF PATTERNS
Stitch width of stabilizer to help avoid stitches puckering the fabric.
E
The top thread may appear on the bottom depending on the thread, fabric, type of stitch and sewing...
Instruction Manual - Page 68
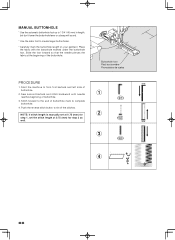
... button to create larger buttonholes.
* Carefully mark the buttonhole length on your garment. NOTE: If stitch length is manually set the stitch length at the beginning of buttonhole.
3. Stitch forward to complete buttonhole.
4. Sew second bartack and stitch backward until needle
1
reaches beginning of the buttonhole. Place the fabric with the buttonhole marked...
Instruction Manual - Page 74
... machine for general sewing.
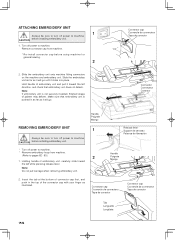
2
2. Hold handle of the connector cap with your finger as illustrated. Make sure that embroidery unit does not detach. Release lever Support de cerceau Palanca de liberación
Handle Poignée Mango
2. Remove connector cap from machine.
(Refer to machine.
* Remove embroidery hoop from machine.
* Re-install connector cap before installing embroidery...
Instruction Manual - Page 84

....
It would have to first install the contents of the software begins with terms given in order to as "installation procedure".
In most personal computers the default drive setting for a CD-ROM drive is refered to successfully install FUTURA on "Next" to use the default selected directory. You can run the installation procedure manually by clicking on a CD...
Instruction Manual - Page 86
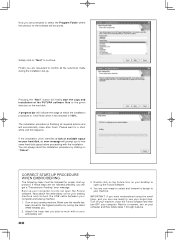
... installation utility identifies a lack of the FUTURA software files to the given directory on the hard disk.
Next attach the embroidery unit to your hard disk, an error message will prompt you plan to work with the installation. Attach the hoop that you to free some hard disk space before proceeding with to your computer and sewing machine...
Instruction Manual - Page 88
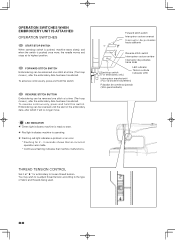
... the embroidery data has been transferred.
LED INDICATOR Green light indicates machine is ...machine starts slowly, and when the switch is operating. Flashing red light indicates a problem or an error.
* Flashing for embroidery to start. Red light indicates machine...EMBROIDERY UNIT IS ATTACHED OPERATION SWITCHES
START/STOP SWITCH When start/stop switch (For embroidery...
Instruction Manual - Page 104

... de verrouillage du pied Palanca de desprendimiento prensatelas
2
Foot holder Support du pied Sujetador prensatelas
Make any adjustments with the foot holder....dessus Cara
BOBBIN TENSION
The bobbin tension has been correctly set at the factory, so you do not need to adjust... determined by the balanced tension of fabric you are sewing.
Push presser foot release button to adjust it. ...
Instruction Manual - Page 106

... operating. Flashing red light indicates a problem or an error.
* Flashing for tie-off the sewing on all patterns except straight and zigzag stitches. START/STOP SWITCH
This switch works only when sewing embroidery.
LED INDICATOR Green light indicates machine is ready to start. Red light indicates machine is pushed. Reverse stitch function for straight...
Instruction Manual - Page 114
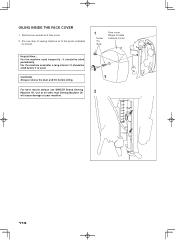
... frontal
Helpful Hints : For the machine used frequently : It should be oiled periodically.
CAUTION: Always remove the dust and lint before it is used after a long interval : It should be oiled before oiling.
F or best results always use SINGER Brand Sewing Machine Oil. Use of sewing machine oil to your machine.
114 OILING INSIDE THE FACE COVER...
Instruction Manual - Page 124
...this manual." 3. "IMPORTANT SAFETY INSTRUCTIONS"
" When using this sewing machine." "DANGER--To reduce the risk of lint, dust, and loose cloth." 5.
Return the sewing machine to the off before replacing light bulb. Special care is being administered." 8. This will benefit the environment for examination, repair, electrical or mechanical adjustment." 4. " Read all moving parts...
Singer CE-350 Futura Reviews
We have not received any reviews for Singer yet.