Singer CE-350 Futura Support Question
Singer CE-350 Futura Support Question
Find answers below for this question about Singer CE-350 Futura.Need a Singer CE-350 Futura manual? We have 1 online manual for this item!
Question posted by patricklindadowney on June 22nd, 2014
Dropped Embroidery Unit Now Will Not Work 88shows On Machine
The person who posted this question about this Singer product did not include a detailed explanation. Please use the "Request More Information" button to the right if more details would help you to answer this question.
Current Answers
Related Singer CE-350 Futura Manual Pages
Instruction Manual - Page 3
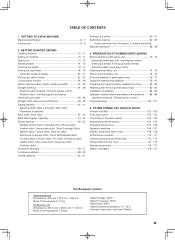
... Oiling inside the face cover 114 - 115 Special accessories 116 - 117 Helpful messages 118 - 121
For European version
Sewing machine Dimensions: 428 mm × 307 mm × 294 mm Mass of the equipment: 10 kg
Embroidery unit Dimensions: 433.5 mm × 269.5 mm × 133 mm Mass of software 84 - 87 Operation switches when...
Instruction Manual - Page 6
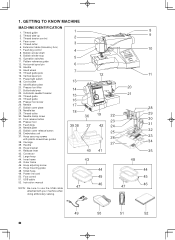
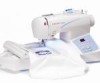
Bobbin winder stop 10. Presser foot lifter 21. Needle 27. Embroidery unit 37. Large hoop 44. Hoop mounting plate 48. USB cable 52. Thread cutter 6. ... 16. Vertical spool pin 17. Thread guide 24. Bobbin cover plate 28. Feed dogs 34. Hoop securing screws
with your machine when doing embroidery sewing.
1 2 3 4 5 6 7 13 14 15 16 17 18
39 38
47
36 37
40 43
12
19 ...
Instruction Manual - Page 8
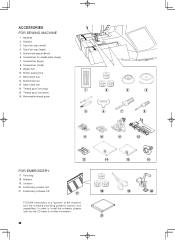
.... Removable thread guide
1
2
3
4
5
6
7
8
9
10
11
12
13
FOR EMBROIDERY
17. Screwdriver (large) 8. Thread spool net (short) 16. Bobbins 19. In order to ... 20. Buttonhole foot 13. Thread spool net (long) 15. Embroidery software CD
17
FUTURA embroidery is a "system" of the machine and the software providing powerful options and capabilities. Buttonhole opener/Brush ...
Instruction Manual - Page 10
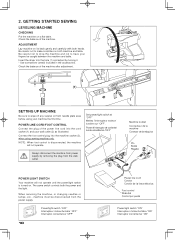
... switch "ON" Interrupteur moteur/lumière "ON" Interruptor corriente/luz "ON" GETTING STARTED SEWING
LEVELING MACHINE
CHECKING
Put the machine on its back gently and carefully with both hands. Check the balance of the machine after adjustment.
(1)
SETTING UP MACHINE
Be sure to wipe off any surplus oil from needle plate area before using...
Instruction Manual - Page 26
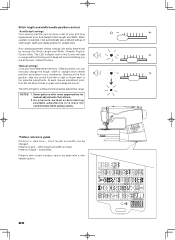
... are easily determined by moving the Stitch Length and Width / Needle Position Control Knob.
Stitch length and width/needle position controls
*Auto/Default settings Your sewing machine will produce most of your stitching requirements at the Auto / Default Position. *Manual settings Once you have determined the Auto / Default position you are at...
Instruction Manual - Page 28

... selection buttons, and a beep will sound when selecting buttonhole pattern with the direct selection button. Helpful Hints: 1. Turning off the machine returns the machine to selecting a pattern.
A l w a y s s e l e c t t h e Tw i n N e e d l e M o d e p r i o r
to normal sewing mode. This will reduce the stitch width automatically and save broken needles and possible damage to your...
Instruction Manual - Page 34

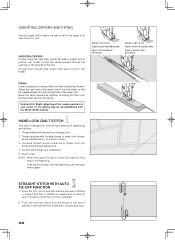
...distance from the needle at its highest position, then raise the presser foot. Needle stop the sewing machine.
6. Reverse stitch switch D. Presser foot lifter G. Place the fabric under the presser foot ... mm) 3/8" ( 9 mm) 1/4" ( 6 mm) Start/stop switch (For embroidery only) E. Start the machine. First turn the handwheel toward the back of the numbered guide lines on the needle...
Instruction Manual - Page 38
... beginning, push the start switch again.
NOTE: When the upper thread is designed to look like hand sewing for the piping.
Set the stitich length at 4 (maximum). 5.
Press the foot control and the machine will sew 4 stitches in reverse and then 4 stitches in forward until you
achieve the desired appearance. 4. INSERTING ZIPPERS AND...
Instruction Manual - Page 70
... you to use full bobbin.
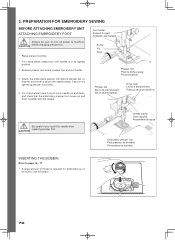
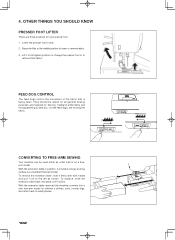
PREPARATION FOR EMBROIDERY SEWING
BEFORE ATTACHING EMBROIDERY UNIT ATTACHING EMBROIDERY FOOT
Always be sure to turn off power to machine CAUTION before changing presser foot.
* Raise ...in its highest
position. 1. Needle clamp Serre-aiguille Abrazadera de aguja
Embroidery presser foot Pied presseur de broderie Prensatelas de bordado
70 INSERTING THE BOBBIN
Refer...
Instruction Manual - Page 74
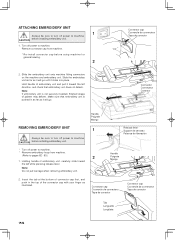
...Tapa de conector
tab Languette Lengüeta
74
ATTACHING EMBROIDERY UNIT
1
Always be sure to turn off power to machine CAUTION before using machine for general sewing.
2
2. Note: Do not pull carriage when removing embroidery unit. Slide the embroidery unit onto machine fitting connectors on the machine and embroidery unit.
Insert the tab at the bottom of connector cap first...
Instruction Manual - Page 82

... mounting screws (D) and remove the hoop from underneath the embroidery foot.
2
(C)
(D)
2. NOTE: Before attaching small hoop, turn on power switch to move the carriage to embroidery unit by aligning hoop mounting
(D)
screws (D) and the grooves in... to its highest position. ATTACHING AND REMOVING EMBROIDERY HOOP
1
(A)
1.
PREPARING THE MACHINE BEFORE
INSTALLING THE HOOP
1
1.
Instruction Manual - Page 86
... 1 through 4 above.
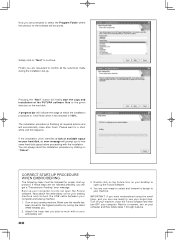
86 Next attach the embroidery unit to 100%.
A progress bar will get a "Transmission Pending" error message.
Finally you are now ready to select and transmit a design to continue.
Wait for a short while until this happens. It will automatically close the Futura software and then turn on "Next" to your computer and sewing machine.
1.
Instruction Manual - Page 88
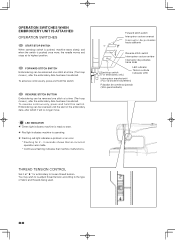
...; Red light indicates machine is pushed once more, the needle moves and stops at a time (The hoop moves.), after the embroidery data has been transferred. To reverse continuously, press and hold this switch.
REVERSE STITCH BUTTON Embroidering can be reversed one stitch at its highest position. OPERATION SWITCHES WHEN EMBROIDERY UNIT IS ATTACHED OPERATION...
Instruction Manual - Page 94
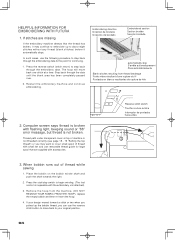
...embroidery machine and continue embroidering. Computer screen says thread is broken with flashing light, beeping sound or "88" error message, but thread is inoperable with the embroidery unit...embroidery data. Thread path under transparent cover at top of machine... spool of thread while sewing
1. Embroidering direction Direction... are missing
If the embroidery machine detects that are supplied ...
Instruction Manual - Page 102
....
102 With the extension table removed the machine converts into place until it provides a large working surface as a freearm model. Raise the lifter to the middle position to sew. 2. CONVERTING TO FREE-ARM SEWING
Your machine can be raised for all general sewing purposes and lowered for darning, freehand embroidery and monogramming so that is being sewn...
Instruction Manual - Page 106

...; Flashing red light indicates a problem or an error.
* Flashing for 2 - 3 seconds shows that an incorrect operation was made.
* Continuous flashing indicates a machine malfunction.
START/STOP SWITCH
This switch works only when sewing embroidery. Reverse stitch function for straight and zigzag stitches
Fonction couture arrière pour les points droits et zigzags
Funció...
Instruction Manual - Page 112

...(2) (A) (B)
5. Remove the bobbin case (2).
3
4. CAUTION
To ensure the best possible operation of sewing machine oil on the hook race as indicated by removing the plug from the wall-outlet. Clean the feed dogs... all times.
1. Replace the bobbin case with the lint brush.
4
Put one drop of your machine, it is necessary to its highest position.
2. Remove the needle plate (1).
(1)
2
3.
Instruction Manual - Page 114
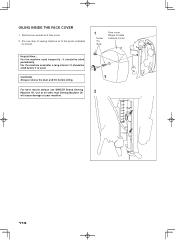
... periodically. Remove two screws and face cover. 2. Use of sewing machine oil to your machine.
114 Put one drop of oil other than Sewing Machine Oil
2
will cause damage to the points indicated
by arrows.
1
Screw Vis Guia
Face cover Plaque frontale
Cubierta frontal
Helpful Hints : For the machine used . OILING INSIDE THE FACE COVER
1. CAUTION: Always...
Instruction Manual - Page 120

... that USB cable is connected and power switch is pushed in operation.
120 Bobbin winder is completed.
Embroidery sewing is in and pulled out while sewing patterns. Don't touch the plug while sewing. Embroidery unit is lowered when starting embroidery sewing. Raise needle by rotating hand wheel toward you. Needle is installed with small hoop attached...
Instruction Manual - Page 124
... Return the sewing machine to the nearest authorized dealer or service center for all moving parts. "To disconnect, turn switch to fit in . Special care is not working properly, if... repair, electrical or mechanical adjustment." 4. "This sewing machine should always be used as a toy. "Keep fingers away from outlet." 9. "Never drop or insert any object into water. Copyright © 2005...
Similar Questions


Singer Futura Quartet Seqs-6700 Embroidery Carriage Has Stopped Working
My embroidery carriage will not move. The machine gives the error that the hoop is the wrong size an...
My embroidery carriage will not move. The machine gives the error that the hoop is the wrong size an...
(Posted by kpbilleaud 2 years ago)

Singer Futura Xl400
My foot pedal will not work when I hook up my embroidery unit - it was working great and I changed o...
My foot pedal will not work when I hook up my embroidery unit - it was working great and I changed o...
(Posted by trinabear 4 years ago)

Embroidery Design Stuck To Machine
I was doing an embroidery project, and it suddenly kept breaking strings and indicating the top thre...
I was doing an embroidery project, and it suddenly kept breaking strings and indicating the top thre...
(Posted by spsfplayscape 9 years ago)

Thread Bunches
The thread keeps bunching under the feed dogs. I have done all what the manual says to do when this ...
The thread keeps bunching under the feed dogs. I have done all what the manual says to do when this ...
(Posted by erlajoanne 10 years ago)