Get support for Singer 90S I SPECIAL EDITION

Singer 90S I SPECIAL EDITION Support Question

Singer 90S I SPECIAL EDITION Support Question

Find answers below for this question about Singer 90S I SPECIAL EDITION.
Need a Singer 90S I SPECIAL EDITION manual? We have 1 online manual for this item!
Question posted by fka4102 on January 26th, 2023

How Do I Lower The Feed Dog?

The person who posted this question about this Singer product did not include a detailed explanation. Please use the "Request More Information" button to the right if more details would help you to answer this question.

Current Answers

Answer #1: Posted by MercedesAMG on January 26th, 2023 4:48 AM
This answer was accepted by the poster of the original question.
MercedesAMG

Member since:
January 26th, 2013

Points: 193,710
1,100
points
The feed dog on a sewing machine is the part that moves the fabric through the machine while you're sewing. On a Singer 90S I Special Edition machine, you can lower the feed dog in order to do free-motion quilting, embroidery, or other types of sewing that require the fabric to be moved manually.

Here are the general steps to lower the feed dog on a Singer 90S I Special Edition machine:

  1. Make sure the machine is unplugged and the presser foot is in the raised position.
  2. Locate the feed dog lever or switch, which is usually on the front or back of the machine near the needle.
  3. Move the lever or switch to the "down" or "off" position. This will lower the feed dog so that it is not in contact with the fabric.
  4. If you have a lever, slide it down to lower the feed dog.
  5. If you have a switch, turn it off to lower the feed dog.
  6. You can now move the fabric manually to do free-motion quilting or other types of sewing that require the feed dog to be lowered.

It's important to note that not all sewing machines have the feed dog lever or switch, or the location of the lever or switch might be different, please consult the manual provided with your machine or contact the manufacturer's customer service for help.


Please respond to my effort to provide you with the best possible solution by using the "Acceptable Solution" and/or the "Helpful" buttons when the answer has proven to be helpful. Please feel free to submit further info for your question, if a solution was not provided. I appreciate the opportunity to serve you!
Answer #2: Posted by EveryComeBack on January 26th, 2023 5:57 AM
EveryComeBack

Member since:
January 22nd, 2023

Points: 310
100
points
The feed dog is the mechanism in a sewing machine that moves the fabric through the machine while you are sewing. To lower the feed dog, the process may vary depending on the specific model of your sewing machine. Here are some general steps that may apply to your machine:
  1. Locate the feed dog lever or knob on your machine. This is usually located near the needle and the presser foot.
  2. Position your machine for darning or free-motion sewing by removing the presser foot and lowering the feed dogs.
  3. Move the feed dog lever or knob to the down or "lowered" position.
  4. Sew your fabric using your darning foot or free-motion quilting foot.
  5. When you are finished, be sure to raise the feed dogs again by moving the lever or knob back to its original position.

Note: Some machines have a button or switch to lower the feed dog others may have a lever or knob. It's always recommended to check the user manual of your machine or contact the manufacturer's customer service for specific instructions.

Answer #3: Posted by ishara12 on January 26th, 2023 4:45 AM
ishara12

Member since:
January 17th, 2023

Points: 90
90
points
Lowering the feed dogs on a sewing machine allows the fabric to be moved freely under the presser foot without being gripped and moved forward by the feed dogs. This is useful for certain types of sewing, such as free-motion quilting or darning.

The method for lowering the feed dogs varies depending on the make and model of the sewing machine. Here are a few general steps that may apply to your machine:

  1. Consult the sewing machine manual for specific instructions for your machine.
  2. Remove the presser foot and the throat plate (the plate that covers the feed dogs) from the machine.
  3. Locate the lever or switch that controls the feed dogs. This may be located on the front or back of the machine, or inside the bobbin case area.
  4. Move the lever or switch to the "down" or "off" position to lower the feed dogs.
  5. Replace the throat plate and presser foot, making sure they are securely in place.
  6. Test the machine by sewing a few stitches to ensure the feed dogs are indeed lowered and the fabric moves freely under the presser foot.

It is important to note that lowering the feed dogs on your machine will not affect the stitching process, but it will affect the movement of the fabric and how it is being fed into the machine. If you are not sure about the process, it is always recommended to consult the manual or contact the manufacturer for assistance.

Answer #4: Posted by SonuKumar on January 26th, 2023 10:45 AM
SonuKumar

Member since:
May 9th, 2021

Points: 16,609,800
90
points


Please respond to my effort to provide you with the best possible solution by using the "Acceptable Solution" and/or the "Helpful" buttons when the answer has proven to be helpful.

Regards,
Sonu
Your search handyman for all e-support needs!!

Related Singer 90S I SPECIAL EDITION Manual Pages

Instruction Manual - Page 2

...GHVFULEHGLQWKLVPDQXDO8VHRQO\DWWDFKPHQWVUHFRPPHQGHGE\WKH manufacturer as contained in this sewing machine. Indoors use , or equivalent. FOOT CONTROL (USA & Canada only) Use Model... ULVN RI LQMXU\ VZLWFK RII EHIRUH VHUYLFLQJ &ORVH FRYHU EHIRUH RSHUDWLQJ machine. Caution - SAVE THESE INSTRUCTIONS This product is for household use only.  'RQRWRSHUDWHZKHUHDHURVRO...
Instruction Manual - Page 5

TABLE OF CONTENTS 1. KNOWING YOUR SEWING MACHINE 0DFKLQHLGHQWL¿FDWLRQ 6 - 7 $FFHVVRULHV 8 - 9 6HWWLQJXS\RXUPDFKLQH 10 - 11 Spool...UHTXHQF\+] 5DWHGLQSXW: 8VLQJDPELHQWWHPSHUDWXUH1RUPDOWHPSHUDWXUH $FRXVWLFQRLVHOHYHOOHVVWKDQGE $ 3 CARING FOR YOUR MACHINE &OHDQLQJKRRNDUHDDQGIHHGGRJV 60 - 61 &OHDQLQJWKHVHZLQJPDFKLQHDQGIRRWFRQWUROOHU 4. OTHER INFORMATION...
Instruction Manual - Page 8

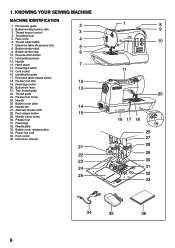
...SLQ 12. Needle bar  $OWHUQDWHWKUHDGFXWWHU 28. Foot release button  1HHGOHFODPSVFUHZ 30. Bobbin cover release button  3RZHUOLQHFRUG 35. KNOWING YOUR SEWING MACHINE MACHINE IDENTIFICATION  3UHWHQVLRQJXLGH  %REELQZLQGLQJWHQVLRQGLVN 3. Handle  +DQGZKHHO  3RZHUOLJKWVZLWFK  &RUGVRFNHW  ,GHQWL¿FDWLRQSODWH 17. Extension table release...
Instruction Manual - Page 10

... underplate The foot that comes on your sewing machine is another very useful foot and should be used for the majority of your sewing. ACCESSORIES 1. Spool pin cap (medium)...The satin foot (11) is called the allpurpose foot and will be used for most of your decorative sewing - Spool pin cap (small) 6. Needles 2. Blindhem stitch foot 13. When purchasing additional bobbins, be...
Instruction Manual - Page 12

...   LQWR WKH PDFKLQHVRFNHW NOTE: W h e n f o o t c o n t r o l i s disconnected, the machine will not operate. 6HWSRZHUOLJKWVZLWFKDW³2))´ 0HWWH]O¶LQWHUUXSWHXUPRWHXU lumière à la position « Fermé »...GHFRUULHQWHOX] HQ³2))´ 0DFKLQHVRFNHW Prise du cordon de la machine &RQHFWRUGHODPiTXLQD 2 1 3LQSOXJ Butée Conector 3 3RZHU...
Instruction Manual - Page 14

...pin cap Chapeau de bobine Tapa del pasador carrete Spool Bobine Carrete Spool pin Porte-bobine Pasador carrete FEED DOG CONTROL 7KH IHHG GRJV FRQWURO WKH PRYHPHQW RI WKH IDEULF WKDW LV ...dientes CONVERTING TO FREE-ARM SEWING NOTE: If you start the machine with presser foot raised, it will alert you with a beep sound to lower the presser foot to sew. Spool Bobine Carrete Felt ...
Instruction Manual - Page 18

...VORW $ DQGWKHQWRWKHOHIW 4  :LWK D ILQJHU KHOG JHQWO\ RQ WRS RI WKH EREELQ SXOO WKH 5 thread until it stops in the slot (B). NOTE: Sewing can be started without picking up the bobbin thread.  5HSODFHWKHFOHDUEREELQFRYHUSODWHRQWRWKHQHHGOHSODWH 6 A Cutter Couteau Cortador Groove 5DLQXUH Surco...
Instruction Manual - Page 20

... SDJH IRU LQVWUXFWLRQV RQ RSHUDWLRQRIWKH$XWRPDWLF1HHGOH7KUHDGHU IMPORTANT: To verify that the machine is threaded properly in the tension discs, do not detect the resistance you should detect only D VOLJKW...WKH needle. 2.) Now lower the presser foot and again pull the thread towards C the back of the machine. This time you have mis-threaded the machine and need to re-thread ...
Instruction Manual - Page 22

... est recommandé de régler votre machine au point droit lors de O¶XWLOLVDWLRQGH...N'abaissez pas le levier d'enfilage lorsque la machine est en marche. IMPORTANT: If the needle...FRQWUDLUHGHVDLJXLOOHVG XQHPRQWUH DYDQWG HQ¿OHUOD machine. 1. 7KUHDGWKHPDFKLQHZLWK\RXUOHIWKDQGZKLOHJULSSLQJWKH... hold it is recommended that the machine be set for straight stitch (in ...
Instruction Manual - Page 24

NEEDLE, THREAD AND FABRIC CHART
Instruction Manual - Page 26

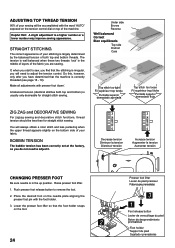
...WR DGMXVW WKH WHQVLRQ FRQWURO 'R WKLV KRZHYHU only after you have determined that the machine is correctly WKUHDGHG VHHSDJH  0DNHDOODGMXVWPHQWVZLWKSUHVVHUIRRWµGRZQ¶ $ EDODQFHG ...: A slight adjustment to a higher number or a lower number may improve sewing appearance. 675$,*+7 STITCHING 7KHFRUUHFWDSSHDUDQFHRI\RXUVWLWFKLQJLVODUJHO\GHWHUPLQHG by the...
Instruction Manual - Page 30

... LV QRW the default. 7KH VHWWLQJV VHOHFWHG IRU HDFK VWLWFK DUH VDYHG XQWLO WKH machine is set at a time. STITCH SELECTION DIAL 7KHUHDUHWZRPDLQFDWHJRULHVRIVWLWFKHV ‡8WLOLW\VWLWFKHV EXWWRQKROHV...Press the center of the stitch width or stitch length value number disappears, the machine is turned off. Example: To select stitch number 52, press the center of...
Instruction Manual - Page 32

...WKHEXWWRQLVOLWUHG 8. To disengage Twin Needle Safety and return the machine to selecting a pattern. NEEDLE STOP POSITION SELECTOR BUTTON When the machine is turned on, needle is lit. 7. Twin Needle Safety is only active ... VXLWDEOH IRU WZLQ needle. Note: Always select the Twin Needle Safety prior to normal sewing mode, either press the Twin Needle Safety button again or turn the...
Instruction Manual - Page 36

SPEED CONTROL LEVER 6OLGLQJWKHOHYHUVHWVGHVLUHGVHZLQJVSHHG:KHQIRRWFRQWURO is pushed, the machine starts VORZO\ DQG ZKHQ WKH EXWWRQ LV SXVKHG RQFH PRUH WKH machine stops. +RZHYHU ZKHQ IRRW FRQWURO LV SOXJJHG WKH 6WDUW6WRS EXWWRQ ZLOOEHLQDFWLYH 2. START/STOP BUTTON When the Start/Stop button is used...
Instruction Manual - Page 38

... 7KHPDFKLQHZLOOFRQWLQXHWRVHZLQUHYHUVHDVORQJDVWKH reverse stitch button is pressed. * Tacking stitch function for tie-off the sewing pattern to avoid raveling at the start and end of other stitches ( ) 7KH VHZLQJ PDFKLQH PDNHV  WLQ\ WDFNLQJ VWLWFKHV WR... H[DFW VSRW LQ WKH SDWWHUQ ZKHUH WKH UHYHUVHWDFNLQJ VWLWFK button is very useful for tying off of sewing. 36
Instruction Manual - Page 44

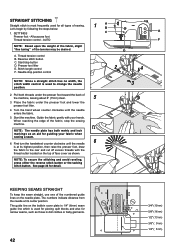
...PDFKLQH*XLGHWKHIDEULFJHQWO\ZLWK\RXUKDQGV :KHQ UHDFKLQJ WKH HGJH RI WKH IDEULF VWRS WKH VHZLQJ machine. Presser foot lifter (6WLWFKOHQJWKFRQWURO F. See page 36 for guiding your fabric when sewing a seam. 6  )LUVWWXUQWKHKDQGZKHHOFRXQWHUFORFNZLVHXQWLOWKHQHHGOH LV DW LWV KLJKHVW SRVLWLRQ WKHQ UDLVH WKH...
Instruction Manual - Page 48

...WKH WKUHDGIDEULFW\SHRIVWLWFKDQGVHZLQJVSHHGEXWWKHEREELQ thread must never appear on the sewing machine. 6$7,167,7&+ 7KLV LV D FORVHO\ VSDFHG ]LJ ]DJ VWLWFK XVHG IRU DSSOLTXp... D EDFNLQJ RI VWDELOL]HU IRU OLJKWZHLJKW IDEULFV WR DYRLG SXFNHULQJ NOTE: When sewing a dense (closely spaced) satin stitch, the satin stitch foot MUST be used. 3/$&(0(172)3$77(516 6WLWFK...
Instruction Manual - Page 56

...Be careful not to the backside of the fabric and tie together. 54 SEWING ON A BUTTON 6(77,1*6 3UHVVHUIRRW$OOSXUSRVHIRRW  )HHG...VHZLQJ   6OLJKWO\ORRVHQWRSWKUHDGWHQVLRQ Helpful hint: For a more pleasing appearance experiment with a slightly lower (-) tension setting. ,'($621'(6,*167,7&+,1* Crescent pattern on collar This is an ideal decorative stitch for the sleeves and ...
Instruction Manual - Page 62

...SRVLWLRQDQGSXW 6 and slide the needle plate into position as illustrated. CARING FOR YOUR MACHINE CLEANING HOOK AREA AND FEED DOGS $OZD\V GLVFRQQHFW WKH PDFKLQH IURP SRZHU 1 VXSSO\ E\ UHPRYLQJ WKH SOXJ IURP WKH HOHFWULFDO CAUTION outlet. Cleaning the sewing machine and foot controller $IWHU XVLQJ NHHS VHZLQJ PDFKLQH DQG IRRW FRQWUROOHU FOHDQ 8VH GU...
Instruction Manual - Page 64

... twin needle breaking. 2. Twin needle is only active when the twin needle switch is lit red. 62 Helpful Hints: 1. To disengage twin needle sewing mode and return the machine to thread the twin needle. OTHER INFORMATION SATIN STITCH FOOT 7KH VDWLQ VWLWFK IRRW LV JURRYHG WR SHUPLW GHQVH VWLWFKLQJ WR SDVVXQGHU...

Similar Questions

Singer 7470 Machine Feed Dog Not Working Howi Do I Get The Back Of The Case
advise on getting the back case of Feed dog not working going up or down Feed dog is making a noise ...
(Posted by Mariawatson2218 2 years ago)
Feed Dogs Remain Lower
My Feed Dogs Are Not Moving They Remain Lowered. Before There Was Clanking Sound Coming From The Bob...
(Posted by donna5905 3 years ago)
How To Lower The Feed Dog In Singer 3229 Model
I have a problem with my machine my fabric is getting bunches n at the same time getting plucked off...
(Posted by sannaizu829 8 years ago)
Singer Futura Feed Dogs Are Stuck In Down Position. How Do I Get Them To Move
Computerized Futura whose feed dogs are stuck in lowered position. Sadly, machine has NEVER been sew...
(Posted by phdbecky 9 years ago)
Feed Dog Won't Come Back Up.
I tried moving the feed dog lever back and forth and I also held the lever for the up postition whil...
(Posted by fmjenness 10 years ago)
Ask a New Question
Use the box below to post a new question about this Singer product .
Points & Prizes
  • You can earn points for nearly everything you do on HelpOwl.com
  • You can trade in those points for gift cards at leading retailers such as Amazon.com and Walmart
  • It's that simple!
See How it Works
Create a Free Account

Singer Manuals

Find free Singer 90S I SPECIAL EDITION manuals and user guides available at ManualOwl.com. Try out our unique manual viewer allowing you to interact with manuals from directly within your browser!

Singer Reviews

View thousands of Singer user reviews and customer ratings available at ReviewOwl.com.

Contact Information

Complete Singer customer service contact information including steps to reach representatives, hours of operation, customer support links and more from ContactHelp.com.

Scoreboard Ratings

See detailed Singer customer service rankings, employee comments and much more from our sister site.