Singer 4423 Heavy Duty Support Question
Singer 4423 Heavy Duty Support Question
Find answers below for this question about Singer 4423 Heavy Duty.Need a Singer 4423 Heavy Duty manual? We have 1 online manual for this item!
Question posted by spsfplayscape on May 9th, 2014
Embroidery Design Stuck To Machine
I was doing an embroidery project, and it suddenly kept breaking strings and indicating the top thread was broken. I realized it kept sewing in the same area when I rethreaded. I finally became frustrated and quit my project. When I attempted to remove the hoop, I could not. It seemed to have been sewn to the bottom plate. How can I prevent this from happening again? I hate that I wasted all that time (it was the last block) and don't want to see another project ruined. I had to slide scissors under the hoop and cut allnthe thread loose.
Current Answers
Related Singer 4423 Heavy Duty Manual Pages
Instruction Manual - Page 2

...care is 75dB(A). 17. The wrong plate can cause the needle to break. 7. Always unplug sewing machine from accumulation of experience and knowledge, unless they do not play with any... threading needle, changing needle, threading bobbin, or changing presser foot, and the like. 10. Use this sewing machine. An appliance should never be left unattended when plugged in the needle area,...
Instruction Manual - Page 6

... Power Source...6 Two Step Presser Foot Lifter/ Adjusting Presser Foot Pressure...8 Accessories...10
Threading the Machine Winding the Bobbin...12 Inserting the Bobbin ...14 Threading the Upper Thread...16 Automatic Needle Threader ...18 Raising the Bobbin Thread ...20 Thread Tension ...22
Sewing How to Choose Your Pattern...24 Three Needle Position Dial ...26 Stitch Width Dial & Stitch...
Instruction Manual - Page 9
... step buttonhole lever
14
15
2 Reverse sewing lever
11
3
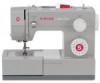
5. Needle plate cover
8. Bobbin stopper
11. Automatic threader 15. Removable extension table/ accessory storage
5
13
9. EN Principal Parts of the Machine
1. Three needle position dial
6
10. Pattern selector dial
8
14. Thread tension dial
2. Thread take-up lever 2
10
4. Thread cutter
6. Presser foot
4
12...
Instruction Manual - Page 11
...
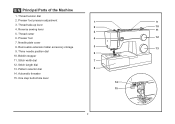
18. Handle
21
27. Drop feed control
29. Presser foot lifter 22
28. Foot speed control 30. EN Principal Parts of the Machine
16. Main plug socket
23. Upper thread guide
25. Handwheel
20. Power cord
4
23 24 25 26 27
29 30
28 Hole for second spool pin
17
19. Buttonhole...
Instruction Manual - Page 13

... grounded
2
6
A 3 Co., Ltd. (Vietnam)
Sewing light
1
Press main switch (A) to install the proper outlet. To reduce the risk of how to connect machine to fit in a polarized outlet only one blade is ...the appliance by FC1902A (110-120V area)/ FC-2902A (220-240V area) manufactured by ZHEJIANG FOUNDER MOTOR CORPORATION LTD. (China) 4C-316Q (110-125V area) manufactured by Wakaho Electric Ind. ...
Instruction Manual - Page 15
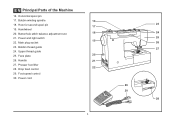
... you need to the type of fabric (light-or-heavy weight). For sewing very thin fabric, loosen the pressure by turning the screw counter clockwise, and for easy positioning of the work. (A)
A
Adjusting Presser Foot Pressure
The presser foot pressure of the machine has been pre-set and requires no particular readjustment according...
Instruction Manual - Page 17

Button sewing foot e. Pack of needles h. Overcasting foot p. Quilting/ straight stitch foot t. Bobbin (3x) j. Gathering foot u. Even Feed foot w. All purpose foot b. Spool holders i. Auxiliary Spool Pin l. Spool pin felt m. they are not supplied with this machine; Buttonhole foot d. Seam ripper/ brush f. Blind hem foot s. Cording foot r. Darning/ embroidery foot v. ...
Instruction Manual - Page 19

... the left (10) and remove. Cut thread. (9) 2
- Push bobbin spindle to spool pin. (1/2)
- Hold thread end. (7) 1
- Step on spindle. (5)
- Place thread and corresponding spool holder on to left
(sewing position).
4
3
5
6
7
8
9
10
12
Please Note:
When the bobbin winder spindle is in "bobbin winding"
position, the machine will not sew and the handwheel turn. EN Winding the...
Instruction Manual - Page 23

... left through pre-tension spring as by not doing so several sewing problems could result.
- Pull about 6-8 inches of thread to spool. (2)
-
Lift up lever and then 1 downwards again. (6)
- For small thread spools, place small side of the take-up the spool pin. Thread tension module by raising the needle to its highest point...
Instruction Manual - Page 31

...are indicated on the Pattern Selector Dial in gray.
Stitch Length Dial e. The blue indicates that the stitch is a stretch stitch pattern, and information on how to sew these stretch patterns is on the machine. ...the patterns indicated with the gray color, turn the Pattern Selector Dial. (e) Use the Stitch Length Dial (d) to adjust the width of the stitch as desired for the project. Use...
Instruction Manual - Page 37

EN Sewing Straight Stitch
To begin sewing, set the machine for straight stitch. (1) Place the fabric under the presser foot with the fabric edge lined up with the desired seam guide line on the needle plate. (2) Lower the presser foot lifter, and then step on the foot controller to start sewing. (3)
1
2
3
30
Instruction Manual - Page 39

... highest position, raise the
presser foot and remove work behind the needle and presser 1
2
foot. (2)
Cutting the Thread
Pull the threads under and behind the presser foot. Pull threads down
the reverse sewing lever (A). A
Release the lever and the machine will sew forward again. (1)
Removing the Work
Turn the handwheel toward you (counterclockwise) to bring
the...
Instruction Manual - Page 41

... stretch and hardwearing seams. The machine sews two stitches forward and one stitch backwards. Ric Rac Stitch is suitable for firm fabrics like denim, corduroy, poplin, duck, etc. M
1 M
2 34 Ric Rac (2) Set the Pattern Selector Dial to the desired pattern. Though there are several stretch patterns, here are indicated with a blue color on...
Instruction Manual - Page 43

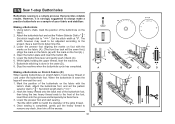
... your SINGER retailer. (See page 10 for the fabric. Sew a test first to catch one or two fabric threads. (2)
Unfold the fabric when hemming is used for lighter weight
fabrics, and a wider stitch is completed and press.
2 Note: To make sure the machine settings are normally sewn
with the range shown on curtains...
Instruction Manual - Page 45
... fabric (A). (The front bar tack will overcast the cord.
1. Sew a test first to
E
remove any slack, then trim off the excess.
38
3 4
2
1
D Lower the presser foot and start the machine. 7. When the buttonhole is completed, gently pull the heavy thread to determine this. 3. Hook the heavy thread onto the back end of the buttonhole foot,
PUSH...
Instruction Manual - Page 49
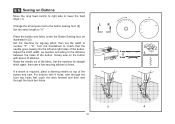
...the front two holes first, push the work forward and then sew through the back two holes.
3
4
42 Set the machine for zig-zag stitch, then set the width to "0".
Turn...on top of the button. Adjust the stitch width, as illustrated in (3). Set the machine for straight
a
2
ba b
stitch again, then sew a few securing stitches to check that the needle goes cleanly into the left and ...
Instruction Manual - Page 55

... knits. For best sewing results always use the same thread on natural woven fabrics for these fabrics and needle sizes. THREAD
Light-duty thread in cotton, nylon,..., kettlecloth, sailcloth, Most threads sold are medium size and suitable
double knits, lightweight woolens.
Heavy woolen, overcoat fabrics, upholstery fabrics, some Heavy duty thread, carpet thread. IMPORTANT: Match needle size...
Instruction Manual - Page 58
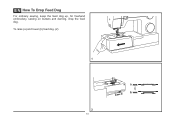
To raise (a) and lower (b) feed dog. (2)
1
2
51
a
ba
b EN How To Drop Feed Dog
For ordinary sewing, keep the feed dog up, for freehand embroidery, sewing on buttons and darning, drop the feed dog.
Instruction Manual - Page 62

... (A) as illustrated. (1) - Replace the face plate and tighten screw. Remove the face plate (B). -
Replace bulb with same type rated 15 watts (110-120V area / 220-240V area).
-
Unscrew the bulb and install a new one (C). (2) - EN Changing the Bulb
Disconnect the machine from the power supply by removing the plug from the main socket!
Instruction Manual - Page 64

... while sewing, let the feed dogs pull
the fabric under the foot.
1. Remove and reinsert needle. (flat side towards the back) 5. Check and attach correctly.
1. Thread the bobbin case as described.
1. The needle size must suit the fabric and thread. 4. Loosen the thread tension.
1. Replace the needle. EN Troubleshooting Guide
Problem
Upper thread breaks
Cause
1. The machine...
Similar Questions

Transmitting Design To Machine
I cannot transmit the design to the machine, Singer XL-580. Everything is connected as stated in the...
I cannot transmit the design to the machine, Singer XL-580. Everything is connected as stated in the...
(Posted by dcarlisle446 1 year ago)

My Singer Sewing Machine 4423 Will Not Do Anything. All You Can Hear Is Motor
I hear motor the shaft spins how to change bel
I hear motor the shaft spins how to change bel
(Posted by Marybeverly4576477 8 years ago)

I Removed The Needle Plate And Now It Won't Go Back On.
(Posted by ntsolarz 9 years ago)

Machine Will Sew With Automatic Button But Not With Foot Controller,machine Is A
(Posted by maryllanez 10 years ago)

Does This Sewing Machine Work In Australia As We Have 220 V Here Please
(Posted by jennymonte 11 years ago)