Singer XL-580 FUTURA Support Question
Singer XL-580 FUTURA Support Question
Find answers below for this question about Singer XL-580 FUTURA.Need a Singer XL-580 FUTURA manual? We have 1 online manual for this item!
Question posted by dcarlisle446 on October 11th, 2022
Transmitting Design To Machine
I cannot transmit the design to the machine, Singer XL-580. Everything is connected as stated in the manual but the option to "Transmit the the machine" is not is not active. How do I correct this?
Current Answers
Answer #1: Posted by SonuKumar on October 11th, 2022 8:47 PM
SonuKumar

Member since:
May 9th, 2021 Points: 16,609,790

Member since:
May 9th, 2021 Points: 16,609,790
https://www.futura-support.com/sites/default/files/XL-580.pdf
follow troubleshooting guide
Please respond to my effort to provide you with the best possible solution by using the "Acceptable Solution" and/or the "Helpful" buttons when the answer has proven to be helpful.
Regards,
Sonu
Your search handyman for all e-support needs!!
Related Singer XL-580 FUTURA Manual Pages
Instruction Manual - Page 2
³,03257$176$)(7
Instruction Manual - Page 5
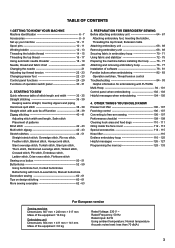
..., Fishbone stitch Sewing on a button 50 - 51 Buttonholes 52 - 59 Using buttonhole foot, Corded buttonholes Buttonholing with FUTURA Multi-Hoop 94...sew fabrics, Manual buttonhole Decorative sewing 60 - 61 Tips on design stitching 60 - 61 More sewing examples 62 - 63
3. TABLE OF CONTENTS
1.GETTING TO KNOW YOUR MACHINE 0DFKLQHLGHQWL¿FDWLRQ 6 - 7 Accessories 8 - 9 Set up your machine...
Instruction Manual - Page 10
... the
General Purpose Foot and will
be sure they are Class I5 J.
16
FOR EMBROIDERY
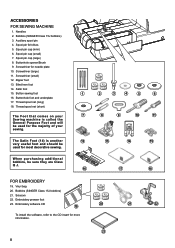
19. ACCESSORIES
FOR SEWING MACHINE
1. Bobbins (SINGER Class 15J bobbins)
3. Spool pin cap (mini)
6. Screwdriver for the majority of your
7
Sewing machine is another
12
very useful foot and should be
used for needle plate
10. Satin foot
15. Thread...
Instruction Manual - Page 12
... surplus oil from needle plate area EHIRUHXVLQJ\RXUPDFKLQHWKH¿UVWWLPH
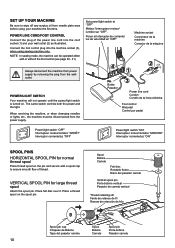
POWER LINE CORD/FOOT CONTROL
Connect the plug of the power line cord into the machine socket (3), when using sewing machine only.
Place felt disc over it.
Spool Bobine Carrete
Felt disc Rondelle feutre Disco del pasador carrete
Vertical spool...
Instruction Manual - Page 24
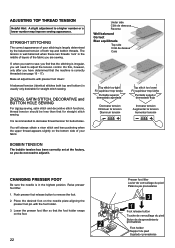
... Support du pied Sujetador prensatelas You will need to decrease thread tension for straight stitch sewing. STRAIGHT STITCHING
The correct appearance of your fabric. Make all adjustments with the foot holder. 3. Raise presser...this, however, only after you have determined that the machine is in the middle of layers of the fabric you are sewing.
,IZKHQ\RXVWDUWWRVHZ\RX¿QGWKDW...
Instruction Manual - Page 40
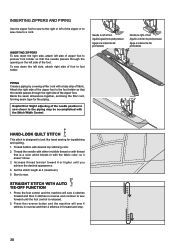
... topstitching and quilting.
1. HAND-LOOK QUILT STITCH 02
This stitch is designed to look like hand sewing for the piping. Set the stitich length at 4 (maximum).
5. Start to sew forward until you achieve the desired appearance.
4.
Press the reverse button and the machine will sew 4 stitches forward and then 4 stitches in reverse and continue to...
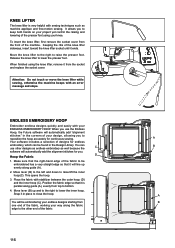
Instruction Manual - Page 68
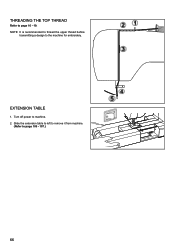
EXTENSION TABLE
1. Turn off power to the machine for embroidery. NOTE: It is recommended to thread the upper thread before
transmitting a design to machine. 2.
Slide the extension table to left to remove it from machine.
(Refer to page 16 - 19. THREADING THE TOP THREAD
Refer to page 106 - 107.)
66
Instruction Manual - Page 80
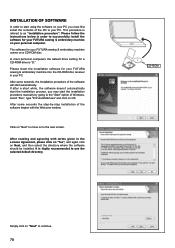
... the installation software for your PC. Click on "Next" to the "Start" option of the software begins with terms given in your FUTURA sewing & embroidery machine comes on OK.
After some seconds, the Installation procedure of the software will start the installation procedure manually by -step installation of Windows, select "Run", type "D:\FuturaStart.exe" and...
Instruction Manual - Page 82
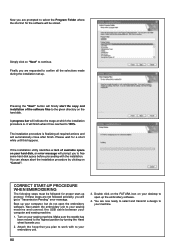
.... You are now ready to select and transmit a design to open the embroidery software. Double click on the FUTURA icon on ³1H[W´ to continue.
)LQDOO\ \RX DUH UHTXHVWHG WR FRQ¿UP DOO WKH VHOHFWLRQV PDGH during the installation set-up your desktop to your sewing machine. Boot up . Attach the hoop that...
Instruction Manual - Page 84
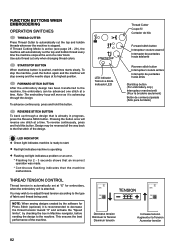
... wish to re-adjust thread tension according to the type of the machine. NOTE: When sewing designs created by the software for embroidery, when the embroidery unit is recommended to decrease the thread tension toward "0" and activate the "Speed limiter", by checking the box in progress, press the Reverse Stitch button.
FORWARD STITCH BUTTON...
Instruction Manual - Page 90
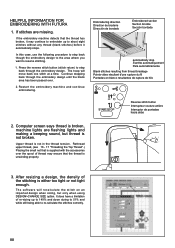
... step back through the embroidery design until the blank area has ...through the embroidery design. Restart the embroidery machine and continue embroidering. Rethread upper...machine lights are missing. Press the reverse stitch button (stitch return) to re-calculate the stitches correctly.... design, the density of re-sizing up to resume stitching.
1. HELPFUL INFORMATION FOR EMBROIDERING WITH FUTURA
...
Instruction Manual - Page 94
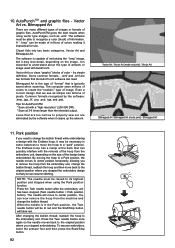
...change the bobbin thread while embroidering a design with AutoPunch. Tips for use. Park position
If you can now remove the hoop from the machine and change the bobbin thread, reattach...the needle moves to recognize a color (block) of the design being embroidered.
After changing the bobbin thread, reattach the hoop to properly sew out are many different types of images or formats of image...
Instruction Manual - Page 96
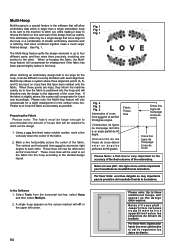
...embroidery data which is larger than a single embroidery hoop to be sent to the machine to stitch out, while making it and sew accordingly. When re-hooping the fabric, the Multihoop feature will compensate for a ... other . If the fabric is very important to hoop the fabric as accurately as the design data requires. Please try to the DFFXUDF\RIWKH¿QDORXWFRPHRIWKHHPEURLGHU\
Notez...
Instruction Manual - Page 98
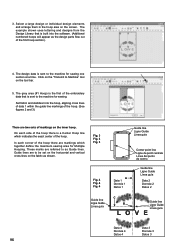
...hoop there are two sets of the hoop there is sent to the machine for Multiple Hooping. Click on the "Transmit to as shown. In each side of markings on the fabric as ... which indicates the exact center of the embroidery data that is sent to the machine for sewing.
Select a large design or individual design elements
and arrange them in the hoop area on the tool bar.
5.
The...
Instruction Manual - Page 104
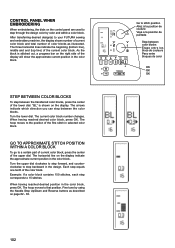
... block. Example: If a color block contains 150 stitches, each step corresponds to your FUTURA sewing and embroidery machine, the display shows number of current color block and total number of color blocks as described...EMBROIDERING
When embroidering, the dials on the control panel are used to step backward in the design. "BL" is stitched out, a progress bar on the right side of the lower dial...
Instruction Manual - Page 118
... for endless
embroidery, which can use the Endless
Hoop, the Futura software will be found in the corners of your design, allowing you to
reposition the hoop accurately for continuous sewing.
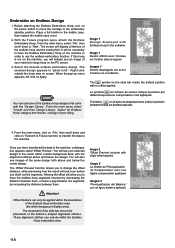
Attention: Do not touch or move the knee lifter while sewing, otherwise the machine beeps with stabilizer between the outer hoop (D) and the inner...
Instruction Manual - Page 120
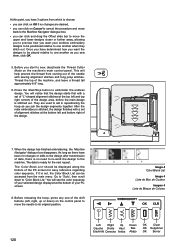
... 2 'Offset Preview' window with the 'Design Library'. Select the desired endless embroidery design.
The movement of the slide bar moves the placement of the endless hoop and the sewing feld. With the Futura program open, attach the Endless Embroidery Hoop. Right click outside the hoop area on 'Transmit to Futura machine' to transfer the data to the...
Instruction Manual - Page 122
... will notice that the design starts first with sewing alignment stitches and long jump stitches.
You will help prevent the thread from the main menu. At this point, you have 3 options from which to choose:
‡ \RXFDQFOLFNRQOK if no need to re-send the design to the machine. Before you join...
Instruction Manual - Page 124
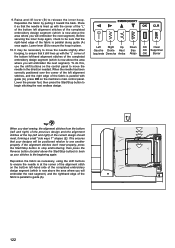
...bottom left alignment stitches of the completed embroidery design segment (which is parallel to move the ... inner hoop. When the needle has been correctly positioned over the corner of the left alignment...
up with guide (A), press OK on the machine's main control panel. Left Right Up Gauche ... (located above the area where you start sewing, the alignment stitches from the bottom
(left...
Instruction Manual - Page 126

... the hoop. Press the Start/Stop button to position and resume sewing. Wind the bobbin, insert it is not possible, due to the type of design you are embroidering, remove the presser foot and needle to remove the hoop from the machine. Lower the presser foot lifter. Place the hoop back onto the...
Similar Questions


Top Thread And Bobbin
Please help me.....for some reason my sewing machine top thread and bobbin thread are not stitching ...
Please help me.....for some reason my sewing machine top thread and bobbin thread are not stitching ...
(Posted by costales 7 years ago)

What Is Included With The Machine ?
what is included with the machine?
what is included with the machine?
(Posted by infomachinemal 9 years ago)

How Do I Set Up The Machine To Correctly Sew On Jersey And Stretch Materials?
I tried the S1 and S2 and it didn't continue sewing but got stuck.
I tried the S1 and S2 and it didn't continue sewing but got stuck.
(Posted by shirlblissj 9 years ago)
Error Message E7
I recently purchased a 7285Q Singer Sewing Machine and am getting an E7 error message. The machine w...
I recently purchased a 7285Q Singer Sewing Machine and am getting an E7 error message. The machine w...
(Posted by joycebogard 10 years ago)