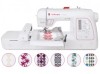
Singer XL-580 FUTURA Support Question
Singer XL-580 FUTURA Support Question
Find answers below for this question about Singer XL-580 FUTURA.Need a Singer XL-580 FUTURA manual? We have 1 online manual for this item!
Question posted by infomachinemal on September 8th, 2014
What Is Included With The Machine ?
what is included with the machine?
Current Answers
Related Singer XL-580 FUTURA Manual Pages
Instruction Manual - Page 2
³,03257$176$)(7
Instruction Manual - Page 5
... 116 - 125 Helpful messages 126 - 127 Programming the memory 128 - 133
For European version
Sewing machine Dimensions: 567 mm × 240 mm × 317 mm Mass of the equipment: 10... Ladder stitch, Criss-cross stitch, Fishbone stitch Sewing on a button 50 - 51 Buttonholes 52 - 59 Using buttonhole foot, Corded buttonholes Buttonholing with FUTURA Multi-Hoop 94 - 101 Control panel when ...
Instruction Manual - Page 10
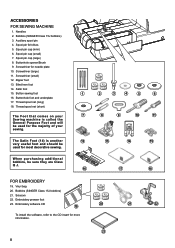
... software, refer to the CD insert for needle plate
10. Spool pin cap (mini)
6. When purchasing additional bobbins, be used for the majority of your
7
Sewing machine is called the
General Purpose Foot and will
be sure they are Class I5 J.
16
FOR EMBROIDERY
19. Buttonhole foot and underplate
17. ACCESSORIES
FOR...
Instruction Manual - Page 12
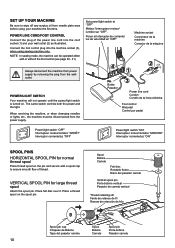
... LINE CORD/FOOT CONTROL
Connect the plug of the power line cord into the machine socket (3), when using sewing machine only. Place a thread spool on . Poner el Interruptor de corriente/ luz de velocidad en "OFF"
Machine socket
Connecteur de la machine
Conector de la máquina
4
2
1
Pin Butée Pasador
3
Power line cord Cordon Cord...
Instruction Manual - Page 24
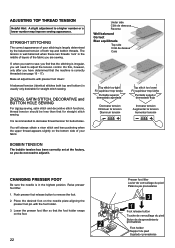
... you have determined that the machine is usually only desirable for straight stitch sewing. ZIGZAG, SATIN STITCH, DECORATIVE and BUTTON HOLE SEWING
For zigzag sewing, satin stitch and decorative stitch ...TENSION
Helpful Hint: A slight adjustment to a higher number or a lower number may improve sewing appearance. Do this, however, only after you will always obtain a nicer stitch and ...
Instruction Manual - Page 26
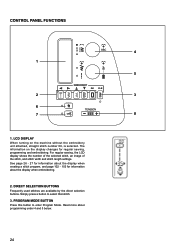
... program, and page 102 - 103 for regular sewing, programming and embroidering. The information on the machine without the embroidery unit attached, straight stitch number 00, is selected. LCD DISPLAY
When turning on the display changes for information about the display when embroidering.
2. For regular sewing, the LCD display shows the number of the...
Instruction Manual - Page 28
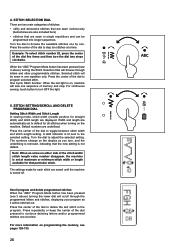
...in one at maximum or minimum stitch width or length available for straight stitch) and stitch length are also included here) ‡ VWLWFKHV WKDW DUH VHZQ LQ VLQJOH UHSHWLWLRQV DQG FDQ EH... the machine is turned off. Note: When an arrow on the display as it will sew one . Default numbers are saved until the machine is set to turn , and the underlining is on, machine will ...
Instruction Manual - Page 30
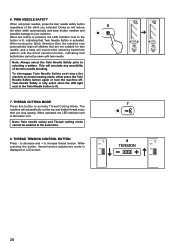
... the Twin Needle Safety prior to activate Thread Cutting Mode. 6. To disengage Twin Needle Safety and return the machine to increase thread tension. The machine will preclude any possibility of the stitch you stop sewing. THREAD TENSION CONTROL BUTTON
Press - When the button is pressed, the LED indicator next to the button is...
Instruction Manual - Page 32
...continues.
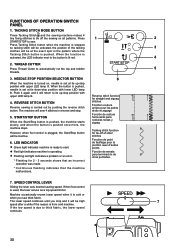
30 SPEED CONTROL LEVER
Sliding the lever sets desired sewing speed.
However, when foot control is pushed. Machine occasionally moves lower speed when it is cold or
when ...you stop position with upper LED lamp lit. TACKING STITCH MODE BUTTON
Press Tacking Stitch and the sewing machine makes 4
WLQ\ ¿[LQJ VWLWFKHV WR WLH RII WKH VHZLQJ RQ DOO SDWWHUQV...
Instruction Manual - Page 38
...both threads under the presser foot and lower the
presser foot lifter.
5
4.
Start/stop the sewing machine. Thread tension control button I
4
2. Power/light switch
F G
2
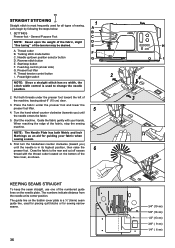
NOTE: Since a straight...Purpose Foot
NOTE: Based upon the weight of the numbered guide lines on the bottom of
3
the machine, leaving about 6" (15 cm) clear.
3. Pull both Metric and Inch Markings as shown. Place...
Instruction Manual - Page 40
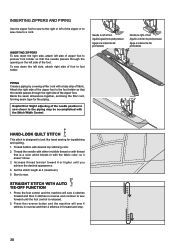
... to the piping may be accomplished with desired top stitching color.
2. Press the reverse button and the machine will sew 4 stitches forward and then 4 stitches in reverse and continue to look like hand sewing for the piping. Thread the needle with either invisible thread or with the fabric color, so it doesn't show...
Instruction Manual - Page 56

5. While holding the top thread, start the machine. Pull out the bobbin thread
underneath the fabric to the... of buttonhole on the buttonhole foot, and then lower the buttonhole foot.
8. Fabric marking Marque du tissu Marca de material
Mark Marque Marca
* Sewing will be completed automatically in the following order.
1
2
3
4
5
6
7
8
1
2
3
4
5
6
7
Fabric marking Marque...
Instruction Manual - Page 66
... for embroidering, so
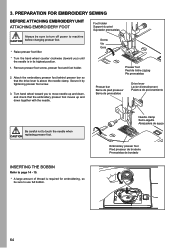
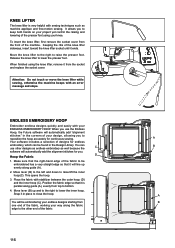
be sure to turn off power to use full bobbin. PREPARATION FOR EMBROIDERY SEWING
BEFORE ATTACHING EMBROIDERY UNIT ATTACHING EMBROIDERY FOOT
Foot holder Support du pied Sujetador prensatelas
Always be sure to machine CAUTION before changing presser foot.
* Raise presser foot lifter.
* Turn the hand wheel counter clockwise (toward...
Instruction Manual - Page 70

... unit is not securely installed, the finished embroidery may cause CAUTION damage to close for general sewing.
3
Handle Poignée Mango
1
Release lever Support de cerceau Palanca de liberación
... unit does not detach. Doing so may be sure to turn off the machine. Turn off power to machine CAUTION before installing embroidery unit.
1. To make sure that the embroidery unit ...
Instruction Manual - Page 80
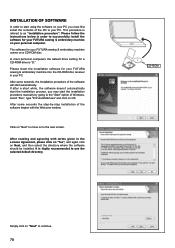
... manually by -step installation of the software begins with terms given in your FUTURA sewing & embroidery machine comes on your PC. In most personal computers the default drive setting for ... IROORZ WKH instructions below in order to successfully install the software for your FUTURA sewing & embroidery machine into the CD-ROM disc receiver in the /LFHQVH$JUHHPHQWSOHDVHFOLFNRQ³...
Instruction Manual - Page 82
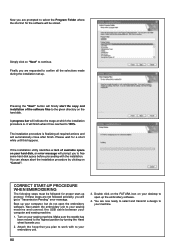
... the Program Folder where the shortcut for a short while until this happens. Double click on the FUTURA icon on your machine.
80 You are now ready to select and transmit a design to your desktop to your sewing machine. Simply click on ³1H[W´ to the highest position by clicking on your embroidery unit...
Instruction Manual - Page 84
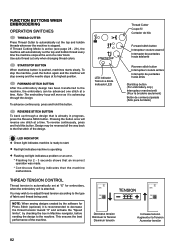
... the needle stops at a time.
THREAD TENSION CONTROL
Thread tension is automatically set at "E" for embroidery, when the embroidery unit is recommended to the machine. NOTE: When sewing designs created by checking the box in progress, press the Reverse Stitch button. Decrease tension Diminuer la Tension
Disminuir tensión
Thread Cutter &RXSH...
Instruction Manual - Page 104
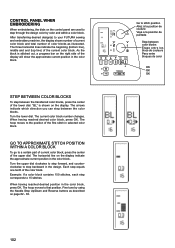
... current color block. When having reached desired position in the color block. Turn the upper dial clockwise to step forward, and counterclockwise to your FUTURA sewing and embroidery machine, the display shows number of current color block and total number of the upper dial. CONTROL PANEL WHEN EMBROIDERING
When embroidering, the dials on...
Instruction Manual - Page 118
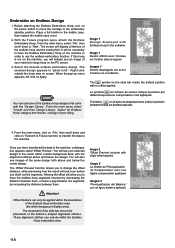
... other designs as endless embroidery as machine applique and free-motion sewing.
Release the knee lifter to raise...use the Endless
Hoop, the Futura software will automatically add the alignment stitches for continuous sewing. Move lever (B) to the... along guide (A), evenly from top to bottom.
4.
Your software includes a selection of your
ENDLESS EMBROIDERY HOOP. Move lever (B) up ...
Instruction Manual - Page 120
...to Futura machine' to transfer the data to have transferred the data to use the endless embroidery function. Select 'for Endless Hoop' category and choose a design of the endless hoop and the sewing ... previewing how the result will look even before you will be necessary to the machine.
With the Futura program open, attach the Endless Embroidery Hoop. You can only be applied within ...
Similar Questions


Transmitting Design To Machine
I cannot transmit the design to the machine, Singer XL-580. Everything is connected as stated in the...
I cannot transmit the design to the machine, Singer XL-580. Everything is connected as stated in the...
(Posted by dcarlisle446 1 year ago)
Singer Futura Quartet Seqs 6700 Sewing Machine
how to set my singer futura quartet seqs 6700 sewing machine to sew. A distance more than one inch a...
how to set my singer futura quartet seqs 6700 sewing machine to sew. A distance more than one inch a...
(Posted by johour2194 3 years ago)

What Does Code 10 Mean And How Can I Fix It?
(Posted by Kateesbowtique 9 years ago)

Power Issues
I was sewing on my singer Futura xl 400. I turned it off n when I went to turn it back on it won't t...
I was sewing on my singer Futura xl 400. I turned it off n when I went to turn it back on it won't t...
(Posted by butterflymom80 9 years ago)