Singer XL-580 FUTURA Support Question
Singer XL-580 FUTURA Support Question
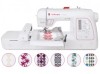
Find answers below for this question about Singer XL-580 FUTURA.Need a Singer XL-580 FUTURA manual? We have 1 online manual for this item!
Question posted by susilauraeric on October 26th, 2022
Error Code 09
the sewin mashine have e error code 09
Current Answers
Answer #1: Posted by SonuKumar on October 26th, 2022 8:49 AM
SonuKumar

Member since:
May 9th, 2021 Points: 16,633,680

Member since:
May 9th, 2021 Points: 16,633,680
https://www.manualslib.com/manual/840172/Singer-Xl-580.html?page=86#manual
please follow all the troubleshooting
Please respond to my effort to provide you with the best possible solution by using the "Acceptable Solution" and/or the "Helpful" buttons when the answer has proven to be helpful.
Regards,
Sonu
Your search handyman for all e-support needs!!
Related Singer XL-580 FUTURA Manual Pages
Instruction Manual - Page 2
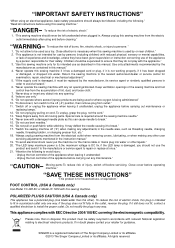
³,03257$176$)(7
Instruction Manual - Page 5
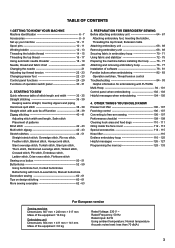
...hoop 116 - 125 Helpful messages 126 - 127 Programming the memory 128 - 133
For European version
Sewing machine Dimensions: 567 mm × 240 mm × 317 mm Mass of the equipment: 10.8 ...seams straight, Inserting zippers and piping Hand-look quilt stitch 38 - 39 Straight stitch with FUTURA Multi-Hoop 94 - 101 Control panel when embroidering 102 - 103 Helpful messages when embroidering 104...
Instruction Manual - Page 10
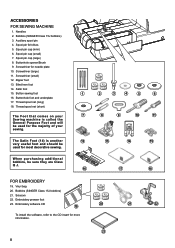
... CD insert for needle plate
10. Spool pin cap (small)
7. Zipper foot
13. Satin foot
15.
Embroidery presser foot 23. Auxiliary spool pin
4. ACCESSORIES
FOR SEWING MACHINE
1. Screwdriver for more information.
8
2
3
4
5
6
8
9
10
11
13
14
15
17
18
20
21
22
23 Buttonhole foot and underplate
17. The Satin Foot (14) is...
Instruction Manual - Page 12
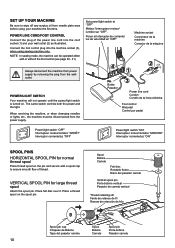
...disc over it.
Place a thread spool on . NOTE: In sewing mode, the machine can be disconnected from the walloutlet.
POWER/LIGHT SWITCH
Your machine will not operate until the power/light switch is turned on the... the plug of the power line cord into the machine socket (3), when using sewing machine only. Connect the foot control plug into the cord socket (1) and your wall outlet...
Instruction Manual - Page 24
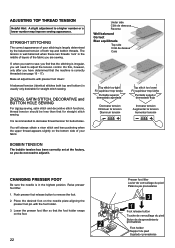
... sure the needle is correctly threaded (see page 16 - 17). ZIGZAG, SATIN STITCH, DECORATIVE and BUTTON HOLE SEWING
For zigzag sewing, satin stitch and decorative stitch functions, thread tension should be less than that the machine is in the middle of layers of your fabric.
ADJUSTING TOP THREAD TENSION
Helpful Hint: A slight adjustment...
Instruction Manual - Page 26
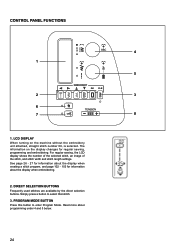
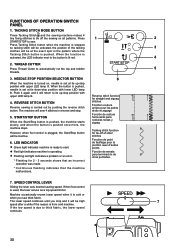
For regular sewing, the LCD display shows the number of the selected stitch, an image of the stitch, and stitch width and stitch length settings. The information on the machine without the ...about the display when creating a stitch program, and page 102 - 103 for regular sewing, programming and embroidering. See page 26 - 27 for information about programming under 4 and 5 below.
24 CONTROL PANEL FUNCTIONS...
Instruction Manual - Page 28
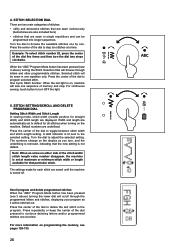
... the dial to continue deleting letters and/or programmed stitches one . The numbers change on , machine will scroll through letters and other programmable stitches.
Press the center of stitches: ‡ XWLOLW...STITCH SETTING/SCROLL AND DELETE PROGRAM DIAL
Setting Stitch Width and Stitch Length In sewing mode, stitch width (needle position for that the new setting is removed, ...
Instruction Manual - Page 30
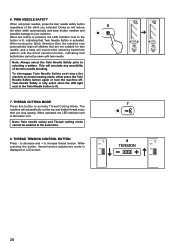
... button, thread tension adjustment mode is lit. This will automatically cut the top and bobbin thread every time you selected. The machine will preclude any possibility of the stitch you stop sewing.
Doing so will sound when selecting buttonhole pattern with the direct selection button, indicating that Twin Needle Safety is lit...
Instruction Manual - Page 32
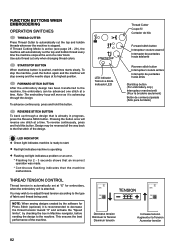
...indicates machine is operating. ¿ Flashing red light indicates a problem or an error.
* Flashing for 2 - 3 seconds shows that an incorrect operation was made.
* Continuous flashing indicates that the machine ...you stop position with upper LED lamp lit. TACKING STITCH MODE BUTTON
Press Tacking Stitch and the sewing machine makes 4
WLQ\ ¿[LQJ VWLWFKHV WR WLH RII WKH VHZLQJ RQ...
Instruction Manual - Page 38
... the left of the fabric, stop button F.
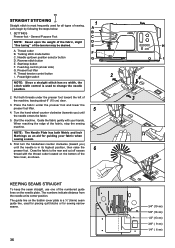
Let's begin by following the steps below.
1. Tacking stitch mode button C. Start/stop the sewing machine. Presser foot lifter H. When reaching the edge of
3
the machine, leaving about 6" (15 cm) clear.
3. KEEPING SEAMS STRAIGHT
To keep the seam straight, use one of the
face cover, as...
Instruction Manual - Page 40
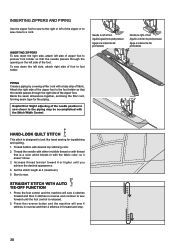
... that the needle passes through the opening on the left side of the foot.
Press the reverse button and the machine will sew 4 stitches forward and then 4 stitches in reverse and continue to sew. Helpful Hint: Slight adjusting of foot to the piping may be accomplished with thread that the needle passes through...
Instruction Manual - Page 46

... STITCH 10
This stitch can also be used for hemstitching and to applique a quilt.
44 It sews DQG¿QLVKHVWKHVHDPLQRQHRSHUDWLRQ,WLVYHU\HIIHFWLYHIRU repairing raw or worn edges ...top-stitch lapels, collars and cuffs to give DSURIHVVLRQDO¿QLVKWR\RXUJDUPHQWV
OVEREDGE STITCH 09
This stitch is especially used for topstitching and for attaching lace and trims. It is far ...
Instruction Manual - Page 80
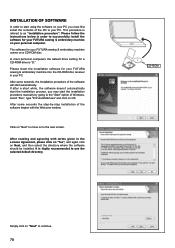
... IROORZ WKH instructions below in order to successfully install the software for your FUTURA sewing & embroidery machine comes on your personal computer.
Click on "Next" to move on OK. ...step-by going to the "Start" option of the software begins with terms given in your FUTURA sewing & embroidery machine on a CD-ROM disc.
INSTALLATION OF SOFTWARE
,Q RUGHU WR VWDUW XVLQJ WKH...
Instruction Manual - Page 82
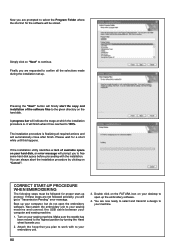
...%.
7KHLQVWDOODWLRQSURFHGXUHLV¿QDOL]LQJDOOUHTXLUHGDFWLRQVDQG will get a "Transmission Pending" error message.
Make sure the needle has been moved to the highest position by clicking on your sewing machine. Double click on the FUTURA icon on your desktop to open the embroidery software. You are prompted to select the...
Instruction Manual - Page 84
... bobbin thread every time the machine stops at a time. NOTE: When sewing designs created by checking the box in progress, press the Reverse Stitch button. To stop sewing and the needle stops at ...Cutting Mode is active (see page 28 - 29), the machine will move as it is operating.
¿ Flashing red light indicates a problem or an error. * Flashing for 2 - 3 seconds shows that an ...
Instruction Manual - Page 104
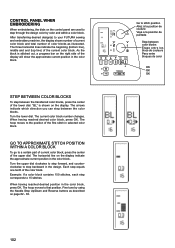
... stitched out, a progress bar on the right side of the lower dial. GO TO APPROXIMATE STITCH POSITION WITHIN A COLOR BLOCK
To go to your FUTURA sewing and embroidery machine, the display shows number of current color block and total number of the color block.
The current color block number changes. The KRRS PRYHV...
Instruction Manual - Page 112

...6
and slide the needle plate into position as indicated by removing the plug from the sewing machine and footcontroller. Clean the feed dogs and hook area with the projection (3) positioned
5
...dry rags to avoid electrical shock.
110
(3) (4)
To ensure the best possible operation of sewing machine oil on the needle plate (1) and slide the needle plate toward you as illustrated for ...
Instruction Manual - Page 114

CAUTION: Always remove the dust and lint before it is used. For best results always use SINGER Brand Sewing Machine Oil. OILING INSIDE THE FACE COVER
1. Put one drop of oil other than Sewing Machine Oil will cause damage to the points indicated
by arrows.
1
Face cover Plaque frontale Cubierta frontal
Helpful Hints : For the...
Instruction Manual - Page 118
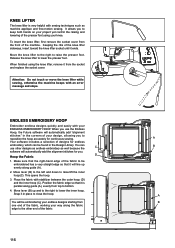
...error message and stops. It allows you . Your software includes a selection of the knee lifter sideways, insert toward the knee lifter socket until it is very helpful with your way along the fabric edge to the other designs as endless embroidery as machine applique and free-motion sewing...Hoop, the Futura software will automatically add the alignment stitches for continuous sewing. To ...
Instruction Manual - Page 120
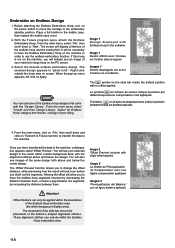
...', then scroll down and click on 'Transmit to Futura machine' to transfer the data to 'New'.
From the main menu, click on 'File', then scroll down to the machine. The movement of the slide bar moves the placement of the endless hoop and the sewing feld.
Before attaching the Endless Embroidery Hoop, turn on...
Similar Questions

Transmitting Design To Machine
I cannot transmit the design to the machine, Singer XL-580. Everything is connected as stated in the...
I cannot transmit the design to the machine, Singer XL-580. Everything is connected as stated in the...
(Posted by dcarlisle446 1 year ago)

How Do I Clear E7 Error Code On Singer Fashion Mate Model 7256 Sewing Machine
(Posted by cathyhowden1 2 years ago)

I Get E7 Error Message On My Singer Model 7258 Sewing Machine. There Is No Refe
Error message E7 is up on my Singer Stylist model 7258 sewing machine. It is not working at all. I t...
Error message E7 is up on my Singer Stylist model 7258 sewing machine. It is not working at all. I t...
(Posted by ebellamybellamy9 5 years ago)

What Does Code 10 Mean And How Can I Fix It?
(Posted by Kateesbowtique 9 years ago)
What Is Included With The Machine ?
what is included with the machine?
what is included with the machine?
(Posted by infomachinemal 9 years ago)