
Singer Futura XL-400 Support Question
Singer Futura XL-400 Support Question
Find answers below for this question about Singer Futura XL-400.Need a Singer Futura XL-400 manual? We have 1 online manual for this item!
Question posted by butterflymom80 on June 22nd, 2014
Power Issues
I was sewing on my singer Futura xl 400. I turned it off n when I went to turn it back on it won't turn on. I have unplugged it n plugged it back in I have checked the cords. And still nothing. Please help I am no longer under warranty
Current Answers
Related Singer Futura XL-400 Manual Pages
Instruction Manual - Page 2
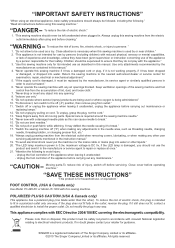
..., and loose cloth." 7.
Return the sewing machine to break." 15. To unplug, grasp the plug, not the cord." 13.
"Never sew with EEC Directive 2004/108/EC covering the electromagnetic compatibility. reduce
risk
of electric shock, this plug is intended to fit in accordance with this sewing machine if it has a damaged cord or plug, if it is used by pulling...
Instruction Manual - Page 5

... inside the face cover 104 - 105 Special accessories 106 - 107 Helpful messages 108 - 109
For European version
Sewing machine Dimensions: 567 mm × 240 mm × 317 mm Mass...Continuous patterns 50 - 51 Sewing on a button 50 - 51 Buttonholes 52 - 57
Using buttonhole foot, Procedure, Corded buttonholes Buttonholing with Futura Multi hoop 88 - 95 Helpful messages when embroidering 96 - ...
Instruction Manual - Page 8
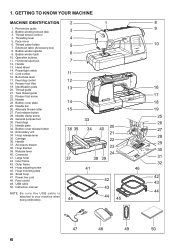
...21. Presser foot screw
17
23. Bobbin cover release button 33. Power line cord 48. Handle
13. Cord socket
11
16. Needle 24. Handle 37. USB cable
42
42...TO KNOW YOUR MACHINE
MACHINE IDENTIFICATION
2
1
8
1. Face cover
6. Thread cutter/holder 7. Feed dogs
26
31. Instruction manual
43
NOTE: B e s u r e t h e U S B c a b l e i s
44
attached to your machine when doing ...
Instruction Manual - Page 10

... software CD
19
FUTURA embroidery is "system" of your
7
Sewing machine is another
12
very useful foot and should be
used for most decorative sewing. Spool pin felt discs
5. Screwdriver (large)
11. Screwdriver (small)
12. When purchasing additional bobbins, be used for the majority of the machine and the software providing powerful option and capabilities. Scissors...
Instruction Manual - Page 12
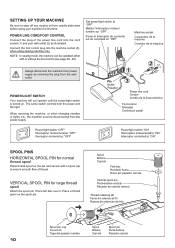
... using sewing machine only. VERTICAL SPOOL PIN for normal thread spool
Place thread spool on the pin and secure with or without the foot control (see page 28 - 29).
Connect the foot control plug into the cord socket (1) and your machine the first time.
The same switch controls both the power and the light. Power line cord/FOOT...
Instruction Manual - Page 24

...control. Make all adjustments with the foot holder. 3. You will be less than that the machine is correctly threaded (see page 7). Raise presser foot lifter. 1.
BOBBIN TENSION
The bobbin ... the needle plate aligning the
presser foot pin with presser foot 'down'.
Helpful Hint: A slight adjustment to sew, you are sewing. Place the desired foot on the foot.
2
22
Presser foot lifter ...
Instruction Manual - Page 26
... de puntada/posición de aguja
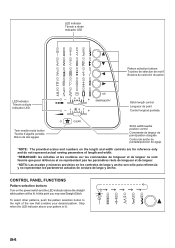
*NOTE: The provided scales and numbers on the power switch and the LED indicator above your desired pattern. At this point you may sew Straight Stitch.
CONTROL PANEL FUNCTIONS
Pattern selection buttons
Turn on the length and width controls are for reference only and do not represent...
Instruction Manual - Page 28

... determined by moving the Stitch Length and Width / Needle Position Control Knob. LED turns on when twin needle sewing is available for manual adjustments than others.
2. Some patterns offer more opportunities for the selected pattern.
Stitch length and width/needle position controls
*Auto/Default settings Your sewing machine will produce most of your preference.
Instruction Manual - Page 30
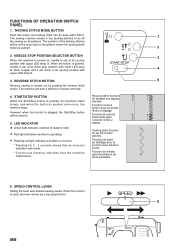
...LED INDICATOR
Green light indicates machine is ready to start.
Red light indicates machine is pushed.
2
2.
REVERSE STITCH BUTTON
5
Reverse sewing is plugged, the Start/Stop button will be...machine starts slowly, and when the button is set at its up -stop position with
4
upper LED lamp lit.
3. NEEDLE STOP POSITION SELECTOR BUTTON
3
When the machine is turned...
Instruction Manual - Page 34
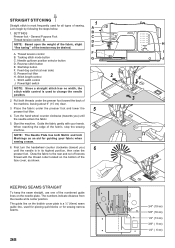
... no width, the
stitch width control is used for sewing narrow seams.
32
3/4" (19 mm) 5/8" (16 mm) 1/2" (13 mm) 3/8" ( 9 mm) 1/4" ( 6 mm) Power/light switch
F G
2
H I . Turn the hand wheel counter clockwise (towards you ) until ....
1
A B C D E
A.
Start/stop the sewing machine. STRAIGHT STITCHING
Straight stitch is most frequently used to the rear and cut off excess
...
Instruction Manual - Page 56

...buttonhole.
Be careful not to the rear.
7. While holding the top thread, start the machine. Align the buttonhole mark on the fabric with the mark on your garment. 6. Fabric marking ...Marque du tissu Marca de material
mark Marque Marca
* Sewing will be completed automatically in the center of the bartack threads.
54
Buttonhole foot alignment...
Instruction Manual - Page 60

... needle is required for embroidering, so
be sure to turn off power to move needle up and down , and check that the drive lever is above the needle clamp. ...SEWING
BEFORE ATTACHING EMBROIDERY UNIT ATTACHING EMBROIDERY FOOT
Foot holder Support du pied Sujetador prensatelas
Always be sure to touch the needle when CAUTION replacing presser foot. Turn hand wheel toward you to machine...
Instruction Manual - Page 62
Turn off power to page 98 - 99.)
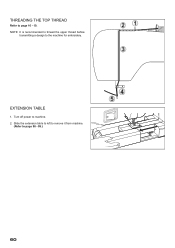
60 Slide the extension table to left to remove it from machine.
(Refer to machine. 2. THREADING THE TOP THREAD
Refer to the machine for embroidery. NOTE: It is recommended to thread the upper thread before
transmitting a design to page 16 - 19. EXTENSION TABLE
1.
Instruction Manual - Page 64
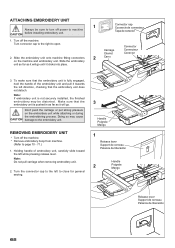
... unit, carefully slide toward the left direction, checking that the embroidery unit does not detach. ATTACHING EMBROIDERY UNIT
1
Always be distorted. Turn off power to machine CAUTION before installing embroidery unit. REMOVING EMBROIDERY UNIT
* Turn off the machine. * Remove embroidery hoop from machine.
(Refer to close for general sewing.
3
Handle Poignée Mango
1
Release lever...
Instruction Manual - Page 72
... hoop, turn on power switch to move the carriage to its highest position. Carriage Chariot Carro
Hoop mounting plate Plaque de montage de cerceau Placa de montaje de aro
Hoop release lever Levier de retrait du cerceau.
Palanca de liberación del aro
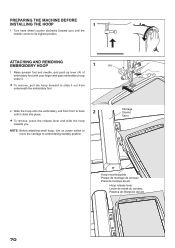
70 ATTACHING AND REMOVING EMBROIDERY HOOP
1
(A)
1. PREPARING THE MACHINE BEFORE...
Instruction Manual - Page 76

... the Program Folder where the shortcut for the software will automatically close the Futura software and then turn on "Cancel". Simply click on your computer.
Finally you plan to work with the installation.
It will finish when it has reached to your sewing machine. Attach the hoop that you are requested to open the...
Instruction Manual - Page 84

... sound, but thread is supplied with the accessories over .
2.
The hoop will move back one stitch at a time. Computer screen says thread is broken, machine lights are missing
If the embroidery machine detects that the thread is not in the thread tension. Restart the embroidery machine and continue embroidering.
HELPFUL INFORMATION FOR EMBROIDERING WITH FUTURA
1.
Instruction Manual - Page 90

... fabric with #1 in the upper left corner.
88
Please note: Up to three additional hoops will therefore sew the design to the alignment of the embroidery. Fig. 2 Fig. 2 Fig. 2
Intersection of cross ...Multi-Hooping is a special feature in the Futura software that will allow embroidery data which is larger than a single embroidery hoop to be sent to the machine to stitch out, while making it easy ...
Instruction Manual - Page 102
... thread tension is turned off.- Stitches are lowered - Lengthen stitch length. (see page
24 - 27). * Feed dogs are irregular. * Needle size is not correct for thread and fabric. (see page 20
- 21). * Needle is being pulled or pushed against machine feeding
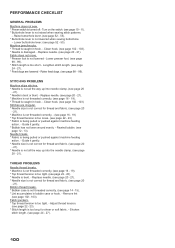
action. - PERFORMANCE CHECKLIST
GENERAL PROBLEMS Machine does not sew. * Power switch is too tight...
Instruction Manual - Page 104
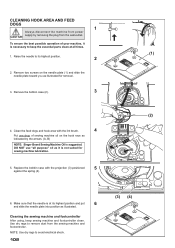
... AREA AND FEED DOGS
1
Always disconnect the machine from power CAUTION supply by the arrows. (A, B)
NOTE: Singer Brand Sewing Machine Oil is suggested. Remove two screws on the hook race as illustrated for sewing machine lubrication.
5.
Raise the needle to keep sewing machine and footcontroller clean.
Cleaning the sewing machine and footcontroller
After using, keep the essential...
Similar Questions

Power Cords No Longer Fitting
The power cords shown in these images apparently used to work with this machine, but when I use them...
The power cords shown in these images apparently used to work with this machine, but when I use them...
(Posted by shadowrainboe 2 years ago)

Replacement Part For Singer Futura Xl 400
I am looking for the embroidery arm unit for a Singer Futura Xl 400. Can you assist me in locating t...
I am looking for the embroidery arm unit for a Singer Futura Xl 400. Can you assist me in locating t...
(Posted by sjh4ba 3 years ago)

Singer Futura Xl-400
I am in need of a Singer Futura XL-400 Startup disc. Any idea where I can get one
I am in need of a Singer Futura XL-400 Startup disc. Any idea where I can get one
(Posted by fayevb 4 years ago)

Sewing Wheel Will Not Turn
I have a singer talent 3323 and the wheel that controls the needle will not move. It also looks as i...
I have a singer talent 3323 and the wheel that controls the needle will not move. It also looks as i...
(Posted by gabriellemharris 9 years ago)
Software Futura Xl-400 And Usb Cable
How can I get Futura XL-400 software to work. Currently, I cannot open software because the (I think...
How can I get Futura XL-400 software to work. Currently, I cannot open software because the (I think...
(Posted by idesktype 10 years ago)