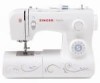
Singer 3323 Talent Support Question
Singer 3323 Talent Support Question
Find answers below for this question about Singer 3323 Talent.Need a Singer 3323 Talent manual? We have 2 online manuals for this item!
Question posted by gabriellemharris on December 23rd, 2014
Sewing Wheel Will Not Turn
I have a singer talent 3323 and the wheel that controls the needle will not move. It also looks as if my bobbin case has moved some. How do I fix this problem
Current Answers
Answer #1: Posted by Brainerd on December 23rd, 2014 12:51 PM
Brainerd

Member since:
May 24th, 2014 Points: 759,630

Member since:
May 24th, 2014 Points: 759,630
Hi, please refer to the tutoria video here:
http://m.youtube.com/watch?v=kK62tfoCmuQ
http://m.youtube.com/watch?v=kK62tfoCmuQ
I hope this helps you!
Please press accept to reward my effort or post again with more details if not satisfied.
Regards, Brainerd
Related Singer 3323 Talent Manual Pages
Instruction Manual - Page 2

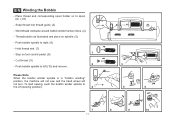
.... 3. Return the appliance to the off the machine or unplug when the machine is 75dB(A). 17. Special care is used as contained in this sewing machine. Do not use the proper needle plate. Always unplug sewing machine from outlet. 15.
Always use bent needles. 8.
Do not use as threading needle, changing needle, threading bobbin, or changing presser foot, and the like...
Instruction Manual - Page 18
...
the left (10) and remove. EN Winding the Bobbin
- Place thread and corresponding spool holder on to right. (6)
- Please Note:
When the bobbin winder spindle is in "bobbin winding"
position, the machine will not sew and the hand wheel will
not turn. Thread bobbin as illustrated and place on foot control pedal. (8)
- Step on spindle. (5)
-
Cut thread. (9) 2
- Snap thread...
Instruction Manual - Page 20
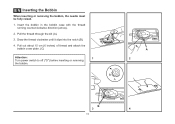
... into the notch (B).
4. EN Inserting the Bobbin
When inserting or removing the bobbin, the needle must be fully raised.
1. Pull out about 15 cm (6 inches) of thread and attach the bobbin cover plate. (C)
Attention:
1
Turn power switch to off ("O") before inserting or removing
the bobbin. Insert the bobbin in the bobbin case with the thread running counterclockwise direction (arrow...
Instruction Manual - Page 30

...to sew these stretch patterns is a stretch stitch pattern, and information on how to Choose Your Pattern
The diagram on this page display the stitch patterns available on the machine. ... direction. Stitch Width Dial c.
Reverse Sewing Lever b.
The Pattern Selector Dial may be turned in gray. To select the patterns indicated with the gray color, turn the Pattern Selector Dial. (d) Use ...
Instruction Manual - Page 36

...
A
machine will sew forward again. (1)
Removing the Work
Turn the handwheel toward you (counterclockwise) to bring
the thread take up lever to cut. (3)
3
29
2 B Pull threads down the reverse sewing lever (A).
Guide the threads to the side of a seam, press down to its highest position, raise the
presser foot and remove work behind the needle...
Instruction Manual - Page 48

... the darning plate. (1)
Remove the presser foot shank. (2) Attach the darning/ embroidery foot to right.
Turn work from behind the needle clamp screw (b). It is controlled by 90° and sew over previous stitching. Stippling: Set the machine for easier sewing and better results. Note: Free motion darning is recommended for straight stitch. Using the darning...
Instruction Manual - Page 50

...bobbin thread and
the needle thread behind the Even Feed Foot attachment. Draw the bobbin thread up and place both the needle screw (d) and the presser bar
attaching screw (b) are tightly secured. 5. Attaching head f. Needle... to sew first without the Even Feed Foot accessory which should fit into the presser foot bar. Arm d. Needle screw & clamp e. It also helps to the machine as ...
Instruction Manual - Page 52

... and put them to stitch selected. Adjust the stitch width and the stitch length according to the direction of feeding.
1 Run machine slowly and start sewing from the below of the needle.
EN Side Cutter
Lift the presser foot lifter (a) to raise the presser foot bar. (1)
Remove the presser foot. (See page 49...
Instruction Manual - Page 58

... at first thread breakage or skipped stitches.
51 thin to large. 9 (70) to thread size and weight of fabric.
NEEDLE, FABRIC SELECTION
NEEDLES
EXPLANATION
TYPE OF FABRIC
SINGER® 2020 Standard sharp needles.
SINGER® 2032 Leather needles. 12 (80) to 18 (110). Medium weight fabrics-cotton duck, woolen, heavier knits, Use polyester threads on synthetic...
Instruction Manual - Page 63
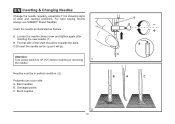
... again after inserting the new needle. (1)
B. C/D.Insert the needle as far up as follows:
A. Damaged points C. Attention:
Turn power switch to off ("O") before inserting or removing
1
the needle. Blunt needles
2
56
D A
B C
B
A
C The flat side of wear and causing problems. For best sewing results always use SINGER® Brand Needles.
Needles must be towards the back.
Instruction Manual - Page 67
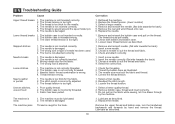
...the threading. 2. Remove the upper thread and bobbin case, turn the handwheel backwards and forwards by the machine.
1. The bobbin case is noisy
The machine jams
1. The wrong size or type of needle has been used. 4. The wrong foot is not inserted correctly. 2. The machine must suit the fabric and thread. 4. Select a larger needle. 4. Readjust the stitch length. 3. Lubricate as...
Instruction Manual 2 - Page 2
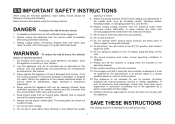
...: 1. Please turn all controls to ensure that is fixed with the appliance.
Use only attachments recommended by the manufacturer or its intended use the proper needle plate. Do not operate where aerosol spray products are being used by a person responsible for examination, repair, electrical or mechanical adjustment. 4.
Always unplug sewing machine from all moving parts. EN...
Instruction Manual 2 - Page 18

... on to left (sewing position).
4
3
5
6
7
8
9
10
11 Thread bobbin as illustrated and place on foot control pedal. (8)
- To start sewing, push the bobbin winder spindle to right. (6)
- Cut thread. (9) 2
- Hold thread end. (7) 1
- Please Note:
When the bobbin winder spindle is in "bobbin winding"
position, the machine will not sew and the hand wheel will
not turn. Snap thread into...
Instruction Manual 2 - Page 20

... attach the bobbin cover plate (C). Attention:
1
Turn power switch to off ("O") before inserting or removing
the bobbin. Draw the thread clockwise until it slips into the notch (B).
4.
Pull the thread through the slit (A).
3. B 3
13
A 2
C
4 EN Inserting the Bobbin
When inserting or removing the bobbin, the needle must be fully raised.
1.
Insert the bobbin in the bobbin case with the...
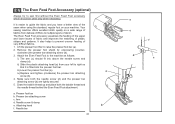
Instruction Manual 2 - Page 48

... behind the needle clamp screw (b). Turn work from left to right.
Using the optional darning/ embroidery foot will help guide you as you sew, in a meandering fashion to create small curving lines to hold layers of the hole (to secure the threads). (5) First row: Always work by the operator. A darning hoop is controlled by...
Instruction Manual 2 - Page 50
... chiffons to the machine as follows:
i) The arm (c) should be used only when necessary.
a. Presser bar attaching screw c. Needle screw & clamp e. Attaching head f.
Your sewing machine offers excellent stitch ... from your machine.
Make sure both the bobbin thread and
the needle thread behind the Even Feed Foot attachment. Draw the bobbin thread up and place both the needle screw (d)...
Instruction Manual 2 - Page 52
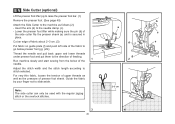
... (c). - Insert the arm (b) to slide aside. Adjust the stitch width and the stitch length according to the direction of feeding.
1 Run machine slowly and start sewing from the below of the needle.
Cut an edge of fabric about 2~3 cm. (3)
Put fabric on guide plate (f) and push left side of the fabric to go...
Instruction Manual 2 - Page 58
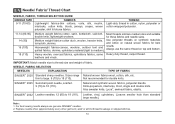
...
Knits-polyesters, interlocks, tricot, single and double knits. Leather, vinyl, upholstery. (Leaves smaller hole than standard large needle.)
Note : 1.
leathers and vinyls.
SINGER® 2045 Semi-ball point needle, scarfed. 9 (70) to medium). For best sewing results always use the same thread on natural woven fabrics for best
Heavyweight fabrics-canvas, woolens, outdoor tent...
Instruction Manual 2 - Page 63
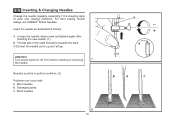
... as far up as follows:
A. Attention:
Turn power switch to off ("O") before inserting or removing
1
the needle.
Bent needles B. The flat side of wear and causing problems. For best sewing results always use SINGER® Brand Needles.
Blunt needles
2
56
D A
B C
B
A
C EN Inserting & Changing Needles
Change the needle regularly, especially if it will go. Damaged points C.
Instruction Manual 2 - Page 67
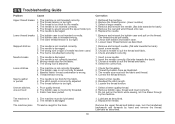
... is not inserted correctly. 5. The machine is damaged. 2. Select a larger needle. 4. Insert a new needle. 3. The needle is noisy
The machine jams
1. Thread tension wrong.
1. Remove and reinsert the bobbin case and pull on the fabric while sewing, let it be lubricated. 2. Lubricate as illustrated. 3. EN Troubleshooting Guide
Problem
Cause
Upper thread breaks
1. The thread...
Similar Questions

Singer Talent 3323 Timing Is Off. How Do You Remove The Black Bobbin Holder To
Singer Talent 3323 timing is off. How do you remove the black bobbin holder to access underneath
Singer Talent 3323 timing is off. How do you remove the black bobbin holder to access underneath
(Posted by fmodin 2 years ago)

Singer Futura Quartet Seqs 6700 Sewing Machine
how to set my singer futura quartet seqs 6700 sewing machine to sew. A distance more than one inch a...
how to set my singer futura quartet seqs 6700 sewing machine to sew. A distance more than one inch a...
(Posted by johour2194 3 years ago)

I Get E7 Error Message On My Singer Model 7258 Sewing Machine. There Is No Refe
Error message E7 is up on my Singer Stylist model 7258 sewing machine. It is not working at all. I t...
Error message E7 is up on my Singer Stylist model 7258 sewing machine. It is not working at all. I t...
(Posted by ebellamybellamy9 5 years ago)
Cloth Advances Backwards Only
Machine sewing fine. Stopped, and started sewing againand only advances material backwards. Moving b...
Machine sewing fine. Stopped, and started sewing againand only advances material backwards. Moving b...
(Posted by bobandlaurie52 9 years ago)

Beeping From Singer Sewing Machine Stylist Ii 5625
My sewing machine will beep and stop sewing after three inches of sewing. I have taken it to be repa...
My sewing machine will beep and stop sewing after three inches of sewing. I have taken it to be repa...
(Posted by arusheria 9 years ago)