
Instruction Manual
Page 2
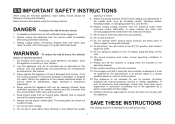
... foot controller free from the electrical outlet when removing covers, lubricating, or when making any adjustments in order to break. 9. The wrong plate can cause the needle to ensure that is fixed with the appliance. Replace bulb with any other user servicing adjustments mentioned in . 2. Always use bent needles. 8. Always unplug sewing machine from accumulation of electric shock: 1. SAVE THESE INSTRUCTIONS This sewing machine is being administered. 14. WARNING - To disconnect, turn off ("O") position...
... foot controller free from the electrical outlet when removing covers, lubricating, or when making any adjustments in order to break. 9. The wrong plate can cause the needle to ensure that is fixed with the appliance. Replace bulb with any other user servicing adjustments mentioned in . 2. Always use bent needles. 8. Always unplug sewing machine from accumulation of electric shock: 1. SAVE THESE INSTRUCTIONS This sewing machine is being administered. 14. WARNING - To disconnect, turn off ("O") position...
Instruction Manual
Page 6
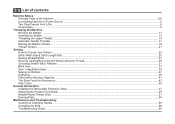
... Dial & Stitch Length Dial ...25 Sewing Straight Stitch ...27 Reverse Sewing/Removing the Work/Cutting the Thread ...29 Choosing Stretch Stitch Patterns ...31 Blind Hem ...33 Sew 1-step Buttonholes ...35 Sewing on Buttons ...37 Gathering...39 Free Motion Darning, Stippling ...41 The Even Feed Foot Accessory ...43 Side Cutter ...45 General Information Installing the Removable Extension Table...47 Attaching the Presser Foot Shank...49 Needle/Fabric/Thread Chart ...51 Darning Plate...54 Maintenance and Troubleshooting Inserting & Changing Needle ...56 Changing the Bulb ...58 Troubleshooting Guide...
... Dial & Stitch Length Dial ...25 Sewing Straight Stitch ...27 Reverse Sewing/Removing the Work/Cutting the Thread ...29 Choosing Stretch Stitch Patterns ...31 Blind Hem ...33 Sew 1-step Buttonholes ...35 Sewing on Buttons ...37 Gathering...39 Free Motion Darning, Stippling ...41 The Even Feed Foot Accessory ...43 Side Cutter ...45 General Information Installing the Removable Extension Table...47 Attaching the Presser Foot Shank...49 Needle/Fabric/Thread Chart ...51 Darning Plate...54 Maintenance and Troubleshooting Inserting & Changing Needle ...56 Changing the Bulb ...58 Troubleshooting Guide...
Instruction Manual
Page 9
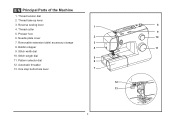
Reverse sewing lever 1 8 4. Thread cutter 9 5. Stitch width dial 10. Presser foot 6. Needle plate cover 2 10 7. Bobbin stopper 4 11 9. One step buttonhole lever 7 12 13 2 Stitch length dial 5 11. Pattern selector dial 6 12. Thread take-up lever 3. Automatic threader 13. EN Principal Parts of the Machine 1. Removable extension table/ accessory storage 3 8. Thread tension dial 2.
Reverse sewing lever 1 8 4. Thread cutter 9 5. Stitch width dial 10. Presser foot 6. Needle plate cover 2 10 7. Bobbin stopper 4 11 9. One step buttonhole lever 7 12 13 2 Stitch length dial 5 11. Pattern selector dial 6 12. Thread take-up lever 3. Automatic threader 13. EN Principal Parts of the Machine 1. Removable extension table/ accessory storage 3 8. Thread tension dial 2.
Instruction Manual
Page 18
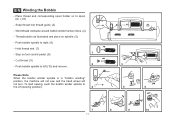
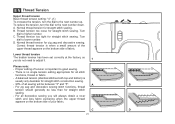
.... (5) - Thread bobbin as illustrated and place on to left (sewing position). 4 3 5 6 7 8 9 10 11 Push bobbin spindle to the left (10) and remove. Step on foot control pedal. (8) - Hold thread end. (7) 1 - Please Note: When the bobbin winder spindle is in "bobbin winding" position, the machine will not sew and the hand wheel will not turn. To start sewing, push the bobbin winder spindle to right. (6) - EN Winding the Bobbin - Push bobbin spindle to spool pin. (1/2) - Wind thread clockwise around bobbin winder tension...
.... (5) - Thread bobbin as illustrated and place on to left (sewing position). 4 3 5 6 7 8 9 10 11 Push bobbin spindle to the left (10) and remove. Step on foot control pedal. (8) - Hold thread end. (7) 1 - Please Note: When the bobbin winder spindle is in "bobbin winding" position, the machine will not sew and the hand wheel will not turn. To start sewing, push the bobbin winder spindle to right. (6) - EN Winding the Bobbin - Push bobbin spindle to spool pin. (1/2) - Wind thread clockwise around bobbin winder tension...
Instruction Manual
Page 28
... loose for zig zag and decorative sewing. A balanced tension (identical stitches both top and bottom) is usually only desirable for straight stitch sewing. - A. Normal thread tension for straight stitch sewing. C. Correct thread tension is important to the next number up. There is no single tension setting appropriate for all decorative sewing you do not need to higher number. For all stitch functions, thread or fabric. - Turn dial to adjust it. 1 Please note: - B. Thread tension too tight for straight stitch sewing. Lower thread tension The bobbin tension...
... loose for zig zag and decorative sewing. A balanced tension (identical stitches both top and bottom) is usually only desirable for straight stitch sewing. - A. Normal thread tension for straight stitch sewing. C. Correct thread tension is important to the next number up. There is no single tension setting appropriate for all decorative sewing you do not need to higher number. For all stitch functions, thread or fabric. - Turn dial to adjust it. 1 Please note: - B. Thread tension too tight for straight stitch sewing. Lower thread tension The bobbin tension...

Instruction Manual
Page 38
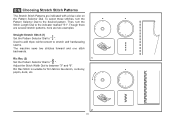
... firm fabrics like denim, corduroy, poplin, duck, etc. 2 31 Though there are several stretch patterns, here are indicated with a blue color on the Pattern Selector Dial. To select these stitches, turn the Stitch Length Dial to the indicator marked "S1". Adjust the Stitch Width Dial to stretch and hardwearing seams. The machine sews two stitches forward and one stitch backwards. EN Choosing Stretch Stitch Patterns The Stretch Stitch Patterns are two examples: Straight Stretch Stitch (1) Set the Pattern Selector Dial...
... firm fabrics like denim, corduroy, poplin, duck, etc. 2 31 Though there are several stretch patterns, here are indicated with a blue color on the Pattern Selector Dial. To select these stitches, turn the Stitch Length Dial to the indicator marked "S1". Adjust the Stitch Width Dial to stretch and hardwearing seams. The machine sews two stitches forward and one stitch backwards. EN Choosing Stretch Stitch Patterns The Stretch Stitch Patterns are two examples: Straight Stretch Stitch (1) Set the Pattern Selector Dial...

Instruction Manual
Page 40
... fabrics. Blind hem for part number) 33 Start to sew slowly on the diagram at a setting appropriate for firm fabrics. Blind Hem: Turn up the hem to the 1 right side of the fabric with a longer stitch length setting. Set the Stitch Length Dial with the range shown on the fold, making sure the needle touches slightly the folded top to catch one or two fabric threads. (2) Unfold the fabric when hemming is used for the fabric. Generally, a narrower stitch is used...
... fabrics. Blind hem for part number) 33 Start to sew slowly on the diagram at a setting appropriate for firm fabrics. Blind Hem: Turn up the hem to the 1 right side of the fabric with a longer stitch length setting. Set the Stitch Length Dial with the range shown on the fold, making sure the needle touches slightly the folded top to catch one or two fabric threads. (2) Unfold the fabric when hemming is used for the fabric. Generally, a narrower stitch is used...

Instruction Manual
Page 42
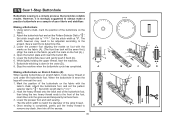
... of the buttonhole foot, PUSH then bring the two heavy thread ends to the front of the buttonhole on stretch fabric, hook heavy thread or cord under the buttonhole foot. Set the stitch width at "6". EN Sew 1-Step Buttonhole Buttonhole sewing is sewn the legs will be adjusted according to the project. However, it back (C). 6. The width however may need to " ". Open the button plate and insert the button (B). 5. Stop the machine when the buttonhole cycle...
... of the buttonhole foot, PUSH then bring the two heavy thread ends to the front of the buttonhole on stretch fabric, hook heavy thread or cord under the buttonhole foot. Set the stitch width at "6". EN Sew 1-Step Buttonhole Buttonhole sewing is sewn the legs will be adjusted according to the project. However, it back (C). 6. The width however may need to " ". Open the button plate and insert the button (B). 5. Stop the machine when the buttonhole cycle...

Instruction Manual
Page 44
... work forward and then sew through the back two holes. 3 4 37 If a shank is required, place a darning needle on top of the fabric. Adjust the stitch width, as illustrated in (3). Set the machine for zig-zag stitch, then set the width to number "3" - "6". Raise the needle out of the 1 2 button and sew. EN Sewing on Buttons Install the darning plate. (1) Change the all purpose foot to the button sewing foot. (2) Set the stitch length to finish. Set the machine for straight stitch again, then sew a few securing stitches...
... work forward and then sew through the back two holes. 3 4 37 If a shank is required, place a darning needle on top of the fabric. Adjust the stitch width, as illustrated in (3). Set the machine for zig-zag stitch, then set the width to number "3" - "6". Raise the needle out of the 1 2 button and sew. EN Sewing on Buttons Install the darning plate. (1) Change the all purpose foot to the button sewing foot. (2) Set the stitch length to finish. Set the machine for straight stitch again, then sew a few securing stitches...

Instruction Manual
Page 48
... work from behind the needle clamp screw (b). Movement of the hole (to secure the threads). (4) First row: Always work by the operator. It is accomplished without the sewing machine internal feed system. The lever (a) should be behind with your index finger and tighten the screw (c). (3) For darning, first sew around the edge of the fabric is recommended for straight stitch. EN Free Motion Darning, Stippling Darning: Install the darning plate. (1) Remove the presser foot shank. (2) Attach the darning/ embroidery foot to right. A darning hoop is controlled...
... work from behind the needle clamp screw (b). Movement of the hole (to secure the threads). (4) First row: Always work by the operator. It is accomplished without the sewing machine internal feed system. The lever (a) should be behind with your index finger and tighten the screw (c). (3) For darning, first sew around the edge of the fabric is recommended for straight stitch. EN Free Motion Darning, Stippling Darning: Install the darning plate. (1) Remove the presser foot shank. (2) Attach the darning/ embroidery foot to right. A darning hoop is controlled...

Instruction Manual
Page 50
... needle screw and clamp (d). Attaching head f. EN The Even Feed Foot Accessory Always try to sew first without the Even Feed Foot accessory which should fit into the presser foot bar. It also helps to prevent uneven feeding of plaids, stripes and patterns. iii) Lower the presser foot bar (a). Arm d. The Even Feed Foot accessory equalizes the feeding of the upper and lower layers of fabric and improves the matching of very difficult fabrics. 1. Attach the Even Feed Foot to raise the presser foot bar (a). 2. Remove the presser foot shank...
... needle screw and clamp (d). Attaching head f. EN The Even Feed Foot Accessory Always try to sew first without the Even Feed Foot accessory which should fit into the presser foot bar. It also helps to prevent uneven feeding of plaids, stripes and patterns. iii) Lower the presser foot bar (a). Arm d. The Even Feed Foot accessory equalizes the feeding of the upper and lower layers of fabric and improves the matching of very difficult fabrics. 1. Attach the Even Feed Foot to raise the presser foot bar (a). 2. Remove the presser foot shank...
Instruction Manual
Page 67
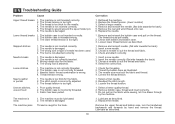
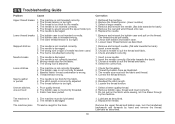
... the thread tension. 1. EN Troubleshooting Guide Problem Cause Upper thread breaks 1. The machine is not correctly threaded. 3. Select a better quality thread. 2. The bobbin case is damaged. The needle is incorrectly threaded. 3. Lubricate as described. 1. Lower thread breaks 1. The needle is too thick for the fabric. 4. Skipped stitches Needle breaks Loose stitches Seams gather or pucker Uneven stitches, uneven feed 1. The thread is not inserted correctly. 2. The bobbin case is incorrectly adjusted. 3. Rethread the machine. 2. Remove and reinsert the needle. (flat...
... the thread tension. 1. EN Troubleshooting Guide Problem Cause Upper thread breaks 1. The machine is not correctly threaded. 3. Select a better quality thread. 2. The bobbin case is damaged. The needle is incorrectly threaded. 3. Lubricate as described. 1. Lower thread breaks 1. The needle is too thick for the fabric. 4. Skipped stitches Needle breaks Loose stitches Seams gather or pucker Uneven stitches, uneven feed 1. The thread is not inserted correctly. 2. The bobbin case is incorrectly adjusted. 3. Rethread the machine. 2. Remove and reinsert the needle. (flat...
Instruction Manual 2
Page 2
... it has been dropped or damaged, or dropped into any adjustments in order to ensure that is fixed with foot controller is not intended for household use as described in the instruction manual. 11. Never operate this appliance only for its service agent or a similar qualified person in the needle area, such as threading needle, changing needle, threading bobbin, or changing presser foot, and the like. 10. Never operate the appliance with...
... it has been dropped or damaged, or dropped into any adjustments in order to ensure that is fixed with foot controller is not intended for household use as described in the instruction manual. 11. Never operate this appliance only for its service agent or a similar qualified person in the needle area, such as threading needle, changing needle, threading bobbin, or changing presser foot, and the like. 10. Never operate the appliance with...

Instruction Manual 2
Page 6
...23 Stitch Width Dial & Stitch Length Dial ...25 Sewing Straight Stitch ...27 Reverse Sewing/Removing the Work/Cutting the Thread ...29 Choosing Stretch Stitch Patterns ...31 Blind Hem ...33 Sew 1-step Buttonholes ...35 Sewing on Buttons ...37 Gathering...39 Free Motion Darning, Stippling ...41 The Even Feed Foot Accessory (optional) ...43 Side Cutter (optional) ...45 General Information Installing the Removable Extension Table...47 Attaching the Presser Foot Shank...49 Needle/Fabric/Thread Chart ...51 Darning Plate...54 Maintenance and Troubleshooting Inserting & Changing Needle ...56 Changing...
...23 Stitch Width Dial & Stitch Length Dial ...25 Sewing Straight Stitch ...27 Reverse Sewing/Removing the Work/Cutting the Thread ...29 Choosing Stretch Stitch Patterns ...31 Blind Hem ...33 Sew 1-step Buttonholes ...35 Sewing on Buttons ...37 Gathering...39 Free Motion Darning, Stippling ...41 The Even Feed Foot Accessory (optional) ...43 Side Cutter (optional) ...45 General Information Installing the Removable Extension Table...47 Attaching the Presser Foot Shank...49 Needle/Fabric/Thread Chart ...51 Darning Plate...54 Maintenance and Troubleshooting Inserting & Changing Needle ...56 Changing...

Instruction Manual 2
Page 9
Thread cutter 9 5. Bobbin stopper 4 11 9. Reverse sewing lever 1 8 4. Removable extension table/ accessory storage 3 8. Needle plate cover 2 10 7. Stitch length dial 5 11. Thread take-up lever 3. Automatic threader 13. Presser foot 6. Stitch width dial 10. Thread tension dial 2. EN Principal Parts of the Machine 1. Pattern selector dial 6 12. One step buttonhole lever 7 12 13 2
Thread cutter 9 5. Bobbin stopper 4 11 9. Reverse sewing lever 1 8 4. Removable extension table/ accessory storage 3 8. Needle plate cover 2 10 7. Stitch length dial 5 11. Thread take-up lever 3. Automatic threader 13. Presser foot 6. Stitch width dial 10. Thread tension dial 2. EN Principal Parts of the Machine 1. Pattern selector dial 6 12. One step buttonhole lever 7 12 13 2

Instruction Manual 2
Page 28
... "3" and "5". Turn dial to lower number. For all stitch functions, thread or fabric. - Thread tension too tight for straight stitch sewing. C D 21 Thread tension too loose for straight stitch sewing. Correct thread tension is no single tension setting appropriate for straight stitch sewing. There is when a small amount of the upper thread appears on the bottom side of fabric. C. A B - B. Normal thread tension for all decorative sewing you do not need to adjust it. 1 Please note: - Lower thread tension The bobbin tension has been set correctly at the...
... "3" and "5". Turn dial to lower number. For all stitch functions, thread or fabric. - Thread tension too tight for straight stitch sewing. C D 21 Thread tension too loose for straight stitch sewing. Correct thread tension is no single tension setting appropriate for straight stitch sewing. There is when a small amount of the upper thread appears on the bottom side of fabric. C. A B - B. Normal thread tension for all decorative sewing you do not need to adjust it. 1 Please note: - Lower thread tension The bobbin tension has been set correctly at the...
Instruction Manual 2
Page 38
... Pattern Selector Dial. Used to add triple reinforcement to between "3" and "6". Ric Rac Stitch is suitable for firm fabrics like denim, corduroy, poplin, duck, etc. 2 31 Adjust the Stitch Width Dial to stretch and hardwearing seams. The machine sews two stitches forward and one stitch backwards. EN Choosing Stretch Stitch Patterns The Stretch Stitch Patterns are two examples: Straight Stretch Stitch (1) Set the Pattern Selector Dial to " ". Then, turn the Pattern Selector Dial to " ". Ric Rac (2) 1 Set the Pattern Selector Dial...
... Pattern Selector Dial. Used to add triple reinforcement to between "3" and "6". Ric Rac Stitch is suitable for firm fabrics like denim, corduroy, poplin, duck, etc. 2 31 Adjust the Stitch Width Dial to stretch and hardwearing seams. The machine sews two stitches forward and one stitch backwards. EN Choosing Stretch Stitch Patterns The Stretch Stitch Patterns are two examples: Straight Stretch Stitch (1) Set the Pattern Selector Dial to " ". Then, turn the Pattern Selector Dial to " ". Ric Rac (2) 1 Set the Pattern Selector Dial...
Instruction Manual 2
Page 42
... thread. 4. Stop the machine when the buttonhole cycle has completed. Lower the presser foot and start the machine. 7. Using tailor's chalk, mark the position of your fabric and stabilizer. Attach the buttonhole foot and set the pattern selector dial to the project. Set the stitch width at "6". EN Sew 1-Step Buttonhole Buttonhole sewing is done in the order (D). 8. However, it back (C). 6. Set stitch length dial to always make a practice buttonhole on a sample of the buttonhole on stretch fabric, hook heavy thread or cord under the buttonhole foot...
... thread. 4. Stop the machine when the buttonhole cycle has completed. Lower the presser foot and start the machine. 7. Using tailor's chalk, mark the position of your fabric and stabilizer. Attach the buttonhole foot and set the pattern selector dial to the project. Set the stitch width at "6". EN Sew 1-Step Buttonhole Buttonhole sewing is done in the order (D). 8. However, it back (C). 6. Set stitch length dial to always make a practice buttonhole on a sample of the buttonhole on stretch fabric, hook heavy thread or cord under the buttonhole foot...

Instruction Manual 2
Page 44
... holes. 3 4 37 Adjust the stitch width, as illustrated in (3). Raise the needle out of the button. Set the machine for zig-zag stitch, then set the width to check that the needle goes cleanly into the left and right holes of the 1 2 button and sew. For buttons with about 10 stitches. EN Sewing on Buttons Install the darning plate. (1) Change the all purpose foot to the button sewing foot. (2) Set the stitch length to finish. Place the button and fabric under the Button Sewing foot, as needed...
... holes. 3 4 37 Adjust the stitch width, as illustrated in (3). Raise the needle out of the button. Set the machine for zig-zag stitch, then set the width to check that the needle goes cleanly into the left and right holes of the 1 2 button and sew. For buttons with about 10 stitches. EN Sewing on Buttons Install the darning plate. (1) Change the all purpose foot to the button sewing foot. (2) Set the stitch length to finish. Place the button and fabric under the Button Sewing foot, as needed...
Instruction Manual 2
Page 67
...tight. Lower thread breaks 1. The lower thread tension is too tight. 3. The wrong size or type of needle has been used. 4. The machine must suit the fabric and thread. 4. The needle is attached. 1. Remove and reinsert the needle. (flat side towards the back) 3. Replace the needle. 1. Insert a new needle. 3. Correct the thread tension. 1. Remove bobbin case, thread and insert correctly. 3. Replace the needle. EN Troubleshooting Guide Problem Cause Upper thread breaks 1. Skipped stitches Needle breaks Loose stitches Seams gather or pucker Uneven stitches, uneven feed 1. The...
...tight. Lower thread breaks 1. The lower thread tension is too tight. 3. The wrong size or type of needle has been used. 4. The machine must suit the fabric and thread. 4. The needle is attached. 1. Remove and reinsert the needle. (flat side towards the back) 3. Replace the needle. 1. Insert a new needle. 3. Correct the thread tension. 1. Remove bobbin case, thread and insert correctly. 3. Replace the needle. EN Troubleshooting Guide Problem Cause Upper thread breaks 1. Skipped stitches Needle breaks Loose stitches Seams gather or pucker Uneven stitches, uneven feed 1. The...


