

Instruction Manual 2
Page 3
...instructions before cleaning. Use only the attachments recommended by the manufacturer as contained in the instruction manual. 11. Always unplug sewing machine from the electrical outlet when removing covers, lubricating, or when making any air openings blocked. IMPORTANT SAFETY INSTRUCTIONS When ...1. It may cause the needle to be followed, including the following: Read all moving parts. Use this manual. Switch the sewing machine off ("O") position, then remove plug from the electric outlet immediately after using and before using the wrong needle plate may ...
...instructions before cleaning. Use only the attachments recommended by the manufacturer as contained in the instruction manual. 11. Always unplug sewing machine from the electrical outlet when removing covers, lubricating, or when making any air openings blocked. IMPORTANT SAFETY INSTRUCTIONS When ...1. It may cause the needle to be followed, including the following: Read all moving parts. Use this manual. Switch the sewing machine off ("O") position, then remove plug from the electric outlet immediately after using and before using the wrong needle plate may ...
Instruction Manual 2
Page 4
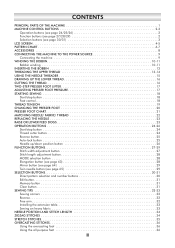
... THREADER 15 DRAWING UP THE LOWER THREAD 16 CUTTING THE THREAD 16 TWO-STEP PRESSER FOOT LIFTER 17 ADJUSTING PRESSER FOOT PRESSURE 17 STARTING SEWING 18 Start/stop button 18 Foot control 18 THREAD TENSION 19 CHANGING THE PRESSER FOOT 20 PRESSER FOOT CHART 21 MATCHING NEEDLE/ FABRIC/ ... Direct pattern selection and number buttons 30 Edit button 31 Memory button 31 Clear button 31 SEWING TIPS 32-33 Sewing corners 32 Reverse 32 Free arm 32 Installing the extension table 33 Sewing on heavy fabric 33 NEEDLE POSITION AND STITCH LENGTH 34 ZIGZAG STITCHES 34 STRETCH STITCHES 35 ...
... THREADER 15 DRAWING UP THE LOWER THREAD 16 CUTTING THE THREAD 16 TWO-STEP PRESSER FOOT LIFTER 17 ADJUSTING PRESSER FOOT PRESSURE 17 STARTING SEWING 18 Start/stop button 18 Foot control 18 THREAD TENSION 19 CHANGING THE PRESSER FOOT 20 PRESSER FOOT CHART 21 MATCHING NEEDLE/ FABRIC/ ... Direct pattern selection and number buttons 30 Edit button 31 Memory button 31 Clear button 31 SEWING TIPS 32-33 Sewing corners 32 Reverse 32 Free arm 32 Installing the extension table 33 Sewing on heavy fabric 33 NEEDLE POSITION AND STITCH LENGTH 34 ZIGZAG STITCHES 34 STRETCH STITCHES 35 ...
Instruction Manual 2
Page 5
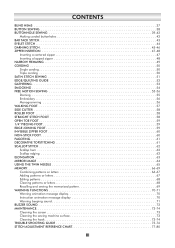
...Inserting a lapped zipper 48 NARROW HEMMING 49 CORDING 50 Single cording 50 Triple cording 50 SATIN STITCH SEWING 51 EDGE/QUILTING GUIDE 52 GATHERING 53 SMOCKING 54 FREE MOTION SEWING 55-56 Darning 55 Embroidery 56 Monogramming 56 WALKING FOOT 57 SIDE CUTTER 58 ROLLER FOOT 58 ...66-69 Combining patterns or letters 66-67 Adding patterns or letters 67 Editing patterns 68 Clearing patterns or letters 68 Recalling and sewing the memorized pattern 69 WARNING FUNCTIONS 70-71 Warning animation message display 70 Instruction animation message display 70 Warning beeping sound 71 ...
...Inserting a lapped zipper 48 NARROW HEMMING 49 CORDING 50 Single cording 50 Triple cording 50 SATIN STITCH SEWING 51 EDGE/QUILTING GUIDE 52 GATHERING 53 SMOCKING 54 FREE MOTION SEWING 55-56 Darning 55 Embroidery 56 Monogramming 56 WALKING FOOT 57 SIDE CUTTER 58 ROLLER FOOT 58 ...66-69 Combining patterns or letters 66-67 Adding patterns or letters 67 Editing patterns 68 Clearing patterns or letters 68 Recalling and sewing the memorized pattern 69 WARNING FUNCTIONS 70-71 Warning animation message display 70 Instruction animation message display 70 Warning beeping sound 71 ...
Instruction Manual 2
Page 6
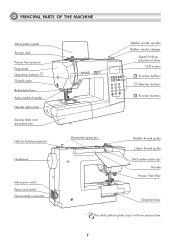
... OF THE MACHINE Stitch pattern plate Tension dial Presser foot pressure Face plate Operation buttons A Thread cutter Buttonhole lever Auto needle threader Needle plate cover Sewing table and accessory box Hole for Auxiliary spool pin Handwheel Main power switch Power cord socket Foot controller connector Bobbin winder spindle Bobbin winder stopper...
... OF THE MACHINE Stitch pattern plate Tension dial Presser foot pressure Face plate Operation buttons A Thread cutter Buttonhole lever Auto needle threader Needle plate cover Sewing table and accessory box Hole for Auxiliary spool pin Handwheel Main power switch Power cord socket Foot controller connector Bobbin winder spindle Bobbin winder stopper...
Instruction Manual 2
Page 7
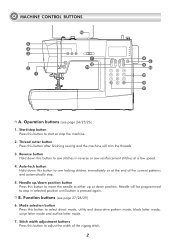
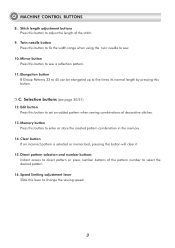
.../down position button Press this button to move the needle to either up or down this button to sew locking stitches immediately or at a low speed. 4. Reverse button Hold down this button to sew stitches in selected position until button is pressed again. Function buttons (see page 24/25/26) 1. Thread... cutter button Press this button to start or stop the machine. 2. Mode selection button Press this button after finishing sewing and the machine will be programmed to adjust the width of the current patterns and automatically stop in reverse or...
.../down position button Press this button to move the needle to either up or down this button to sew locking stitches immediately or at a low speed. 4. Reverse button Hold down this button to sew stitches in selected position until button is pressed again. Function buttons (see page 24/25/26) 1. Thread... cutter button Press this button to start or stop the machine. 2. Mode selection button Press this button after finishing sewing and the machine will be programmed to adjust the width of the current patterns and automatically stop in reverse or...
Instruction Manual 2
Page 8
... can be elongated up to five times its normal length by pressing this button to fix the width range when using the twin needle to sew. 10. Memory button Press this lever to enter or store the created pattern combination in the memory. 14. Speed limiting adjustment lever Slide this ...button to change the sewing speed. 3 MACHINE CONTROL BUTTONS 8. Clear button If an incorrect pattern is selected or memorized, pressing this button to set an added pattern when...
... can be elongated up to five times its normal length by pressing this button to fix the width range when using the twin needle to sew. 10. Memory button Press this lever to enter or store the created pattern combination in the memory. 14. Speed limiting adjustment lever Slide this ...button to change the sewing speed. 3 MACHINE CONTROL BUTTONS 8. Clear button If an incorrect pattern is selected or memorized, pressing this button to set an added pattern when...

Instruction Manual 2
Page 10
LCD SCREEN Memory Editing patterns Edit mode Memory group Number of current unit M EDIT Total number of unit Sewing the memorized pattern Memory mode M Elongation Elongation Pattern to edit Amount of elongation 5
LCD SCREEN Memory Editing patterns Edit mode Memory group Number of current unit M EDIT Total number of unit Sewing the memorized pattern Memory mode M Elongation Elongation Pattern to edit Amount of elongation 5
Instruction Manual 2
Page 13
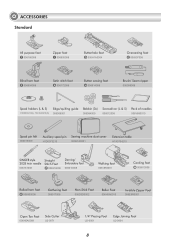
... foot I 006905008 Buttonhole foot D 006H1A0004 Overcasting foot E 006907008 Blind hem foot F 006904008 Satin stitch foot A 006172008 Button sewing foot H 006914008 Brush/ Seam ripper 006099008 Spool holders (L & S) Edge/quilting guide Bobbin (3x) Screwdriver (L & S)...needles H1D0083210(L) TA10943210(S) 006008001 006084009 006012008 006V880010 Spool pin felt 006015009 Auxiliary spool pin Sewing machine dust cover H1D0073210 020H7A0001 Extension table H7A0754210 SINGER style 2025 twin needle 006161008 Straight Stitch Foot P 006916008 Darning/ Embroidery foot 006016008 Walking...
... foot I 006905008 Buttonhole foot D 006H1A0004 Overcasting foot E 006907008 Blind hem foot F 006904008 Satin stitch foot A 006172008 Button sewing foot H 006914008 Brush/ Seam ripper 006099008 Spool holders (L & S) Edge/quilting guide Bobbin (3x) Screwdriver (L & S)...needles H1D0083210(L) TA10943210(S) 006008001 006084009 006012008 006V880010 Spool pin felt 006015009 Auxiliary spool pin Sewing machine dust cover H1D0073210 020H7A0001 Extension table H7A0754210 SINGER style 2025 twin needle 006161008 Straight Stitch Foot P 006916008 Darning/ Embroidery foot 006016008 Walking...
Instruction Manual 2
Page 14
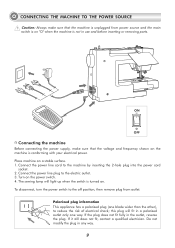
... a polarized plug (one way. Do not modify the plug in the outlet, reverse the plug. Connect the power line cord to the electric outlet. 3. The sewing lamp will fit in a polarized outlet only one blade wider than the other), to the off position, then remove plug from power source and the...
... a polarized plug (one way. Do not modify the plug in the outlet, reverse the plug. Connect the power line cord to the electric outlet. 3. The sewing lamp will fit in a polarized outlet only one blade wider than the other), to the off position, then remove plug from power source and the...
Instruction Manual 2
Page 16
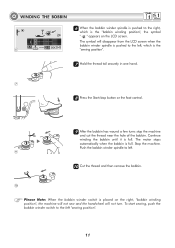
.... The motor stops automatically when the bobbin is full. WINDING THE BOBBIN 6 When the bobbin winder spindle is pushed to the right, which is the 6 "sewing position". 7 Hold the thread tail securely in one hand. 7 8 Press the Start/stop button or the foot control. 8 9 After the bobbin has wound a ... remove the bobbin. 10 Please Note: When the bobbin winder switch is placed on the right, "bobbin winding position", the machine will not sew and the handwheel will disappear from the LCD screen when the bobbin winder spindle is pushed to the left, which is the "bobbin winding position...
.... The motor stops automatically when the bobbin is full. WINDING THE BOBBIN 6 When the bobbin winder spindle is pushed to the right, which is the 6 "sewing position". 7 Hold the thread tail securely in one hand. 7 8 Press the Start/stop button or the foot control. 8 9 After the bobbin has wound a ... remove the bobbin. 10 Please Note: When the bobbin winder switch is placed on the right, "bobbin winding position", the machine will not sew and the handwheel will disappear from the LCD screen when the bobbin winder spindle is pushed to the left, which is the "bobbin winding position...

Instruction Manual 2
Page 18
Place the spool of thread on the spool pin so that the thread comes from the front of the spool, 1 then place the spool cap at the end of the spool pin. 22 Draw the thread from the spool through the upper thread guide. 2 13 Start by raising the needle to its highest point, and also raise the presser foot to carry out the threading correctly as by not doing so several sewing problems could result. THREADING THE UPPER THREAD 3 2 1 4 6 5 7 8 Please Note: It is important to release the tension discs. 11 Lift up the spool pin.
Place the spool of thread on the spool pin so that the thread comes from the front of the spool, 1 then place the spool cap at the end of the spool pin. 22 Draw the thread from the spool through the upper thread guide. 2 13 Start by raising the needle to its highest point, and also raise the presser foot to carry out the threading correctly as by not doing so several sewing problems could result. THREADING THE UPPER THREAD 3 2 1 4 6 5 7 8 Please Note: It is important to release the tension discs. 11 Lift up the spool pin.
Instruction Manual 2
Page 22
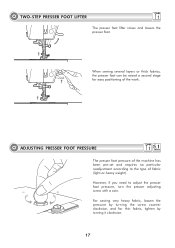
... according to adjust the presser foot pressure, turn the presser adjusting screw with a coin. However, if you need to the type of the work. For sewing very heavy fabric, loosen the pressure by turning the screw counter clockwise, and for easy positioning of fabric (light-or-heavy weight). When...
... according to adjust the presser foot pressure, turn the presser adjusting screw with a coin. However, if you need to the type of the work. For sewing very heavy fabric, loosen the pressure by turning the screw counter clockwise, and for easy positioning of fabric (light-or-heavy weight). When...
Instruction Manual 2
Page 23
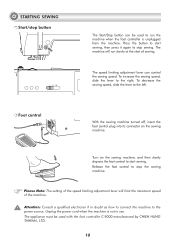
... left. Unplug the power cord when the machine is not in doubt as how to connect the machine to run slowly at the start of sewing. The appliance must be used with the foot controller C-9000 manufactured by CHIEN HUNG TAIWAN., LTD. 18 Attention: Consult a qualified electrician if in use...maximum speed of the speed limiting adjustment lever will run the machine when the foot controller is unplugged from the machine. Turn on the sewing machine. Please Note: The setting of the machine. The speed limiting adjustment lever can be used to the power source. To increase the...
... left. Unplug the power cord when the machine is not in doubt as how to connect the machine to run slowly at the start of sewing. The appliance must be used with the foot controller C-9000 manufactured by CHIEN HUNG TAIWAN., LTD. 18 Attention: Consult a qualified electrician if in use...maximum speed of the speed limiting adjustment lever will run the machine when the foot controller is unplugged from the machine. Turn on the sewing machine. Please Note: The setting of the machine. The speed limiting adjustment lever can be used to the power source. To increase the...
Instruction Manual 2
Page 24
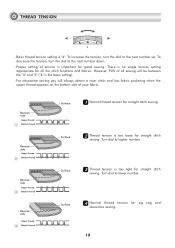
...decrease the tension, turn the dial to the next number down. - Turn dial to lower number. Surface 44 Normal thread tension for straight stitch sewing. However, 90% of all the stitch functions and fabrics. Reverse side Upper thread 1 Bobbin thread Reverse side Upper thread 2 Bobbin thread Reverse... side Upper thread 3 Bobbin thread Reverse side Upper thread 4 Bobbin thread Surface 11 Normal thread tension for zig zag and decorative sewing. 19 Surface 22 Thread tension is the basic setting). - Turn dial to higher number. To increase the tension, turn the dial to...
...decrease the tension, turn the dial to the next number down. - Turn dial to lower number. Surface 44 Normal thread tension for straight stitch sewing. However, 90% of all the stitch functions and fabrics. Reverse side Upper thread 1 Bobbin thread Reverse side Upper thread 2 Bobbin thread Reverse... side Upper thread 3 Bobbin thread Reverse side Upper thread 4 Bobbin thread Surface 11 Normal thread tension for zig zag and decorative sewing. 19 Surface 22 Thread tension is the basic setting). - Turn dial to higher number. To increase the tension, turn the dial to...
Instruction Manual 2
Page 26
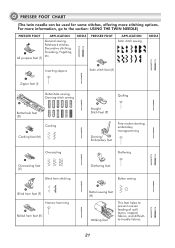
... For more stitching options. All purpose foot (T) NEEDLE PRESSER FOOT APPLICATION Satin stitch sewing NEEDLE Inserting zippers Satin stitch foot (A) Zipper foot (I) Buttonhole sewing, Darning-stitch sewing Buttonhole foot (D) Cording Cording foot (M) Overcasting Quilting Straight Stitch Foot (P) Darning/ ...-motion darning, embroidery, monogramming Gathering Overcasting foot (E) Blind hem stitching Gathering foot Button sewing Blind hem foot (F) Narrow hemming Rolled hem foot (K) Button sewing foot (H) Walking foot This foot helps to the section: USING THE TWIN NEEDLE) ...
... For more stitching options. All purpose foot (T) NEEDLE PRESSER FOOT APPLICATION Satin stitch sewing NEEDLE Inserting zippers Satin stitch foot (A) Zipper foot (I) Buttonhole sewing, Darning-stitch sewing Buttonhole foot (D) Cording Cording foot (M) Overcasting Quilting Straight Stitch Foot (P) Darning/ ...-motion darning, embroidery, monogramming Gathering Overcasting foot (E) Blind hem stitching Gathering foot Button sewing Blind hem foot (F) Narrow hemming Rolled hem foot (K) Button sewing foot (H) Walking foot This foot helps to the section: USING THE TWIN NEEDLE) ...

Instruction Manual 2
Page 27
... materials and cotton on a small piece of fabric which will be used for actual sewing. - upholstery fabrics, some leathers and vinyls. In general, fine threads and needles are used for sewing fine fabrics, and thicker threads are used for sewing heavy fabrics. - Always test thread and needle size on natural woven fabrics for...
... materials and cotton on a small piece of fabric which will be used for actual sewing. - upholstery fabrics, some leathers and vinyls. In general, fine threads and needles are used for sewing fine fabrics, and thicker threads are used for sewing heavy fabrics. - Always test thread and needle size on natural woven fabrics for...

Instruction Manual 2
Page 28
...revolution of wear and causing problems. Insert the needle following the illustrated instructions. Insert the needle as far up if you wish to continue sewing normally, slide the lever to the " " (a) in perfect condition. Change the needle regularly, especially if it will lower the feed ...dog, for example during button sewing. B. REPLACING THE NEEDLE B A Attention: Turn power switch of off ("O") position when carrying out any of the shaft should be in order to...
...revolution of wear and causing problems. Insert the needle following the illustrated instructions. Insert the needle as far up if you wish to continue sewing normally, slide the lever to the " " (a) in perfect condition. Change the needle regularly, especially if it will lower the feed ...dog, for example during button sewing. B. REPLACING THE NEEDLE B A Attention: Turn power switch of off ("O") position when carrying out any of the shaft should be in order to...
Instruction Manual 2
Page 29
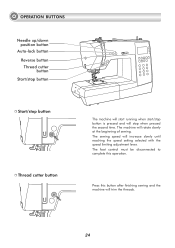
... foot control must be disconnected to complete this button after finishing sewing and the machine will stop button is pressed and will trim the threads. 24 The machine will increase slowly until reaching the speed setting selected ...
... foot control must be disconnected to complete this button after finishing sewing and the machine will stop button is pressed and will trim the threads. 24 The machine will increase slowly until reaching the speed setting selected ...

Instruction Manual 2
Page 30
...if the reverse button is pressed. Select Direct patterns 6-7, B Group Patterns 07-16, 33-50, and C Group Patterns 01-66 a reinforcement stitch sews at the end of the current pattern and automatically stop . When Direct Patterns 1-4, and B Group Patterns 01-05 are selected, press the Auto-lock... button, the machine will display the figure " " until the machine is stopped. The machine will immediately sew 3 locking stitches when the Auto-lock button is pressed, then automatically stop . If you press the button once again or select another pattern....
...if the reverse button is pressed. Select Direct patterns 6-7, B Group Patterns 07-16, 33-50, and C Group Patterns 01-66 a reinforcement stitch sews at the end of the current pattern and automatically stop . When Direct Patterns 1-4, and B Group Patterns 01-05 are selected, press the Auto-lock... button, the machine will display the figure " " until the machine is stopped. The machine will immediately sew 3 locking stitches when the Auto-lock button is pressed, then automatically stop . If you press the button once again or select another pattern....

Instruction Manual 2
Page 31
.... 26 When the arrow points downward, the needle will raise or lower the needle. OPERATION BUTTONS Needle up/down position button The machine automatically stops sewing with the needle in the up or down position. Pressing the Needle up/down in the up position. The Needle up/down position button offers...
.... 26 When the arrow points downward, the needle will raise or lower the needle. OPERATION BUTTONS Needle up/down position button The machine automatically stops sewing with the needle in the up or down position. Pressing the Needle up/down in the up position. The Needle up/down position button offers...


