Instruction Manual
Page 31
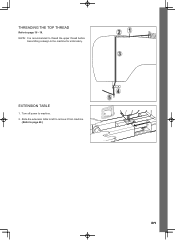
Turn off power to the machine for embroidery. EXTENSION TABLE 1. NOTE: It is recommended to thread the upper thread before transmitting a design to machine. 2. Slide the extension table to left to remove it from machine. (Refer to page 16 - 19. THREADING THE TOP THREAD Refer to page 49.) 31
Turn off power to the machine for embroidery. EXTENSION TABLE 1. NOTE: It is recommended to thread the upper thread before transmitting a design to machine. 2. Slide the extension table to left to remove it from machine. (Refer to page 16 - 19. THREADING THE TOP THREAD Refer to page 49.) 31

Instruction Manual
Page 38
... Turn off your machine, close after finish. If the installation utility identifies a lack of the FUTURA software files to the given directory on "Cancel". If these steps are now ready to select and transmit a design to your machine. Make sure the needle has been moved to the highest position by clicking...your computer, but do not open up . Pressing the "Next" button will prompt you to free some hard disk space before proceeding with to your embroidery unit. 3. Turn on "Next" to continue. Now you are now ready to use your large hoop. Finally you are requested to confirm all required...
... Turn off your machine, close after finish. If the installation utility identifies a lack of the FUTURA software files to the given directory on "Cancel". If these steps are now ready to select and transmit a design to your machine. Make sure the needle has been moved to the highest position by clicking...your computer, but do not open up . Pressing the "Next" button will prompt you to free some hard disk space before proceeding with to your embroidery unit. 3. Turn on "Next" to continue. Now you are now ready to use your large hoop. Finally you are requested to confirm all required...
Instruction Manual
Page 39
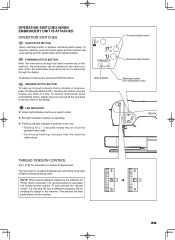
.... NOTE: When sewing designs created by the software for Photo Stitch (optional) it at a time. You may be advanced one stitch at its highest position. FORWARD STITCH BUTTON After the embroidery design has been transferred to the machine, the embroidery can be reversed all ...the way back to the first stitch of the design. REVERSE STITCH BUTTON To back up through the design. To reverse continuously, press and hold this...
.... NOTE: When sewing designs created by the software for Photo Stitch (optional) it at a time. You may be advanced one stitch at its highest position. FORWARD STITCH BUTTON After the embroidery design has been transferred to the machine, the embroidery can be reversed all ...the way back to the first stitch of the design. REVERSE STITCH BUTTON To back up through the design. To reverse continuously, press and hold this...
Instruction Manual
Page 44
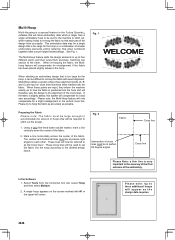
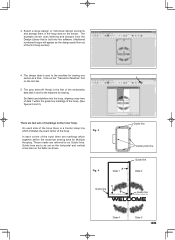
Fig. 1 When stitching an embroidery design that is too large for it and sew accordingly. If the fabric is slightly askew, this system will compensate for the hoop, it easy to ..., while making it can be at perfect 90 degree angles. Please note: Up to four different parts; The Multi-Hoop feature splits the design elements in the Futura QuartetTM software that have been marked onto the fabric. When re-hooping the fabric, the Multihoop feature will appear as possible. Please try to...
Fig. 1 When stitching an embroidery design that is too large for it and sew accordingly. If the fabric is slightly askew, this system will compensate for the hoop, it easy to ..., while making it can be at perfect 90 degree angles. Please note: Up to four different parts; The Multi-Hoop feature splits the design elements in the Futura QuartetTM software that have been marked onto the fabric. When re-hooping the fabric, the Multihoop feature will appear as possible. Please try to...
Instruction Manual
Page 45
... in the hoop area on the tool bar. 5. The design data is built into the hoop, aligning cross lines of data 1 within the guide line markings of markings on the fabric as shown. The grey area (#1 Hoop) is the first of the embroidery data that is sent to the machine for sewing.... Set fabric and stabilizer into the software. (Additional numbered hoops will appear as Guide lines. There are to as the design parts flow out of the hoop there are referred to be...
... in the hoop area on the tool bar. 5. The design data is built into the hoop, aligning cross lines of data 1 within the guide line markings of markings on the fabric as shown. The grey area (#1 Hoop) is the first of the embroidery data that is sent to the machine for sewing.... Set fabric and stabilizer into the software. (Additional numbered hoops will appear as Guide lines. There are to as the design parts flow out of the hoop there are referred to be...


