
Instruction Manual
Page 1
MODEL CG-590 COMMERCIAL GRADE SEWING MACHINE WORKBOOK
MODEL CG-590 COMMERCIAL GRADE SEWING MACHINE WORKBOOK

Instruction Manual
Page 2
...! We are certain that your creativity will be inspired, and that you can apply to your new SINGER® Sewing Machine! This commercial grade sewing machine is a registered trademark of the Singer Company Ltd. © 2004 Singer Sewing Company All Rights Reserved. This workbook has been created as a tool for all types of sewing, including fashion sewing...
...! We are certain that your creativity will be inspired, and that you can apply to your new SINGER® Sewing Machine! This commercial grade sewing machine is a registered trademark of the Singer Company Ltd. © 2004 Singer Sewing Company All Rights Reserved. This workbook has been created as a tool for all types of sewing, including fashion sewing...
Instruction Manual
Page 5
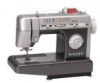
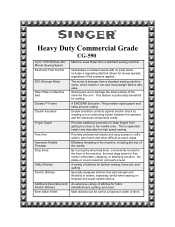
..., collars, pant hems and other difficult-to the needle area. An extensive variety of the pressure applied. Heavy Duty Commercial Grade CG-590 Up to 1100 Stitches-PerMinute Sewing Speed Electronic Foot Control 60% Stronger Motor Steel Plate on knitwear and super-stretch fabrics...means it can be set for fabric embellishment, quilting, and more. A SINGER® Exclusive. This is stronger than a standard sewing machine. Effortless threading of the machine, including the eye of the machine free arm. Specially designed stitches that allows for slower speeds, regardless of stitches...
..., collars, pant hems and other difficult-to the needle area. An extensive variety of the pressure applied. Heavy Duty Commercial Grade CG-590 Up to 1100 Stitches-PerMinute Sewing Speed Electronic Foot Control 60% Stronger Motor Steel Plate on knitwear and super-stretch fabrics...means it can be set for fabric embellishment, quilting, and more. A SINGER® Exclusive. This is stronger than a standard sewing machine. Effortless threading of the machine, including the eye of the machine free arm. Specially designed stitches that allows for slower speeds, regardless of stitches...
Instruction Manual
Page 6
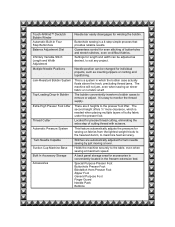
...High Presser Foot Lifter Thread Cutter There are automatically adjusted for twin needle sewing by just moving a lever. Twin Needle Capable Suction Cup Machine Base Built In Accessory Storage Accessories Stitches are 2 heights to the presser foot lifter. It is a 4-step simple process that provides ... step of buttonholes and stretch stitches, even on difficult fabrics. Buttonhole sewing is easy to monitor the thread supply. Holds the machine securely to suit any project. Jam-Resistant Bobbin System Top-Loading Drop-In Bobbin This is a system in which is conveniently located...
...High Presser Foot Lifter Thread Cutter There are automatically adjusted for twin needle sewing by just moving a lever. Twin Needle Capable Suction Cup Machine Base Built In Accessory Storage Accessories Stitches are 2 heights to the presser foot lifter. It is a 4-step simple process that provides ... step of buttonholes and stretch stitches, even on difficult fabrics. Buttonhole sewing is easy to monitor the thread supply. Holds the machine securely to suit any project. Jam-Resistant Bobbin System Top-Loading Drop-In Bobbin This is a system in which is conveniently located...
Instruction Manual
Page 7
Self-Lubricating Because the machine is permanently lubricated, there is a registered trademark of mind knowing the machine has a 25 year School and Home Warranty limited warranty. Machine can be mounted into a cabinet. \ SINGER® is no oil gets on fabric. 25 Year Limited Commercial, Peace of the Singer Company Ltd. © 2004 Singer Sewing Company. All Rights Reserved. Portable Cabinet Mountable Machine has a built-in carry handle, making it easy to oil the machine, and no need to transport the machine.
Self-Lubricating Because the machine is permanently lubricated, there is a registered trademark of mind knowing the machine has a 25 year School and Home Warranty limited warranty. Machine can be mounted into a cabinet. \ SINGER® is no oil gets on fabric. 25 Year Limited Commercial, Peace of the Singer Company Ltd. © 2004 Singer Sewing Company. All Rights Reserved. Portable Cabinet Mountable Machine has a built-in carry handle, making it easy to oil the machine, and no need to transport the machine.
Instruction Manual
Page 8
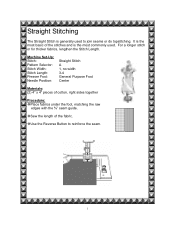
Machine Set-Up: Stitch: Pattern Selector: Stitch Width: Stitch Length: Presser Foot: Needle Position: Straight Stitch A 1, no width 3-4 General Purpose Foot Center Materials: (2) 4" x 4" pieces of the ...
Machine Set-Up: Stitch: Pattern Selector: Stitch Width: Stitch Length: Presser Foot: Needle Position: Straight Stitch A 1, no width 3-4 General Purpose Foot Center Materials: (2) 4" x 4" pieces of the ...
Instruction Manual
Page 9
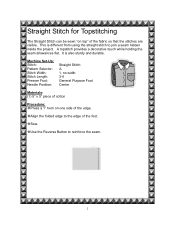
Machine Set-Up: Stitch: Pattern Selector: Stitch Width: Stitch Length: Presser Foot: Needle Position: Straight Stitch A 1, no width 3-4 General Purpose Foot Center Materials: (1) 5" x 5" piece of cotton ...
Machine Set-Up: Stitch: Pattern Selector: Stitch Width: Stitch Length: Presser Foot: Needle Position: Straight Stitch A 1, no width 3-4 General Purpose Foot Center Materials: (1) 5" x 5" piece of cotton ...
Instruction Manual
Page 10
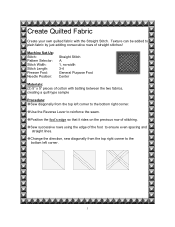
... the two fabrics, creating a quilt-type sample Procedure: Sew diagonally from the top right corner to the bottom left corner to the bottom right corner. Machine Set-Up: Stitch: Pattern Selector: Stitch Width: Stitch Length: Presser Foot: Needle Position: Straight Stitch A 1, no width 3-4 General Purpose Foot Center Materials: (2) 5" x 5" pieces of straight...
... the two fabrics, creating a quilt-type sample Procedure: Sew diagonally from the top right corner to the bottom left corner to the bottom right corner. Machine Set-Up: Stitch: Pattern Selector: Stitch Width: Stitch Length: Presser Foot: Needle Position: Straight Stitch A 1, no width 3-4 General Purpose Foot Center Materials: (2) 5" x 5" pieces of straight...
Instruction Manual
Page 11
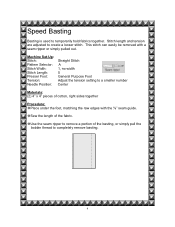
Machine Set-Up: Stitch: Pattern Selector: Stitch Width: Stitch Length: Presser Foot: Tension: Needle Position: Straight Stitch A 1, no width 5 General Purpose Foot Adjust the tension setting ...
Machine Set-Up: Stitch: Pattern Selector: Stitch Width: Stitch Length: Presser Foot: Tension: Needle Position: Straight Stitch A 1, no width 5 General Purpose Foot Adjust the tension setting ...
Instruction Manual
Page 12
... needle to stitch very closely to the edge of the fabric, sew a straight stitch close to projects such as pillows, sleeve edges, collars and more. Machine Set-Up: Stitch: Pattern Selector: Stitch Width: Stitch Length: Presser Foot: Needle Position: Straight Stitch A 1, no width 3-4 Zipper Foot Center Materials: 5" x 6" home décor fabric...
... needle to stitch very closely to the edge of the fabric, sew a straight stitch close to projects such as pillows, sleeve edges, collars and more. Machine Set-Up: Stitch: Pattern Selector: Stitch Width: Stitch Length: Presser Foot: Needle Position: Straight Stitch A 1, no width 3-4 Zipper Foot Center Materials: 5" x 6" home décor fabric...
Instruction Manual
Page 13
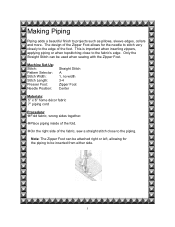
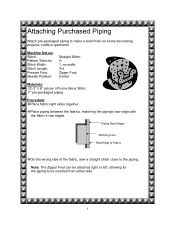
... make a bold finish on home decorating projects, crafts or garments. Place piping between the fabrics, matching the piping's raw edge with the fabric's raw edges. Machine Set-up: Stitch: Pattern Selector: Stitch Width: Stitch Length: Presser Foot: Needle Position: Straight Stitch A 1, no width 3-4 Zipper Foot Center Materials: (2) 3" x 6" pieces of the fabric...
... make a bold finish on home decorating projects, crafts or garments. Place piping between the fabrics, matching the piping's raw edge with the fabric's raw edges. Machine Set-up: Stitch: Pattern Selector: Stitch Width: Stitch Length: Presser Foot: Needle Position: Straight Stitch A 1, no width 3-4 Zipper Foot Center Materials: (2) 3" x 6" pieces of the fabric...
Instruction Manual
Page 14
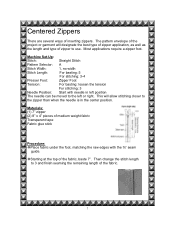
.... This will designate the best type of zipper application, as well as the length and type of inserting zippers. Materials: (1) 7" zipper (2) 8" x 4" pieces of the fabric. 7 Machine Set-Up: Stitch: Straight Stitch Pattern Selector: A Stitch Width: 1, no width Stitch Length: For basting: 5 For stitching: 3-4 Presser Foot: Zipper Foot Tension: For basting: loosen...
.... This will designate the best type of zipper application, as well as the length and type of inserting zippers. Materials: (1) 7" zipper (2) 8" x 4" pieces of the fabric. 7 Machine Set-Up: Stitch: Straight Stitch Pattern Selector: A Stitch Width: 1, no width Stitch Length: For basting: 5 For stitching: 3-4 Presser Foot: Zipper Foot Tension: For basting: loosen...
Instruction Manual
Page 15
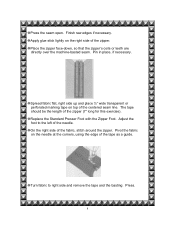
... the right side of the tape as a guide. Press. 8 Place the zipper face-down, so that the zipper's coils or teeth are directly over the machine-basted seam. The tape should be the length of the fabric, stitch around the zipper. Turn fabric to the left of the centered seam line...
... the right side of the tape as a guide. Press. 8 Place the zipper face-down, so that the zipper's coils or teeth are directly over the machine-basted seam. The tape should be the length of the fabric, stitch around the zipper. Turn fabric to the left of the centered seam line...

Instruction Manual
Page 16
... stabilizer underneath the fabric. (This is a series of the stitch will form on the applique and half on the base fabric. Sew around the applique. Machine Set-Up: Stitch: Pattern Selector: Stitch Width: Stitch Length: Presser Foot: Needle Position: Zigzag Stitch A 2-3 0.5-1 Special Purpose Foot (J) Center Materials: 2" x 3" cotton fabric for a smoother looking...
... stabilizer underneath the fabric. (This is a series of the stitch will form on the applique and half on the base fabric. Sew around the applique. Machine Set-Up: Stitch: Pattern Selector: Stitch Width: Stitch Length: Presser Foot: Needle Position: Zigzag Stitch A 2-3 0.5-1 Special Purpose Foot (J) Center Materials: 2" x 3" cotton fabric for a smoother looking...
Instruction Manual
Page 18
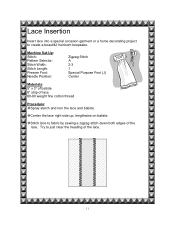
.... Lace Insertion Insert lace into a special occasion garment or a home decorating project to fabric by sewing a zigzag stitch down both edges of the lace. 11 Machine Set-Up: Stitch: Pattern Selector: Stitch Width: Stitch Length: Presser Foot: Needle Position: Zigzag Stitch A 2-3 1 Special Purpose Foot (J) Center Materials: 5" x 3" of batiste 6" strip of lace...
.... Lace Insertion Insert lace into a special occasion garment or a home decorating project to fabric by sewing a zigzag stitch down both edges of the lace. 11 Machine Set-Up: Stitch: Pattern Selector: Stitch Width: Stitch Length: Presser Foot: Needle Position: Zigzag Stitch A 2-3 1 Special Purpose Foot (J) Center Materials: 5" x 3" of batiste 6" strip of lace...

Instruction Manual
Page 20
... helpful when making a large project where several buttons need to sew on the fabric so that has button tabs. Button Sewing Use your SINGER® Retailer. 13 Machine Set-Up: Stitch: Pattern Selector: Stitch Width: Stitch Length: Feed Dogs: Presser Foot: Needle Position: Zigzag Stitch A Determined by button... between the toes of the foot. *The Button Sewing Foot is optional. Position the button on buttons, snaps or hooks with your sewing machine to be attached, such as a shower curtain that the holes in the button are between the holes is usually 3mm) N/A Lowered Feed Dogs...
... helpful when making a large project where several buttons need to sew on the fabric so that has button tabs. Button Sewing Use your SINGER® Retailer. 13 Machine Set-Up: Stitch: Pattern Selector: Stitch Width: Stitch Length: Feed Dogs: Presser Foot: Needle Position: Zigzag Stitch A Determined by button... between the toes of the foot. *The Button Sewing Foot is optional. Position the button on buttons, snaps or hooks with your sewing machine to be attached, such as a shower curtain that the holes in the button are between the holes is usually 3mm) N/A Lowered Feed Dogs...

Instruction Manual
Page 21
... stitch width dial to fine tune the swing of the needle into the right or left hole. Before removing the button and fabric from the machine, set machine to secure the button. Trim threads after they dry, being careful not to cut thread knots. 14 Apply a liquid fray preventer on the backside...
... stitch width dial to fine tune the swing of the needle into the right or left hole. Before removing the button and fabric from the machine, set machine to secure the button. Trim threads after they dry, being careful not to cut thread knots. 14 Apply a liquid fray preventer on the backside...
Instruction Manual
Page 22
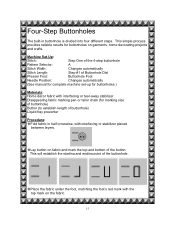
...of buttonhole) Button (to establish length of Buttonhole Dial Presser Foot: Buttonhole Foot Needle Position: Changes automatically (See manual for complete machine set-up for buttonholes.) Materials: Home décor fabric with interfacing or tear-away stabilizer Disappearing fabric marking pen or tailor chalk... under the foot, matching the foot's red mark with the top mark on fabric and mark the top and bottom of the buttonhole. Machine Set-Up: Stitch: Step One of the 4-step buttonhole Pattern Selector: A Stitch Width: Changes automatically Stitch Length: Step #1 of buttonhole...
...of buttonhole) Button (to establish length of Buttonhole Dial Presser Foot: Buttonhole Foot Needle Position: Changes automatically (See manual for complete machine set-up for buttonholes.) Materials: Home décor fabric with interfacing or tear-away stabilizer Disappearing fabric marking pen or tailor chalk... under the foot, matching the foot's red mark with the top mark on fabric and mark the top and bottom of the buttonhole. Machine Set-Up: Stitch: Step One of the 4-step buttonhole Pattern Selector: A Stitch Width: Changes automatically Stitch Length: Step #1 of buttonhole...

Instruction Manual
Page 23
Sew 5 to 6 stitches, bartacking the bottom of the buttonhole. Sew, and the machine will stitch the right side of the buttonhole. Turn Pattern Selection knob to Step Two of the Four-Step buttonhole. Turn Pattern Selection knob to ... knob to reinforce the buttonhole. 16 Stop sewing when the needle reaches the fabric mark which indicates the top of the buttonhole. Sew, and the machine will stitch in reverse, making the left side of the buttonhole. Stop sewing when the needle reaches the fabric mark which indicates the bottom of...
Sew 5 to 6 stitches, bartacking the bottom of the buttonhole. Sew, and the machine will stitch the right side of the buttonhole. Turn Pattern Selection knob to Step Two of the Four-Step buttonhole. Turn Pattern Selection knob to ... knob to reinforce the buttonhole. 16 Stop sewing when the needle reaches the fabric mark which indicates the top of the buttonhole. Sew, and the machine will stitch in reverse, making the left side of the buttonhole. Stop sewing when the needle reaches the fabric mark which indicates the bottom of...

Instruction Manual
Page 24
... the embroidery hoop, making sure the fabric is taut. Place the hoop under the foot, positioning the needle over the starting point of the monogram. Machine Set-Up: Stitch: Pattern Selector: Stitch Width: Stitch Length: Feet Dogs: Presser Foot: Needle Position: Zigzag Stitch A 2 N/A Lowered Embroidery/Darning Foot* (or remove the foot...
... the embroidery hoop, making sure the fabric is taut. Place the hoop under the foot, positioning the needle over the starting point of the monogram. Machine Set-Up: Stitch: Pattern Selector: Stitch Width: Stitch Length: Feet Dogs: Presser Foot: Needle Position: Zigzag Stitch A 2 N/A Lowered Embroidery/Darning Foot* (or remove the foot...


