Instruction Manual
Page 5
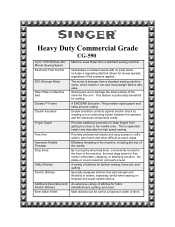
... the eye of the machine free arm. This feature is stronger than a standard sewing machine. A SINGER® Exclusive. A variety of stitches for fabric embellishment, quilting, and more. Heavy Duty Commercial Grade CG-590 Up to seams, especially useful when sewing on Machine Bed Duratec™ Frame Double Insulated Finger Guard Free Arm Automatic Needle Threader Drop Feed Utility Stitches Stretch Stitches Additional Decorative and Stretch Stitches 6mm Stitch Width Machine sews faster than a standard sewing machine motor, which means it can be set for a maximum width of...
... the eye of the machine free arm. This feature is stronger than a standard sewing machine. A SINGER® Exclusive. A variety of stitches for fabric embellishment, quilting, and more. Heavy Duty Commercial Grade CG-590 Up to seams, especially useful when sewing on Machine Bed Duratec™ Frame Double Insulated Finger Guard Free Arm Automatic Needle Threader Drop Feed Utility Stitches Stretch Stitches Additional Decorative and Stretch Stitches 6mm Stitch Width Machine sews faster than a standard sewing machine motor, which means it can be set for a maximum width of...
Instruction Manual
Page 6
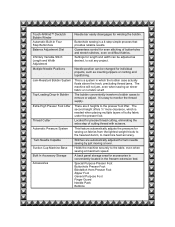
... the table, even when sewing at all! Multiple Needle Positions Needle position can be changed for even stitching of bulky fabric under the presser foot. Holds the machine securely to remove or adjust. Twin Needle Capable Suction Cup Machine Base Built In Accessory Storage Accessories Stitches are 2 heights to maximize feed accuracy. A back panel storage area for sewing on difficult fabrics. Located for winding the bobbin. It is a 4-step simple process that provides reliable results. Automatic Pressure...
... the table, even when sewing at all! Multiple Needle Positions Needle position can be changed for even stitching of bulky fabric under the presser foot. Holds the machine securely to remove or adjust. Twin Needle Capable Suction Cup Machine Base Built In Accessory Storage Accessories Stitches are 2 heights to maximize feed accuracy. A back panel storage area for sewing on difficult fabrics. Located for winding the bobbin. It is a 4-step simple process that provides reliable results. Automatic Pressure...
Instruction Manual
Page 9
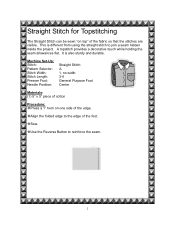
... holding the seam allowances flat. Align the folded edge to the edge of the fabric so that the stitches are visible. Machine Set-Up: Stitch: Pattern Selector: Stitch Width: Stitch Length: Presser Foot: Needle Position: Straight Stitch A 1, no width 3-4 General Purpose Foot Center Materials: (1) 5" x 5" piece of cotton Procedure: Press a 1" hem on top" of the foot. Sew. Use the Reverse Button to join a seam hidden inside the project. It is different from using the straight stitch to reinforce...
... holding the seam allowances flat. Align the folded edge to the edge of the fabric so that the stitches are visible. Machine Set-Up: Stitch: Pattern Selector: Stitch Width: Stitch Length: Presser Foot: Needle Position: Straight Stitch A 1, no width 3-4 General Purpose Foot Center Materials: (1) 5" x 5" piece of cotton Procedure: Press a 1" hem on top" of the foot. Sew. Use the Reverse Button to join a seam hidden inside the project. It is different from using the straight stitch to reinforce...
Instruction Manual
Page 10
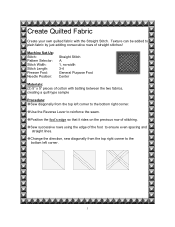
Machine Set-Up: Stitch: Pattern Selector: Stitch Width: Stitch Length: Presser Foot: Needle Position: Straight Stitch A 1, no width 3-4 General Purpose Foot Center Materials: (2) 5" x 5" pieces of straight stitches! Change the direction, sew diagonally from the top left corner. 3 Create Quilted Fabric Create your own quilted fabric with batting between the two fabrics, creating a quilt-type sample Procedure: Sew diagonally from the top right corner to reinforce the seam. Position the foot's edge so that it rides on the previous row of the...
Machine Set-Up: Stitch: Pattern Selector: Stitch Width: Stitch Length: Presser Foot: Needle Position: Straight Stitch A 1, no width 3-4 General Purpose Foot Center Materials: (2) 5" x 5" pieces of straight stitches! Change the direction, sew diagonally from the top left corner. 3 Create Quilted Fabric Create your own quilted fabric with batting between the two fabrics, creating a quilt-type sample Procedure: Sew diagonally from the top right corner to reinforce the seam. Position the foot's edge so that it rides on the previous row of the...
Instruction Manual
Page 11
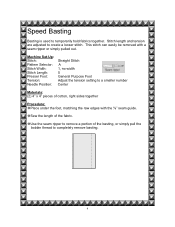
...the basting, or simply pull the bobbin thread to a smaller number Center Materials: (2) 4" x 4" pieces of the fabric. Sew the length of cotton, right sides together Procedure: Place under the foot, matching the raw edges with a seam ripper or simply pulled out. Machine Set-Up: Stitch: Pattern Selector: Stitch Width: Stitch Length: Presser Foot: Tension: Needle Position: Straight Stitch A 1, no width 5 General Purpose Foot Adjust the tension setting to completely remove basting. 4 Speed Basting Basting is used to create a looser stitch. Stitch length and tension are adjusted to...
...the basting, or simply pull the bobbin thread to a smaller number Center Materials: (2) 4" x 4" pieces of the fabric. Sew the length of cotton, right sides together Procedure: Place under the foot, matching the raw edges with a seam ripper or simply pulled out. Machine Set-Up: Stitch: Pattern Selector: Stitch Width: Stitch Length: Presser Foot: Tension: Needle Position: Straight Stitch A 1, no width 5 General Purpose Foot Adjust the tension setting to completely remove basting. 4 Speed Basting Basting is used to create a looser stitch. Stitch length and tension are adjusted to...
Instruction Manual
Page 12
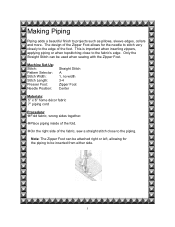
... used when sewing with the Zipper Foot. Only the Straight Stitch can be attached right or left, allowing for the needle to stitch very closely to the edge of the fabric, sew a straight stitch close to projects such as pillows, sleeve edges, collars and more. Note: The Zipper Foot can be inserted from either side. 5 Machine Set-Up: Stitch: Pattern Selector: Stitch Width: Stitch Length: Presser Foot: Needle Position: Straight Stitch A 1, no width 3-4 Zipper Foot Center Materials: 5" x 6" home décor fabric 7" piping cord...
... used when sewing with the Zipper Foot. Only the Straight Stitch can be attached right or left, allowing for the needle to stitch very closely to the edge of the fabric, sew a straight stitch close to projects such as pillows, sleeve edges, collars and more. Note: The Zipper Foot can be inserted from either side. 5 Machine Set-Up: Stitch: Pattern Selector: Stitch Width: Stitch Length: Presser Foot: Needle Position: Straight Stitch A 1, no width 3-4 Zipper Foot Center Materials: 5" x 6" home décor fabric 7" piping cord...
Instruction Manual
Page 14
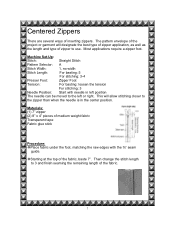
... of the fabric. 7 Machine Set-Up: Stitch: Straight Stitch Pattern Selector: A Stitch Width: 1, no width Stitch Length: For basting: 5 For stitching: 3-4 Presser Foot: Zipper Foot Tension: For basting: loosen the tension For stitching: 3 Needle Position: Start with the ⅝" seam guide. Most applications require a zipper foot. This will designate the best type of zipper application, as well as the length and type of the project or garment will allow stitching closer to 3 and finish seaming the remaining length of inserting zippers. Then change the stitch length to...
... of the fabric. 7 Machine Set-Up: Stitch: Straight Stitch Pattern Selector: A Stitch Width: 1, no width Stitch Length: For basting: 5 For stitching: 3-4 Presser Foot: Zipper Foot Tension: For basting: loosen the tension For stitching: 3 Needle Position: Start with the ⅝" seam guide. Most applications require a zipper foot. This will designate the best type of zipper application, as well as the length and type of the project or garment will allow stitching closer to 3 and finish seaming the remaining length of inserting zippers. Then change the stitch length to...

Instruction Manual
Page 16
... while stitching.) Place a tear-away stabilizer underneath the fabric. (This is a series of the stitch will form on the applique and half on the base fabric. Machine Set-Up: Stitch: Pattern Selector: Stitch Width: Stitch Length: Presser Foot: Needle Position: Zigzag Stitch A 2-3 0.5-1 Special Purpose Foot (J) Center Materials: 2" x 3" cotton fabric for a smoother looking finish. Satin Stitching can be used to ensure quality stitching when using dense stitches.) Place the applique under the foot, so that half of closely spaced zig-zag stitches.
... while stitching.) Place a tear-away stabilizer underneath the fabric. (This is a series of the stitch will form on the applique and half on the base fabric. Machine Set-Up: Stitch: Pattern Selector: Stitch Width: Stitch Length: Presser Foot: Needle Position: Zigzag Stitch A 2-3 0.5-1 Special Purpose Foot (J) Center Materials: 2" x 3" cotton fabric for a smoother looking finish. Satin Stitching can be used to ensure quality stitching when using dense stitches.) Place the applique under the foot, so that half of closely spaced zig-zag stitches.
Instruction Manual
Page 18
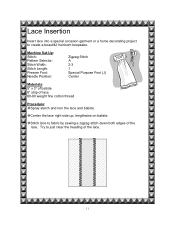
... batiste. Machine Set-Up: Stitch: Pattern Selector: Stitch Width: Stitch Length: Presser Foot: Needle Position: Zigzag Stitch A 2-3 1 Special Purpose Foot (J) Center Materials: 5" x 3" of batiste 6" strip of the lace. 11 Try to just clear the heading of lace 60-80 weight fine cotton thread Procedure: Spray starch and iron the lace and batiste. Lace Insertion Insert lace into a special occasion garment or a home decorating project to fabric by sewing a zigzag stitch down...
... batiste. Machine Set-Up: Stitch: Pattern Selector: Stitch Width: Stitch Length: Presser Foot: Needle Position: Zigzag Stitch A 2-3 1 Special Purpose Foot (J) Center Materials: 5" x 3" of batiste 6" strip of the lace. 11 Try to just clear the heading of lace 60-80 weight fine cotton thread Procedure: Spray starch and iron the lace and batiste. Lace Insertion Insert lace into a special occasion garment or a home decorating project to fabric by sewing a zigzag stitch down...

Instruction Manual
Page 20
.... Machine Set-Up: Stitch: Pattern Selector: Stitch Width: Stitch Length: Feed Dogs: Presser Foot: Needle Position: Zigzag Stitch A Determined by button (width between the toes of the foot. *The Button Sewing Foot is usually 3mm) N/A Lowered Feed Dogs Button Sewing Foot* Center Materials: Home décor fabric or shirting One 2-hole button Liquid fray preventer Procedure: Lower the Feed Dogs Fold fabric in the button are between the holes is optional. This is especially helpful when making a large project where several buttons need to sew on the fabric so that has button...
.... Machine Set-Up: Stitch: Pattern Selector: Stitch Width: Stitch Length: Feed Dogs: Presser Foot: Needle Position: Zigzag Stitch A Determined by button (width between the toes of the foot. *The Button Sewing Foot is usually 3mm) N/A Lowered Feed Dogs Button Sewing Foot* Center Materials: Home décor fabric or shirting One 2-hole button Liquid fray preventer Procedure: Lower the Feed Dogs Fold fabric in the button are between the holes is optional. This is especially helpful when making a large project where several buttons need to sew on the fabric so that has button...

Instruction Manual
Page 21
... the back side to cut thread knots. 14 Before removing the button and fabric from the machine, set machine to sew 5-6 stitches. This forms a tie-off on the knots. Trim threads after they dry, being careful not to secure the button. Adjust the stitch width dial to hold the button in place for three stitches. Lower the presser foot to fine tune the swing of the needle into the opposite hole.
... the back side to cut thread knots. 14 Before removing the button and fabric from the machine, set machine to sew 5-6 stitches. This forms a tie-off on the knots. Trim threads after they dry, being careful not to secure the button. Adjust the stitch width dial to hold the button in place for three stitches. Lower the presser foot to fine tune the swing of the needle into the opposite hole.
Instruction Manual
Page 22
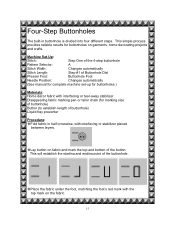
... top mark on the fabric. 15 Machine Set-Up: Stitch: Step One of the 4-step buttonhole Pattern Selector: A Stitch Width: Changes automatically Stitch Length: Step #1 of Buttonhole Dial Presser Foot: Buttonhole Foot Needle Position: Changes automatically (See manual for complete machine set-up for buttonholes.) Materials: Home décor fabric with interfacing or tear-away stabilizer Disappearing fabric marking pen or tailor chalk (for buttonholes on fabric and mark the top and bottom of the buttonhole. Lay button on garments, home...
... top mark on the fabric. 15 Machine Set-Up: Stitch: Step One of the 4-step buttonhole Pattern Selector: A Stitch Width: Changes automatically Stitch Length: Step #1 of Buttonhole Dial Presser Foot: Buttonhole Foot Needle Position: Changes automatically (See manual for complete machine set-up for buttonholes.) Materials: Home décor fabric with interfacing or tear-away stabilizer Disappearing fabric marking pen or tailor chalk (for buttonholes on fabric and mark the top and bottom of the buttonhole. Lay button on garments, home...

Instruction Manual
Page 24
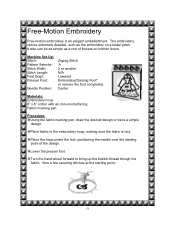
Machine Set-Up: Stitch: Pattern Selector: Stitch Width: Stitch Length: Feet Dogs: Presser Foot: Needle Position: Zigzag Stitch A 2 N/A Lowered Embroidery/Darning Foot* (or remove the foot completely ) Center Materials: Embroidery hoop 8" x 8" cotton with an iron-on interfacing Fabric marking pen Procedure: Using the fabric marking pen, draw the desired monogram letter. Place the hoop under the foot, positioning the needle over the starting point of the monogram. Free-Motion Monogramming Monogramming adds a personal and professional touch to garments, home decorating items and ...
Machine Set-Up: Stitch: Pattern Selector: Stitch Width: Stitch Length: Feet Dogs: Presser Foot: Needle Position: Zigzag Stitch A 2 N/A Lowered Embroidery/Darning Foot* (or remove the foot completely ) Center Materials: Embroidery hoop 8" x 8" cotton with an iron-on interfacing Fabric marking pen Procedure: Using the fabric marking pen, draw the desired monogram letter. Place the hoop under the foot, positioning the needle over the starting point of the monogram. Free-Motion Monogramming Monogramming adds a personal and professional touch to garments, home decorating items and ...
Instruction Manual
Page 26
... design. Lower the presser foot. Turn the hand wheel forward to bring up the bobbin thread though the fabric. Machine Set-Up: Stitch: Pattern Selector: Stitch Width: Stitch Length: Feet Dogs: Presser Foot: Needle Position: Zigzag Stitch A 2 or smaller N/A Lowered Embroidery/Darning Foot* or remove the foot completely Center Materials: Embroidery hoop 8" x 8" cotton with an iron-on kitchen linens. Sew a few securing stitches at the starting point of flowers on interfacing Fabric marking pen Procedure: Using the fabric marking pen, draw the desired design or trace a simple design...
... design. Lower the presser foot. Turn the hand wheel forward to bring up the bobbin thread though the fabric. Machine Set-Up: Stitch: Pattern Selector: Stitch Width: Stitch Length: Feet Dogs: Presser Foot: Needle Position: Zigzag Stitch A 2 or smaller N/A Lowered Embroidery/Darning Foot* or remove the foot completely Center Materials: Embroidery hoop 8" x 8" cotton with an iron-on kitchen linens. Sew a few securing stitches at the starting point of flowers on interfacing Fabric marking pen Procedure: Using the fabric marking pen, draw the desired design or trace a simple design...

Instruction Manual
Page 32
Machine Set-Up: Stitch: Pattern Selector: Stitch Width: Stitch Length: Presser Foot: Needle Position: Decorative Stitches B, C, D, E, F, G or H Adjust according to preference Adjust according to preference Special Purpose Foot (J) Center Materials: Fabric scraps Foundation fabric or paper Various decorative threads Procedure: Crazy-piece the scraps onto the foundation fabric or paper, starting from the center and working outward. This technique is done by stitching scraps of velvets, silks, cottons, satins and other decorative threads, as desired...
Machine Set-Up: Stitch: Pattern Selector: Stitch Width: Stitch Length: Presser Foot: Needle Position: Decorative Stitches B, C, D, E, F, G or H Adjust according to preference Adjust according to preference Special Purpose Foot (J) Center Materials: Fabric scraps Foundation fabric or paper Various decorative threads Procedure: Crazy-piece the scraps onto the foundation fabric or paper, starting from the center and working outward. This technique is done by stitching scraps of velvets, silks, cottons, satins and other decorative threads, as desired...
Instruction Manual
Page 39
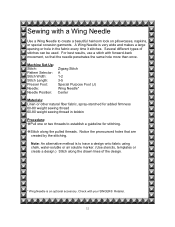
... two threads to trace a design onto fabric using chalk, water-soluble or air soluble marker. (Use stencils, templates or create a design.) Stitch along the pulled threads. Sewing with your SINGER® Retailer. 32 Note: An alternative method is to establish a guideline for added firmness 60-80 weight sewing thread 60-80 weight sewing thread in the fabric every time it stitches. Machine Set-Up: Stitch: Pattern Selector: Stitch Width: Stitch Length: Presser Foot: Needle: Needle Position: Zigzag Stitch A 1-2 3-5 Special Purpose Foot (J) Wing Needle...
... two threads to trace a design onto fabric using chalk, water-soluble or air soluble marker. (Use stencils, templates or create a design.) Stitch along the pulled threads. Sewing with your SINGER® Retailer. 32 Note: An alternative method is to establish a guideline for added firmness 60-80 weight sewing thread 60-80 weight sewing thread in the fabric every time it stitches. Machine Set-Up: Stitch: Pattern Selector: Stitch Width: Stitch Length: Presser Foot: Needle: Needle Position: Zigzag Stitch A 1-2 3-5 Special Purpose Foot (J) Wing Needle...
Instruction Manual
Page 40
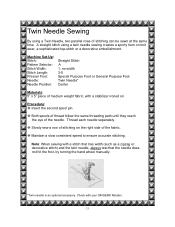
A straight stitch using a Twin Needle, two parallel rows of the fabric. Check with a stitch that has width (such as a zigzag or decorative stitch) and the twin needle, always test that the needle does not hit the foot, by turning the hand wheel manually. *Twin needle is an optional accessory. Thread each needle separately. Note: When sewing with your SINGER® Retailer. 33 Machine Set-Up: Stitch: Pattern Selector: Stitch Width: Stitch Length: Presser Foot: Needle: Needle Position: Straight Stitch A 1, no width 3-5 Special Purpose Foot or General Purpose...
A straight stitch using a Twin Needle, two parallel rows of the fabric. Check with a stitch that has width (such as a zigzag or decorative stitch) and the twin needle, always test that the needle does not hit the foot, by turning the hand wheel manually. *Twin needle is an optional accessory. Thread each needle separately. Note: When sewing with your SINGER® Retailer. 33 Machine Set-Up: Stitch: Pattern Selector: Stitch Width: Stitch Length: Presser Foot: Needle: Needle Position: Straight Stitch A 1, no width 3-5 Special Purpose Foot or General Purpose...
Instruction Manual 2
Page 9
... needle correct size? Bobbin winding difficulties Is thread unwinding freely from spool? Upper thread breaks Is machine properly threaded? Is needle correct size for bobbin winding? Is bobbin case properly inserted? Is bobbin correctly inserted into needle clamp? Is bobbin correctly inserted into needle clamp? Are controls properly set ? 78 1 446492 2 3 507836 161927 4 5 507664 7 179967 6 Accessoires Les accessoires suivants sont fournis avec votre machine pour faciliter la couture et augmenter les possibilités de votre machine. Is bobbin rim free of wind? Needle...
... needle correct size? Bobbin winding difficulties Is thread unwinding freely from spool? Upper thread breaks Is machine properly threaded? Is needle correct size for bobbin winding? Is bobbin case properly inserted? Is bobbin correctly inserted into needle clamp? Is bobbin correctly inserted into needle clamp? Are controls properly set ? 78 1 446492 2 3 507836 161927 4 5 507664 7 179967 6 Accessoires Les accessoires suivants sont fournis avec votre machine pour faciliter la couture et augmenter les possibilités de votre machine. Is bobbin rim free of wind? Needle...
Instruction Manual 2
Page 10
... antes de conectarla. • Use la máquina de acuerdo con este manual. Keep ventilation openings of the machine and foot control pedal free from the accumulation of the socket outlet is the same as threading needle, changing needle, changing the needle plate, changing presser foot or removing bobbin case, etc. • Always unplug the machine from all moving parts. Réglages recommandés Sélecteur de point: Point zig-zag (B) Position d'aiguille: Largeur de point...
... antes de conectarla. • Use la máquina de acuerdo con este manual. Keep ventilation openings of the machine and foot control pedal free from the accumulation of the socket outlet is the same as threading needle, changing needle, changing the needle plate, changing presser foot or removing bobbin case, etc. • Always unplug the machine from all moving parts. Réglages recommandés Sélecteur de point: Point zig-zag (B) Position d'aiguille: Largeur de point...
Instruction Manual 2
Page 18
...; la tension supérieure. Les surfaces extérieures peuvent être nettoyées avec du savon et un chiffon doux. Skip the last thread guide and set length to use the same size and type of thread in both needle and bobbin. Si el protector se quita para realizar otras aplicaciones, vuelva a colocarlo en la máquina una vez instalado...
...; la tension supérieure. Les surfaces extérieures peuvent être nettoyées avec du savon et un chiffon doux. Skip the last thread guide and set length to use the same size and type of thread in both needle and bobbin. Si el protector se quita para realizar otras aplicaciones, vuelva a colocarlo en la máquina una vez instalado...


