Instruction Manual
Page 1
CE-150 INSTRUCTION MANUAL
CE-150 INSTRUCTION MANUAL
Instruction Manual
Page 3
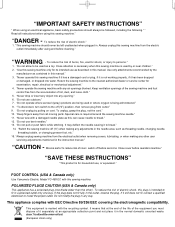
...while stitching. Moving parts-To reduce risk of burns, fire, electric shock, or injury to be left unattended when plugged in this manual. If the plug does not fit fully in any other ). "Use this plug is being administered." 8. "Always unplug sewing machine..., repair, electrical or mechanical adjustment." 4. "Never sew with EEC Directive 89/336/EEC covering the electromagnetic compatibility. If it in the instruction manual." This appliance complies with a damaged needle plate as a toy. "DANGER - "WARNING - "Do not unplug by or near children." 2....
...while stitching. Moving parts-To reduce risk of burns, fire, electric shock, or injury to be left unattended when plugged in this manual. If the plug does not fit fully in any other ). "Use this plug is being administered." 8. "Always unplug sewing machine..., repair, electrical or mechanical adjustment." 4. "Never sew with EEC Directive 89/336/EEC covering the electromagnetic compatibility. If it in the instruction manual." This appliance complies with a damaged needle plate as a toy. "DANGER - "WARNING - "Do not unplug by or near children." 2....
Instruction Manual
Page 10
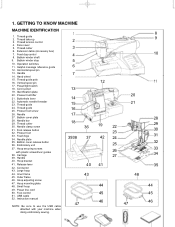
.... Handle 14. Power/light switch 18. Presser foot screw 26. Presser foot 33. Embroidery unit 37. Carriage 39. Inner frame 45. Outer frame 46. Instruction manual NOTE: Be sure to use the USB cable attached with plastic screwdriver guides 38. Bobbin winder stop 10. Cord socket 19. Automatic needle threader 23...
.... Handle 14. Power/light switch 18. Presser foot screw 26. Presser foot 33. Embroidery unit 37. Carriage 39. Inner frame 45. Outer frame 46. Instruction manual NOTE: Be sure to use the USB cable attached with plastic screwdriver guides 38. Bobbin winder stop 10. Cord socket 19. Automatic needle threader 23...
Instruction Manual
Page 30
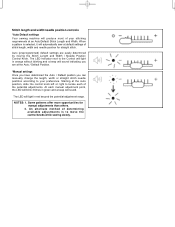
...stitch. Auto (preprogrammed) default settings are at default settings of determining available adjustments is selected, it will sound indicating you can manually change the length, width or straight stitch needle postition according to the Control will light in orange without blinking and a beep ...will automatically sew at the Auto / Default Position. *Manual settings Once you have determined the Auto / Default position you are easily determined by moving the Stitch Length and Width / Needle Position...
...stitch. Auto (preprogrammed) default settings are at default settings of determining available adjustments is selected, it will sound indicating you can manually change the length, width or straight stitch needle postition according to the Control will light in orange without blinking and a beep ...will automatically sew at the Auto / Default Position. *Manual settings Once you have determined the Auto / Default position you are easily determined by moving the Stitch Length and Width / Needle Position...

Instruction Manual
Page 40
...;té de dessus Cara ADJUSTING STITCH WIDTH AND LENGTH is values set automatically when pattern (No. 03) is the selection range when setting the value manually. is set.
...;té de dessus Cara ADJUSTING STITCH WIDTH AND LENGTH is values set automatically when pattern (No. 03) is the selection range when setting the value manually. is set.
Instruction Manual
Page 42
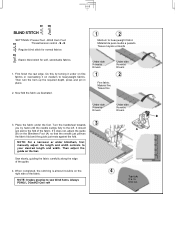
... STITCH SETTINGS :Presser foot - Now fold the fabric as illustrated. E − Regular blind stitch for soft, stretchable fabrics 1. NOTE: For a narrower or wider blindhem, first manually adjust the length and width controls to heavyweight fabrics. When completed, the stitching is almost invisible on the foot. S - Blind Hem Foot :Thread tension control -
... STITCH SETTINGS :Presser foot - Now fold the fabric as illustrated. E − Regular blind stitch for soft, stretchable fabrics 1. NOTE: For a narrower or wider blindhem, first manually adjust the length and width controls to heavyweight fabrics. When completed, the stitching is almost invisible on the foot. S - Blind Hem Foot :Thread tension control -
Instruction Manual
Page 76
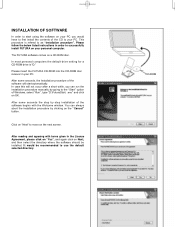
... most personal computers the default drive setting for a CD-ROM drive is refered to as "installation procedure". You can run the installation procedure manually by going to use the default selected directory. CD-ROM After some seconds the step by clicking on Next, and then select the directory ...After some seconds, the Installation procedure of the CD to move on a CD-ROM disc. After reading and agreeing with the Welcome window. The FUTURA software comes on the next screen. Please follow the below listed instructions in your PC. Click on "Next" to your PC. It would have...
... most personal computers the default drive setting for a CD-ROM drive is refered to as "installation procedure". You can run the installation procedure manually by going to use the default selected directory. CD-ROM After some seconds the step by clicking on Next, and then select the directory ...After some seconds, the Installation procedure of the CD to move on a CD-ROM disc. After reading and agreeing with the Welcome window. The FUTURA software comes on the next screen. Please follow the below listed instructions in your PC. Click on "Next" to your PC. It would have...


