Instruction Manual
Page 2
... operate the appliance with same type rated 10 watts (110-120V area) or 15 watts (220-240V area). Special care is used as threading needle, changing needle, threading bobbin, or changing presser foot, and the like. 10.Always unplug sewing machine from the electric outlet immediately after using this appliance is required...
... operate the appliance with same type rated 10 watts (110-120V area) or 15 watts (220-240V area). Special care is used as threading needle, changing needle, threading bobbin, or changing presser foot, and the like. 10.Always unplug sewing machine from the electric outlet immediately after using this appliance is required...
Instruction Manual
Page 6
... Winding the bobbin 18 Inserting the bobbin 20 Inserting and changing needles 22 Threading the upper thread 24 Automatic needle threader 26 Thread tension 28 Raising the bobbin thread 30 Reverse sewing/ Removing the work/ Cutting the thread ..........32 Matching needle/ fabric/ thread 34 How to choose your pattern 38 Straight stitch / Zigzag stitching 40 Blind...
... Winding the bobbin 18 Inserting the bobbin 20 Inserting and changing needles 22 Threading the upper thread 24 Automatic needle threader 26 Thread tension 28 Raising the bobbin thread 30 Reverse sewing/ Removing the work/ Cutting the thread ..........32 Matching needle/ fabric/ thread 34 How to choose your pattern 38 Straight stitch / Zigzag stitching 40 Blind...

Instruction Manual
Page 9
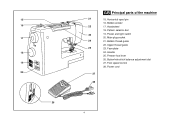
Presser foot 11 6. Bobbin stopper 5 10. Pattern indicator window 12. Drop feed control 6 13. Thread take-up lever 10 4. Thread cutter 3 5. One step buttonhole lever 14. Presser foot pressure adjustment 2 3. Removable sewing table/ accessory storage 4 8. Thread tension dial 9 2. Needle plate 7. GB Principal parts of the machine 8 1 1. Stitch length dial 11. Reverse sewing lever 9. Automatic threader 7 13 14 12 PUSH 2
Presser foot 11 6. Bobbin stopper 5 10. Pattern indicator window 12. Drop feed control 6 13. Thread take-up lever 10 4. Thread cutter 3 5. One step buttonhole lever 14. Presser foot pressure adjustment 2 3. Removable sewing table/ accessory storage 4 8. Thread tension dial 9 2. Needle plate 7. GB Principal parts of the machine 8 1 1. Stitch length dial 11. Reverse sewing lever 9. Automatic threader 7 13 14 12 PUSH 2
Instruction Manual
Page 11
15 16 17 18 19 20 26 21 22 23 24 25 27 28 GB Principal parts of the machine 15. Handwheel 18. Main plug socket 21. Handle 25. Power cord 4 Upper thread guide 23. Buttonhole stitch balance adjustment slot 27. Pattern selector dial 19. Bobbin thread guide 22. Face plate 24. Foot speed control 28. Bobbin winder 17. Presser foot lever 26. Power and light switch 20. Horizontal spool pin 16.
15 16 17 18 19 20 26 21 22 23 24 25 27 28 GB Principal parts of the machine 15. Handwheel 18. Main plug socket 21. Handle 25. Power cord 4 Upper thread guide 23. Buttonhole stitch balance adjustment slot 27. Pattern selector dial 19. Bobbin thread guide 22. Face plate 24. Foot speed control 28. Bobbin winder 17. Presser foot lever 26. Power and light switch 20. Horizontal spool pin 16.

Instruction Manual
Page 25
... pedal. (8) - Step on spindle. (5) - Press bobbin to the left (10) and remove. Snap thread into thread guide. (3) - To start sewing, push the bobbin winder 4 5 6 spindle to left (sewing position). 7 8 9 10 18 Wind thread clockwise around bobbin winder tension discs. (4) - Hold thread end (7). Please Note: When the bobbin winder spindle is in "bobbin winding" position...
... pedal. (8) - Step on spindle. (5) - Press bobbin to the left (10) and remove. Snap thread into thread guide. (3) - To start sewing, push the bobbin winder 4 5 6 spindle to left (sewing position). 7 8 9 10 18 Wind thread clockwise around bobbin winder tension discs. (4) - Hold thread end (7). Please Note: When the bobbin winder spindle is in "bobbin winding" position...
Instruction Manual
Page 27
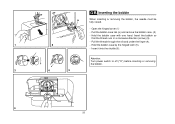
GB Inserting the bobbin a When inserting or removing the bobbin, the needle must be fully raised. - Hold the bobbin case with one hand. Pull the bobbin case tab (a) and remove the bobbin case. (2) - Hold the bobbin case by the hinged latch (5). - Pull the thread through the slit and under the finger (4). 1 2 - Attention: Turn power switch to off ("O") before inserting or removing the bobbin. 3 4 5 6 20 Insert the bobbin so that the thread runs in a clockwise direction (arrow) (3). - Insert it into the shuttle (6). Open the hinged cover (1) -
GB Inserting the bobbin a When inserting or removing the bobbin, the needle must be fully raised. - Hold the bobbin case with one hand. Pull the bobbin case tab (a) and remove the bobbin case. (2) - Hold the bobbin case by the hinged latch (5). - Pull the thread through the slit and under the finger (4). 1 2 - Attention: Turn power switch to off ("O") before inserting or removing the bobbin. 3 4 5 6 20 Insert the bobbin so that the thread runs in a clockwise direction (arrow) (3). - Insert it into the shuttle (6). Open the hinged cover (1) -
Instruction Manual
Page 31
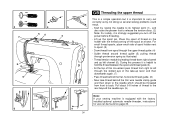
... needle clamp guide and then down right channel and up the spool pin. Place the spool of the take thread behind the flat, horizontal thread guide. (8) - 3 7 68 9 6 4 54 5 3 2 7 8 9 GB Threading the upper thread This is a simple operation but it is strongly suggested you turn off the spool as illustrated. - Lift up left through the slotted...
... needle clamp guide and then down right channel and up the spool pin. Place the spool of the take thread behind the flat, horizontal thread guide. (8) - 3 7 68 9 6 4 54 5 3 2 7 8 9 GB Threading the upper thread This is a simple operation but it is strongly suggested you turn off the spool as illustrated. - Lift up left through the slotted...
Instruction Manual
Page 33
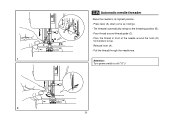
Pull the thread through the needle eye. 1 Attention: Turn power switch to top. - Pass the thread in front of the needle around thread guide (C). - A 2 26 A C A B C B D D GB Automatic needle threader -Raise the needle to the threading position (B). - Pass thread around the hook (D) from bottom to off ("O")! Release lever (A). - Press lever (A) down as far as it will go. - The threader automatically swings to its highest position. -
Pull the thread through the needle eye. 1 Attention: Turn power switch to top. - Pass the thread in front of the needle around thread guide (C). - A 2 26 A C A B C B D D GB Automatic needle threader -Raise the needle to the threading position (B). - Pass thread around the hook (D) from bottom to off ("O")! Release lever (A). - Press lever (A) down as far as it will go. - The threader automatically swings to its highest position. -

Instruction Manual
Page 35
...straight stitch construction sewing. - 90% of fabric. 1 2 Lower thread tension To test the bobbin thread tension, remove the bobbin case and bobbin and hold it by suspending it once or twice. For all . Normal thread tension for straight stitch sewing. D. Turn dial to lower number. ...decorative sewing you will unwind by the thread. B. GB Thread tension 4 Upper thread tension Basic thread tension setting: "4" To increase the tension, turn the dial to the next number down. Correct thread tension is when a small amount of the upper thread appears on the side of tension ...
...straight stitch construction sewing. - 90% of fabric. 1 2 Lower thread tension To test the bobbin thread tension, remove the bobbin case and bobbin and hold it by suspending it once or twice. For all . Normal thread tension for straight stitch sewing. D. Turn dial to lower number. ...decorative sewing you will unwind by the thread. B. GB Thread tension 4 Upper thread tension Basic thread tension setting: "4" To increase the tension, turn the dial to the next number down. Correct thread tension is when a small amount of the upper thread appears on the side of tension ...
Instruction Manual
Page 37
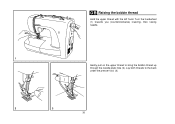
GB Raising the bobbin thread Hold the upper thread with the left hand. Turn the handwheel (1) towards you (counterclockwise) lowering, then raising needle. 1 Gently pull on the upper thread to the back under the presser foot. (3) 2 3 30 Lay both threads to bring the bobbin thread up through the needle plate hole (2).
GB Raising the bobbin thread Hold the upper thread with the left hand. Turn the handwheel (1) towards you (counterclockwise) lowering, then raising needle. 1 Gently pull on the upper thread to the back under the presser foot. (3) 2 3 30 Lay both threads to bring the bobbin thread up through the needle plate hole (2).
Instruction Manual
Page 39
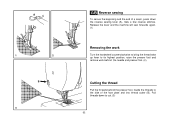
Guide the threads to the side of a seam, press down to its highest position, raise the presser foot and remove work Turn the handwheel counterclockwise to bring the thread take up lever to cut. (3) 32 Pull threads down the reverse sewing lever (A). Release the lever and the machine will sew forwards again. (1) Removing the work behind the needle and presser foot. (2) Cutting the thread Pull the threads behind the presser foot. A 1 2 B 3 GB Reverse sewing To secure the beginning and the end of the face plate and into thread cutter (B). Sew a few reverse stitches.
Guide the threads to the side of a seam, press down to its highest position, raise the presser foot and remove work Turn the handwheel counterclockwise to bring the thread take up lever to cut. (3) 32 Pull threads down the reverse sewing lever (A). Release the lever and the machine will sew forwards again. (1) Removing the work behind the needle and presser foot. (2) Cutting the thread Pull the threads behind the presser foot. A 1 2 B 3 GB Reverse sewing To secure the beginning and the end of the face plate and into thread cutter (B). Sew a few reverse stitches.
Instruction Manual
Page 41
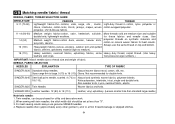
..., some leathers and vinyls. Use polyester threads on synthetic materials and cotton on top and bottom. Natural woven fabrics-wool, cotton, silk, etc. SINGER 2045 SINGER 2025 Semi-ball point needle, scarfed. 9 (70) to medium). Most threads sold are medium size and suitable for ...best results. NEEDLE, FABRIC SELECTION NEEDLES EXPLANATION TYPE OF FABRIC SINGER 2020 Standard sharp needles. Knits-polyesters, interlocks...
..., some leathers and vinyls. Use polyester threads on synthetic materials and cotton on top and bottom. Natural woven fabrics-wool, cotton, silk, etc. SINGER 2045 SINGER 2025 Semi-ball point needle, scarfed. 9 (70) to medium). Most threads sold are medium size and suitable for ...best results. NEEDLE, FABRIC SELECTION NEEDLES EXPLANATION TYPE OF FABRIC SINGER 2020 Standard sharp needles. Knits-polyesters, interlocks...
Instruction Manual
Page 47
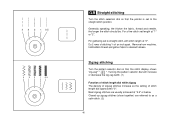
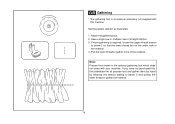
...with stitch length at "1" or "2". Do 2 rows of stitching ¼ of stitch length dial approaches "0". Remove from machine, hold bobbin thread and gather fabric to the straight stitch position. Closed up zigzag stitches (close together) are usually achieved at "2.5" or below. Generally speaking, ...the thicker the fabric, thread and needle, the longer the stitch should be. For a fine stitch set to desired fullness. Turning the pattern selector dial will ...
...with stitch length at "1" or "2". Do 2 rows of stitching ¼ of stitch length dial approaches "0". Remove from machine, hold bobbin thread and gather fabric to the straight stitch position. Closed up zigzag stitches (close together) are usually achieved at "2.5" or below. Generally speaking, ...the thicker the fabric, thread and needle, the longer the stitch should be. For a fine stitch set to desired fullness. Turning the pattern selector dial will ...
Instruction Manual
Page 55
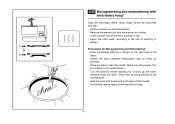
...buttonhole foot, and set the pattern selector dial to " ". 2. Stop the machine when the buttonhole is a simple process that provides reliable results. Hook the heavy thread onto the back end of your fabric and interfacing. However, it back (C). 6. Lower the presser foot aligning ...the marks on foot with the marks on a sample of the buttonhole foot, then bring the two heavy thread ends to " ". 3. a b A PUSH B C PUSH E 3 4 2 1 D 48 GB How to sew buttonholes (one-step buttonhole) Buttonhole sewing is sewn. ...
...buttonhole foot, and set the pattern selector dial to " ". 2. Stop the machine when the buttonhole is a simple process that provides reliable results. Hook the heavy thread onto the back end of your fabric and interfacing. However, it back (C). 6. Lower the presser foot aligning ...the marks on foot with the marks on a sample of the buttonhole foot, then bring the two heavy thread ends to " ". 3. a b A PUSH B C PUSH E 3 4 2 1 D 48 GB How to sew buttonholes (one-step buttonhole) Buttonhole sewing is sewn. ...
Instruction Manual
Page 61
... hem, turn under the edge twice by holding it upright and slightly to secure. For hems in fine or sheer fabrics. Change to " ". Pull the thread slightly towards you and lower the presser foot. Insert the needle into the fabric, raise the presser foot and guide the fold into the scroll...
... hem, turn under the edge twice by holding it upright and slightly to secure. For hems in fine or sheer fabrics. Change to " ". Pull the thread slightly towards you and lower the presser foot. Insert the needle into the fabric, raise the presser foot and guide the fold into the scroll...
Instruction Manual
Page 71
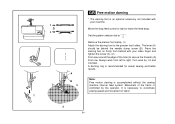
... without the sewing machine internal feed system. First row: Always work by the operator. Press the darning foot on firmly from left to secure the threads) (3). Set the pattern selector dial to lower the feed dogs. It is necessary to the presser foot holder. a b ab C 1 A B 3 GB Free motion darning * The darning...
... without the sewing machine internal feed system. First row: Always work by the operator. Press the darning foot on firmly from left to secure the threads) (3). Set the pattern selector dial to lower the feed dogs. It is necessary to the presser foot holder. a b ab C 1 A B 3 GB Free motion darning * The darning...
Instruction Manual
Page 81
... feed dogs. (Note: Stitch length cannot be controlled with thumb and forefingers of hoop. 74 Adjust the stitch width according to bring up the lower thread through the fabric. Turn the balance wheel towards you to the size of the fabric. -
... feed dogs. (Note: Stitch length cannot be controlled with thumb and forefingers of hoop. 74 Adjust the stitch width according to bring up the lower thread through the fabric. Turn the balance wheel towards you to the size of the fabric. -
Instruction Manual
Page 85
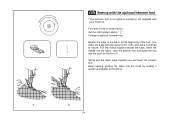
... not supplied with your machine. Attach the gathering foot. 2. Set the pattern selector as illustrated. 1. If more of the material. Pull the lower thread to gather more gathering is the optional gathering foot which does not come with this foot substitute the all purpose foot and gather fabric by... hand by lowering the tension setting to below 2 and pulling the lower thread to below 2 so that the lower thread lies on the under side of straight stitches. 3. If you have not purchased this machine. Sew a single row or multiple...
... not supplied with your machine. Attach the gathering foot. 2. Set the pattern selector as illustrated. 1. If more of the material. Pull the lower thread to gather more gathering is the optional gathering foot which does not come with this foot substitute the all purpose foot and gather fabric by... hand by lowering the tension setting to below 2 and pulling the lower thread to below 2 so that the lower thread lies on the under side of straight stitches. 3. If you have not purchased this machine. Sew a single row or multiple...
Instruction Manual
Page 87
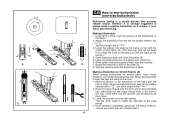
...from delicate chiffons to the machine as follows: i) The arm (3) should be used only when necessary. Make sure both the bobbin thread and the needle thread behind the walking foot attachment. Always try to raise the presser foot bar (1). 2. Lift the presser foot lifter to sew first without... foot to multiple layers of the seam when using the standard, regular foot on a wide range of fabrics from your machine. Draw the bobbin thread up and place both the needle screw (4) and the presser bar attaching screw (2) are tightly secured. 5. It is optional. a.Arm b.Attaching ...
...from delicate chiffons to the machine as follows: i) The arm (3) should be used only when necessary. Make sure both the bobbin thread and the needle thread behind the walking foot attachment. Always try to raise the presser foot bar (1). 2. Lift the presser foot lifter to sew first without... foot to multiple layers of the seam when using the standard, regular foot on a wide range of fabrics from your machine. Draw the bobbin thread up and place both the needle screw (4) and the presser bar attaching screw (2) are tightly secured. 5. It is optional. a.Arm b.Attaching ...
Instruction Manual
Page 89
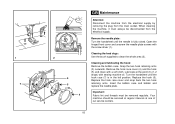
... race cover and snap back the two hook retaining arms. Insert the bobbin case and bobbin and replace the needle plate. Important: Fabric lint and threads must always be removed regularly. Your machine should be serviced at regular intervals at the point (6) (1-2 drops) with sewing machine oil. Replace the hook (5). Cleaning...
... race cover and snap back the two hook retaining arms. Insert the bobbin case and bobbin and replace the needle plate. Important: Fabric lint and threads must always be removed regularly. Your machine should be serviced at regular intervals at the point (6) (1-2 drops) with sewing machine oil. Replace the hook (5). Cleaning...


