Instruction Manual
Page 2
.... 12.Do not use only. Return the appliance to the off the machine or unplug when the machine is 75dB(A). 17.Please turn all moving parts. Keep ventilation openings of the sewing machine and foot controller free from the electric outlet immediately after using this appliance is used or where oxygen...
.... 12.Do not use only. Return the appliance to the off the machine or unplug when the machine is 75dB(A). 17.Please turn all moving parts. Keep ventilation openings of the sewing machine and foot controller free from the electric outlet immediately after using this appliance is used or where oxygen...
Instruction Manual
Page 6
GB List of contents Principal parts of the machine 2/4 Accessories 6 Installing the snap-in sewing table 8 Connecting machine to power source 10 Changing the bulb 12 Two-step presser foot lifter/ ...
GB List of contents Principal parts of the machine 2/4 Accessories 6 Installing the snap-in sewing table 8 Connecting machine to power source 10 Changing the bulb 12 Two-step presser foot lifter/ ...

Instruction Manual
Page 9
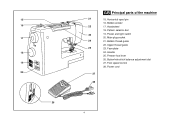
Removable sewing table/ accessory storage 4 8. Thread cutter 3 5. One step buttonhole lever 14. Presser foot 11 6. Pattern indicator window 12. Automatic threader 7 13 14 12 PUSH 2 Thread take-up lever 10 4. Drop feed control 6 13. Needle plate 7. Reverse sewing lever 9. GB Principal parts of the machine 8 1 1. Stitch length dial 11. Thread tension dial 9 2. Presser foot pressure adjustment 2 3. Bobbin stopper 5 10.
Removable sewing table/ accessory storage 4 8. Thread cutter 3 5. One step buttonhole lever 14. Presser foot 11 6. Pattern indicator window 12. Automatic threader 7 13 14 12 PUSH 2 Thread take-up lever 10 4. Drop feed control 6 13. Needle plate 7. Reverse sewing lever 9. GB Principal parts of the machine 8 1 1. Stitch length dial 11. Thread tension dial 9 2. Presser foot pressure adjustment 2 3. Bobbin stopper 5 10.
Instruction Manual
Page 11
Horizontal spool pin 16. Power and light switch 20. Bobbin thread guide 22. Power cord 4 Handwheel 18. Main plug socket 21. Presser foot lever 26. 15 16 17 18 19 20 26 21 22 23 24 25 27 28 GB Principal parts of the machine 15. Pattern selector dial 19. Upper thread guide 23. Handle 25. Foot speed control 28. Buttonhole stitch balance adjustment slot 27. Face plate 24. Bobbin winder 17.
Horizontal spool pin 16. Power and light switch 20. Bobbin thread guide 22. Power cord 4 Handwheel 18. Main plug socket 21. Presser foot lever 26. 15 16 17 18 19 20 26 21 22 23 24 25 27 28 GB Principal parts of the machine 15. Pattern selector dial 19. Upper thread guide 23. Handle 25. Foot speed control 28. Buttonhole stitch balance adjustment slot 27. Face plate 24. Bobbin winder 17.
Instruction Manual
Page 73
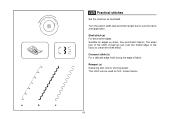
The wider part of the stitch should go just over the folded edge of fabric. a b c 66 Shell stitch (a) For decorative edges. Suitable for firm, thicker fabrics. Crescent stitch (b) For a delicate edge finish along the edge of the fabric to suit the fabric and application. Turn the switch width dial and stitch length dial to create the shell effect. This stitch can be used for edges on sheer, fine and stretch fabrics. GB Practical stitches Set the machine as illustrated. Rampart (c) Gathering with cord or shirring elastic.
The wider part of the stitch should go just over the folded edge of fabric. a b c 66 Shell stitch (a) For decorative edges. Suitable for firm, thicker fabrics. Crescent stitch (b) For a delicate edge finish along the edge of the fabric to suit the fabric and application. Turn the switch width dial and stitch length dial to create the shell effect. This stitch can be used for edges on sheer, fine and stretch fabrics. GB Practical stitches Set the machine as illustrated. Rampart (c) Gathering with cord or shirring elastic.

