
Singer Futura XL-400 Support Question
Singer Futura XL-400 Support Question
Find answers below for this question about Singer Futura XL-400.Need a Singer Futura XL-400 manual? We have 1 online manual for this item!
Question posted by dfmitchell1977 on January 26th, 2017
Parts To The Feed Dog
I need an image that shows the parts to the feed dog raising and lowering mechanism. While replacing the feed dog, the pin that attaches underneath the nut/screw that makes contact with the up / down position button will not make contact.
Current Answers
Answer #1: Posted by Troubleshooter101 on January 27th, 2017 11:57 PM
Troubleshooter101

Member since:
September 30th, 2015 Points: 2,927,040

Member since:
September 30th, 2015 Points: 2,927,040
You can buy parts from here
http://www.singermachines.co.uk/sewingmachineparts/
Thanks
Please respond to my effort to provide you with the best possible solution by using the "Acceptable Solution" and/or the "Helpful" buttons when the answer has proven to be helpful. Please feel free to submit further info for your question, if a solution was not provided. I appreciate the opportunity to serve you!
Troublshooter101
Related Singer Futura XL-400 Manual Pages
Instruction Manual - Page 2
... or
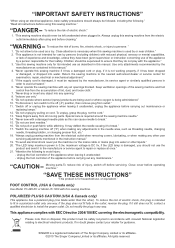
replacing lamps." 12. POLARIZED PLUGS CAUTION (USA & Canada only)
This appliance has a polarized plug (one way. Return the sewing machine to persons: " 1. Please note that they have been given supervision or instruction concerning use , or equivalent."
Use only attachments recommended by a person responsible for examination, repair, electrical or mechanical adjustment...
Instruction Manual - Page 5

... 99 Feed dog control 98 - 99 Converting to -sew fabrics
3. PREPARATION FOR EMBROIDERY SEWING Before attaching embroidery unit 58 - 61
Attaching embroidery foot, Inserting the bobbin, Threading the top thread, Extension table, Attaching embroidery unit 62 - 63 Removing embroidery unit 62 - 63 Securing fabric in embroidery hoop 64 - 65 Using fabric and stabilizer 66 - 69 Preparing the machine...
Instruction Manual - Page 8
...U S B c a b l e i s
44
attached to your machine when doing embroidery.
45
44 45
47
48
49
50
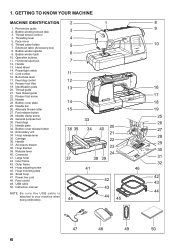
6 Bobbin winder spindle 9. Feed dogs
26
31. Feed dog control
12
18. Foot release button
28. Bobbin cover plate
... wheel
14. Thread cutter/holder 7. Hoop adjusting screw 45. Twin thread guide 22. Horizontal spool pin
7
12. Release lever 40. Connector 41. Cord...
Instruction Manual - Page 10

... Class I5 J.
16
FOR EMBROIDERY
19. Bobbins 21. Embroidery software CD
19
FUTURA embroidery is called the
General Purpose Foot and will
be
used for most decorative sewing. Spool pin cap (large)
8. ACCESSORIES
FOR SEWING MACHINE
1. Bobbins
3. Satin foot
15. Scissors 22. Spool pin cap (mini)
6. Thread spool net (long)
18. Zipper foot
13. To install...
Instruction Manual - Page 12
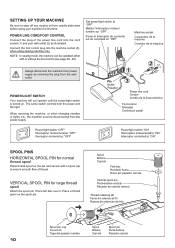
...machine socket Connecteur de la machine Conector de la máquina
2 1
Pin Butée Pasador
3
Power line cord Cordon Cordón de la linea eléctrica
Foot control Rhéostat
XL... PINS HORIZONTAL SPOOL PIN for large thread spool
Attach the spool pin.
Always disconnect the machine from power supply by removing the plug from needle plate area before using sewing machine only...
Instruction Manual - Page 24

... that the machine is recommended for straight stitch sewing. Make all adjustments with the foot holder. 3.
It is correctly threaded (see page 7). Lower the presser foot lifter so that the foot holder snaps
on the bottom side of your fabric. The tension is well balanced when these two threads 'lock' in the highest position. If...
Instruction Manual - Page 28

... orange without blinking and a beep will sound indicating you can be activated, if it will automatically sew at the Auto position, slide the control knob left or right to the Control will light in green and a beep ...Auto/Default Stitch Length and Width.
Stitch length and width/needle position controls
*Auto/Default settings Your sewing machine will produce most of your preference.
Instruction Manual - Page 30
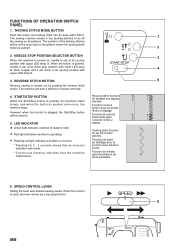
The sewing machine makes 4 tiny tacking stitches to tie off of the tacking stitches
will sew 4 stitches in the pattern where the tacking stitch button is set at its up -stop position with lower LED lamp lit. Push it again and it will be at the exact spot in reverse and stop position with
4
upper LED lamp lit...
Instruction Manual - Page 34
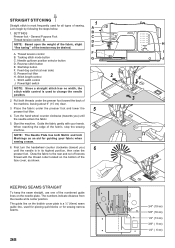
... to the rear and cut off excess
thread with your fabric when sewing a seam.
6. Start the machine. The guide line on the bobbin cover plate is used for piecing quilt blocks or for guiding your hands. Feed dog control (at its highest position, then raise the
6
presser foot. Power/light switch
F G
2
H I . Reverse stitch button E. Tacking stitch...
Instruction Manual - Page 52
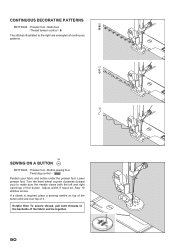
... of the button.
Button sewing foot :Feed dog control - Lower presser foot.
Helpful Hint: To secure thread, pull both threads to make sure the needle clears both the left and right openings of the fabric and tie together.
50 SEWING ON A BUTTON
SETTINGS :Presser foot -
CONTINUOUS DECORATIVE PATTERNS
SETTINGS :Presser foot - Position your fabric and button under...
Instruction Manual - Page 56

... the machine. 5. Pull out the bobbin thread
underneath the fabric to a length of about 4 inches to cut any of the bartack threads.
54
Buttonhole foot alignment position Position d'alignement... tissu Marca de material
9. Carefully mark the position of the buttonhole. Fabric marking Marque du tissu Marca de material
mark Marque Marca
* Sewing will be completed automatically in the center of ...
Instruction Manual - Page 60

... CAUTION replacing presser ... de bordado
58 Secure it by tightening presser foot screw.
3.
Screw Vis Guia
* Turn the hand wheel counter clockwise ...position.
1.
PREPARATION FOR EMBROIDERY SEWING
BEFORE ATTACHING EMBROIDERY UNIT ATTACHING EMBROIDERY FOOT
Foot holder Support du pied Sujetador prensatelas
Always be sure to machine CAUTION before changing presser foot.
* Raise...
Instruction Manual - Page 64
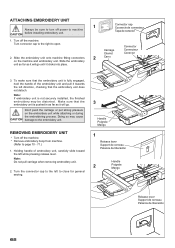
... connecteur Tapa de conector
1. Turn off the machine. * Remove embroidery hoop from machine.
(Refer to close for general sewing.
3
Handle Poignée Mango
1
Release ... machine fitting connectors
2
Carro
on the embroidery unit while attaching or during the embroidering process. REMOVING EMBROIDERY UNIT
* Turn off the machine.
ATTACHING EMBROIDERY UNIT
1
Always be distorted. Make sure...
Instruction Manual - Page 76

... to continue. Next attach the embroidery unit to your sewing machine and connect the USB cable between your sewing machine. A progress bar ...automatically close the Futura software and then turn on your machine. Please wait for a short while until this happens.
Turn off your machine, close after...Make sure the needle has been moved to the highest position by clicking on "Cancel".
Instruction Manual - Page 90

...sews them precisely, matching one section to re-hoop the fabric so that each other . Multi-Hoop utilizes a system where three alignment points (A, B, and C) are input, they inform the machine exactly as to how the fabric is positioned...in the Futura software that will allow embroidery data which is larger than a single embroidery hoop to be sent to the machine to stitch out, while making it easy ...
Instruction Manual - Page 92

Set fabric and stabilizer into the software. (Additional numbered hoops will appear as the design parts flow out of the first hoop section).
4. Fig. 3 Fig. 3 Fig. 3
Fig. 4 Fig. 4 Fig. 4
Guide ...cross lines of data 1 within the guide line markings of the hoop there are to the machine for sewing one section at a time. 3.
The grey area (#1 Hoop) is the first of the embroidery data that is ...
Instruction Manual - Page 100

...-bed model.
With the extension table removed the machine converts into place until it to its highest position to change the presser foot or to sew. 2. FEED DOG CONTROL
The feed dogs control the movement of the fabric that you, not the feed dogs, are three positions for your presser foot. 1.
To replace, slide the extension table back into a slim free...
Instruction Manual - Page 102
... - 11). * Buttonhole lever is not threaded correctly. (see page 16 - 19). * Thread is not lowered - Fabric does not move. * Presser foot is caught in bobbin case or hook. - Raise feed dogs. (see page 20 - 21). Replace needle. (see page 20 - 21). * Machine is not threaded correctly. (see page 14 - 15). * Lint accumulates in hook. - Clean hook...
Instruction Manual - Page 104
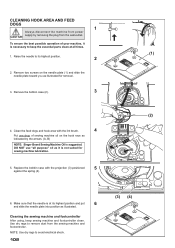
... parts clean at its highest position.
2
2. Clean the feed dogs and hook area with the projection (3) positioned
5
against the spring (4).
(2)
(A) (B)
6. Make sure that the needle is not suited for removal.
3. CLEANING HOOK AREA AND FEED DOGS
1
Always disconnect the machine from power CAUTION supply by the arrows. (A, B)
NOTE: Singer Brand Sewing Machine Oil is suggested. Raise...
Instruction Manual - Page 106
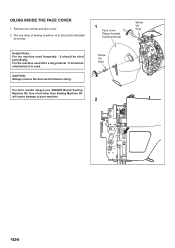
... oiled before oiling.
For best results always use SINGER Brand Sewing Machine Oil. Screw Vis Guia
2
Screw Vis Guia
104 Remove two screws and face cover. 2. CAUTION: Always remove the dust and lint before it is used. Use of sewing machine oil to your machine.
For the machine used frequently : It should be oiled periodically. OILING INSIDE THE FACE...
Similar Questions

What Is The Part Number For Face Cover Screw For Futura Xl420?
I have lost the screw that holds the face cover in place. It is the one on the side that is under th...
I have lost the screw that holds the face cover in place. It is the one on the side that is under th...
(Posted by barbara27028 3 years ago)

Replacement Part For Singer Futura Xl 400
I am looking for the embroidery arm unit for a Singer Futura Xl 400. Can you assist me in locating t...
I am looking for the embroidery arm unit for a Singer Futura Xl 400. Can you assist me in locating t...
(Posted by sjh4ba 3 years ago)
Singer Futura Xl-400
I am in need of a Singer Futura XL-400 Startup disc. Any idea where I can get one
I am in need of a Singer Futura XL-400 Startup disc. Any idea where I can get one
(Posted by fayevb 4 years ago)

Sewing Machine Model 5523 Page 53 In Manual Does Not Show Me How To Attach Pres
The page in your instructions I had and was reading it when it deleted
The page in your instructions I had and was reading it when it deleted
(Posted by ramseyrobert 7 years ago)

Beeping From Singer Sewing Machine Stylist Ii 5625
My sewing machine will beep and stop sewing after three inches of sewing. I have taken it to be repa...
My sewing machine will beep and stop sewing after three inches of sewing. I have taken it to be repa...
(Posted by arusheria 9 years ago)