Singer 3116 Simple Support Question
Singer 3116 Simple Support Question
Find answers below for this question about Singer 3116 Simple.Need a Singer 3116 Simple manual? We have 1 online manual for this item!
Question posted by brucebernardr on July 13th, 2016
Singer 3116 Thread Take Up Lever Out Of Sync.
Singer 3116 thread take up lever out of sync and gets stuck. Also the needle shaft to thread take up lever may need adjustment. Found set screws loose. Thread take up lever gets stuck, initial resync procedures needed in order to set the correct adjustment for the needle shaft to thread take up lever?
Current Answers
Related Singer 3116 Simple Manual Pages
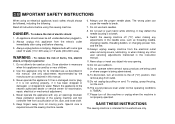
Instruction Manual - Page 2
...:
1. Switch the sewing machine off ("O") when making any other user servicing adjustments mentioned in the instruction manual.
11.Never drop or insert any object into water.
To reduce the risk of lint, dust, and loose cloth.
5. Always unplug this manual.
3. Replace bulb with any opening.
12.Do not use as threading needle, changing needle, threading bobbin, or changing...
Instruction Manual - Page 6
... sewing table 8 Connecting machine to power source 10 Changing the bulb 12 Two-step presser foot lifter/
Adjusting presser foot pressure 14 Attaching the presser foot shank 16 Winding the bobbin 18 Inserting the bobbin 20 Inserting and changing needles 22 Threading the upper thread 24 Automatic needle threader 26 Thread tension 28 Raising the bobbin thread 30 Reverse sewing...
Instruction Manual - Page 9

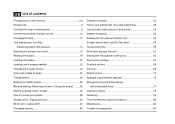
...foot pressure adjustment
2
3. Thread take-up lever
10
4. Needle plate
7. Bobbin stopper
5
10. Automatic threader
7
13 14
12
PUSH
2 One step buttonhole lever
14. Removable sewing table/ accessory storage
4
8. Thread cutter
3
5. Stitch length dial
11. Reverse sewing lever
9. Drop feed control
6
13. GB Principal parts of the machine
8
1
1. Thread tension...
Instruction Manual - Page 11
... 23 24 25
27 28
GB Principal parts of the machine
15. Bobbin thread guide 22. Handle 25. Buttonhole stitch balance adjustment slot 27. Pattern selector dial 19. Main plug socket 21. Face plate 24. Power cord
4 Bobbin winder 17. Presser foot lever 26. Upper thread guide 23. Handwheel 18. Foot speed control 28. Power...
Instruction Manual - Page 17
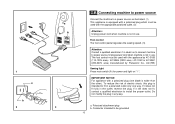
...control must be used with the appropriate polarized outlet. (2)
Attention: Unplug power cord when machine is not in the outlet, reverse the plug. If it still does not fit,...
GB Connecting machine to power source
Connect the machine to a power source as to connect machine to power source.
Do not modify the plug in use .
Foot control The foot control pedal regulates the sewing speed. (3)...
Instruction Manual - Page 21

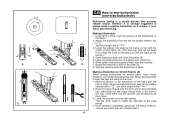
... presser foot lifter
When sewing several layers or thick fabrics, the presser foot can be raised to a high rise position for heavy fabric, tighten by turning the screw counter counterclockwise, and for easy positioning of the work. (A)
A
Adjusting presser foot pressure
The presser foot pressure of the machine has been pre-set and requires no...
Instruction Manual - Page 25

Please Note:
When the bobbin winder spindle is in "bobbin winding"
position, the machine will not sew and the hand wheel
will not turn. For smaller spools of thread place spool holder with small side next to right. (6)
- Cut thread (9). 1
2
3
GB Winding the bobbin
- Push bobbin to spool. (2)
- Press bobbin to the left (10) and...
Instruction Manual - Page 31
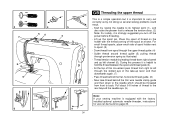
... spool of the take thread behind the flat, horizontal thread guide. (8)
- Thread tension module by leading thread down to the needle which should be found on the
holder with the factory installed optional automatic needle threader, instructions for use can be threaded from right to the rear beyond the needle eye. (9)
Note: If your sewing machine is strongly suggested you...
Instruction Manual - Page 33
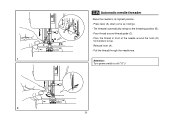
... position. -
Press lever (A) down as far as it will go. - The threader automatically swings to off ("O")! Pull the thread through the needle eye.
1
Attention:
Turn power switch to the threading position (B). - Release lever (A). - Pass the thread in front of the needle around thread guide (C). - A C
A B
C
B
D
D
GB Automatic needle threader
-Raise the needle to top...
Instruction Manual - Page 39
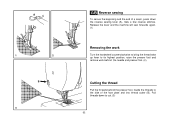
.... Release the lever and the machine will sew forwards again. (1)
Removing the work
Turn the handwheel counterclockwise to bring the thread take up lever to cut. (3)
32 Pull threads down the reverse sewing lever (A). Guide the threads to the side of a seam, press down to its highest position, raise the presser foot and remove work behind the needle and presser...
Instruction Manual - Page 41
..., double knits, lightweight woollens. Always use genuine SINGER needles. 4. Woven fabrics and knits.
Twin needles, can be set at first thread breakage or skipped stitches.
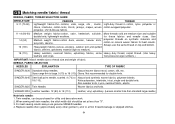
34 When sewing with twin needles, the stitch width dial should be purchased for best results. GB Matching needle/ fabric/ thread
NEEDLE, FABRIC, THREAD SELECTION GUIDE
NEEDLE SIZE 9-11 (70-80)
FABRICS
Lightweight...
Instruction Manual - Page 51
... accessory not supplied with your machine. Seams, neatening, visible hems. Standard overlock: For fine knits, jerseys, neck edges, ribbing. (a) Double overlock stitch: For fine knits, handknits, seams. (b) All overedge stitches are suitable for sewing and overcasting edges and visible seams in one operation.
Attention: Use new needles or ball point needles or stretch needle!
44
Instruction Manual - Page 55
...'s chalk, attach the buttonhole foot, and set the pattern selector dial
to " ". Open the button plate and insert the button (B). 5. Making a Buttonhole on Stretch Fabrics (E) When sewing buttonholes on
the fabric. 2. Once sewing is a simple process that provides reliable results. Using tailor's chalk, mark the position of the gimp thread. 4. Mark the position of the...
Instruction Manual - Page 61
... fabric. Gently pull the fabric edge towards the back.
Change to " ". Set the stitch pattern dial to optional hummer foot. Neaten the edge of the hem... needle into the fabric, raise the presser foot and guide the fold into the scroll by about 3 mm (1/8") and sew 4-5 stitches to the left (2).
1
2
54 Pull the thread slightly towards you and lower the presser foot. Begin sewing,...
Instruction Manual - Page 71
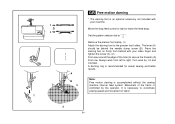
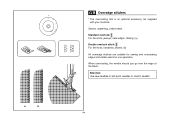
... for easier sewing and better results. Set the pattern selector dial to right. A darning ring is accomplished without the sewing machine internal feed system. It is necessary to secure the threads) (3). a b
ab
C 1
A
B 3
GB Free motion darning
* The darning foot is an optional accessory not included with your machine.
Turn work from behind the needle clamp screw (B). Press...
Instruction Manual - Page 81
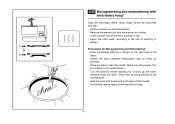
... presser foot
bar is down in its lowest position. - Sew a few securing stitches at the starting to sew. - Preparation for Monogramming and Embroidering* - Place the fabric under the needle. Hold the hoop with dial) - Adjust the stitch width according to bring up the lower
thread through the fabric. Turn the balance wheel towards you to...
Instruction Manual - Page 85
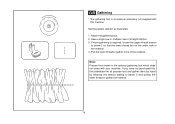
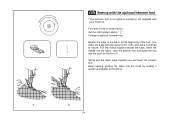
Set the pattern selector as illustrated. 1.
GB Gathering
* The gathering foot is an optional accessory not supplied with your machine. Sew a single row or multiple rows of the material. If you have not purchased this machine. Attach the gathering foot. 2. If more of straight stitches. 3. Note: Presser foot shown is required, loosen the upper thread tension...
Instruction Manual - Page 87
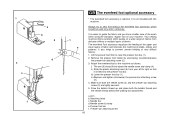
... of fabrics from your machine. Draw the bobbin thread up and place both the needle screw (4) and the presser bar attaching
screw (2) are tightly secured. 5. a.Arm b.Attaching head c. It is optional.
Lift the presser foot lifter to sew first without the evenfeed foot accessory which should fit into the presser foot bar. Your sewing machine offers excellent stitch...
Instruction Manual - Page 89
... in the left position.
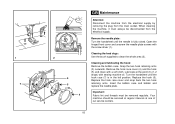
Cleaning and lubricating the hook: Remove the bobbin case. Your machine should be serviced at regular intervals at the point (6) (1-2 drops) with sewing machine oil. Open the hinged front cover and unscrew the needle plate screws with a soft cloth. Lubricate at one of our service centers.
82 Replace the hook (5). 1 7
2 3
6 5
4
GB...
Instruction Manual - Page 91
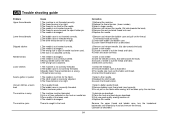
...Trouble shooting guide
Problem Upper thread breaks
Lower thread breaks
Cause 1.The machine is not threaded correctly. 2.The thread tension is too tight. 3.The thread is too thick for the fabric. 2.The stitch length is incorrectly adjusted. 3.The thread tension is too tight. 1.Poor quality thread. 2.The bobbin case is damaged. Skipped stitches Needle breaks Loose stitches Seams gather or pucker...
Similar Questions

I Get E7 Error Message On My Singer Model 7258 Sewing Machine. There Is No Refe
Error message E7 is up on my Singer Stylist model 7258 sewing machine. It is not working at all. I t...
Error message E7 is up on my Singer Stylist model 7258 sewing machine. It is not working at all. I t...
(Posted by ebellamybellamy9 5 years ago)

Bigger Thread Spool
I want to be able to use the bigger thread spool which does not fit in the horizontal one the machin...
I want to be able to use the bigger thread spool which does not fit in the horizontal one the machin...
(Posted by hotty1977 8 years ago)

Singer Simple 3116 Cover
How do I take the cover off of my singer simple 3116 sewing machine?
How do I take the cover off of my singer simple 3116 sewing machine?
(Posted by Munkiegirl90786 9 years ago)
Beeping From Singer Sewing Machine Stylist Ii 5625
My sewing machine will beep and stop sewing after three inches of sewing. I have taken it to be repa...
My sewing machine will beep and stop sewing after three inches of sewing. I have taken it to be repa...
(Posted by arusheria 9 years ago)

On A 3116, How Do I Adjust The Hook So The Thread Comes Around To Make The Stitc
(Posted by 67yearoldgamer 10 years ago)