
Operation Manual
Page 2
... of the parts, service and labor warranty applicable to your new SHARP Projector, using the projector, please read this equip- DO NOT REMOVE SCREWS EXCEPT SPECIFIED USER SERVICE SCREWS. The lightning flash with the projector. 1. NO USER-SERVICEABLE PARTS EXCEPT LAMP UNIT. ONLY XV-Z10000#Print#p01_03.p65 1 -1 02.10.25, 7:24 PM WARRANTY This is...
... of the parts, service and labor warranty applicable to your new SHARP Projector, using the projector, please read this equip- DO NOT REMOVE SCREWS EXCEPT SPECIFIED USER SERVICE SCREWS. The lightning flash with the projector. 1. NO USER-SERVICEABLE PARTS EXCEPT LAMP UNIT. ONLY XV-Z10000#Print#p01_03.p65 1 -1 02.10.25, 7:24 PM WARRANTY This is...

Operation Manual
Page 3
These limits are located in this device must accept any interference received, including interference that may cause undesired operation. ONLY Declaration of Conformity SHARP PROJECTOR, MODEL XV-Z10000 This device complies with the limits for a Class B digital device, pursuant to Part 15 of the FCC Rules. ONLY WARNING: The cooling fan in a residential ...
These limits are located in this device must accept any interference received, including interference that may cause undesired operation. ONLY Declaration of Conformity SHARP PROJECTOR, MODEL XV-Z10000 This device complies with the limits for a Class B digital device, pursuant to Part 15 of the FCC Rules. ONLY WARNING: The cooling fan in a residential ...
Operation Manual
Page 4
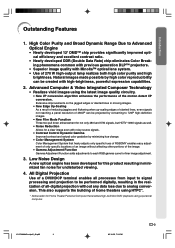
... contrast ratio. • Newly developed DDR (Double Data Rate) chip eliminates Color Breaking phenomena common with previous generation DLP™ projectors. • Superior image quality with high-brightness, powerful expression capabilities. 2. XV-Z10000#Print#p01_03.p65 3 -3 02.10.25, 7:24 PM Low Noise Design A new optical engine has been developed for Home Theater...
... contrast ratio. • Newly developed DDR (Double Data Rate) chip eliminates Color Breaking phenomena common with previous generation DLP™ projectors. • Superior image quality with high-brightness, powerful expression capabilities. 2. XV-Z10000#Print#p01_03.p65 3 -3 02.10.25, 7:24 PM Low Noise Design A new optical engine has been developed for Home Theater...
Operation Manual
Page 5
... Trapezoidal Distortion and Adjusting the Vertical Size of the Display 62 Video Digital Noise Reduction (DNR) System .... 63 Reducing Image Noise 63 XV-Z10000#Print#p04_05.p65 4 02.10.25, 8:30 PM Color 45 Progressive Mode 46 Picture Setting Function 47 Adjusting the Gamma 48 Selecting ... 21 Connecting to a Computer Using a DVI Cable (Sold Separately 22 Connecting the thumbscrew cables 22 "Plug and Play" function 22 Controlling the Projector by a Computer 23 Controlling the Projecor Using an RS-232C Cable ... 23 Using as a Wired Remote Control 24 Connecting the Remote Control to ...
... Trapezoidal Distortion and Adjusting the Vertical Size of the Display 62 Video Digital Noise Reduction (DNR) System .... 63 Reducing Image Noise 63 XV-Z10000#Print#p04_05.p65 4 02.10.25, 8:30 PM Color 45 Progressive Mode 46 Picture Setting Function 47 Adjusting the Gamma 48 Selecting ... 21 Connecting to a Computer Using a DVI Cable (Sold Separately 22 Connecting the thumbscrew cables 22 "Plug and Play" function 22 Controlling the Projector by a Computer 23 Controlling the Projecor Using an RS-232C Cable ... 23 Using as a Wired Remote Control 24 Connecting the Remote Control to ...
Operation Manual
Page 9
...bright light. Do not set up the projector in places exposed to read the operation manuals of the fan may safely be connected. I Take care with the lens so as not to hard impact and/or vibration, as the cooling fan also stops. -8 XV-Z10000#Print#p06_14.p65 8 02.10.25,...This does not indicate malfunction. • Do not unplug the power cord during projector operation due to make the connections AFTER turning off , the temperature warning indicator on how to changes in damage. ity, SHARP recommends that the intake vent and the exhaust vent are not blocked, plug the ...
...bright light. Do not set up the projector in places exposed to read the operation manuals of the fan may safely be connected. I Take care with the lens so as not to hard impact and/or vibration, as the cooling fan also stops. -8 XV-Z10000#Print#p06_14.p65 8 02.10.25,...This does not indicate malfunction. • Do not unplug the power cord during projector operation due to make the connections AFTER turning off , the temperature warning indicator on how to changes in damage. ity, SHARP recommends that the intake vent and the exhaust vent are not blocked, plug the ...
Operation Manual
Page 10
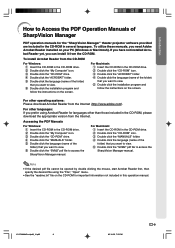
... the language (name of the folder) that you want to view. 5 Double click the installation program and follow the instructions on the screen. XV-Z10000#Print#p06_14.p65 9 -9 02.10.25, 7:25 PM To install Acrobat Reader from the Internet (http://www.adobe.com). For other languages:...install it from the Internet. Introduction How to Access the PDF Operation Manuals of SharpVision Manager PDF operation manuals for the "SharpVision Manager" theater projector software provided are included in the CD-ROM in the CD-ROM drive. 2 Double click the "My Computer" icon. 3 Double click...
... the language (name of the folder) that you want to view. 5 Double click the installation program and follow the instructions on the screen. XV-Z10000#Print#p06_14.p65 9 -9 02.10.25, 7:25 PM To install Acrobat Reader from the Internet (http://www.adobe.com). For other languages:...install it from the Internet. Introduction How to Access the PDF Operation Manuals of SharpVision Manager PDF operation manuals for the "SharpVision Manager" theater projector software provided are included in the CD-ROM in the CD-ROM drive. 2 Double click the "My Computer" icon. 3 Double click...

Operation Manual
Page 11
...replacement indicator Illuminates blue, indicating normal function. Replace the lamp when the indicator illuminates red. 32 Power indicator Illuminates red, when the projector is in this indicator will illuminate blue. 73 Intake vent 25 Adjustment foot 13 Remote control sensor 61 HIGH CONTRAST/ HIGH BRIGHTNESS MODE...input mode 1, 2, 3, 4 or 5. Projector (Front and Top View) Adjustment buttons 32 For selecting menu items. ENTER button 32 For setting items selected or adjusted on the bottom of the lens cap and attach it from the lens. -10 XV-Z10000#Print#p06_14.p65 10 32 Power (ON/OFF...
...replacement indicator Illuminates blue, indicating normal function. Replace the lamp when the indicator illuminates red. 32 Power indicator Illuminates red, when the projector is in this indicator will illuminate blue. 73 Intake vent 25 Adjustment foot 13 Remote control sensor 61 HIGH CONTRAST/ HIGH BRIGHTNESS MODE...input mode 1, 2, 3, 4 or 5. Projector (Front and Top View) Adjustment buttons 32 For selecting menu items. ENTER button 32 For setting items selected or adjusted on the bottom of the lens cap and attach it from the lens. -10 XV-Z10000#Print#p06_14.p65 10 32 Power (ON/OFF...
Operation Manual
Page 12
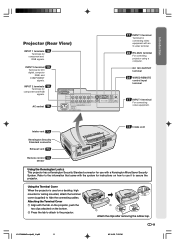
... Attach the clips after removing the rubber cap. -11 XV-Z10000#Print#p06_14.p65 11 02.10.25, 7:25 PM Intake vent 73 Kensington Security Standard connector Exhaust vent 73 73 Intake vent Remote control 13 sensor Using the Kensington Lock This projector has a Kensington Security Standard connector for instructions on how to... two clips attached on a desktop, high mounted or ceiling mounted, attach the terminal cover (supplied) to the projector. Using the Terminal Cover When the projector is used on the bottom. 2 Press the tab to attach to hide the connecting cables. DC 12V OUTPUT ...
... Attach the clips after removing the rubber cap. -11 XV-Z10000#Print#p06_14.p65 11 02.10.25, 7:25 PM Intake vent 73 Kensington Security Standard connector Exhaust vent 73 73 Intake vent Remote control 13 sensor Using the Kensington Lock This projector has a Kensington Security Standard connector for instructions on how to... two clips attached on a desktop, high mounted or ceiling mounted, attach the terminal cover (supplied) to the projector. Using the Terminal Cover When the projector is used on the bottom. 2 Press the tab to attach to hide the connecting cables. DC 12V OUTPUT ...

Operation Manual
Page 13
...or returning to the projector. 02.10.25, 7:25 PM button 18 For switching to the respective input signal type. 32 Power (ON/OFF) buttons For turning the power on the menu. Remote Control (Top View) Remote control signal transmitters 13 -12 XV-Z10000#Print#p06_14.p65 ...12 24 WIRED R/C JACK For controlling the projector by connecting the remote control to the default settings. AUTO SYNC button 55 For automatically adjusting images when connected...
...or returning to the projector. 02.10.25, 7:25 PM button 18 For switching to the respective input signal type. 32 Power (ON/OFF) buttons For turning the power on the menu. Remote Control (Top View) Remote control signal transmitters 13 -12 XV-Z10000#Print#p06_14.p65 ...12 24 WIRED R/C JACK For controlling the projector by connecting the remote control to the default settings. AUTO SYNC button 55 For automatically adjusting images when connected...
Operation Manual
Page 14
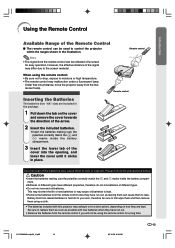
... the precautions below. Using the Remote Control Introduction Available Range of the Remote Control I The remote control can be used to control the projector within the ranges shown in place. Caution • Insert the batteries making sure the polarities correctly match the and marks inside the battery ... Insert the lower tab of the cover into the opening, and lower the cover until it clicks in the illustration. XV-Z10000#Print#p06_14.p65 13 02.10.25, 8:40 PM -13 Incorrect use of different types have run out, as possible with this projector may cause them to leak.
... the precautions below. Using the Remote Control Introduction Available Range of the Remote Control I The remote control can be used to control the projector within the ranges shown in place. Caution • Insert the batteries making sure the polarities correctly match the and marks inside the battery ... Insert the lower tab of the cover into the opening, and lower the cover until it clicks in the illustration. XV-Z10000#Print#p06_14.p65 13 02.10.25, 8:40 PM -13 Incorrect use of different types have run out, as possible with this projector may cause them to leak.

Operation Manual
Page 17
This projector can be connected before making all the connections are made. • Be sure to read the ...be turned on after all connections, turn off both the projector and the devices to be connected. Connecting the Projector to Other Devices Before Connecting Note • Before connecting, be sure to turn on the projector and then the other video equipment (See page 17.) ... television system in the supplied power cord into the AC socket on the rear of the projector. Supplied accessory Power cord -16 XV-Z10000#Print#p15_16.p65 16 02.10.25, 7:25 PM After making connections.
This projector can be connected before making all the connections are made. • Be sure to read the ...be turned on after all connections, turn off both the projector and the devices to be connected. Connecting the Projector to Other Devices Before Connecting Note • Before connecting, be sure to turn on the projector and then the other video equipment (See page 17.) ... television system in the supplied power cord into the AC socket on the rear of the projector. Supplied accessory Power cord -16 XV-Z10000#Print#p15_16.p65 16 02.10.25, 7:25 PM After making connections.

Operation Manual
Page 18
... an S-video or a composite video cable, a VCR, laser disc player or other video equipment Composite video cable (commercially available) S-video cable (commercially available) XV-Z10000#Print#p17_20.p65 17 02.10.25, 7:26 PM -17 Connect the projector to the video equipment using an S-video cable or a composite video cable (both commercially available).
... an S-video or a composite video cable, a VCR, laser disc player or other video equipment Composite video cable (commercially available) S-video cable (commercially available) XV-Z10000#Print#p17_20.p65 17 02.10.25, 7:26 PM -17 Connect the projector to the video equipment using an S-video cable or a composite video cable (both commercially available).
Operation Manual
Page 19
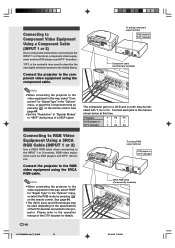
...equipment using the 5RCA RGB cable. Connect the projector to the video equipment in the manner shown below at this way, select "RGB" for details. -18 To analog RGB output terminal DVD player or DTV* decoder 5RCA RGB cable (Commercially available) XV-Z10000#Print#p17_20.p65 18 02.10.25, 7:...26 PM Connect each jack in this way, select "Component" for a DVD and so forth may be indicated with Y, CB or CR. The component jack for "Signal Type" in the United States. Note • When connecting the projector to the...
...equipment using the 5RCA RGB cable. Connect the projector to the video equipment in the manner shown below at this way, select "RGB" for details. -18 To analog RGB output terminal DVD player or DTV* decoder 5RCA RGB cable (Commercially available) XV-Z10000#Print#p17_20.p65 18 02.10.25, 7:...26 PM Connect each jack in this way, select "Component" for a DVD and so forth may be indicated with Y, CB or CR. The component jack for "Signal Type" in the United States. Note • When connecting the projector to the...

Operation Manual
Page 20
... 15-pin D-sub adaptor Model: AN-A1DV (7.9" (20 cm)) To analog component output terminal DVD player or DTV* decoder XV-Z10000#Print#p17_20.p65 19 02.10.25, 7:26 PM -19 Connect the projector to the video equipment using a 3 RCA to 15-pin D-Sub cable using the DVI to 15-pin D-Sub adaptor... when connecting to describe the new digital television system in the manner shown below at this time. Projector DVD player or DTV decoder Y PB PR Y CB CR 3 RCA to 15-pin D-sub cable Type: AN-C3CP (9'10" (3.0 m)) DVI to 15-pin D-sub cable...
... 15-pin D-sub adaptor Model: AN-A1DV (7.9" (20 cm)) To analog component output terminal DVD player or DTV* decoder XV-Z10000#Print#p17_20.p65 19 02.10.25, 7:26 PM -19 Connect the projector to the video equipment using a 3 RCA to 15-pin D-Sub cable using the DVI to 15-pin D-Sub adaptor... when connecting to describe the new digital television system in the manner shown below at this time. Projector DVD player or DTV decoder Y PB PR Y CB CR 3 RCA to 15-pin D-sub cable Type: AN-C3CP (9'10" (3.0 m)) DVI to 15-pin D-sub cable...

Operation Manual
Page 21
Optional accessory *DTV is the umbrella term used to the video equipment using the DVI cable. DVI cable (sold separately) Connect the projector to describe the new digital television system in the United States. Connecting to Video Equipment with the DVI Output Termianl Using the DVI Cable Use ...; Select the input signal type of the video equipment. See page 64. DVI cable Type:AN-C3DV (9'10'' (3.0m)) DVD player or DTV* decoder -20 XV-Z10000#Print#p17_20.p65 20 02.10.25, 7:26 PM
Optional accessory *DTV is the umbrella term used to the video equipment using the DVI cable. DVI cable (sold separately) Connect the projector to describe the new digital television system in the United States. Connecting to Video Equipment with the DVI Output Termianl Using the DVI Cable Use ...; Select the input signal type of the video equipment. See page 64. DVI cable Type:AN-C3DV (9'10'' (3.0m)) DVD player or DTV* decoder -20 XV-Z10000#Print#p17_20.p65 20 02.10.25, 7:26 PM
Operation Manual
Page 22
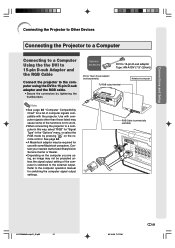
...RGB Cable (commercially available) XV-Z10000#Print#p21_22.p65 21 02.10.25, 7:27 PM -21 puter is switched to a com- See page 64. • A Macintosh adaptor may not be required for use with some of the functions not to work. • When connecting the projector to the external output.... and the RGB cable. • Secure the connectors by pressing on the computer you are us- Connections and Setup Connecting the Projector to Other Devices Connecting the Projector to a Computer Connecting to a Computer Using the the DVI to 15-pin D-sub Adaptor and the RGB Cable Connect the...
...RGB Cable (commercially available) XV-Z10000#Print#p21_22.p65 21 02.10.25, 7:27 PM -21 puter is switched to a com- See page 64. • A Macintosh adaptor may not be required for use with some of the functions not to work. • When connecting the projector to the external output.... and the RGB cable. • Secure the connectors by pressing on the computer you are us- Connections and Setup Connecting the Projector to Other Devices Connecting the Projector to a Computer Connecting to a Computer Using the the DVI to 15-pin D-sub Adaptor and the RGB Cable Connect the...

Operation Manual
Page 23
... I Before using the "Plug and Play" function, be sure to the computer using the DVI cable. I This projector is compatible with a VESA DDC compatible computer. -22 XV-Z10000#Print#p21_22.p65 22 02.10.25, 7:27 PM Then, firmly secure the connectors by tightening the screws on the... projector first and the connected computer last. Connecting to a Computer Using a DVI Cable (Sold Separately) Connect the projector to turn on both sides...
... I Before using the "Plug and Play" function, be sure to the computer using the DVI cable. I This projector is compatible with a VESA DDC compatible computer. -22 XV-Z10000#Print#p21_22.p65 22 02.10.25, 7:27 PM Then, firmly secure the connectors by tightening the screws on the... projector first and the connected computer last. Connecting to a Computer Using a DVI Cable (Sold Separately) Connect the projector to turn on both sides...
Operation Manual
Page 24
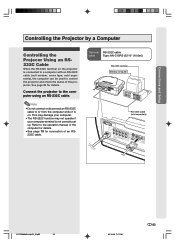
...your computer. • The RS-232C function may not operate if your computer terminal is on the projector is connected to a computer with an RS-232C cable (null modem, cross type, sold separately) XV-Z10000#Print#p23_24.p65 23 02.10.25, 7:27 PM -23 Connections and Setup Controlling the... Projector by a Computer Controlling the Projecor Using an RS232C Cable When the RS-232C terminal on . See page...
...your computer. • The RS-232C function may not operate if your computer terminal is on the projector is connected to a computer with an RS-232C cable (null modem, cross type, sold separately) XV-Z10000#Print#p23_24.p65 23 02.10.25, 7:27 PM -23 Connections and Setup Controlling the... Projector by a Computer Controlling the Projecor Using an RS232C Cable When the RS-232C terminal on . See page...
Operation Manual
Page 25
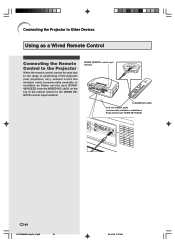
...cable (commercially available or available as Sharp service part QCNW4870CEZZ) from the WIRED R/C JACK on the top of the projector (rear projection, etc.), connect a ø3.5 mm minijack cable (commercially available or available as Sharp service part QCNW-4870CEZZ) -24 XV-Z10000#Print#p23_24.p65 24 02.10.25..., 7:27 PM Connecting the Projector to Other Devices Using as a ...
...cable (commercially available or available as Sharp service part QCNW4870CEZZ) from the WIRED R/C JACK on the top of the projector (rear projection, etc.), connect a ø3.5 mm minijack cable (commercially available or available as Sharp service part QCNW-4870CEZZ) -24 XV-Z10000#Print#p23_24.p65 24 02.10.25..., 7:27 PM Connecting the Projector to Other Devices Using as a ...

Operation Manual
Page 26
...position. • When the height of the projector and the screen. Once the adjustment feet have locked in position, release the projector. • If the screen is in the area between the adjustment foot and the projector. Foot releases Adjustment feet XV-Z10000#Print#p25_30.p65 25 02.10.25, 7:28... PM -25 Note • The projector is adjustable up to the desired angle. 2 Remove your finger caught in a location lower than the ...
...position. • When the height of the projector and the screen. Once the adjustment feet have locked in position, release the projector. • If the screen is in the area between the adjustment foot and the projector. Foot releases Adjustment feet XV-Z10000#Print#p25_30.p65 25 02.10.25, 7:28... PM -25 Note • The projector is adjustable up to the desired angle. 2 Remove your finger caught in a location lower than the ...


