
PG-MB56X , PG-MB66X Operation Manual
Page 2
IMPORTANT • For your assistance in reporting the loss or theft of your Projector, please record the Model and Serial Number located on the bottom of the projector and retain this information. • Before recycling the packaging, please ensure that you have checked the contents of the carton thoroughly against the list of "Supplied accessories" on page 10. Model No.: Serial No.:
IMPORTANT • For your assistance in reporting the loss or theft of your Projector, please record the Model and Serial Number located on the bottom of the projector and retain this information. • Before recycling the packaging, please ensure that you have checked the contents of the carton thoroughly against the list of "Supplied accessories" on page 10. Model No.: Serial No.:
PG-MB56X , PG-MB66X Operation Manual
Page 3
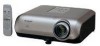
... do not stare directly into standby mode always use the STANDBY/ON button on the projector or the STANDBY button on the remote control. WARNING: FCC Regulations state that SHARP may be required to give under the 1972 Consumer Product Safety Act, PLEASE READ CAREFULLY...before disconnecting the power cord. Introduction Before using the projector, please read this product to your new SHARP Projector, using the REGISTRATION CARD packed with the projector. 1. WARRANTY This is intended to alert the user to operate this projector continues to persons. DO NOT REMOVE SCREWS EXCEPT ...
... do not stare directly into standby mode always use the STANDBY/ON button on the projector or the STANDBY button on the remote control. WARNING: FCC Regulations state that SHARP may be required to give under the 1972 Consumer Product Safety Act, PLEASE READ CAREFULLY...before disconnecting the power cord. Introduction Before using the projector, please read this product to your new SHARP Projector, using the REGISTRATION CARD packed with the projector. 1. WARRANTY This is intended to alert the user to operate this projector continues to persons. DO NOT REMOVE SCREWS EXCEPT ...
PG-MB56X , PG-MB66X Operation Manual
Page 4
...energy and, if not installed and used in accordance with the operation manual, may cause undesired operation. ONLY Declaration of conformity SHARP PROJECTOR, MODEL PG-MB66X/PG-MB56X/XG-MB50X-L/XR-11XC-L/XR-10X-L/XR-10S-L This device complies with Part 15 of the...or the life expectancy of the FCC rules. Responsible Party: SHARP ELECTRONICS CORPORATION Sharp Plaza, Mahwah, New Jersey 07430-2135 TEL: 1-800-BE-SHARP (1-800-237-4277) U.S.A. This SHARP projector uses a DMD panel. ONLY PRODUCT DISPOSAL This projector utilizes tin-lead solder, and a pressurized lamp containing a ...
...energy and, if not installed and used in accordance with the operation manual, may cause undesired operation. ONLY Declaration of conformity SHARP PROJECTOR, MODEL PG-MB66X/PG-MB56X/XG-MB50X-L/XR-11XC-L/XR-10X-L/XR-10S-L This device complies with Part 15 of the...or the life expectancy of the FCC rules. Responsible Party: SHARP ELECTRONICS CORPORATION Sharp Plaza, Mahwah, New Jersey 07430-2135 TEL: 1-800-BE-SHARP (1-800-237-4277) U.S.A. This SHARP projector uses a DMD panel. ONLY PRODUCT DISPOSAL This projector utilizes tin-lead solder, and a pressurized lamp containing a ...
PG-MB56X , PG-MB66X Operation Manual
Page 5
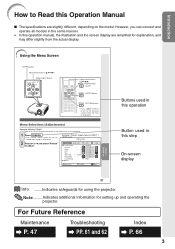
Example: "Picture" screen menu for setting up and operating the projector. Note .........Indicates additional information for INPUT 1 (RGB) mode Menu item 2 Press Q or O and select "Picture" to adjust. Picture SCR - ADJ PRJ - Introduction... and operate all models in this operation manual, the illustration and the screen display are slightly different, depending on the projector. 1 Press BMENU. • The "Picture" menu screen for using the projector. ADJ Picture Mode Contrast Bright Red Blue CLR Temp Bright Boost Lamp Setting Reset 0 0 0 0 7500K 1 Standard ...
Example: "Picture" screen menu for setting up and operating the projector. Note .........Indicates additional information for INPUT 1 (RGB) mode Menu item 2 Press Q or O and select "Picture" to adjust. Picture SCR - ADJ PRJ - Introduction... and operate all models in this operation manual, the illustration and the screen display are slightly different, depending on the projector. 1 Press BMENU. • The "Picture" menu screen for using the projector. ADJ Picture Mode Contrast Bright Red Blue CLR Temp Bright Boost Lamp Setting Reset 0 0 0 0 7500K 1 Standard ...
PG-MB56X , PG-MB66X Operation Manual
Page 6
... Accessories 10 Part Names and Functions 11 Inserting the Batteries 14 Usable Range 15 Quick Start Quick Start 16 Setup Setting up the Projector 18 Setting up the Projector 18 Standard Setup (Front Projection) ....... 18 Ceiling-mount Setup 18 Projection (PRJ) Mode 19 Screen Size and Projection Distance .....Checking the Lamp Life Status 44 System Lock Function 44 Locking the Operation Buttons on 27 Turning the Power off (Putting the Projector into Standby Mode 27 Image Projection 28 About the Setup Guide 28 Adjusting the Projected Image 28 Switching the Input Mode 30 Adjusting...
... Accessories 10 Part Names and Functions 11 Inserting the Batteries 14 Usable Range 15 Quick Start Quick Start 16 Setup Setting up the Projector 18 Setting up the Projector 18 Standard Setup (Front Projection) ....... 18 Ceiling-mount Setup 18 Projection (PRJ) Mode 19 Screen Size and Projection Distance .....Checking the Lamp Life Status 44 System Lock Function 44 Locking the Operation Buttons on 27 Turning the Power off (Putting the Projector into Standby Mode 27 Image Projection 28 About the Setup Guide 28 Adjusting the Projected Image 28 Switching the Input Mode 30 Adjusting...
PG-MB56X , PG-MB66X Operation Manual
Page 10
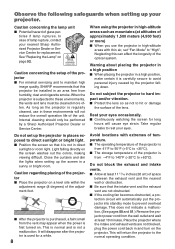
... to maintain high image quality, SHARP recommends that this can affect the longevity of the projector I Protect the lens so as the projector is carefully secure to these environments will cause eye strain. Rest your nearest Sharp Authorized Projector Dealer or Service Center for replacement... the cooling fan becomes obstructed, a protection circuit will disappear after the projector is from the vent may appear when the power is subjected to avoid personal injury caused by a Sharp Authorized Projector Dealer or Service Center. I The storage temperature of lamp rupture, contact...
... to maintain high image quality, SHARP recommends that this can affect the longevity of the projector I Protect the lens so as the projector is carefully secure to these environments will cause eye strain. Rest your nearest Sharp Authorized Projector Dealer or Service Center for replacement... the cooling fan becomes obstructed, a protection circuit will disappear after the projector is from the vent may appear when the power is subjected to avoid personal injury caused by a Sharp Authorized Projector Dealer or Service Center. I The storage temperature of lamp rupture, contact...
PG-MB56X , PG-MB66X Operation Manual
Page 11
...in other audio- Unplug the power cord after a 90-second cooling-off period the projector will blink, and after the cooling fan stops. I Do not carry the projector by holding the lens. Using the projector in damage. The sound of the fan may affect the cabinet color or cause ...of the air vents, " " and " " will turn off, the temperature warn- Temperature monitor function I If the projector starts to overheat due to setup problems or blockage of the projector from the wall outlet, and disconnect any other cables connected to it to hard impact and/or vibration, as the...
...in other audio- Unplug the power cord after a 90-second cooling-off period the projector will blink, and after the cooling fan stops. I Do not carry the projector by holding the lens. Using the projector in damage. The sound of the fan may affect the cabinet color or cause ...of the air vents, " " and " " will turn off, the temperature warn- Temperature monitor function I If the projector starts to overheat due to setup problems or blockage of the projector from the wall outlet, and disconnect any other cables connected to it to hard impact and/or vibration, as the...
PG-MB56X , PG-MB66X Operation Manual
Page 12
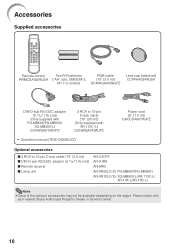
... XR-11XC-L) QCNWGA043WJPZ • Operation manual (TINS-C690WJZZ) Power cord (6' (1.8 m)) QACCDA007WJPZ Optional accessories I 3 RCA to 15-pin D-sub cable (10' (3.0 m)) (Only supplied with your nearest Sharp Authorized Projector Dealer or Service Center. 10
... XR-11XC-L) QCNWGA043WJPZ • Operation manual (TINS-C690WJZZ) Power cord (6' (1.8 m)) QACCDA007WJPZ Optional accessories I 3 RCA to 15-pin D-sub cable (10' (3.0 m)) (Only supplied with your nearest Sharp Authorized Projector Dealer or Service Center. 10
PG-MB56X , PG-MB66X Operation Manual
Page 13
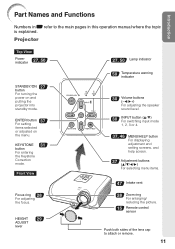
Projector Top View Power indicator 27, 50 STANDBY/ON 27 button For turning the power on the menu. Front View Focus ring 28 For adjusting the ... topic is explained. KEYSTONE 31 button For entering the Keystone Correction mode. ENTER button 37 For setting items selected or adjusted on and putting the projector into standby mode. Introduction Part Names and Functions Numbers in Z refer to attach or remove. 11
Projector Top View Power indicator 27, 50 STANDBY/ON 27 button For turning the power on the menu. Front View Focus ring 28 For adjusting the ... topic is explained. KEYSTONE 31 button For entering the Keystone Correction mode. ENTER button 37 For setting items selected or adjusted on and putting the projector into standby mode. Introduction Part Names and Functions Numbers in Z refer to attach or remove. 11
PG-MB56X , PG-MB66X Operation Manual
Page 14
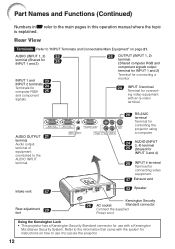
...3 and 4) 25 INPUT 4 terminal Terminal for use it to the information that came with an S-video terminal. Refer to secure the projector. 12 Part Names and Functions (Continued) Numbers in Z refer to the AUDIO INPUT terminal. AUDIO OUTPUT 21 terminal Audio output terminal of ... 3 terminal Terminal for connecting video equipment with the system for instructions on page 21. Using the Kensington Lock • This projector has a Kensington Security Standard connector for connecting video equipment. 47 Exhaust vent 43 Speaker Rear adjustment foot 29 Kensington Security 26 AC...
...3 and 4) 25 INPUT 4 terminal Terminal for use it to the information that came with an S-video terminal. Refer to secure the projector. 12 Part Names and Functions (Continued) Numbers in Z refer to the AUDIO INPUT terminal. AUDIO OUTPUT 21 terminal Audio output terminal of ... 3 terminal Terminal for connecting video equipment with the system for instructions on page 21. Using the Kensington Lock • This projector has a Kensington Security Standard connector for connecting video equipment. 47 Exhaust vent 43 Speaker Rear adjustment foot 29 Kensington Security 26 AC...
PG-MB56X , PG-MB66X Operation Manual
Page 15
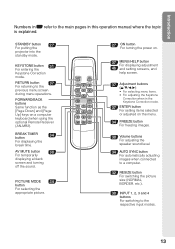
... picture. 27 ON button For turning the power on a computer keyboard when using the optional Remote Receiver (AN-MR2). STANDBY button 27 For putting the projector into the standby mode.
... picture. 27 ON button For turning the power on a computer keyboard when using the optional Remote Receiver (AN-MR2). STANDBY button 27 For putting the projector into the standby mode.
PG-MB56X , PG-MB66X Operation Manual
Page 16
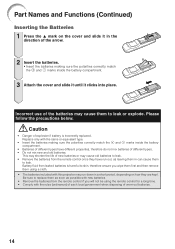
... m and n marks inside the battery compartment. • Batteries of the batteries may cause them using the remote control for a long time. • Comply with this projector may cause old batteries to leak or explode.
... m and n marks inside the battery compartment. • Batteries of the batteries may cause them using the remote control for a long time. • Comply with this projector may cause old batteries to leak or explode.
PG-MB56X , PG-MB66X Operation Manual
Page 17
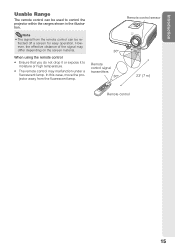
In this case, move the projector away from the remote control can be re- Introduction Usable Range The remote control can be used to moisture or high temperature. • The remote .... flected off a screen for easy operation. When using the remote control • Ensure that you do not drop it or expose it to control the projector within the ranges shown in the illustration.
In this case, move the projector away from the remote control can be re- Introduction Usable Range The remote control can be used to moisture or high temperature. • The remote .... flected off a screen for easy operation. When using the remote control • Ensure that you do not drop it or expose it to control the projector within the ranges shown in the illustration.

PG-MB56X , PG-MB66X Operation Manual
Page 18
... the page described below for each step. Remove the lens cap and turn the projector on On the projector On the remote control _P. 27 16 For details, see pages 24 and 25. _PP. 21-26 3. Connect the projector to the computer and plug the power cord into the AC socket of the... projector and the computer is explained using one example. 3 8 STANDBY/ON button 6 INPUT button 4 ENTER button 8 STANDBY button 3 ON...
... the page described below for each step. Remove the lens cap and turn the projector on On the projector On the remote control _P. 27 16 For details, see pages 24 and 25. _PP. 21-26 3. Connect the projector to the computer and plug the power cord into the AC socket of the... projector and the computer is explained using one example. 3 8 STANDBY/ON button 6 INPUT button 4 ENTER button 8 STANDBY button 3 ON...
PG-MB56X , PG-MB66X Operation Manual
Page 19
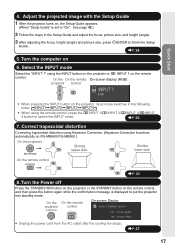
... using Keystone Correction. (Keystone Correction functions automatically on 6. Quick Start 4. Adjust the projected image with the Setup Guide 1 After the projector turns on the projector, input mode switches in the Setup Guide and adjust the focus, picture size, and height (angle). 3 After adjusting the focus, ... CINPUT 1/CINPUT 2/DINPUT 3/EINPUT 4 button to finish the Setup Guide. _P. 28 5. On the On the remote On-screen display (RGB) projector control • When pressing the INPUT button on , the Setup Guide appears. (When "Setup Guide" is displayed to "On". Turn the Power...
... using Keystone Correction. (Keystone Correction functions automatically on 6. Quick Start 4. Adjust the projected image with the Setup Guide 1 After the projector turns on the projector, input mode switches in the Setup Guide and adjust the focus, picture size, and height (angle). 3 After adjusting the focus, ... CINPUT 1/CINPUT 2/DINPUT 3/EINPUT 4 button to finish the Setup Guide. _P. 28 5. On the On the remote On-screen display (RGB) projector control • When pressing the INPUT button on , the Setup Guide appears. (When "Setup Guide" is displayed to "On". Turn the Power...
PG-MB56X , PG-MB66X Operation Manual
Page 20
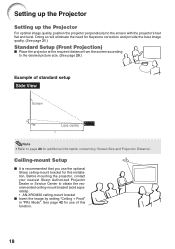
See page 42 for this function. 18 Before mounting the projector, contact your nearest Sharp Authorized Projector Dealer or Service Center to obtain the recommended ceiling-mount bracket (sold separately). • AN-XRCM30 ceiling-mount bracket I Place the projector at the required distance from the screen according to the desired picture size. (See page 20...
See page 42 for this function. 18 Before mounting the projector, contact your nearest Sharp Authorized Projector Dealer or Service Center to obtain the recommended ceiling-mount bracket (sold separately). • AN-XRCM30 ceiling-mount bracket I Place the projector at the required distance from the screen according to the desired picture size. (See page 20...
PG-MB56X , PG-MB66X Operation Manual
Page 21
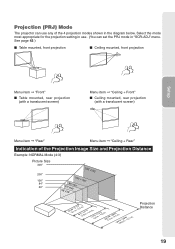
...;"60" 6'1(02."1-7m'1-129".4'7m("2-).191m'1-"3.41m1)'(53."5-1m3-'34".0 m2)2'(17.00"m-2-68'5.1"3m4)'(310"-.43m9'8-"12.1 m) Projection Distance 19 Projection (PRJ) Mode The projector can use . (You can set the PRJ mode in "SCR-ADJ" menu.
...;"60" 6'1(02."1-7m'1-129".4'7m("2-).191m'1-"3.41m1)'(53."5-1m3-'34".0 m2)2'(17.00"m-2-68'5.1"3m4)'(310"-.43m9'8-"12.1 m) Projection Distance 19 Projection (PRJ) Mode The projector can use . (You can set the PRJ mode in "SCR-ADJ" menu.
PG-MB56X , PG-MB66X Operation Manual
Page 22
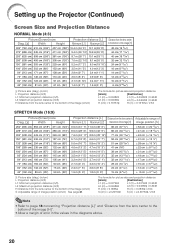
Setting up the Projector (Continued) Screen Size and Projection Distance NORMAL Mode (4:3) Picture (Screen) size Diag. [χ] Width Height Projection distance [L] Minimum [L1] Maximum [L2] 300Љ (762 cm) ...
Setting up the Projector (Continued) Screen Size and Projection Distance NORMAL Mode (4:3) Picture (Screen) size Diag. [χ] Width Height Projection distance [L] Minimum [L1] Maximum [L2] 300Љ (762 cm) ...

PG-MB56X , PG-MB66X Operation Manual
Page 23
... page 23.) I Connecting video equipment with S-video output terminal (VCR, DVD player, etc.). (See page 24.) RS-232C terminal Connecting the computer to control the projector. (See page 26.) AUDIO OUTPUT terminal Connecting to this terminal.
... page 23.) I Connecting video equipment with S-video output terminal (VCR, DVD player, etc.). (See page 24.) RS-232C terminal Connecting the computer to control the projector. (See page 26.) AUDIO OUTPUT terminal Connecting to this terminal.
PG-MB56X , PG-MB66X Operation Manual
Page 24
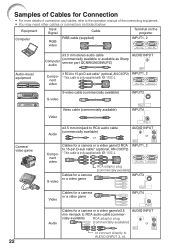
... XR-11XC-L. Samples of the connecting equipment. • You may need other cables or connectors not listed below. Equipment Input Signal Cable Terminal on the projector Computer RGB video RGB cable (supplied) INPUT1, 2 Audio-visual equipment ø3.5 mm stereo audio cable AUDIO INPUT Computer audio (commercially available or available as...
... XR-11XC-L. Samples of the connecting equipment. • You may need other cables or connectors not listed below. Equipment Input Signal Cable Terminal on the projector Computer RGB video RGB cable (supplied) INPUT1, 2 Audio-visual equipment ø3.5 mm stereo audio cable AUDIO INPUT Computer audio (commercially available or available as...


