PG-MB56X , PG-MB66X Operation Manual
Page 3
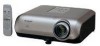
... THE IMPORTANT "LIMITED WARRANTY" CLAUSE. U.S.A. Be especially careful that may be of the parts, service and labor warranty applicable to your new SHARP Projector, using the projector, please read this projector continues to run for prompt warranty registration of your purchase. 2. CAUTION: TO REDUCE THE...light. Do not stare into standby mode always use the STANDBY/ON button on the projector or the STANDBY button on the remote control. The lightning flash with the projector. 1. Ensure the cooling fan has stopped before disconnecting the power cord. FAILURE TO OBSERVE...
... THE IMPORTANT "LIMITED WARRANTY" CLAUSE. U.S.A. Be especially careful that may be of the parts, service and labor warranty applicable to your new SHARP Projector, using the projector, please read this projector continues to run for prompt warranty registration of your purchase. 2. CAUTION: TO REDUCE THE...light. Do not stare into standby mode always use the STANDBY/ON button on the projector or the STANDBY button on the remote control. The lightning flash with the projector. 1. Ensure the cooling fan has stopped before disconnecting the power cord. FAILURE TO OBSERVE...
PG-MB56X , PG-MB66X Operation Manual
Page 6
...Manual .... 3 Contents 4 IMPORTANT SAFEGUARDS 6 Accessories 10 Part Names and Functions 11 Inserting the Batteries 14 Usable Range 15 Quick Start Quick Start 16 Setup Setting up the Projector 18 Setting up the Projector 18 Standard Setup (Front Projection) ....... 18 Ceiling-... Monitor with RGB Input Terminal 25 Controlling the Projector by a Computer 26 Connecting the Power Cord 26 Using Basic Operation Turning the Projector On/Off 27 Turning the Projector on the Projector (Keylock Function 45 Troubleshooting with the Remote Control .... 34 Displaying and Setting the Break...
...Manual .... 3 Contents 4 IMPORTANT SAFEGUARDS 6 Accessories 10 Part Names and Functions 11 Inserting the Batteries 14 Usable Range 15 Quick Start Quick Start 16 Setup Setting up the Projector 18 Setting up the Projector 18 Standard Setup (Front Projection) ....... 18 Ceiling-... Monitor with RGB Input Terminal 25 Controlling the Projector by a Computer 26 Connecting the Power Cord 26 Using Basic Operation Turning the Projector On/Off 27 Turning the Projector on the Projector (Keylock Function 45 Troubleshooting with the Remote Control .... 34 Displaying and Setting the Break...
PG-MB56X , PG-MB66X Operation Manual
Page 13
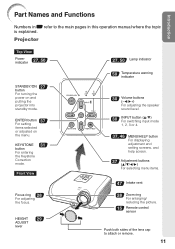
ENTER button 37 For setting items selected or adjusted on and putting the projector into standby mode. KEYSTONE 31 button For entering the Keystone Correction mode. Front View Focus ring 28 For adjusting the focus. HEIGHT 29 ADJUST lever ... Zoom ring For enlarging/ reducing the picture. 15 Remote control sensor Push both sides of the lens cap to the main pages in Z refer to attach or remove. 11 Introduction Part Names and Functions Numbers in this operation manual where the topic is explained. Projector Top View Power indicator 27, 50 STANDBY/ON 27...
ENTER button 37 For setting items selected or adjusted on and putting the projector into standby mode. KEYSTONE 31 button For entering the Keystone Correction mode. Front View Focus ring 28 For adjusting the focus. HEIGHT 29 ADJUST lever ... Zoom ring For enlarging/ reducing the picture. 15 Remote control sensor Push both sides of the lens cap to the main pages in Z refer to attach or remove. 11 Introduction Part Names and Functions Numbers in this operation manual where the topic is explained. Projector Top View Power indicator 27, 50 STANDBY/ON 27...
PG-MB56X , PG-MB66X Operation Manual
Page 16
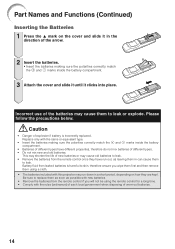
.... • Do not mix new and old batteries. Battery fluid from the remote control if you wipe them first and then remove them using the remote control for a long time. • Comply with this projector may cause them to leak. Part Names and Functions (Continued) Inserting the Batteries 1 Press the P mark on ... replaced. Be sure to replace them as soon as leaving them in can cause them to leak. • Remove the batteries from the remote control once they are kept. Incorrect use of the batteries may run out, as possible with the same or equivalent type. • Insert the...
.... • Do not mix new and old batteries. Battery fluid from the remote control if you wipe them first and then remove them using the remote control for a long time. • Comply with this projector may cause them to leak. Part Names and Functions (Continued) Inserting the Batteries 1 Press the P mark on ... replaced. Be sure to replace them as soon as leaving them in can cause them to leak. • Remove the batteries from the remote control once they are kept. Incorrect use of the batteries may run out, as possible with the same or equivalent type. • Insert the...
PG-MB56X , PG-MB66X Operation Manual
Page 55
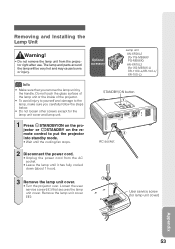
... standby mode. • Wait until it has fully cooled down (about 1 hour). 3 Remove the lamp unit cover. • Turn the projector over. Loosen the user service screw (1) that you carefully follow the steps below. • Do not loosen other screws except for lamp unit cover) Appendix ... service screw (for the lamp unit cover and lamp unit. 1 Press SSTANDBY/ON on the projector or eSTANDBY on the remote control to the lamp, make sure you remove the lamp unit by the handle. The lamp and parts around the lamp will be very hot and may cause burns or injury. Optional accessory...
... standby mode. • Wait until it has fully cooled down (about 1 hour). 3 Remove the lamp unit cover. • Turn the projector over. Loosen the user service screw (1) that you carefully follow the steps below. • Do not loosen other screws except for lamp unit cover) Appendix ... service screw (for the lamp unit cover and lamp unit. 1 Press SSTANDBY/ON on the projector or eSTANDBY on the remote control to the lamp, make sure you remove the lamp unit by the handle. The lamp and parts around the lamp will be very hot and may cause burns or injury. Optional accessory...
PG-MB56X , PG-MB66X Operation Manual
Page 66
Specifications Product type Projector Model PG-MB66X/PG-MB56X/XG-MB50X-L/XR-11XC...DMD panel Panel size: [PG-MB66X/PG-MB56X/XG-MB50X-L/XR-11XC-L/XR-10X-L] 0.55" (14 mm), 1chip XGA DMD [XR-10S-L] 0.55" (14 mm), 1chip SVGA DMD No. The performance specification figures indicated are nominal ...including adjustment foot and projecting parts) Weight (approx.) 8.6 lbs. (3.9 kg) Replacement parts Remote control, Power cord, RGB cable, 3 RCA to 15-pin D-sub cable, DIN-Dsub RS-232C adaptor, Operation manual, Dust filter As a part of policy of continuous improvement, SHARP reserves the right to make...
Specifications Product type Projector Model PG-MB66X/PG-MB56X/XG-MB50X-L/XR-11XC...DMD panel Panel size: [PG-MB66X/PG-MB56X/XG-MB50X-L/XR-11XC-L/XR-10X-L] 0.55" (14 mm), 1chip XGA DMD [XR-10S-L] 0.55" (14 mm), 1chip SVGA DMD No. The performance specification figures indicated are nominal ...including adjustment foot and projecting parts) Weight (approx.) 8.6 lbs. (3.9 kg) Replacement parts Remote control, Power cord, RGB cable, 3 RCA to 15-pin D-sub cable, DIN-Dsub RS-232C adaptor, Operation manual, Dust filter As a part of policy of continuous improvement, SHARP reserves the right to make...


