Operation Manual
Page 5
...the risk of the parts, service and labor warranty applicable to your new SHARP Projector, using the projector, please read this product to rain or moisture. NO USER-SERVICEABLE PARTS EXCEPT LAMP UNIT. Introduction Before using the REGISTRATION CARD packed with arrowhead symbol, within ... changes or modifications to this equipment not expressly approved by the manufacturer could void the user's authority to the presence of projector. REFER SERVICING TO QUALIFIED SERVICE PERSONNEL. WARNING: FCC Regulations state that children do not expose this operation manual carefully. ...
...the risk of the parts, service and labor warranty applicable to your new SHARP Projector, using the projector, please read this product to rain or moisture. NO USER-SERVICEABLE PARTS EXCEPT LAMP UNIT. Introduction Before using the REGISTRATION CARD packed with arrowhead symbol, within ... changes or modifications to this equipment not expressly approved by the manufacturer could void the user's authority to the presence of projector. REFER SERVICING TO QUALIFIED SERVICE PERSONNEL. WARNING: FCC Regulations state that children do not expose this operation manual carefully. ...

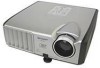
Operation Manual
Page 6
... may result in accordance with the operation manual, may cause undesired operation. U.S.A. Caution Concerning Lamp Replacement See "Replacing the Lamp" on a circuit different from that to which can radiate radio frequency energy and, if ...SHARP projector uses a DLP® chip. INFORMATION This equipment has been tested and found to comply with the limits for the European Union Community Market SHARP ELECTRONICS (Europe) GmbH Sonninstraße 3, D-20097 Hamburg E.U. If this device must conform to. This very sophisticated panel contains 786,432 (XR40X/XR-30X) / 480,000 (XR-30S...
... may result in accordance with the operation manual, may cause undesired operation. U.S.A. Caution Concerning Lamp Replacement See "Replacing the Lamp" on a circuit different from that to which can radiate radio frequency energy and, if ...SHARP projector uses a DLP® chip. INFORMATION This equipment has been tested and found to comply with the limits for the European Union Community Market SHARP ELECTRONICS (Europe) GmbH Sonninstraße 3, D-20097 Hamburg E.U. If this device must conform to. This very sophisticated panel contains 786,432 (XR40X/XR-30X) / 480,000 (XR-30S...

Operation Manual
Page 7
... O and select "Picture" to the previous screen when the menu is displayed. Example: "Picture" screen menu for setting up and operating the projector. Note .........Indicates additional information for COMPUTER (RGB) input Menu item Picture SCR - For Future Reference Maintenance P. 47 Troubleshooting PP. 61 and 62...display. ADJ Standard 0 0 0 0 0 1 Bright Help SEL./ADJ. ADJ Picture Mode Contrast Bright Red Blue CLR Temp Bright Boost Lamp Setting Reset PRJ - ENTER END Useful Features Button used in the same manner. • In this step On-screen display 37 Info ...........
... O and select "Picture" to the previous screen when the menu is displayed. Example: "Picture" screen menu for setting up and operating the projector. Note .........Indicates additional information for COMPUTER (RGB) input Menu item Picture SCR - For Future Reference Maintenance P. 47 Troubleshooting PP. 61 and 62...display. ADJ Standard 0 0 0 0 0 1 Bright Help SEL./ADJ. ADJ Picture Mode Contrast Bright Red Blue CLR Temp Bright Boost Lamp Setting Reset PRJ - ENTER END Useful Features Button used in the same manner. • In this step On-screen display 37 Info ...........

Operation Manual
Page 8
... ("Picture" Menu) .. 39 Selecting the Picture Mode 39 Adjusting the Image 40 Adjusting the Color Temperature ......... 40 Progressive 40 Lamp Setting 40 Adjusting the Projected Image ("SCR - Contents Preparing Introduction How to Read this Operation Manual .... 3 Contents 4 IMPORTANT ...Projector into Standby Mode 25 Image Projection 26 About the Setup Guide 26 Adjusting the Projected Image 26 Correcting Trapezoidal Distortion ........ 28 Switching the Input Mode 29 Adjusting the Volume 29 Displaying the Black Screen and Turning off the Sound Temporarily .... 29 Resize Mode 30...
... ("Picture" Menu) .. 39 Selecting the Picture Mode 39 Adjusting the Image 40 Adjusting the Color Temperature ......... 40 Progressive 40 Lamp Setting 40 Adjusting the Projected Image ("SCR - Contents Preparing Introduction How to Read this Operation Manual .... 3 Contents 4 IMPORTANT ...Projector into Standby Mode 25 Image Projection 26 About the Setup Guide 26 Adjusting the Projected Image 26 Correcting Trapezoidal Distortion ........ 28 Switching the Input Mode 29 Adjusting the Volume 29 Displaying the Black Screen and Turning off the Sound Temporarily .... 29 Resize Mode 30...

Operation Manual
Page 12
...turn on . It will disappear after the projector is purchased, a faint smell from the wall outlet and wait at least 11 13/16 inches (30 cm) of the adjustment foot. ■ After the projector is used for replacement. ticles if lamp ruptures. Take regular breaks to "High". This... will not reduce the overall operation life of glass par- Rest your nearest Sharp Authorized Projector Dealer or Service Center for ...
...turn on . It will disappear after the projector is purchased, a faint smell from the wall outlet and wait at least 11 13/16 inches (30 cm) of the adjustment foot. ■ After the projector is used for replacement. ticles if lamp ruptures. Take regular breaks to "High". This... will not reduce the overall operation life of glass par- Rest your nearest Sharp Authorized Projector Dealer or Service Center for ...

Operation Manual
Page 13
...automatically controlled. Please download Adobe® Reader® from the AC outlet and turning off the equipment to access the projector manuals. When using the projector overseas, make the connections. This does not indicate malfunction. Other connected equipment ■ When connecting a computer or other...several languages are using the "File", "Open" menu. 9 Using the projector in the CD-ROM. dicators" on the region or country you want to rise, the lamp will turn off period the projector will blink, and after a 60-second cooling-off , the temperature warn-...
...automatically controlled. Please download Adobe® Reader® from the AC outlet and turning off the equipment to access the projector manuals. When using the projector overseas, make the connections. This does not indicate malfunction. Other connected equipment ■ When connecting a computer or other...several languages are using the "File", "Open" menu. 9 Using the projector in the CD-ROM. dicators" on the region or country you want to rise, the lamp will turn off period the projector will blink, and after a 60-second cooling-off , the temperature warn-...

Operation Manual
Page 14
...• Codes in "< >" are Replacement parts codes. and For Europe, Canada, etc. Optional accessories ■ 3 RCA to the wall outlet in your nearest Sharp Authorized Projector Dealer or Service Center. 10 except U.K. (6' (1.8 m)) (6' (1.8 m)) For U.K. Accessories Supplied accessories Two R-6 batteries RGB cable Lens cap (attached) ("AA"...pin cable (10n (3.0 m)) ■ DIN-D-sub RS-232C adaptor (5 57/64" (15cm)) ■ Remote receiver ■ Lamp unit ■ Ceiling-mount bracket ■ Extension tube AN-C3CP2 AN-A1RS AN-MR2 AN-XR30LP AN-XRCM30 (for U.S.A.) AN-...
...• Codes in "< >" are Replacement parts codes. and For Europe, Canada, etc. Optional accessories ■ 3 RCA to the wall outlet in your nearest Sharp Authorized Projector Dealer or Service Center. 10 except U.K. (6' (1.8 m)) (6' (1.8 m)) For U.K. Accessories Supplied accessories Two R-6 batteries RGB cable Lens cap (attached) ("AA"...pin cable (10n (3.0 m)) ■ DIN-D-sub RS-232C adaptor (5 57/64" (15cm)) ■ Remote receiver ■ Lamp unit ■ Ceiling-mount bracket ■ Extension tube AN-C3CP2 AN-A1RS AN-MR2 AN-XR30LP AN-XRCM30 (for U.S.A.) AN-...

Operation Manual
Page 15
...to attach or remove. 11 ENTER button For setting 37 items selected or adjusted on and putting the projector into standby mode. Remote control 15 sensor Exhaust vent 47 25, 48 Lamp indicator 48 Temperature warning indicator 32 ECO+QUIET button For lowering the noise of the lens cap to the... 43 Speaker HEIGHT 27 ADJUST lever 26 Focus ring For adjusting the focus. Front View Zoom ring 26 For enlarging/ reducing the picture. Projector Top View Power indicator 25, 48 STANDBY/ON 25 button For turning the power on the menu. KEYSTONE 28 button For entering the Keystone...
...to attach or remove. 11 ENTER button For setting 37 items selected or adjusted on and putting the projector into standby mode. Remote control 15 sensor Exhaust vent 47 25, 48 Lamp indicator 48 Temperature warning indicator 32 ECO+QUIET button For lowering the noise of the lens cap to the... 43 Speaker HEIGHT 27 ADJUST lever 26 Focus ring For adjusting the focus. Front View Zoom ring 26 For enlarging/ reducing the picture. Projector Top View Power indicator 25, 48 STANDBY/ON 25 button For turning the power on the menu. KEYSTONE 28 button For entering the Keystone...

Operation Manual
Page 17
... returning to the previous menu screen during menu operations. 37 MENU/HELP button 46 For displaying adjustment and setting screens, and help screen. 30 RESIZE button For switching the picture size (NORMAL, BORDER, etc.). 33 PICTURE MODE button For selecting the appropriate picture. 13 Introduction MOUSE/...when connected to the respective input modes. STANDBY button 25 For putting the projector into the standby mode. ECO+QUIET button 32 For lowering the noise of the cooling fan and extending the lamp life. 25 ON button For turning the power on. 33 FREEZE button For...
... returning to the previous menu screen during menu operations. 37 MENU/HELP button 46 For displaying adjustment and setting screens, and help screen. 30 RESIZE button For switching the picture size (NORMAL, BORDER, etc.). 33 PICTURE MODE button For selecting the appropriate picture. 13 Introduction MOUSE/...when connected to the respective input modes. STANDBY button 25 For putting the projector into the standby mode. ECO+QUIET button 32 For lowering the noise of the cooling fan and extending the lamp life. 25 ON button For turning the power on. 33 FREEZE button For...

Operation Manual
Page 19
...sensor Note • The signal from the fluorescent lamp. 30° 23n (7 m) Remote control Remote control signal transmitters 15 When using the remote control • Ensure that you do not drop it or expose it to control the projector within the ranges shown in the illustration. ever, ...the effective distance of the signal may malfunction under a fluorescent lamp. flected off a screen for easy operation. In this case, move the projector away from the remote control can be re- Introduction Usable Range The remote control can be used...
...sensor Note • The signal from the fluorescent lamp. 30° 23n (7 m) Remote control Remote control signal transmitters 15 When using the remote control • Ensure that you do not drop it or expose it to control the projector within the ranges shown in the illustration. ever, ...the effective distance of the signal may malfunction under a fluorescent lamp. flected off a screen for easy operation. In this case, move the projector away from the remote control can be re- Introduction Usable Range The remote control can be used...
Operation Manual
Page 29
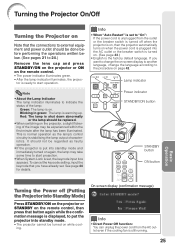
.... • When System Lock is set . tor is warming up. Green: The lamp is stabilising the lamp output characteristics. This is normal operation as faulty operation. • If the projector is put the projector into the AC outlet or the breaker switch is turned on. (See page 43.) ... remote control, then press that button again while the confirmation message is shut down abnormally or the lamp should be replaced. • When switching on the projector, a slight flickering of the lamp. On-screen display (confirmation message) Info • Direct Power Off function: You can unplug the...
.... • When System Lock is set . tor is warming up. Green: The lamp is stabilising the lamp output characteristics. This is normal operation as faulty operation. • If the projector is put the projector into the AC outlet or the breaker switch is turned on. (See page 43.) ... remote control, then press that button again while the confirmation message is shut down abnormally or the lamp should be replaced. • When switching on the projector, a slight flickering of the lamp. On-screen display (confirmation message) Info • Direct Power Off function: You can unplug the...

Operation Manual
Page 36
... page 40 for details of the Eco+Quiet mode. 32 Switching the Eco+Quiet Mode Press ECO+QUIET on the remote control or on the projector to switch the Eco+Quiet mode between on the remote control to move the pointer. 2 Press POINTER again. • The pointer will extend. jector is... minute • The break time can be set to "ON", the sound of the cooling fan will turn down from 5 minutes. Note • Refer to "Lamp Setting" on the remote control to move the spot area. 2 Press SPOT again. • The spot area will disappear. 1 Press BREAK TIMER. • The timer...
... page 40 for details of the Eco+Quiet mode. 32 Switching the Eco+Quiet Mode Press ECO+QUIET on the remote control or on the projector to switch the Eco+Quiet mode between on the remote control to move the pointer. 2 Press POINTER again. • The pointer will extend. jector is... minute • The break time can be set to "ON", the sound of the cooling fan will turn down from 5 minutes. Note • Refer to "Lamp Setting" on the remote control to move the spot area. 2 Press SPOT again. • The spot area will disappear. 1 Press BREAK TIMER. • The timer...

Operation Manual
Page 39
...inputting component signal through COMPUTER, or when selecting S-VIDEO or VIDEO. *5 Adjustment range for XR-40X/XR-30X. *6 Adjustment range for XR-30S. ADJ Picture Mode Contrast Bright Color Tint Sharp CLR Temp Bright Boost Progressive Lamp Setting Reset PRJ - ADJ Border 0 0 On Logo On Front English Help Main menu ...screen only when PAL or SECAM signals are input (including when forcibly changed to adjust "Tone", but you can be set in the projector. "Picture" menu Main menu Picture Picture Mode COMPUTER (RGB), DVI (RGB) input Page 39 Page 39 Picture SCR - Resize Page...
...inputting component signal through COMPUTER, or when selecting S-VIDEO or VIDEO. *5 Adjustment range for XR-40X/XR-30X. *6 Adjustment range for XR-30S. ADJ Picture Mode Contrast Bright Color Tint Sharp CLR Temp Bright Boost Progressive Lamp Setting Reset PRJ - ADJ Border 0 0 On Logo On Front English Help Main menu ...screen only when PAL or SECAM signals are input (including when forcibly changed to adjust "Tone", but you can be set in the projector. "Picture" menu Main menu Picture Picture Mode COMPUTER (RGB), DVI (RGB) input Page 39 Page 39 Picture SCR - Resize Page...
Operation Manual
Page 40
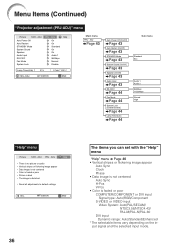
...] Page 43 Speaker [On/Off] Page 43 Audio Input Page 43 RS-232C Page 44 Fan Mode Page 44 System Lock [Enable/Disable] Page 44 Lamp Timer(Life) Page 44 Sub menu Standard Eco Audio 1 Audio 2 9600bps 115200bps Normal High "Help" menu Picture SCR - ADJ There is no picture or audio... • Data image is not centered Auto Sync H-Pos V-Pos • Color is distorted Reset all adjustments to default settings Help SEL. Menu Items (Continued) "Projector adjustment (PRJ-ADJ)" menu Picture SCR - ADJ On On Standard On On Audio 1 9600bps Normal Disable Help...
...] Page 43 Speaker [On/Off] Page 43 Audio Input Page 43 RS-232C Page 44 Fan Mode Page 44 System Lock [Enable/Disable] Page 44 Lamp Timer(Life) Page 44 Sub menu Standard Eco Audio 1 Audio 2 9600bps 115200bps Normal High "Help" menu Picture SCR - ADJ There is no picture or audio... • Data image is not centered Auto Sync H-Pos V-Pos • Color is distorted Reset all adjustments to default settings Help SEL. Menu Items (Continued) "Projector adjustment (PRJ-ADJ)" menu Picture SCR - ADJ On On Standard On On Audio 1 9600bps Normal Disable Help...
Operation Manual
Page 41
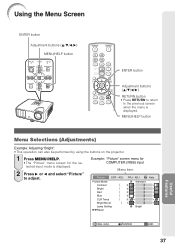
ADJ Picture Mode Contrast Bright Red Blue CLR Temp Bright Boost Lamp Setting Reset PRJ - ADJ Standard 0 0 0 0 0 1 Bright Help SEL./ADJ. ENTER END 37 Example: "Picture" screen menu for the selected input mode is displayed. Using the ... adjust. MENU/HELP button Useful Features Menu Selections (Adjustments) Example: Adjusting "Bright". • This operation can also be performed by using the buttons on the projector. 1 Press MENU/HELP. • The "Picture" menu screen for COMPUTER (RGB) input Menu item Picture SCR -
ADJ Picture Mode Contrast Bright Red Blue CLR Temp Bright Boost Lamp Setting Reset PRJ - ADJ Standard 0 0 0 0 0 1 Bright Help SEL./ADJ. ENTER END 37 Example: "Picture" screen menu for the selected input mode is displayed. Using the ... adjust. MENU/HELP button Useful Features Menu Selections (Adjustments) Example: Adjusting "Bright". • This operation can also be performed by using the buttons on the projector. 1 Press MENU/HELP. • The "Picture" menu screen for COMPUTER (RGB) input Menu item Picture SCR -
Operation Manual
Page 42
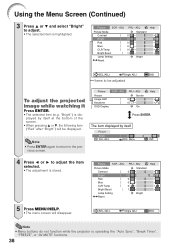
ADJ Picture Mode Contrast Bright Red Blue CLR Temp Bright Boost Lamp Setting Reset PRJ - Single ADJ END Note • Menu buttons do not function while the projector is displayed by itself at the bottom of the screen. • When pressing P or R, the following item ("Red" after "Bright") will disappear....Picture Resize Image Shift Keystone OSD Display SCR - Picture SCR - ADJ PRJ - ADJ Picture Mode Contrast Bright Red Blue CLR Temp Bright Boost Lamp Setting Reset Standard 0 15 0 0 0 1 Bright Help 5 Press MENU/HELP. • The menu screen will be adjusted To adjust ...
ADJ Picture Mode Contrast Bright Red Blue CLR Temp Bright Boost Lamp Setting Reset PRJ - Single ADJ END Note • Menu buttons do not function while the projector is displayed by itself at the bottom of the screen. • When pressing P or R, the following item ("Red" after "Bright") will disappear....Picture Resize Image Shift Keystone OSD Display SCR - Picture SCR - ADJ PRJ - ADJ Picture Mode Contrast Bright Red Blue CLR Temp Bright Boost Lamp Setting Reset Standard 0 15 0 0 0 1 Bright Help 5 Press MENU/HELP. • The menu screen will be adjusted To adjust ...
Operation Manual
Page 44
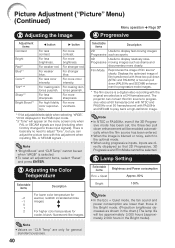
... such as sports. 3D Useful to play back a high-definition image. The projector can adjust the picture tone with PAL50Hz and SECAM to display relatively slow- mately... 37 2 Adjusting the Image 4 Progressive Adjustment items Contrast Bright Red*1 Blue*1 Color*2 Tint*2 *3 Sharp*2 Bright Boost*1 O button Q button For less contrast. Film Mode Reproduces the image of film transformed...down (NTSC and PAL60Hz) or two-two pull down enhancement will be selected. 5 Lamp Setting Selectable items Eco + Quiet Brightness and Power consumption Approx. 80% Selectable items Description...
... such as sports. 3D Useful to play back a high-definition image. The projector can adjust the picture tone with PAL50Hz and SECAM to display relatively slow- mately... 37 2 Adjusting the Image 4 Progressive Adjustment items Contrast Bright Red*1 Blue*1 Color*2 Tint*2 *3 Sharp*2 Bright Boost*1 O button Q button For less contrast. Film Mode Reproduces the image of film transformed...down (NTSC and PAL60Hz) or two-two pull down enhancement will be selected. 5 Lamp Setting Selectable items Eco + Quiet Brightness and Power consumption Approx. 80% Selectable items Description...
Operation Manual
Page 47
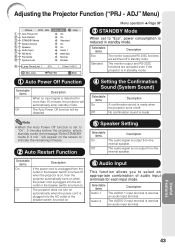
ADJ On On Standard On On Audio 1 9600 bps Normal Disable Help Lamp Timer(Life) 0h 0 min 100% SEL./ADJ. No confirmation sound is made when the projector turns on/off. Selectable items Audio 1 Audio 2 Description The AUDIO 1 input terminal is turned on when the power cord ...mode in standby mode. 1 Auto Power Off Function Selectable items On Off Description When no input signal is reduced in standby mode. Adjusting the Projector Function ("PRJ - ENTER END Menu operation n Page 37 3 STANDBY Mode When set to indicate the remaining minutes. 2 Auto Restart Function ...
ADJ On On Standard On On Audio 1 9600 bps Normal Disable Help Lamp Timer(Life) 0h 0 min 100% SEL./ADJ. No confirmation sound is made when the projector turns on/off. Selectable items Audio 1 Audio 2 Description The AUDIO 1 input terminal is turned on when the power cord ...mode in standby mode. 1 Auto Power Off Function Selectable items On Off Description When no input signal is reduced in standby mode. Adjusting the Projector Function ("PRJ - ENTER END Menu operation n Page 37 3 STANDBY Mode When set to indicate the remaining minutes. 2 Auto Restart Function ...
Operation Manual
Page 48
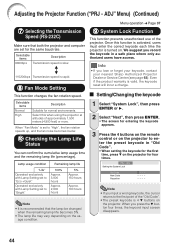
...Quiet" Operated exclusively with Lamp Setting set for the first time, press R on the usage condition. 9 System Lock Function This function prevents unauthorized use of the projector. We suggest you lose or forget your keycode, contact your nearest Sharp Authorized Projector Dealer or Service Center (..., and the fan noise becomes louder. 0 Checking the Lamp Life Status You can confirm the cumulative lamp usage time and the remaining lamp life (percentage). P R 115200bps Transmission speed is recommended that both the projector and computer are set to enter the preset keycode in...
...Quiet" Operated exclusively with Lamp Setting set for the first time, press R on the usage condition. 9 System Lock Function This function prevents unauthorized use of the projector. We suggest you lose or forget your keycode, contact your nearest Sharp Authorized Projector Dealer or Service Center (..., and the fan noise becomes louder. 0 Checking the Lamp Life Status You can confirm the cumulative lamp usage time and the remaining lamp life (percentage). P R 115200bps Transmission speed is recommended that both the projector and computer are set to enter the preset keycode in...
Operation Manual
Page 56
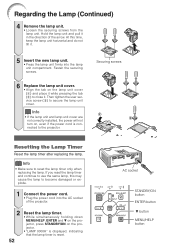
... is reset. If you reset the lamp timer and continue to the projector. Securing screws Resetting the Lamp Timer Reset the lamp timer after replacing the lamp. Fasten the securing screws. 6 Replace the lamp unit cover. • Align the tab on the projector. • "LAMP 0000H" is displayed, indicating that the lamp timer is connected to use the same...
... is reset. If you reset the lamp timer and continue to the projector. Securing screws Resetting the Lamp Timer Reset the lamp timer after replacing the lamp. Fasten the securing screws. 6 Replace the lamp unit cover. • Align the tab on the projector. • "LAMP 0000H" is displayed, indicating that the lamp timer is connected to use the same...


