

XL-MP60 Operation Manual
Page 2
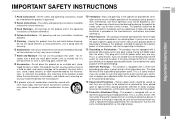
... magnitude to which the receiver is intended to alert the user to Part 15 of important operating and maintenance (servicing) instructions in a residential installation. If this equipment not expressly approved by one or more of loss or theft, please record below the model number and serial number which can radiate radio frequency energy and, if not installed and used in a particular installation. q Consult the dealer...
... magnitude to which the receiver is intended to alert the user to Part 15 of important operating and maintenance (servicing) instructions in a residential installation. If this equipment not expressly approved by one or more of loss or theft, please record below the model number and serial number which can radiate radio frequency energy and, if not installed and used in a particular installation. q Consult the dealer...
XL-MP60 Operation Manual
Page 3
...-in the operating instructions should be routed so that has the same overload protection as the original plug. 3 This is equipped with a three-wire grounding-type plug, a plug having one way. The product is a safety feature. If you are provided for replacement or resetting of the grounding-type plug. 13 Power-Cord Protection - This plug will fit into the outlet, try reversing the plug. Use a damp...
...-in the operating instructions should be routed so that has the same overload protection as the original plug. 3 This is equipped with a three-wire grounding-type plug, a plug having one way. The product is a safety feature. If you are provided for replacement or resetting of the grounding-type plug. 13 Power-Cord Protection - This plug will fit into the outlet, try reversing the plug. Use a damp...
XL-MP60 Operation Manual
Page 4
... ELECTRICAL CODE S2898A ANTENNA DISCHARGE UNIT (NEC SECTION 810-20) GROUNDING CONDUCTORS (NEC SECTION 810-21) GROUND CLAMPS P OWER SERVICE GROUNDING ELECTRODE SYSTEM (NEC ART 250, PART H) 16 Lightning - Adjust only those controls that the product is in a fire or electric shock. When replacement parts are covered by the operating instructions as radiators, heat registers, stoves, or other products (including amplifiers...
... ELECTRICAL CODE S2898A ANTENNA DISCHARGE UNIT (NEC SECTION 810-20) GROUNDING CONDUCTORS (NEC SECTION 810-21) GROUND CLAMPS P OWER SERVICE GROUNDING ELECTRODE SYSTEM (NEC ART 250, PART H) 16 Lightning - Adjust only those controls that the product is in a fire or electric shock. When replacement parts are covered by the operating instructions as radiators, heat registers, stoves, or other products (including amplifiers...
XL-MP60 Operation Manual
Page 5
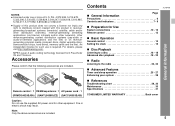
... on revenuegenerating physical media (compact discs, digital versatile discs, semiconductor chips, hard drives, memory cards and the like). Disc Playback Listening to the radio 23, 24 ! Remote control 1 FM/AM loop antenna 1 AC power cord 1 (RRMCGA029SJSA) (QANTL0009SJZZ) (QACCU0003SJ00) Caution: Do not use is required. References Troubleshooting chart 29, 30 Maintenance 30 Specifications 31 CONSUMER LIMITED WARRANTY Back cover General Information XL-MP60 5 For details, please visit...
... on revenuegenerating physical media (compact discs, digital versatile discs, semiconductor chips, hard drives, memory cards and the like). Disc Playback Listening to the radio 23, 24 ! Remote control 1 FM/AM loop antenna 1 AC power cord 1 (RRMCGA029SJSA) (QANTL0009SJZZ) (QACCU0003SJ00) Caution: Do not use is required. References Troubleshooting chart 29, 30 Maintenance 30 Specifications 31 CONSUMER LIMITED WARRANTY Back cover General Information XL-MP60 5 For details, please visit...
XL-MP60 Operation Manual
Page 6
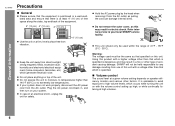
... range of accident causing damage. General Information XL-MP60 Precautions ! General " Please ensure that the equipment is positioned in a well-ventilated area and ensure that which generate electrical noise. Plug the AC power cord back in, and then turn on this may result in electric shock. " This unit should only be used must be held responsible for safety. SHARP...
... range of accident causing damage. General Information XL-MP60 Precautions ! General " Please ensure that the equipment is positioned in a well-ventilated area and ensure that which generate electrical noise. Plug the AC power cord back in, and then turn on this may result in electric shock. " This unit should only be used must be held responsible for safety. SHARP...
XL-MP60 Operation Manual
Page 7
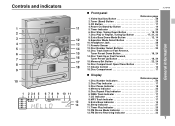
... 5. Disc Repeat Play Indicator 21 6. Disc Play or Repeat, Tuning Up Button 17, 21, 23 8. Remote Sensor 13 12. Memory/Set Button 22, 24 16. Disc Play Indicator 17 3. Disc Pause Indicator 18 4. WMA Track Indicator 17 7. FM Stereo Mode Indicator 23 13. Timer Indicator 26 6. Extra Bass Indicator 14 10. FM Stereo Receiving Indicator 23 General Information XL-MP60 7 Volume Control 14 18. MP3 Track Indicator 17 9. Tuner (Band) Button 23 3. Headphone Jack...
... 5. Disc Repeat Play Indicator 21 6. Disc Play or Repeat, Tuning Up Button 17, 21, 23 8. Remote Sensor 13 12. Memory/Set Button 22, 24 16. Disc Play Indicator 17 3. Disc Pause Indicator 18 4. WMA Track Indicator 17 7. FM Stereo Mode Indicator 23 13. Timer Indicator 26 6. Extra Bass Indicator 14 10. FM Stereo Receiving Indicator 23 General Information XL-MP60 7 Volume Control 14 18. MP3 Track Indicator 17 9. Tuner (Band) Button 23 3. Headphone Jack...

XL-MP60 Operation Manual
Page 9
.... Disc Number Select Buttons 20 5 16 14. Tuner (Band) Button 23 9 20 10 21 11 9 Extra Bass Button 14 7. Disc Random Button 21 18 18. Video/Auxiliary Button 28 19 20. Volume Up and Down Buttons 14 9. XL-MP60 General Information ! Memory/Set Button 15, 22, 24, 25, 27 14 10. Direct Track Search Buttons 20 2 4. Disc Stop Button 18 13 6. Power On/Stand-by Button 14 3. Disc Track Up or Fast Forward, Tuner Preset Up, Time Up Button...
.... Disc Number Select Buttons 20 5 16 14. Tuner (Band) Button 23 9 20 10 21 11 9 Extra Bass Button 14 7. Disc Random Button 21 18 18. Video/Auxiliary Button 28 19 20. Volume Up and Down Buttons 14 9. XL-MP60 General Information ! Memory/Set Button 15, 22, 24, 25, 27 14 10. Direct Track Search Buttons 20 2 4. Disc Stop Button 18 13 6. Power On/Stand-by Button 14 3. Disc Track Up or Fast Forward, Tuner Preset Up, Time Up Button...
XL-MP60 Operation Manual
Page 11
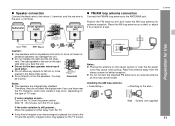
...... Turn off the TV (from the TV. ! Notes: " The speakers are magnetically shielded. " If any objects to fall into or to the TV and the system, irregular colors may cause trouble. FM/AM loop antenna connection Connect the FM/AM loop antenna to the wall > If color variation occurs... XL-MP60 Preparation for Use Red Black Caution: " Use speakers with an impedance of 6 ohms or...
...... Turn off the TV (from the TV. ! Notes: " The speakers are magnetically shielded. " If any objects to fall into or to the TV and the system, irregular colors may cause trouble. FM/AM loop antenna connection Connect the FM/AM loop antenna to the wall > If color variation occurs... XL-MP60 Preparation for Use Red Black Caution: " Use speakers with an impedance of 6 ohms or...
XL-MP60 Operation Manual
Page 12
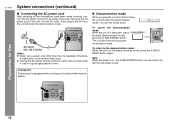
... may occur. Preparation for better heat radiation. XL-MP60 System connections (continued) ! Cooling fan: This product is in the power stand-by mode, press the X-BASS/ DEMO button again. Connecting the AC power cord After checking all the connections have been made correctly, connect the AC power cord to the AC power input jack, then plug the AC power cord of time. ! " Unplug the AC power cord from the AC outlet if the unit...
... may occur. Preparation for better heat radiation. XL-MP60 System connections (continued) ! Cooling fan: This product is in the power stand-by mode, press the X-BASS/ DEMO button again. Connecting the AC power cord After checking all the connections have been made correctly, connect the AC power cord to the AC power input jack, then plug the AC power cord of time. ! " Unplug the AC power cord from the AC outlet if the unit...

XL-MP60 Operation Manual
Page 13
...' (0.2 m - 6 m) Remote sensor 13 Change the lighting or the direction of the remote control Check the remote control after checking all old batteries with a soft cloth. The remote control can enjoy music. This will not be used for battery use: " Replace all the connections (see pages 10 - 12). tion. Does the power turn on the unit. Test of the unit if this occurs. Now, you can be used within the range...
...' (0.2 m - 6 m) Remote sensor 13 Change the lighting or the direction of the remote control Check the remote control after checking all old batteries with a soft cloth. The remote control can enjoy music. This will not be used for battery use: " Replace all the connections (see pages 10 - 12). tion. Does the power turn on the unit. Test of the unit if this occurs. Now, you can be used within the range...

XL-MP60 Operation Manual
Page 14
... volume. 0 ..... 30 MAXIMUM ! FLAT ROCK The sound is slightly emphasized. Bass control (X-BASS) When the power is cut a little. Basic Operation ! CLASSIC Treble is first turned on . VOCAL Vocals (midrange tones) are emphasized. Equalizer When the EQUALIZER (EQUALIZER MODE) button is pressed, the current mode setting will appear. Remote control operation: Press the VOLUME (+ or -) button to turn the power on , the unit will enter the extra bass mode which emphasizes the bass frequencies, and "X-BASS" will be displayed. XL-MP60 General control...
... volume. 0 ..... 30 MAXIMUM ! FLAT ROCK The sound is slightly emphasized. Bass control (X-BASS) When the power is cut a little. Basic Operation ! CLASSIC Treble is first turned on . VOCAL Vocals (midrange tones) are emphasized. Equalizer When the EQUALIZER (EQUALIZER MODE) button is pressed, the current mode setting will appear. Remote control operation: Press the VOLUME (+ or -) button to turn the power on , the unit will enter the extra bass mode which emphasizes the bass frequencies, and "X-BASS" will be displayed. XL-MP60 General control...
XL-MP60 Operation Manual
Page 15
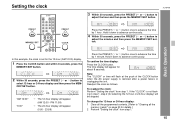
... seconds, press the PRESET ( or ) button to adjust the hour and then press the MEMORY/SET button. Setting the clock 3 Within 30 seconds, press the PRESET ( or ) button to adjust the minutes and then press the MEMORY/SET button. XL-MP60 Press the PRESET ( or ) button once to select 12-hour or 24-hour display and then press the MEMORY/SET button. The time display will appear for selecting the 12-hour...
... seconds, press the PRESET ( or ) button to adjust the hour and then press the MEMORY/SET button. Setting the clock 3 Within 30 seconds, press the PRESET ( or ) button to adjust the minutes and then press the MEMORY/SET button. XL-MP60 Press the PRESET ( or ) button once to select 12-hour or 24-hour display and then press the MEMORY/SET button. The time display will appear for selecting the 12-hour...
XL-MP60 Operation Manual
Page 24
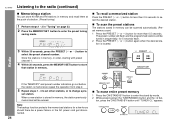
... preset channel number. Note: The backup function protects the memorized stations for a few hours should there be scanned automatically. (Preset memory scan) 1 Press the PRESET ( or ) button for less than 0.5 seconds. Memorizing a station You can be a power failure or the AC power cord get disconnected. 24 Store the stations in memory, in order, starting with preset channel 1. 4 Within 30 seconds, press the MEMORY/SET button to the radio (continued) ! XL-MP60...
... preset channel number. Note: The backup function protects the memorized stations for a few hours should there be scanned automatically. (Preset memory scan) 1 Press the PRESET ( or ) button for less than 0.5 seconds. Memorizing a station You can be a power failure or the AC power cord get disconnected. 24 Store the stations in memory, in order, starting with preset channel 1. 4 Within 30 seconds, press the MEMORY/SET button to the radio (continued) ! XL-MP60...

XL-MP60 Operation Manual
Page 25
... turned off automatically. ! sired function. Timer playback Before setting timer: 1 Press the CLOCK button to check that the clock is dis- When you select the TUNER (BAND), tune into the desired station. 3 Adjust the volume using the VOLUME buttons. Do not turn the power on and plays the desired source (CD, tuner) at the preset time. Continued to start, then press the MEMORY/SET button. played and then within 8 seconds, press the MEMORY/SET button...
... turned off automatically. ! sired function. Timer playback Before setting timer: 1 Press the CLOCK button to check that the clock is dis- When you select the TUNER (BAND), tune into the desired station. 3 Adjust the volume using the VOLUME buttons. Do not turn the power on and plays the desired source (CD, tuner) at the preset time. Continued to start, then press the MEMORY/SET button. played and then within 8 seconds, press the MEMORY/SET button...
XL-MP60 Operation Manual
Page 26
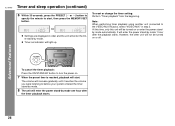
... displayed in step 2. " Timer set indicator will start , then press the MEMORY/SET button. XL-MP60 Timer and sleep operation (continued) 6 Within 30 seconds, press the PRESET ( or ) button to specify the minute to start . To reset or change the timer setting: Perform "Timer playback" from the beginning. At this time, only this unit will be turned on . 7 When the preset time is reached, playback will light...
... displayed in step 2. " Timer set indicator will start , then press the MEMORY/SET button. XL-MP60 Timer and sleep operation (continued) 6 Within 30 seconds, press the PRESET ( or ) button to specify the minute to start . To reset or change the timer setting: Perform "Timer playback" from the beginning. At this time, only this unit will be turned on . 7 When the preset time is reached, playback will light...

XL-MP60 Operation Manual
Page 27
Timer playback start time 27 To use timer and sleep operation together Example: To fall asleep and wake up to the same radio station You can play back the same source only (the function cannot be turned down 30 seconds before the sleep operation finishes. XL-MP60 Advanced Features To change the sleep time: While the sleep time is set, set the timer playback (steps 4 - 6, pages 25 - 26...
Timer playback start time 27 To use timer and sleep operation together Example: To fall asleep and wake up to the same radio station You can play back the same source only (the function cannot be turned down 30 seconds before the sleep operation finishes. XL-MP60 Advanced Features To change the sleep time: While the sleep time is set, set the timer playback (steps 4 - 6, pages 25 - 26...

XL-MP60 Operation Manual
Page 28
... your system The connection cord is 32 ohms. " Plugging in or unplugging the headphones, reduce the volume. Listening to connect the VCR, DVD, etc. When using the VOLUME control. 28 to turn the power on. 3 Press the VIDEO/AUX button. 4 Play the connected equipment. Adjust the volume using video equipment, connect the audio output to this unit and the video output to a television. 2 Press the ON/STAND-BY button to the VIDEO/AUX IN jacks. Purchase a commercially available cord as shown...
... your system The connection cord is 32 ohms. " Plugging in or unplugging the headphones, reduce the volume. Listening to connect the VCR, DVD, etc. When using the VOLUME control. 28 to turn the power on. 3 Press the VIDEO/AUX button. 4 Play the connected equipment. Adjust the volume using video equipment, connect the audio output to this unit and the video output to a television. 2 Press the ON/STAND-BY button to the VIDEO/AUX IN jacks. Purchase a commercially available cord as shown...
XL-MP60 Operation Manual
Page 29
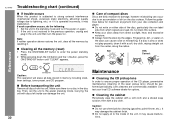
...? ! Condensation Sudden temperature changes, storage or operation in the vibrations? Condensation can be resolved by mode and then turn it back on. " Are the speaker wires disconnected? ! " Is the disc loaded upside down? " Is the disc very dirty? Remote control Symptom " The remote control does not operate. Tuner Symptom " The radio makes unusual noises continuously. Move the antenna away from the AC power cord if it's located nearby...
...? ! Condensation Sudden temperature changes, storage or operation in the vibrations? Condensation can be resolved by mode and then turn it back on. " Are the speaker wires disconnected? ! " Is the disc loaded upside down? " Is the disc very dirty? Remote control Symptom " The remote control does not operate. Tuner Symptom " The radio makes unusual noises continuously. Move the antenna away from the AC power cord if it's located nearby...
XL-MP60 Operation Manual
Page 30
... settings, tuner preset, and CD program. ! It may damage the cabinet finish. If such a problem occurs, do the following: 1 Set the unit to enter the power stand-by resetting it. ! " Keep your disc collection and player. Maintenance ! Contact your local CD software dealer for maximum enjoyment from your discs away from the unit. If trouble occurs When this surface. Note: If neither operation...
... settings, tuner preset, and CD program. ! It may damage the cabinet finish. If such a problem occurs, do the following: 1 Set the unit to enter the power stand-by resetting it. ! " Keep your disc collection and player. Maintenance ! Contact your local CD software dealer for maximum enjoyment from your discs away from the unit. If trouble occurs When this surface. Note: If neither operation...

XL-MP60 Operation Manual
Page 31
... values of continuous improvement, SHARP reserves the right to make design and specification changes for product improvement without prior notice. Amplifier Output power Output terminals Input terminals Front speakers: 37.5 watts minimum RMS per channel into 6 ohms from 100 Hz to 130 Hz, 10% total harmonic distortion Front speakers and subwoofer: 6 ohms Headphones: 16 - 50 ohms (recommended: 32 ohms) Video/Auxiliary (audio signal): 500 mV/47 k ohms ! There may be some...
... values of continuous improvement, SHARP reserves the right to make design and specification changes for product improvement without prior notice. Amplifier Output power Output terminals Input terminals Front speakers: 37.5 watts minimum RMS per channel into 6 ohms from 100 Hz to 130 Hz, 10% total harmonic distortion Front speakers and subwoofer: 6 ohms Headphones: 16 - 50 ohms (recommended: 32 ohms) Video/Auxiliary (audio signal): 500 mV/47 k ohms ! There may be some...


