
Service Manual
Page 4
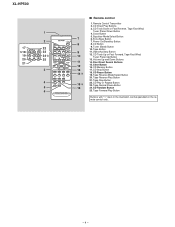
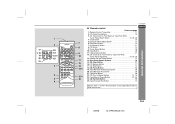
Tuner (Band) Button 10. Tape Button 9 11. Tape Forward Play Button Buttons with " " mark in the illustration can be operated on the remote control only. - 4 - Equalizer Mode Select Button 7 6. CD Button 9. Volume Up and Down Buttons 11 14. Clear Button 16. CD Direct Play ...Track Up or Fast Forward, Tape Fast Wind, Tuner Preset Up Button 13. CD Play or Repeat Button 23. XL-HP500 1 2 17 22 18 23 19 24 20 25 21 3 4 5 6 s Remote control 1. Extra Bass Button 7. CD Random Button 25. Disc Direct Search Buttons 12 15. Tape Stop Button 15 ...
Tuner (Band) Button 10. Tape Button 9 11. Tape Forward Play Button Buttons with " " mark in the illustration can be operated on the remote control only. - 4 - Equalizer Mode Select Button 7 6. CD Button 9. Volume Up and Down Buttons 11 14. Clear Button 16. CD Direct Play ...Track Up or Fast Forward, Tape Fast Wind, Tuner Preset Up Button 13. CD Play or Repeat Button 23. XL-HP500 1 2 17 22 18 23 19 24 20 25 21 3 4 5 6 s Remote control 1. Extra Bass Button 7. CD Random Button 25. Disc Direct Search Buttons 12 15. Tape Stop Button 15 ...
Service Manual
Page 15
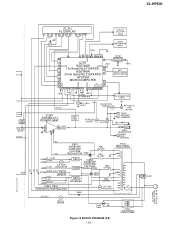
... MOTOR DRIVER Q906 +B7 M971(212-3) M FAN MOTOR IC901 STK402-071 POWER AMP. RL841 VF1 -VF VF2 AC POWER SUPPLY CORD AC 120 V, 60 Hz XL-HP500 Q603 Q604 SYSTEM MUTE C/PLAY BIAS FL701 FL DISPLAY 1 5 ~ 12 13 15 ~ 19 29 ~ 34 35 ~41 14 45 +B9 Q701 +B10 TO CD SECTION... 92 MICROCOMPUTER 37 VDD RESET VDD CE CLK DI DO 93 15 - 100 41 - 1 2 4 5 6 7 8 9 10 11 12 16 17 20 21 22 23 24 RX701 REMOTE 1 SENSOR 2 3 +B10 KEY SW701-SW708 SW712-SW728 +B10 +B10 XL700 4.19403 MHz TO CD SECTION CNP5 SP DET.
... MOTOR DRIVER Q906 +B7 M971(212-3) M FAN MOTOR IC901 STK402-071 POWER AMP. RL841 VF1 -VF VF2 AC POWER SUPPLY CORD AC 120 V, 60 Hz XL-HP500 Q603 Q604 SYSTEM MUTE C/PLAY BIAS FL701 FL DISPLAY 1 5 ~ 12 13 15 ~ 19 29 ~ 34 35 ~41 14 45 +B9 Q701 +B10 TO CD SECTION... 92 MICROCOMPUTER 37 VDD RESET VDD CE CLK DI DO 93 15 - 100 41 - 1 2 4 5 6 7 8 9 10 11 12 16 17 20 21 22 23 24 RX701 REMOTE 1 SENSOR 2 3 +B10 KEY SW701-SW708 SW712-SW728 +B10 +B10 XL700 4.19403 MHz TO CD SECTION CNP5 SP DET.

Service Manual
Page 23
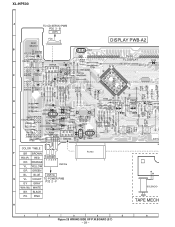
... R787 10K +B KEY 2 KEY 1 KEY 0 5V BACK UP +B UN_SW5.6V L701 +B 100µH D705 DS1SS133 +B D706 DS1SS133 R796 47K Q702 KRC102 M 2 3 1 C719 3.3/50 RX701 REMOTE SENSOR 1 2 3 R798 100 C721 47/25 C720 0.022 C722 150P R797 100K D707 DS1SS133 C718 0.01 RD19 RD20 RD21 RD22 RD23 RD24 680 820 1K... 33 32 31 1K 0.022 KEY 0 KEY 1 KEY 2 1K 1K 1K 560 2.2K 680 680 1K R790 5.6K R793 10K R721 C705 R794 10K R795 1.5 XL-HP500 DISPLAY PWB-A2 CNP5A CD RESOUT 7 CD_CLK 6 CD_DI 5 CD_DO 4 CD_CE 3 CD_DRF 2 CD_WRQ 1 BI706 VF2 1 2 -VF 3 P_IN 4 VF1 5 AC_RLY CON 6 7 FC5 P25 9 - B CNP5 TO CD...
... R787 10K +B KEY 2 KEY 1 KEY 0 5V BACK UP +B UN_SW5.6V L701 +B 100µH D705 DS1SS133 +B D706 DS1SS133 R796 47K Q702 KRC102 M 2 3 1 C719 3.3/50 RX701 REMOTE SENSOR 1 2 3 R798 100 C721 47/25 C720 0.022 C722 150P R797 100K D707 DS1SS133 C718 0.01 RD19 RD20 RD21 RD22 RD23 RD24 680 820 1K... 33 32 31 1K 0.022 KEY 0 KEY 1 KEY 2 1K 1K 1K 560 2.2K 680 680 1K R790 5.6K R793 10K R721 C705 R794 10K R795 1.5 XL-HP500 DISPLAY PWB-A2 CNP5A CD RESOUT 7 CD_CLK 6 CD_DI 5 CD_DO 4 CD_CE 3 CD_DRF 2 CD_WRQ 1 BI706 VF2 1 2 -VF 3 P_IN 4 VF1 5 AC_RLY CON 6 7 FC5 P25 9 - B CNP5 TO CD...
Service Manual
Page 28
... 29 30 31 32 33 34 35 36 37 R713 RD20 SW724 RD21 CNP5A C700 R765 FL DISPLAY D703 80 85 81 75 70 C720 REMOTE SENSOR 2 7 5 3 1 RX701 642 R764 C702 C SW725 SW722 R705 C722 5 95 90 65 1 100 60 3 21 10 3 45 55 IC701 R712 R711 R710 R709 ... F B R BROWN FC702 RD WH GY WH GY RD( R) RED 1 2 345 1 1 OR ORANGE CNS706 Y L YELLOW GR GREEN BL BLUE CNP706 G V L VIOLET TO POWER PWB P32 2 - XL-HP500 A TO CD SERVO PWB P30 3 - F GY GRAY WH( W) WHITE SOLENOID B K BLACK PK PINK TAPE MECH H 1 2 3 4 5 6 Figure 28 WIRING SIDE OF P.W.BOARD (3/7) - 28 -
... 29 30 31 32 33 34 35 36 37 R713 RD20 SW724 RD21 CNP5A C700 R765 FL DISPLAY D703 80 85 81 75 70 C720 REMOTE SENSOR 2 7 5 3 1 RX701 642 R764 C702 C SW725 SW722 R705 C722 5 95 90 65 1 100 60 3 21 10 3 45 55 IC701 R712 R711 R710 R709 ... F B R BROWN FC702 RD WH GY WH GY RD( R) RED 1 2 345 1 1 OR ORANGE CNS706 Y L YELLOW GR GREEN BL BLUE CNP706 G V L VIOLET TO POWER PWB P32 2 - XL-HP500 A TO CD SERVO PWB P30 3 - F GY GRAY WH( W) WHITE SOLENOID B K BLACK PK PINK TAPE MECH H 1 2 3 4 5 6 Figure 28 WIRING SIDE OF P.W.BOARD (3/7) - 28 -
Service Manual
Page 51
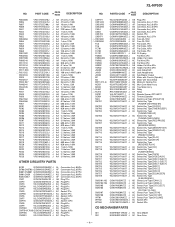
XL-HP500 NO. PART CODE PRICE RANK DESCRIPTION R804,805 R806 R807 R808 R841 R842 R843 R852 R853,854 R856 R857 R858 R859 R860 R901,902 R903,... [Spindle] AP Motor with Gear [Sled] AM Motor,Air Cooling Fan AQ Main Cam Motor Ass'y AQ Tray Motor Ass'y AH Relay AK Relay AH Remote Sensor,GP1UM271 AE Terminal,Speaker AD Switch,Leaf Type [PICKUP IN] AC Switch,Key Type [POWER ON/STAND BY] AC Switch,Key Type [CLOCK] AC...
XL-HP500 NO. PART CODE PRICE RANK DESCRIPTION R804,805 R806 R807 R808 R841 R842 R843 R852 R853,854 R856 R857 R858 R859 R860 R901,902 R903,... [Spindle] AP Motor with Gear [Sled] AM Motor,Air Cooling Fan AQ Main Cam Motor Ass'y AQ Tray Motor Ass'y AH Relay AK Relay AH Remote Sensor,GP1UM271 AE Terminal,Speaker AD Switch,Leaf Type [PICKUP IN] AC Switch,Key Type [POWER ON/STAND BY] AC Switch,Key Type [CLOCK] AC...
Service Manual
Page 53
... J QTANA9010AWZZ J PCOVZ1022AWSA J PDUC-0015AWSA J CPNLS1074AW01 J ---- LHLDZ8002AWSA J XJBSD30P12000 J CWAKP1074AW01 J ---- Net Flame (Not Replacement Item) AD Badge,SHARP AC Label,Specification AA Screw,ø3×10mm AA Screw,ø4×12mm AR Tweeter AY Woofer PACKING PARTS (EXCEPT FOR U.S.A.) SPAKA0395AWZZ J AM Packing...Manual [Except for Canada] AF Operation Manual [For Canada] AG Quick Guide [Except for Canada] AS Remote Control Battery Lid,Remote Control P.W.B. XL-HP500 Front Panel (Not Replacement Item) AG Catching Holder AA Screw,ø3×12mm AS Net Frame Ass'y -...
... J QTANA9010AWZZ J PCOVZ1022AWSA J PDUC-0015AWSA J CPNLS1074AW01 J ---- LHLDZ8002AWSA J XJBSD30P12000 J CWAKP1074AW01 J ---- Net Flame (Not Replacement Item) AD Badge,SHARP AC Label,Specification AA Screw,ø3×10mm AA Screw,ø4×12mm AR Tweeter AY Woofer PACKING PARTS (EXCEPT FOR U.S.A.) SPAKA0395AWZZ J AM Packing...Manual [Except for Canada] AF Operation Manual [For Canada] AG Quick Guide [Except for Canada] AS Remote Control Battery Lid,Remote Control P.W.B. XL-HP500 Front Panel (Not Replacement Item) AG Catching Holder AA Screw,ø3×12mm AS Net Frame Ass'y -...
Service Manual
Page 58
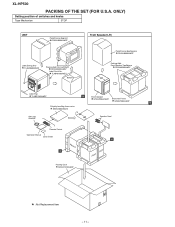
...,Add., Front Speaker,Top/Bottom SPAKA0396AWZZ Label,Pop TLABZ1340AWZZ A Sheet,Speaker SPAKZ0963AWZZ Sheet,Net Frame SPAKZ1005AWZZ B Polyethylene Bag,Accessories SSAKA0007AWZZ AM Loop Antenna Speaker Cord Remote Control Operation Manual Quick Guide B A Packing Case SPAKC1510AWZZ : Not Replacement Item - 11 - XL-HP500 PACKING OF THE SET (FOR U.S.A.
...,Add., Front Speaker,Top/Bottom SPAKA0396AWZZ Label,Pop TLABZ1340AWZZ A Sheet,Speaker SPAKZ0963AWZZ Sheet,Net Frame SPAKZ1005AWZZ B Polyethylene Bag,Accessories SSAKA0007AWZZ AM Loop Antenna Speaker Cord Remote Control Operation Manual Quick Guide B A Packing Case SPAKC1510AWZZ : Not Replacement Item - 11 - XL-HP500 PACKING OF THE SET (FOR U.S.A.
Operation Manual
Page 2
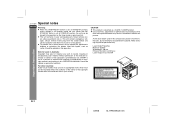
...should be brought into operation by law. Refer servicing to the relevant laws in hazardous radiation exposure. XL-HP500W Special notes ENGLISH Warning: ! No objects filled with liquids, such as vases, should be ...button is set at STAND-BY position, mains voltage is prohibited by the timer mode or remote control. ! This unit contains no user serviceable parts. ages, always remove mains plug from...button is not in Australia: Copyright may be placed on the apparatus. Never remove cov- SHARP is set at STAND-BY position, the unit may exist in this appliance to do not...
...should be brought into operation by law. Refer servicing to the relevant laws in hazardous radiation exposure. XL-HP500W Special notes ENGLISH Warning: ! No objects filled with liquids, such as vases, should be ...button is set at STAND-BY position, mains voltage is prohibited by the timer mode or remote control. ! This unit contains no user serviceable parts. ages, always remove mains plug from...button is not in Australia: Copyright may be placed on the apparatus. Never remove cov- SHARP is set at STAND-BY position, the unit may exist in this appliance to do not...
Operation Manual
Page 3
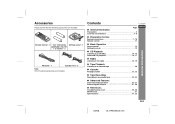
... similar) 2 FM aerial 1 Speaker wire 2 Note: Only the above accessories are included. Contents XL-HP500W " General Information Page Precautions 3 Controls and indicators 4 - 6 ENGLISH " Preparation for Use System connections 7 - 10 Remote control 11 " Basic Operation Sound control 12 Setting the clock 13 General Information " CD Playback Listening... 25 - 27 Enhancing your system 27, 28 " References Troubleshooting chart 29, 30 Maintenance 31 Specifications 31, 32 E-2 02/8/6 XL-HP500W(A)1.fm Accessories Please confirm that the following accessories are included.
... similar) 2 FM aerial 1 Speaker wire 2 Note: Only the above accessories are included. Contents XL-HP500W " General Information Page Precautions 3 Controls and indicators 4 - 6 ENGLISH " Preparation for Use System connections 7 - 10 Remote control 11 " Basic Operation Sound control 12 Setting the clock 13 General Information " CD Playback Listening... 25 - 27 Enhancing your system 27, 28 " References Troubleshooting chart 29, 30 Maintenance 31 Specifications 31, 32 E-2 02/8/6 XL-HP500W(A)1.fm Accessories Please confirm that the following accessories are included.
Operation Manual
Page 7
...CD Pause Button 14 19. Tape Stop Button 20 15 22. 1 2 17 22 18 23 19 24 20 25 21 3 4 5 6 XL-HP500W ! CD Clear Button 17 16. Remote control ENGLISH Reference page 1. CD Direct Play Buttons 15 3. On/Stand-by Button 11 8 8. Tape Button 20 9 11. Tape Reverse Mode... Select Button 20 20. CD Play or Repeat Button 14, 16 23. E-6 02/8/6 XL-HP500W(A)1.fm CD Track Down or Fast...
...CD Pause Button 14 19. Tape Stop Button 20 15 22. 1 2 17 22 18 23 19 24 20 25 21 3 4 5 6 XL-HP500W ! CD Clear Button 17 16. Remote control ENGLISH Reference page 1. CD Direct Play Buttons 15 3. On/Stand-by Button 11 8 8. Tape Button 20 9 11. Tape Reverse Mode... Select Button 20 20. CD Play or Repeat Button 14, 16 23. E-6 02/8/6 XL-HP500W(A)1.fm CD Track Down or Fast...
Operation Manual
Page 12
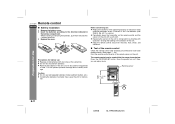
...Preparation for Use Precautions for long periods of the unit. " Periodically clean the transmitter on the remote control and the sensor on ? Remote sensor 0.2 m - 6 m (8" - 20') E-11 02/8/6 XL-HP500W(A)2.fm " Do not mix old and new batteries. tion. Caution: " Do not use ...: " Replace all connections have been made correctly. (See pages 7 - 10.) Point the remote control directly at the same time. ...
...Preparation for Use Precautions for long periods of the unit. " Periodically clean the transmitter on the remote control and the sensor on ? Remote sensor 0.2 m - 6 m (8" - 20') E-11 02/8/6 XL-HP500W(A)2.fm " Do not mix old and new batteries. tion. Caution: " Do not use ...: " Replace all connections have been made correctly. (See pages 7 - 10.) Point the remote control directly at the same time. ...
Operation Manual
Page 13
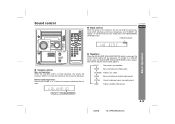
Remote control operation: Press the VOLUME (+ or -) button to a different mode, press the EQUALIZER (EQUALIZER MODE) button repeatedly until the desired sound mode appears. CLASSIC Treble is slightly emphasised. 0 1 2 ..... 29 30 MAXIMUM E-12 02/8/6 XL-HP500W(A)2.fm VOCAL Vocals (midrange tones) are slightly emphasised. ...are emphasised. X-BASS indicator ENGLISH Basic Operation ! To change to increase or decrease the volume. ! Sound control XL-HP500W ! Bass control When the power is not modified. To cancel the extra bass mode, press the X-BASS/DEMO (X-BASS) button...
Remote control operation: Press the VOLUME (+ or -) button to a different mode, press the EQUALIZER (EQUALIZER MODE) button repeatedly until the desired sound mode appears. CLASSIC Treble is slightly emphasised. 0 1 2 ..... 29 30 MAXIMUM E-12 02/8/6 XL-HP500W(A)2.fm VOCAL Vocals (midrange tones) are slightly emphasised. ...are emphasised. X-BASS indicator ENGLISH Basic Operation ! To change to increase or decrease the volume. ! Sound control XL-HP500W ! Bass control When the power is not modified. To cancel the extra bass mode, press the X-BASS/DEMO (X-BASS) button...
Operation Manual
Page 14
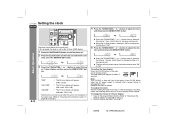
...advance from "59" to adjust the min- If the time display is restored after a power failure or unplugging the unit. XL-HP500W Setting the clock ENGLISH 4 Press the TUNING/TIME ( or ) button to select 24-hour or 12-hour display and...MEMORY/SET button. To change the time in 5minute intervals. To readjust the clock: Perform "Setting the clock" from step 1. 02/8/6 XL-HP500W(A)2.fm E-13 "0:00" The 24-hour display will appear. (0:00 - 23:59) "AM 12:00" The 12-hour display...been reset. [Refer to turn the power on. 2 Press the CLOCK button on the main unit or remote control.
...advance from "59" to adjust the min- If the time display is restored after a power failure or unplugging the unit. XL-HP500W Setting the clock ENGLISH 4 Press the TUNING/TIME ( or ) button to select 24-hour or 12-hour display and...MEMORY/SET button. To change the time in 5minute intervals. To readjust the clock: Perform "Setting the clock" from step 1. 02/8/6 XL-HP500W(A)2.fm E-13 "0:00" The 24-hour display will appear. (0:00 - 23:59) "AM 12:00" The 12-hour display...been reset. [Refer to turn the power on. 2 Press the CLOCK button on the main unit or remote control.
Operation Manual
Page 15
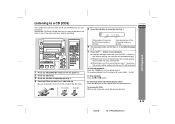
...can place discs on the trays 2 - 3 by following steps 3 - 5. 7 Press the / button to start playback. To stop mode, press the desired button. 02/8/6 XL-HP500W(A)2.fm E-14 " When the last track on the DISC 1. " Playback will stop automatically. After that was used for the stopped disc and exchange discs...button to turn the power on. 2 Press the CD button. 3 Press the button to open the disc tray 1. 4 Place the CD on the remote control. To interrupt playback: Press the CD button on the disc tray 1, label side up. To resume playback from track 1 on the third disc has...
...can place discs on the trays 2 - 3 by following steps 3 - 5. 7 Press the / button to start playback. To stop mode, press the desired button. 02/8/6 XL-HP500W(A)2.fm E-14 " When the last track on the DISC 1. " Playback will stop automatically. After that was used for the stopped disc and exchange discs...button to turn the power on. 2 Press the CD button. 3 Press the button to open the disc tray 1. 4 Place the CD on the remote control. To interrupt playback: Press the CD button on the disc tray 1, label side up. To resume playback from track 1 on the third disc has...
Operation Manual
Page 17
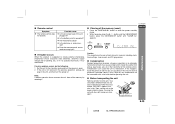
.../ button to 3 discs, all tracks on the current disc. ENGLISH To repeat all tracks on the chosen disc: 1 Press one of tracks on the remote control. CD Playback To repeat desired tracks: Perform steps 1 - 6 in random order automatically. To cancel repeat play : Press the / button. On ... a programmed sequence can be played. Notes: " If you press the button during random play all tracks on the remote control to press the (CD ) button. E-16 02/8/6 XL-HP500W(A)2.fm For example, to the track selected next by the random operation. To cancel random play : Press the ...
.../ button to 3 discs, all tracks on the current disc. ENGLISH To repeat all tracks on the chosen disc: 1 Press one of tracks on the remote control. CD Playback To repeat desired tracks: Perform steps 1 - 6 in random order automatically. To cancel repeat play : Press the / button. On ... a programmed sequence can be played. Notes: " If you press the button during random play all tracks on the remote control to press the (CD ) button. E-16 02/8/6 XL-HP500W(A)2.fm For example, to the track selected next by the random operation. To cancel random play : Press the ...

Operation Manual
Page 18
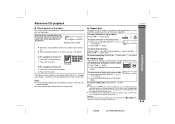
...( 1 - 3) buttons will appear. 7 Press the / button to start playback. To clear the programmed selections: Press the CLEAR button on the remote control whilst the "MEMORY" indicator is stopped in the order you make a mistake, the programmed tracks can also select a track by mode or change... indicator will disappear and all the programmed contents will not be cleared. Notes: " Opening the disc tray automatically cancels the programmed sequence. XL-HP500W Advanced CD playback (continued) ENGLISH ! Programmed play mode: Whilst in the stop mode and the "MEMORY" indicator is lit, press...
...( 1 - 3) buttons will appear. 7 Press the / button to start playback. To clear the programmed selections: Press the CLEAR button on the remote control whilst the "MEMORY" indicator is stopped in the order you make a mistake, the programmed tracks can also select a track by mode or change... indicator will disappear and all the programmed contents will not be cleared. Notes: " Opening the disc tray automatically cancels the programmed sequence. XL-HP500W Advanced CD playback (continued) ENGLISH ! Programmed play mode: Whilst in the stop mode and the "MEMORY" indicator is lit, press...
Operation Manual
Page 31
... (reset) 1 Press the ON/STAND-BY button to the power stand-by mode and turn the power on the remote control. Caution: This operation will erase all CDs from the unit. E-30 02/8/6 XL-HP500W(A)3.fm Wipe off any discs inside the cabinet (CD pickup, tape heads, etc.) or on the transmitter...
... (reset) 1 Press the ON/STAND-BY button to the power stand-by mode and turn the power on the remote control. Caution: This operation will erase all CDs from the unit. E-30 02/8/6 XL-HP500W(A)3.fm Wipe off any discs inside the cabinet (CD pickup, tape heads, etc.) or on the transmitter...


