
XG-PH70X Operation Manual
Page 7
S." Introduction Using Basic Operation Turning the Projector On/Off 37 Image Projection 38 Shifting the Lens 38 Using the Adjustment Feet 39 Adjusting the Focus 40 Adjusting the Projected Image Size 40 Correcting Trapezoidal Distortion 41 Switching the ... Life Status 83 Setting the Lamp Mode 83 Reversing/Inverting Projected Images 84 Controlling Multiple Projectors with the One Remote Control 84 Shortcut to Make Projector Stack Settings ........ 85 Locking the Operation Buttons on the Projector ... 85 Bypassing Unused Input Selections 86 Selecting the Fan Mode 86 Direct Power On...
S." Introduction Using Basic Operation Turning the Projector On/Off 37 Image Projection 38 Shifting the Lens 38 Using the Adjustment Feet 39 Adjusting the Focus 40 Adjusting the Projected Image Size 40 Correcting Trapezoidal Distortion 41 Switching the ... Life Status 83 Setting the Lamp Mode 83 Reversing/Inverting Projected Images 84 Controlling Multiple Projectors with the One Remote Control 84 Shortcut to Make Projector Stack Settings ........ 85 Locking the Operation Buttons on the Projector ... 85 Bypassing Unused Input Selections 86 Selecting the Fan Mode 86 Direct Power On...

XG-PH70X Operation Manual
Page 8
Contents Reference Appendix Maintenance 93 Maintenance Indicators 94 Regarding the Lamp 96 Lamp 96 Caution Concerning the Lamp 96 Replacing the Lamp 96 Removing and Installing the Lamp Unit 97 Resetting the Lamp Timer 99 Computer Compatibility Chart 100 Troubleshooting 102 For SHARP Assistance 104 Specifications 105 Glossary 106 Index 107 The optional lenses are introduced on page 12. Please purchase the lens for your desired usage. -6
Contents Reference Appendix Maintenance 93 Maintenance Indicators 94 Regarding the Lamp 96 Lamp 96 Caution Concerning the Lamp 96 Replacing the Lamp 96 Removing and Installing the Lamp Unit 97 Resetting the Lamp Timer 99 Computer Compatibility Chart 100 Troubleshooting 102 For SHARP Assistance 104 Specifications 105 Glossary 106 Index 107 The optional lenses are introduced on page 12. Please purchase the lens for your desired usage. -6

XG-PH70X Operation Manual
Page 11
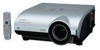
.... If you have application requiring tilt angle exceeding 9 degrees, please check with the lens so as not to maintain high image quality, SHARP recommends that it is regularly cleaned, use the projector in high-altitude areas with extremes of temperature. ■ The operating temperature of the...(at altitudes of lamp rupture, contact your projector. Close the curtains and dim the lights when setting up your nearest Sharp Authorized Projector Dealer or Service Center for long hours will not reduce the overall operation life of the lens. Do not set "Fan Mode" to ...
.... If you have application requiring tilt angle exceeding 9 degrees, please check with the lens so as not to maintain high image quality, SHARP recommends that it is regularly cleaned, use the projector in high-altitude areas with extremes of temperature. ■ The operating temperature of the...(at altitudes of lamp rupture, contact your projector. Close the curtains and dim the lights when setting up your nearest Sharp Authorized Projector Dealer or Service Center for long hours will not reduce the overall operation life of the lens. Do not set "Fan Mode" to ...
XG-PH70X Operation Manual
Page 12
... as this can result in damage. ject it . ■ Do not carry the projector by holding the lens. ■ When storing the projector, ensure you attach the lens cap to the projector. (See page 13.) ■ Do not expose the projector to use an appropriate power cord for a long time, make certain you are not... lower left corner of the plug may change color or become deformed. Take extra care with the lens. visual equipment to the projector, make the connections AFTER unplugging the power cord of the projector from the wall outlet and wait at least 11 13/16 inches (30 cm) of the fan...
... as this can result in damage. ject it . ■ Do not carry the projector by holding the lens. ■ When storing the projector, ensure you attach the lens cap to the projector. (See page 13.) ■ Do not expose the projector to use an appropriate power cord for a long time, make certain you are not... lower left corner of the plug may change color or become deformed. Take extra care with the lens. visual equipment to the projector, make the connections AFTER unplugging the power cord of the projector from the wall outlet and wait at least 11 13/16 inches (30 cm) of the fan...
XG-PH70X Operation Manual
Page 13
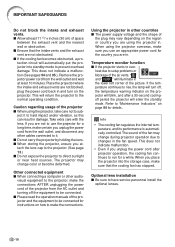
Please check with XG-PH70X) 9NK3797200400 Projector manual and technical reference CD-ROM 9NK3534022800 Optional accessories ■ Cable 3 RCA to the wall outlet in your nearest Sharp Authorized Projector Dealer or Service Center. -11 For Australia, New Zealand and Oceania (6' (1.8 m)) 9NK3090152600 RGB cable (10' (3.0 m)) 9NK3080431000 Remote mouse receiver (5'3" (1.6 m)) 9NK3790197000 Cap for the standard zoom lens (Only supplied...
Please check with XG-PH70X) 9NK3797200400 Projector manual and technical reference CD-ROM 9NK3534022800 Optional accessories ■ Cable 3 RCA to the wall outlet in your nearest Sharp Authorized Projector Dealer or Service Center. -11 For Australia, New Zealand and Oceania (6' (1.8 m)) 9NK3090152600 RGB cable (10' (3.0 m)) 9NK3080431000 Remote mouse receiver (5'3" (1.6 m)) 9NK3790197000 Cap for the standard zoom lens (Only supplied...
XG-PH70X Operation Manual
Page 14
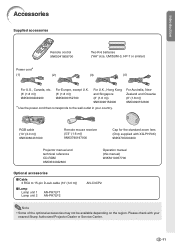
... AN-PH60EZ 15' - 20' (4.6 m - 6.1 m) 20' - 30' (6.1 m - 9.1 m) 30' - 46'8" (9.1 m - 14.2 m) No lens is attached to XG-PH70X-N. The standard zoom lens is attached to XG-PH70X. Please see your nearest Sharp Authorized Projector Dealer for 100 inches (254 cm) screen with XG-PH70X) 12'-14'8" (3.7 m-4.5 m) Throw distance ratio 1:1.8-2.2 Tele-zoom lens (AN-PH40EZ) 15'-20' (4.6 m-6.1 m) Throw distance ratio 1:2.25-3.00 Tele-zoom...
... AN-PH60EZ 15' - 20' (4.6 m - 6.1 m) 20' - 30' (6.1 m - 9.1 m) 30' - 46'8" (9.1 m - 14.2 m) No lens is attached to XG-PH70X-N. The standard zoom lens is attached to XG-PH70X. Please see your nearest Sharp Authorized Projector Dealer for 100 inches (254 cm) screen with XG-PH70X) 12'-14'8" (3.7 m-4.5 m) Throw distance ratio 1:1.8-2.2 Tele-zoom lens (AN-PH40EZ) 15'-20' (4.6 m-6.1 m) Throw distance ratio 1:2.25-3.00 Tele-zoom...
XG-PH70X Operation Manual
Page 15
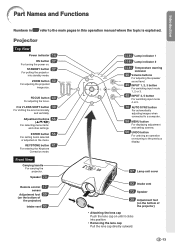
...40 For adjusting the focus. Speaker 73 Remote control 17 sensor Adjustment foot 39 (on the bottom of the projector) • Attaching the lens cap Push the lens cap on until it clicks into standby mode. Part Names and Functions Introduction Numbers in refer to the previous... ZOOM button 40 For adjusting the projected image size. H & V LENS SHIFT button 39 For shifting the lens horizontally and vertically. STANDBY button 37 For putting the projector into position. • Removing the lens cap Pull the lens cap directly outward. -13 ENTER button 56 For setting items selected or...
...40 For adjusting the focus. Speaker 73 Remote control 17 sensor Adjustment foot 39 (on the bottom of the projector) • Attaching the lens cap Push the lens cap on until it clicks into standby mode. Part Names and Functions Introduction Numbers in refer to the previous... ZOOM button 40 For adjusting the projected image size. H & V LENS SHIFT button 39 For shifting the lens horizontally and vertically. STANDBY button 37 For putting the projector into position. • Removing the lens cap Pull the lens cap directly outward. -13 ENTER button 56 For setting items selected or...
XG-PH70X Operation Manual
Page 18
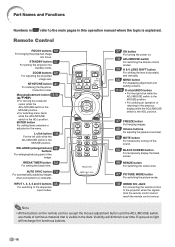
...Remote Control FOCUS buttons 40 For bringing the projected image into standby mode. AUTO SYNC button 70 For automatically adjusting images when connected to the projector when the signals from the remote control cannot reach the remote control sensor. INPUT 1, 2, 3, 4 and 5 buttons 45 For switching .... Note • All the buttons on . 18 ADJ./MOUSE switch For switching the remote control modes. 39 H & V LENS SHIFT button For shifting the lens horizontally and vertically. 56 MENU button For displaying adjustment and setting screens. 19·56 R-click/UNDO button • For the...
...Remote Control FOCUS buttons 40 For bringing the projected image into standby mode. AUTO SYNC button 70 For automatically adjusting images when connected to the projector when the signals from the remote control cannot reach the remote control sensor. INPUT 1, 2, 3, 4 and 5 buttons 45 For switching .... Note • All the buttons on . 18 ADJ./MOUSE switch For switching the remote control modes. 39 H & V LENS SHIFT button For shifting the lens horizontally and vertically. 56 MENU button For displaying adjustment and setting screens. 19·56 R-click/UNDO button • For the...
XG-PH70X Operation Manual
Page 22
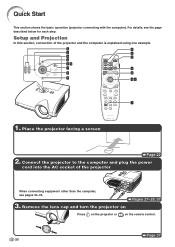
... of the projector and the computer is explained using one example. 5 8 4 5 8 3 3 46 7 4 6 6 6 46 7 1. Remove the lens cap and turn the projector on Pages 27-29, 37 Press on the projector or on the remote control. Page 37 -20 Place the projector facing a... screen Page 22 2. Setup and Projection In this section, connection of the projector When connecting equipment other than the computer, ...
... of the projector and the computer is explained using one example. 5 8 4 5 8 3 3 46 7 4 6 6 6 46 7 1. Remove the lens cap and turn the projector on Pages 27-29, 37 Press on the projector or on the remote control. Page 37 -20 Place the projector facing a... screen Page 22 2. Setup and Projection In this section, connection of the projector When connecting equipment other than the computer, ...
XG-PH70X Operation Manual
Page 23
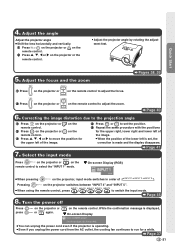
... " On-screen Display (RGB) remote control to move the position for a while. on the projector, input mode switches in order of the image. 7. Adjust the angle Adjust the projector angle • Shift the lens horizontally and vertically. 1 Press on the projector or on the remote control. 2 Press ', ", \ or | on the remote control. Page 40...
... " On-screen Display (RGB) remote control to move the position for a while. on the projector, input mode switches in order of the image. 7. Adjust the angle Adjust the projector angle • Shift the lens horizontally and vertically. 1 Press on the projector or on the remote control. 2 Press ', ", \ or | on the remote control. Page 40...
XG-PH70X Operation Manual
Page 24
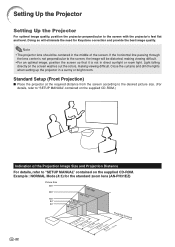
...Mode (4:3) for Keystone correction and provide the best image quality. Note • The projector lens should be distorted, making viewing difficult. Standard Setup (Front Projection) ■ Place the projector at the required distance from the screen according to the desired picture size. (For details... to the screen with the projector's feet flat and level. Setting Up the Projector Setting Up the Projector For optimal image quality, position the projector perpendicular to the screen, the image will eliminate the need for the standard zoom lens (AN-PH31EZ) Picture Size 300...
...Mode (4:3) for Keystone correction and provide the best image quality. Note • The projector lens should be distorted, making viewing difficult. Standard Setup (Front Projection) ■ Place the projector at the required distance from the screen according to the desired picture size. (For details... to the screen with the projector's feet flat and level. Setting Up the Projector Setting Up the Projector For optimal image quality, position the projector perpendicular to the screen, the image will eliminate the need for the standard zoom lens (AN-PH31EZ) Picture Size 300...

XG-PH70X Operation Manual
Page 25
Before mounting the projector, contact your nearest Sharp Authorized Projector Dealer or Service Center to obtain the recommended ceiling-mount bracket (sold separately). • AN-PHCM20 ceiling-mount bracket, its AN-EP101AP extension tube (for ..." in the "PRJ Mode" menu. (See page 84.) Setup Translucent screen Audience Projection Using a Mirror ■ Place a mirror (normal flat type) in front of the lens. ■ When the translucent screen is placed between the mirror and audience, set to "Rear" Mirror Audience Translucent screen Audience Mirror Info • When using...
Before mounting the projector, contact your nearest Sharp Authorized Projector Dealer or Service Center to obtain the recommended ceiling-mount bracket (sold separately). • AN-PHCM20 ceiling-mount bracket, its AN-EP101AP extension tube (for ..." in the "PRJ Mode" menu. (See page 84.) Setup Translucent screen Audience Projection Using a Mirror ■ Place a mirror (normal flat type) in front of the lens. ■ When the translucent screen is placed between the mirror and audience, set to "Rear" Mirror Audience Translucent screen Audience Mirror Info • When using...

XG-PH70X Operation Manual
Page 39
...standby mode and immediately turned on again, the lamp may be turned on automatically when you use with the projector. (See pages 27-36.) Remove the lens cap and press on the projector or on page 92. Enter the right keycode to start projection. This does not indicate malfunction. •... page 79 for a while. -37 Basic Operation Green: The lamp is put the projector into standby mode. ▼On-screen Display Lens cap Info • You can unplug the power cord even if the projector is warming up. This is normal operation as the lamp's control circuitry is dis- ON...
...standby mode and immediately turned on again, the lamp may be turned on automatically when you use with the projector. (See pages 27-36.) Remove the lens cap and press on the projector or on page 92. Enter the right keycode to start projection. This does not indicate malfunction. •... page 79 for a while. -37 Basic Operation Green: The lamp is put the projector into standby mode. ▼On-screen Display Lens cap Info • You can unplug the power cord even if the projector is warming up. This is normal operation as the lamp's control circuitry is dis- ON...

XG-PH70X Operation Manual
Page 40
...a useful function in the left and right direction Adjustable range Adjustable range Adjustable range The adjustable range is masked with a shadow while using the lens shift function. AN-PH20EZ, AN-PH31EZ, AN-PH40EZ, AN-PH50EZ, AN-PH60EZ Height of the image × 10% Height of the image ×...The position of the image when the vertical position of the image is center and the horizontal position is masked with a shadow while using the lens shift function. Horizontal range: ±15% Vertical range: +50% (to the zoom function and adjustment of projection angle using the adjustment feet...
...a useful function in the left and right direction Adjustable range Adjustable range Adjustable range The adjustable range is masked with a shadow while using the lens shift function. AN-PH20EZ, AN-PH31EZ, AN-PH40EZ, AN-PH50EZ, AN-PH60EZ Height of the image × 10% Height of the image ×...The position of the image when the vertical position of the image is center and the horizontal position is masked with a shadow while using the lens shift function. Horizontal range: ±15% Vertical range: +50% (to the zoom function and adjustment of projection angle using the adjustment feet...

XG-PH70X Operation Manual
Page 41
...feet to adjust the projected angle. • The height of the projector can be careful not to adjust the image position. tate the adjustment feet for more accurate adjustment. ▼On-screen Display H & V LENS SHIFT button H & V LENS SHIFT button Mouse/adjustment button ('/"/\/|) ENTER button Adjustment button ('/"/\/|) 2 ... is adjustable up to approximately 9 degrees. 2 Lower the projector, and then ro- ENTER button Using the Adjustment Feet • When the position of the projected image cannot be adjusted with the lens shift function, use - jector or the remote control to ...
...feet to adjust the projected angle. • The height of the projector can be careful not to adjust the image position. tate the adjustment feet for more accurate adjustment. ▼On-screen Display H & V LENS SHIFT button H & V LENS SHIFT button Mouse/adjustment button ('/"/\/|) ENTER button Adjustment button ('/"/\/|) 2 ... is adjustable up to approximately 9 degrees. 2 Lower the projector, and then ro- ENTER button Using the Adjustment Feet • When the position of the projected image cannot be adjusted with the lens shift function, use - jector or the remote control to ...

XG-PH70X Operation Manual
Page 42
The test pattern is useful for making more accurate adjustments. • For fine adjustments, when pressing the H & V LENS SHIFT buttons, the FOCUS buttons or the ZOOM buttons, the projected image moves a small amount toward the desired direction for approximately one second. Hold down ... size. ▼On-screen Display -40 Note • After you have pressed the FOCUS buttons or the ZOOM buttons on the remote control or the projector, you can display the test pattern by pressing the ENTER button. Image Projection Adjusting the Focus Press on the...
The test pattern is useful for making more accurate adjustments. • For fine adjustments, when pressing the H & V LENS SHIFT buttons, the FOCUS buttons or the ZOOM buttons, the projected image moves a small amount toward the desired direction for approximately one second. Hold down ... size. ▼On-screen Display -40 Note • After you have pressed the FOCUS buttons or the ZOOM buttons on the remote control or the projector, you can display the test pattern by pressing the ENTER button. Image Projection Adjusting the Focus Press on the...

XG-PH70X Operation Manual
Page 44
... projected image. • Match screen's four sides to green test pattern. • Pressing ', ", \ or | on the projector or on the remote control allows you to shift the lens. • Pressing on the projector or on the remote control allows you to adjust the projected image size. • Pressing on the... projector or on the remote control allows you to set , the correction is made and the display disappears. -...
... projected image. • Match screen's four sides to green test pattern. • Pressing ', ", \ or | on the projector or on the remote control allows you to shift the lens. • Pressing on the projector or on the remote control allows you to adjust the projected image size. • Pressing on the... projector or on the remote control allows you to set , the correction is made and the display disappears. -...

XG-PH70X Operation Manual
Page 77
played. and warning displays) Note • While "Keylock Level" is "Level A" or "Level B", pressing displays "All buttons on Projector are displayed. Note • The "Digital Shift" function works with the "NORMAL", "BORDER", "STRETCH" or "SMART STRETCH" image. (See ... projected image down eliminating either the upper or lower black band found in 16:9 and other wide aspect ratios. Level B cept the menu, H & V LENS SHIFT, KEYSTONE, FOCUS, ZOOM, "All buttons on or off. despite the "OSD Display" setting. Menu operation Page 58 Example: "Options (1)" screen menu ...
played. and warning displays) Note • While "Keylock Level" is "Level A" or "Level B", pressing displays "All buttons on Projector are displayed. Note • The "Digital Shift" function works with the "NORMAL", "BORDER", "STRETCH" or "SMART STRETCH" image. (See ... projected image down eliminating either the upper or lower black band found in 16:9 and other wide aspect ratios. Level B cept the menu, H & V LENS SHIFT, KEYSTONE, FOCUS, ZOOM, "All buttons on or off. despite the "OSD Display" setting. Menu operation Page 58 Example: "Options (1)" screen menu ...

XG-PH70X Operation Manual
Page 82
...If you input a wrong keycode, the cursor returns to the first point of the "Old Code". • The preset keycode is 4 " buttons on the projector for keycode: • ON button • STANDBY button • ENTER button • L-click button • R-click/UNDO button • MENU button ...• ZOOM buttons • FOCUS buttons • H & V LENS SHIFT button • System Lock function recognizes each button on the remote control or on the projector to enter the new keycode in "New Code". 3 Enter the same keycode in "Recon-
...If you input a wrong keycode, the cursor returns to the first point of the "Old Code". • The preset keycode is 4 " buttons on the projector for keycode: • ON button • STANDBY button • ENTER button • L-click button • R-click/UNDO button • MENU button ...• ZOOM buttons • FOCUS buttons • H & V LENS SHIFT button • System Lock function recognizes each button on the remote control or on the projector to enter the new keycode in "New Code". 3 Enter the same keycode in "Recon-

XG-PH70X Operation Manual
Page 95
... can easily get damaged, be cleaned every 100 hours of the projector). The effects of some of the lens can damage the finish on the cabinet. ■ Do not use volatile agents such as insecticides on the projector. Cleaning the exhaust and intake vents Mild detergent Mild detergent diluted with... the air vents and the intake vent cover. Strong cleaning detergents may cause damage to the projector for cleaning the lens. Clean the air vents and the intake vent cover more often when the projector is used in a dusty or smoky location. • Ensure the intake vent cover is ...
... can easily get damaged, be cleaned every 100 hours of the projector). The effects of some of the lens can damage the finish on the cabinet. ■ Do not use volatile agents such as insecticides on the projector. Cleaning the exhaust and intake vents Mild detergent Mild detergent diluted with... the air vents and the intake vent cover. Strong cleaning detergents may cause damage to the projector for cleaning the lens. Clean the air vents and the intake vent cover more often when the projector is used in a dusty or smoky location. • Ensure the intake vent cover is ...
