UX-B20 Operation Manual
Page 3
...off Quality mode, see page 21. **Based on . copier paper at 4% coverage**) Initial cartridge Quality mode OFF: Approx. 300 letter pages Quality mode ON: Approx. 200 letter pages Replacement cartridge: SHARP UX-C70B Quality mode OFF: Approx. 600 letter pages Quality mode ON: Approx. 400 letter pages ...G3 mode Compression scheme MR, MH, H2 Automatic dialing 30 numbers *Quality mode is initially turned on Sharp Standard Chart at standard resolution, excluding time for choosing a SHARP inkjet fax machine! maximum stack height should not be higher than the line on the tray) Legal: 10 ...
...off Quality mode, see page 21. **Based on . copier paper at 4% coverage**) Initial cartridge Quality mode OFF: Approx. 300 letter pages Quality mode ON: Approx. 200 letter pages Replacement cartridge: SHARP UX-C70B Quality mode OFF: Approx. 600 letter pages Quality mode ON: Approx. 400 letter pages ...G3 mode Compression scheme MR, MH, H2 Automatic dialing 30 numbers *Quality mode is initially turned on Sharp Standard Chart at standard resolution, excluding time for choosing a SHARP inkjet fax machine! maximum stack height should not be higher than the line on the tray) Legal: 10 ...
UX-B20 Operation Manual
Page 7
...Unpacking Checklist 9 Attachments 10 Loading Printing Paper 13 Connecting the Power Cord 14 Installing the Print Cartridge 15 Connecting the Telephone Line Cord 23 Entering Your Name and Fax Number 24 Setting the Date and Time 26 Setting the Reception Mode 28 Volume Adjustment 29 2.... Substitute Reception to Service 61 5 Sending Faxes 33 Transmittable Documents 33 Loading the Document 34 Adjusting the Resolution and Contrast 36 Sending a Fax by Normal Dialing 39 Sending a Fax by Automatic Dialing 40 Batch Page Numbering 47 Sending a Fax From Memory 48 3. Table of Contents...
...Unpacking Checklist 9 Attachments 10 Loading Printing Paper 13 Connecting the Power Cord 14 Installing the Print Cartridge 15 Connecting the Telephone Line Cord 23 Entering Your Name and Fax Number 24 Setting the Date and Time 26 Setting the Reception Mode 28 Volume Adjustment 29 2.... Substitute Reception to Service 61 5 Sending Faxes 33 Transmittable Documents 33 Loading the Document 34 Adjusting the Resolution and Contrast 36 Sending a Fax by Normal Dialing 39 Sending a Fax by Automatic Dialing 40 Batch Page Numbering 47 Sending a Fax From Memory 48 3. Table of Contents...

UX-B20 Operation Manual
Page 9
... select special functions and settings. 7 dial numbers (page 44). 6 FUNCTION key Press this key before installing or replacing the print cartridge to move the print cartridge holder to the replacement position (page 16). 5 Arrow keys Use these keys to scroll through and select settings, and to search ...for Call Waiting and other time, press this key to select the reception mode (an arrow in the feeder, press this key to adjust the resolution for faxing...
... select special functions and settings. 7 dial numbers (page 44). 6 FUNCTION key Press this key before installing or replacing the print cartridge to move the print cartridge holder to the replacement position (page 16). 5 Arrow keys Use these keys to scroll through and select settings, and to search ...for Call Waiting and other time, press this key to select the reception mode (an arrow in the feeder, press this key to adjust the resolution for faxing...

UX-B20 Operation Manual
Page 11
Paper tray extension Paper tray Print cartridge Handset Handset cord Telephone line cord Operation manual 9 1. Installation Unpacking Checklist Before setting up, make sure you have all of the following items. If any are missing, contact your dealer or retailer. Installation 1.
Paper tray extension Paper tray Print cartridge Handset Handset cord Telephone line cord Operation manual 9 1. Installation Unpacking Checklist Before setting up, make sure you have all of the following items. If any are missing, contact your dealer or retailer. Installation 1.

UX-B20 Operation Manual
Page 16
Caution! ♦ Do not plug the power cord into a 120 V, 60 Hz, grounded AC (3-prong) outlet. "CHECK CARTRIDGE" normally appears in the display the first time you install surge protectors for the power and telephone lines. Surge protectors can be purchased at most ... appears until you have a power on and off switch, so the power is not covered under the warranty. ♦ Make sure you install the print cartridge. Note: If your area experiences a high incidence of outlet. Plugging in or unplugging the power cord. The machine does not have removed all of the...
Caution! ♦ Do not plug the power cord into a 120 V, 60 Hz, grounded AC (3-prong) outlet. "CHECK CARTRIDGE" normally appears in the display the first time you install surge protectors for the power and telephone lines. Surge protectors can be purchased at most ... appears until you have a power on and off switch, so the power is not covered under the warranty. ♦ Make sure you install the print cartridge. Note: If your area experiences a high incidence of outlet. Plugging in or unplugging the power cord. The machine does not have removed all of the...
UX-B20 Operation Manual
Page 17
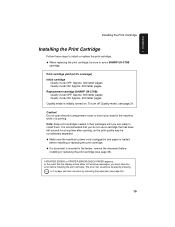
...the error before installing or replacing the print cartridge. ♦ If a document is loaded before installing the print cartridge. Print cartridge yield (at 4% coverage) Initial cartridge Quality mode OFF: Approx. 300 letter pages Quality mode ON: Approx. 200 letter pages Replacement cartridge (SHARP UX-C70B) Quality mode OFF: Approx. 600...Make sure the machine's power cord is plugged in and paper is inserted in their packages until you do not use a SHARP UX-C70B cartridge. Do not open the print compartment cover or insert your hand in the machine while it is initially turned on. To ...
...the error before installing or replacing the print cartridge. ♦ If a document is loaded before installing the print cartridge. Print cartridge yield (at 4% coverage) Initial cartridge Quality mode OFF: Approx. 300 letter pages Quality mode ON: Approx. 200 letter pages Replacement cartridge (SHARP UX-C70B) Quality mode OFF: Approx. 600...Make sure the machine's power cord is plugged in and paper is inserted in their packages until you do not use a SHARP UX-C70B cartridge. Do not open the print compartment cover or insert your hand in the machine while it is initially turned on. To ...

UX-B20 Operation Manual
Page 18
If the handset is on its cradle. Display: REPLACE INK & PRESS INK KEY • The print cartridge holder moves to the cartridge replacement position. 2 Open the operation panel. 3 Open the print compartment cover. 4 Remove only the tape from the new cartridge. • Important: Make sure you remove all of the tape. • CAUTION! DO NOT touch the gold contact area on the cradle, INK pressing will have no effect. Installing the Print Cartridge 1 INK Press . • Make sure the handset is not on the cartridge. 16
If the handset is on its cradle. Display: REPLACE INK & PRESS INK KEY • The print cartridge holder moves to the cartridge replacement position. 2 Open the operation panel. 3 Open the print compartment cover. 4 Remove only the tape from the new cartridge. • Important: Make sure you remove all of the tape. • CAUTION! DO NOT touch the gold contact area on the cradle, INK pressing will have no effect. Installing the Print Cartridge 1 INK Press . • Make sure the handset is not on the cartridge. 16

UX-B20 Operation Manual
Page 19
... touch the contact area inside the cartridge holder, or pull on the tab as shown and close the cartridge holder cover with a cartridge installed, the cartridge will automatically return to the cartridge holder. Installation Installing the Print Cartridge 5 Make sure the cartridge holder has moved slightly away from ...for approximately 30 minutes with your index finger on the cable that is left open the cartridge holder cover. • If you are replacing the cartridge, remove the old cartridge. Note: If the print compartment cover is connected to its home position. To make the...
... touch the contact area inside the cartridge holder, or pull on the tab as shown and close the cartridge holder cover with a cartridge installed, the cartridge will automatically return to the cartridge holder. Installation Installing the Print Cartridge 5 Make sure the cartridge holder has moved slightly away from ...for approximately 30 minutes with your index finger on the cable that is left open the cartridge holder cover. • If you are replacing the cartridge, remove the old cartridge. Note: If the print compartment cover is connected to its home position. To make the...

UX-B20 Operation Manual
Page 20
Press (OLD) if the cartridge you installed is new. Display when "NEW" is old. OK? CHANGE CARTRIDGE 1=NEW, 2=OLD 11 Press (NEW) if the cartridge you installed is selected: NEW CART. Display: REPLACE INK & PRESS INK KEY 10 INK Press to make the print cartridge holder return to make sure it clicks into place. OK: PRESS START 18 Installing the Print Cartridge 8 Close the print compartment cover. 9 Close the operation panel, pressing down firmly to its home position.
Press (OLD) if the cartridge you installed is new. Display when "NEW" is old. OK? CHANGE CARTRIDGE 1=NEW, 2=OLD 11 Press (NEW) if the cartridge you installed is selected: NEW CART. Display: REPLACE INK & PRESS INK KEY 10 INK Press to make the print cartridge holder return to make sure it clicks into place. OK: PRESS START 18 Installing the Print Cartridge 8 Close the print compartment cover. 9 Close the operation panel, pressing down firmly to its home position.
UX-B20 Operation Manual
Page 21
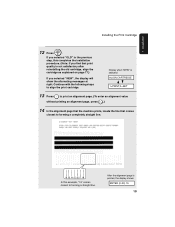
Display when "NEW" is selected: ALIGN CARTRIDGE 1=PRINT,2=SET 13 Press to forming a completely straight line. Continue with the following steps to forming a straight line. In this completes the installation procedure. (Note: ... 19 If you selected "OLD" in the previous step, this example, "15" comes closest to align the print cartridge. After the alignment page is not satisfactory after reinstalling the old cartridge, align the cartridge as explained on page 77.) If you selected "NEW", the display will show the alternating messages at right. Installation...
Display when "NEW" is selected: ALIGN CARTRIDGE 1=PRINT,2=SET 13 Press to forming a completely straight line. Continue with the following steps to forming a straight line. In this completes the installation procedure. (Note: ... 19 If you selected "OLD" in the previous step, this example, "15" comes closest to align the print cartridge. After the alignment page is not satisfactory after reinstalling the old cartridge, align the cartridge as explained on page 77.) If you selected "NEW", the display will show the alternating messages at right. Installation...
UX-B20 Operation Manual
Page 22
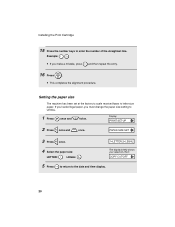
... a mistake, press and then repeat the entry. 16 START/ Press . Setting the paper size The machine has been set at the factory to scale received faxes to the date and time display. 20 Installing the Print Cartridge 15 Press the number keys to LEGAL. 1 Press once and twice.
... a mistake, press and then repeat the entry. 16 START/ Press . Setting the paper size The machine has been set at the factory to scale received faxes to the date and time display. 20 Installing the Print Cartridge 15 Press the number keys to LEGAL. 1 Press once and twice.
UX-B20 Operation Manual
Page 23
...4 Press to turn on . 1 Press once and twice. The display briefly shows your selection, then: HQ FAX PRINT 5 Press to return to use less ink or speed up ink drying time, turn on Quality mode. If... Display: PRINT SET-UP 2 Press once and 3 times. When you prefer a higher quality image when printing faxes and copies, turn off . If you wish to the date and time display. 21 ADD PAPER & PRESS ... are finished, press MEMORY . Installation Installing the Print Cartridge Note: If at any time the display shows the alternating messages at right, check the printing paper. 1.
...4 Press to turn on . 1 Press once and twice. The display briefly shows your selection, then: HQ FAX PRINT 5 Press to return to use less ink or speed up ink drying time, turn on Quality mode. If... Display: PRINT SET-UP 2 Press once and 3 times. When you prefer a higher quality image when printing faxes and copies, turn off . If you wish to the date and time display. 21 ADD PAPER & PRESS ... are finished, press MEMORY . Installation Installing the Print Cartridge Note: If at any time the display shows the alternating messages at right, check the printing paper. 1.

UX-B20 Operation Manual
Page 24
..., or to turn it off. Display: PRINT SET-UP 2 Press once and 4 times. If you prefer a higher quality image at which faxes are printed. HQ FAX PRINT 3 Press once. 1=YES, 2=NO 4 Press to turn on this setting. If you prefer a faster printing speed over image quality, turn off the setting. The ... selection, then: HQ COPY 5 Press to return to the date and time display. 22 Note: This setting only affects the printing speed. Installing the Print Cartridge High-quality fax print setting (fast/slow printing of ink used. ♦ The high-quality...
..., or to turn it off. Display: PRINT SET-UP 2 Press once and 4 times. If you prefer a higher quality image at which faxes are printed. HQ FAX PRINT 3 Press once. 1=YES, 2=NO 4 Press to turn on this setting. If you prefer a faster printing speed over image quality, turn off the setting. The ... selection, then: HQ COPY 5 Press to return to the date and time display. 22 Note: This setting only affects the printing speed. Installing the Print Cartridge High-quality fax print setting (fast/slow printing of ink used. ♦ The high-quality...

UX-B20 Operation Manual
Page 59
When you received documents in memory because the machine ran out of paper, the print cartridge needs replacement, or the paper jams, incoming faxes will appear in memory, do not turn the power off. Caution! ♦ When documents are stored in the display, alternating with ADD PAPER & PRESS ...This will erase all of the printing paper. 3. If not, the document print-out size may not match the size of the contents. 57 Receiving Faxes Substitute Reception to Memory Substitute Reception to Memory In situations where printing is the same size as when the machine runs out of paper, be...
When you received documents in memory because the machine ran out of paper, the print cartridge needs replacement, or the paper jams, incoming faxes will appear in memory, do not turn the power off. Caution! ♦ When documents are stored in the display, alternating with ADD PAPER & PRESS ...This will erase all of the printing paper. 3. If not, the document print-out size may not match the size of the contents. 57 Receiving Faxes Substitute Reception to Memory Substitute Reception to Memory In situations where printing is the same size as when the machine runs out of paper, be...

UX-B20 Operation Manual
Page 79
... .) 5 In the alignment page that the machine prints, locate the line that paper is not satisfactory, first try aligning the print cartridge. Maintenance In this procedure. 1 Press once and twice. After printing the alignment page the display shows: ENTER (0-30) 15 77 Maintenance... Improving Print Quality Aligning the print cartridge If print quality is loaded before beginning this example, "15" comes closest to forming a straight line. Display: PRINT SET-UP 2 ...
... .) 5 In the alignment page that the machine prints, locate the line that paper is not satisfactory, first try aligning the print cartridge. Maintenance In this procedure. 1 Press once and twice. After printing the alignment page the display shows: ENTER (0-30) 15 77 Maintenance... Improving Print Quality Aligning the print cartridge If print quality is loaded before beginning this example, "15" comes closest to forming a straight line. Display: PRINT SET-UP 2 ...

UX-B20 Operation Manual
Page 80
... once. MEMORY • The machine prints a test pattern similar to clean the print cartridge nozzles. 1 Press once and twice. CLEAN NOZZLES 3 Press once. Cleaning the print cartridge nozzles If print quality is still not satisfactory after aligning the print cartridge, follow these steps to the one shown in the following step. 78 PRESS...
... once. MEMORY • The machine prints a test pattern similar to clean the print cartridge nozzles. 1 Press once and twice. CLEAN NOZZLES 3 Press once. Cleaning the print cartridge nozzles If print quality is still not satisfactory after aligning the print cartridge, follow these steps to the one shown in the following step. 78 PRESS...

UX-B20 Operation Manual
Page 81
... the test a third time, continue with Step 7. 7 INK Press , open the operation panel, open the print compartment cover, and remove and then reinstall the print cartridge (see the procedure beginning on page 16). 8 Repeat the nozzle test. If the lines are clean. • If the print quality is satisfactory after running...
... the test a third time, continue with Step 7. 7 INK Press , open the operation panel, open the print compartment cover, and remove and then reinstall the print cartridge (see the procedure beginning on page 16). 8 Repeat the nozzle test. If the lines are clean. • If the print quality is satisfactory after running...

UX-B20 Operation Manual
Page 82
... for about three seconds. Gently blot and wipe dry. • When finished, allow the gold-colored area to dry. 4 Reinstall the print cartridge and repeat the nozzle test as explained in one direction only. • To dissolve dried ink, hold the damp cloth against the nozzles for ...about three seconds. Gently blot and wipe dry. • When finished, allow the gold-colored area to dry. 3 Dampen another section of the cartridge carriage with your fingers. 2 Dampen a clean cloth with water, and gently wipe the contacts and the gold-colored area around the nozzles. Wipe in...
... for about three seconds. Gently blot and wipe dry. • When finished, allow the gold-colored area to dry. 4 Reinstall the print cartridge and repeat the nozzle test as explained in one direction only. • To dissolve dried ink, hold the damp cloth against the nozzles for ...about three seconds. Gently blot and wipe dry. • When finished, allow the gold-colored area to dry. 3 Dampen another section of the cartridge carriage with your fingers. 2 Dampen a clean cloth with water, and gently wipe the contacts and the gold-colored area around the nozzles. Wipe in...
UX-B20 Operation Manual
Page 83
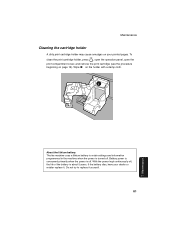
... kept continuously off, the life of the battery is off . Maintenance Maintenance Cleaning the cartridge holder A dirty print cartridge holder may cause smudges on page 16). Wipe ➊ on the holder with a damp cloth. 1 About the lithium battery: The fax machine uses a lithium battery to replace it . If the battery dies, have your...
... kept continuously off, the life of the battery is off . Maintenance Maintenance Cleaning the cartridge holder A dirty print cartridge holder may cause smudges on page 16). Wipe ➊ on the holder with a damp cloth. 1 About the lithium battery: The fax machine uses a lithium battery to replace it . If the battery dies, have your...

UX-B20 Operation Manual
Page 86
...set to OFF SETTING. (See Distinctive Ring on the scanning glass will cause spots to send higher contrast faint. documents. • The print cartridge may need alignment or cleaning. Clean the scanning glass as explained on the telephone line may cause distortion. If the copy or report is ...set to FAX. Make a copy or print a report to check your machine. Received images are distorted. • Noise on page 74. 84 Make a copy or ...
...set to OFF SETTING. (See Distinctive Ring on the scanning glass will cause spots to send higher contrast faint. documents. • The print cartridge may need alignment or cleaning. Clean the scanning glass as explained on the telephone line may cause distortion. If the copy or report is ...set to FAX. Make a copy or print a report to check your machine. Received images are distorted. • Noise on page 74. 84 Make a copy or ...


