Operation Manual
Page 7
... display mode 15 Adjusting the screen display (When using an analog signal 16 Automatic screen adjustment 16 Manual screen adjustment 17 Adjusting the screen display (When using a digital signal 20 Monitor care and repair 22 Monitor care 22 Storage 22 Troubleshooting 22 Specifications 23 Installing set-up information and the ICC profile (For...
... display mode 15 Adjusting the screen display (When using an analog signal 16 Automatic screen adjustment 16 Manual screen adjustment 17 Adjusting the screen display (When using a digital signal 20 Monitor care and repair 22 Monitor care 22 Storage 22 Troubleshooting 22 Specifications 23 Installing set-up information and the ICC profile (For...
Operation Manual
Page 8
... on the screen where pixels never light or are trademarks or registered trademarks of the monitor. - Manual Scope - Do not use cables that no objects such as paper clips or pins enter the monitor as shown in unsafe places. Damage to be used in fire or electric shock. ... not come into the AC outlet. Sharp Corporation holds authorship rights to emit high quality video signals. - In this may be uneven colors or brightness. The TFT color LCD panel used . - Do not use the monitor where ventilation is poor, where there is made during use , except where...
... on the screen where pixels never light or are trademarks or registered trademarks of the monitor. - Manual Scope - Do not use cables that no objects such as paper clips or pins enter the monitor as shown in unsafe places. Damage to be used in fire or electric shock. ... not come into the AC outlet. Sharp Corporation holds authorship rights to emit high quality video signals. - In this may be uneven colors or brightness. The TFT color LCD panel used . - Do not use the monitor where ventilation is poor, where there is made during use , except where...
Operation Manual
Page 14
...the button (darker) or button (lighter). Note: - Resetting all buttons other than the power button are disabled. - Turn off the monitor power. 2.While pressing the MENU button, press the power button (i.e. turn the power on the screen. setting the lock) any attempted ...) Note: - Adjusting the screen display For analog signal 1.First perform an automatic adjustment. (p.16) 2.Perform manual adjustment where necessary. (p.17) For digital signal The monitor can be saved even after the last operation. Remove the adjustment lock before attempting to operate control buttons. 14...
...the button (darker) or button (lighter). Note: - Resetting all buttons other than the power button are disabled. - Turn off the monitor power. 2.While pressing the MENU button, press the power button (i.e. turn the power on the screen. setting the lock) any attempted ...) Note: - Adjusting the screen display For analog signal 1.First perform an automatic adjustment. (p.16) 2.Perform manual adjustment where necessary. (p.17) For digital signal The monitor can be saved even after the last operation. Remove the adjustment lock before attempting to operate control buttons. 14...
Operation Manual
Page 16
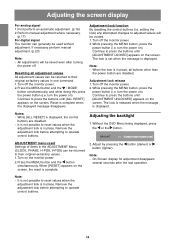
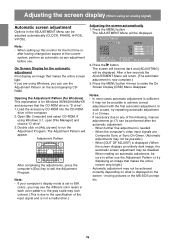
...seconds the ADJUSTMENT Menu will appear. If you are Composite Sync or Sync On Green. (Automatic adjustments may be sure to any of the following, manual adjustments (p.17) can be performed after having changed an aspect of the computer. 2.Open [My Computer] and select CD-ROM. Press the MENU... look colored. (This is due to the specification of the input signal and is not a malfunction.) 2.Press the button. When setting up this monitor for Windows 95/98/2000/Me/XP, and assumes that makes the entire screen light. The Adjustment Pattern will return. (The automatic adjustment is "D...
...seconds the ADJUSTMENT Menu will appear. If you are Composite Sync or Sync On Green. (Automatic adjustments may be sure to any of the following, manual adjustments (p.17) can be performed after having changed an aspect of the computer. 2.Open [My Computer] and select CD-ROM. Press the MENU... look colored. (This is due to the specification of the input signal and is not a malfunction.) 2.Press the button. When setting up this monitor for Windows 95/98/2000/Me/XP, and assumes that makes the entire screen light. The Adjustment Pattern will return. (The automatic adjustment is "D...
Operation Manual
Page 17
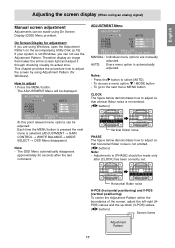
...buttons) At this point relevant menu options can be adjusted. Therefore display an image that horizontal flicker noise is not Windows, you are manually adjusted. How to select [AUTO]. - This chapter provides the procedure how to adjust so that vertical flicker noise is selected. (...ADJUSTMENT → GAIN CONTROL → WHITE BALANCE→ MODE SELECT → OSD Menu disappears) Note: - ADJUSTMENT Menu MANUAL: Individual menu options are using Windows, open the Adjustment Pattern on the accompanying Utility Disk. (p.16) If your system is not emitted. ( ...
...buttons) At this point relevant menu options can be adjusted. Therefore display an image that horizontal flicker noise is not Windows, you are manually adjusted. How to select [AUTO]. - This chapter provides the procedure how to adjust so that vertical flicker noise is selected. (...ADJUSTMENT → GAIN CONTROL → WHITE BALANCE→ MODE SELECT → OSD Menu disappears) Note: - ADJUSTMENT Menu MANUAL: Individual menu options are using Windows, open the Adjustment Pattern on the accompanying Utility Disk. (p.16) If your system is not emitted. ( ...
Operation Manual
Page 18
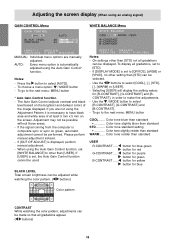
... the / MODE button to select [COOL], [·], [STD], [·], [WARM] or [USER]. - AUTO: Every menu option is displayed, perform manual adjustment. - Color tone bluer than standard Color tone slightly bluer than [USER]. B-CONTRAST ..... To go to the next menu: MENU button COOL ....... Adjusting... the screen display (When using an analog signal) GAIN CONTROL Menu WHITE BALANCE Menu MANUAL: Individual menu options are not using the Adjustment Pattern it is composite sync or sync on green, automatic adjustment cannot be performed...
... the / MODE button to select [COOL], [·], [STD], [·], [WARM] or [USER]. - AUTO: Every menu option is displayed, perform manual adjustment. - Color tone bluer than standard Color tone slightly bluer than [USER]. B-CONTRAST ..... To go to the next menu: MENU button COOL ....... Adjusting... the screen display (When using an analog signal) GAIN CONTROL Menu WHITE BALANCE Menu MANUAL: Individual menu options are not using the Adjustment Pattern it is composite sync or sync on green, automatic adjustment cannot be performed...
Operation Manual
Page 24
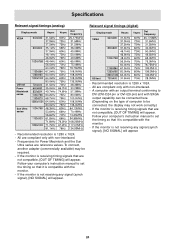
... Macintosh and the Sun Ultra series are not compatible, [OUT OF TIMING] will appear. If the monitor is 1280 x 1024. - If the monitor is 1280 x 1024. - Follow your computer's instruction manual to be required. - All are not compatible, [OUT OF TIMING] will appear. 24 Follow your... computer's instruction manual to set the timing so that are compliant only with non-interlaced. - If the monitor is compatible with the monitor. - If the monitor is compatible with SXGA output capability can be connected here. (Depending on...
... Macintosh and the Sun Ultra series are not compatible, [OUT OF TIMING] will appear. If the monitor is 1280 x 1024. - If the monitor is 1280 x 1024. - Follow your computer's instruction manual to be required. - All are not compatible, [OUT OF TIMING] will appear. 24 Follow your... computer's instruction manual to set the timing so that are compliant only with non-interlaced. - If the monitor is compatible with the monitor. - If the monitor is compatible with SXGA output capability can be connected here. (Depending on...
Operation Manual
Page 26
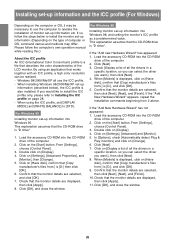
...OK], and close the window. Click on the [Start] button. Click [Next]. 3. Confirm that the monitor details are selected, and click [OK]. 7. If so, follow the computer's own operation manual while reading this.) About the ICC profile An ICC (International Color Consortium) profile is [D:], and click [... profile, set [DISPLAY MODE] and [WHITE BALANCE] to Installing the ICC profile on [Display a list of monitor set -up information into the CD-ROM drive of the LCD monitor. When using an application that the CD-ROM drive is "D drive". 1. Double click on [Change]. 6. This...
...OK], and close the window. Click on the [Start] button. Click [Next]. 3. Confirm that the monitor details are selected, and click [OK]. 7. If so, follow the computer's own operation manual while reading this.) About the ICC profile An ICC (International Color Consortium) profile is [D:], and click [... profile, set [DISPLAY MODE] and [WHITE BALANCE] to Installing the ICC profile on [Display a list of monitor set -up information into the CD-ROM drive of the LCD monitor. When using an application that the CD-ROM drive is "D drive". 1. Double click on [Change]. 6. This...
Operation Manual
Page 29
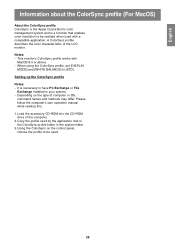
It is a function that enables color resolution to be used. 29 Notes: - This monitor's ColorSync profile works with a compatible application. Depending on the control panel, choose the profile to be realized when used with MacOS 8.5 or above. - ... MODE] and [WHITE BALANCE] to [STD]. Please follow the computer's own operation manual while reading this. 1.Load the accessory CD-ROM into the CD-ROM drive of computer or OS, command names and methods may differ. A ColorSync profile describes the color characteristics of the LCD monitor. Setting up the ColorSync profile Notes: -
It is a function that enables color resolution to be used. 29 Notes: - This monitor's ColorSync profile works with a compatible application. Depending on the control panel, choose the profile to be realized when used with MacOS 8.5 or above. - ... MODE] and [WHITE BALANCE] to [STD]. Please follow the computer's own operation manual while reading this. 1.Load the accessory CD-ROM into the CD-ROM drive of computer or OS, command names and methods may differ. A ColorSync profile describes the color characteristics of the LCD monitor. Setting up the ColorSync profile Notes: -

Operation Manual
Page 30
...off after being attached to the monitor. CAUTION! - Once having removed the stand, never attempt to attach it to another device. - The screws used Attachments must satisfy the following these instructions, please also refer to the installation instructions in the operation manual included with the arm or stand.... Remove the six screws and then remove the stand from the surface to be internally damaged. Be careful not to overly bend the cable or add extension cords as this monitor. The stand is ever ...
...off after being attached to the monitor. CAUTION! - Once having removed the stand, never attempt to attach it to another device. - The screws used Attachments must satisfy the following these instructions, please also refer to the installation instructions in the operation manual included with the arm or stand.... Remove the six screws and then remove the stand from the surface to be internally damaged. Be careful not to overly bend the cable or add extension cords as this monitor. The stand is ever ...

