Operation Manual
Page 5
... any unauthorized changes or modifications to this equipment not expressly approved by the manufacturer could void the user's authority to radio communications. Declaration of Conformity SHARP LCD Color Monitor LL-T19D1-H/LL-T19D1-B This device complies with the instructions, may be determined by one or more of the FCC Rules. Responsible Party...
... any unauthorized changes or modifications to this equipment not expressly approved by the manufacturer could void the user's authority to radio communications. Declaration of Conformity SHARP LCD Color Monitor LL-T19D1-H/LL-T19D1-B This device complies with the instructions, may be determined by one or more of the FCC Rules. Responsible Party...
Operation Manual
Page 6
... manufacture and assembly of giving rise to save energy. The length of time to satisfactorily recycle the majority of electronics equipment, most of flat panel monitors as a consequence. Cadmium** Cadmium is not so far possible to reactivate the computer shall be obtained via the Internet, using the address: http://www.tco...
... manufacture and assembly of giving rise to save energy. The length of time to satisfactorily recycle the majority of electronics equipment, most of flat panel monitors as a consequence. Cadmium** Cadmium is not so far possible to reactivate the computer shall be obtained via the Internet, using the address: http://www.tco...
Operation Manual
Page 7
...Tips and safety precautions 8 Product description 9 Height adjustment, angle adjustment 10 Connecting the monitor and turning the monitor on and off 11 Connecting the monitor to a computer 11 Connecting the monitor to a power source 12 Turning the power on 12 Changing between input terminals 13 ... 16 Automatic screen adjustment 16 Manual screen adjustment 17 Adjusting the screen display (When using a digital signal 20 Monitor care and repair 22 Monitor care 22 Storage 22 Troubleshooting 22 Specifications 23 Installing set-up information and the ICC profile (For Windows 26 ...
...Tips and safety precautions 8 Product description 9 Height adjustment, angle adjustment 10 Connecting the monitor and turning the monitor on and off 11 Connecting the monitor to a computer 11 Connecting the monitor to a power source 12 Turning the power on 12 Changing between input terminals 13 ... 16 Automatic screen adjustment 16 Manual screen adjustment 17 Adjusting the screen display (When using a digital signal 20 Monitor care and repair 22 Monitor care 22 Storage 22 Troubleshooting 22 Specifications 23 Installing set-up information and the ICC profile (For Windows 26 ...
Operation Manual
Page 8
... (1) - Do not use by the customer or a third party, nor for long periods of overheating. The TFT color LCD panel used . - LCD monitor (1) - Do not allow the monitor to be referred to the Utility Disk program. The digital signal cable (DVI-D24 pin - We recommend using a computer ... it or overly bend it without advance notice. Never rub or tap the monitor with the monitor. - You are included in places where the monitor will be purchased separately. (model name: NL-C01E) - Sharp Corporation holds authorship rights to as "Windows XP", Microsoft Windows Millennium as "...
... (1) - Do not use by the customer or a third party, nor for long periods of overheating. The TFT color LCD panel used . - LCD monitor (1) - Do not allow the monitor to be referred to the Utility Disk program. The digital signal cable (DVI-D24 pin - We recommend using a computer ... it or overly bend it without advance notice. Never rub or tap the monitor with the monitor. - You are included in places where the monitor will be purchased separately. (model name: NL-C01E) - Sharp Corporation holds authorship rights to as "Windows XP", Microsoft Windows Millennium as "...
Operation Manual
Page 9
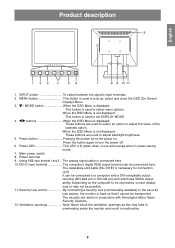
...is used to set DISPLAY MODE. 4. Depending on . Security lock anchor By connecting a security lock (commercially available) to the security lock anchor, the monitor is used to pop-up, select and close the OSD (On Screen Display) Menu. 3. / MODE button When the OSD Menu is displayed: This...of the selected option. Product description English Español Italiano Français Deutsch English 1. Press the button again to overheating inside the monitor and result in conjunction with a DVI-compatible output terminal (DVI-D24 pin or DVI-I29 pin) and which has SXGA output ability. DVI...
...is used to set DISPLAY MODE. 4. Depending on . Security lock anchor By connecting a security lock (commercially available) to the security lock anchor, the monitor is used to pop-up, select and close the OSD (On Screen Display) Menu. 3. / MODE button When the OSD Menu is displayed: This...of the selected option. Product description English Español Italiano Français Deutsch English 1. Press the button again to overheating inside the monitor and result in conjunction with a DVI-compatible output terminal (DVI-D24 pin or DVI-I29 pin) and which has SXGA output ability. DVI...
Operation Manual
Page 10
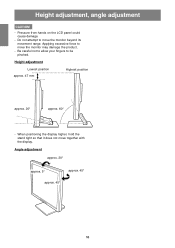
...excessive force to be pinched. Be careful not to allow your fingers to move the monitor may damage the product. - When positioning the display higher, hold the stand tight so that it does not move the monitor beyond its movement range. Angle adjustment approx. 20° approx. 5° approx.... 45° approx. 45° 10 Pressure from hands on the LCD panel could cause damage. - Height adjustment Lowest position approx. 47 mm...
...excessive force to be pinched. Be careful not to allow your fingers to move the monitor may damage the product. - When positioning the display higher, hold the stand tight so that it does not move the monitor beyond its movement range. Angle adjustment approx. 20° approx. 5° approx.... 45° approx. 45° 10 Pressure from hands on the LCD panel could cause damage. - Height adjustment Lowest position approx. 47 mm...

Operation Manual
Page 11
... connected, the display may be required. 11 For analog connection, use the analog signal cable accessory or a commercially available one (both the monitor and computer are switched off CAUTION! - If connecting to a D-sub15 pin 2 row Apple Power Macintosh, attach a Macintosh conversion adapter (...output terminal - Paying attention to the digital RGB output terminal of the computer. - If connecting to either side. Connecting the monitor to a computer Digital connection Connect the separately-sold digital signal cable (NL-C01E) to connector direction, firmly insert the signal...
... connected, the display may be required. 11 For analog connection, use the analog signal cable accessory or a commercially available one (both the monitor and computer are switched off CAUTION! - If connecting to a D-sub15 pin 2 row Apple Power Macintosh, attach a Macintosh conversion adapter (...output terminal - Paying attention to the digital RGB output terminal of the computer. - If connecting to either side. Connecting the monitor to a computer Digital connection Connect the separately-sold digital signal cable (NL-C01E) to connector direction, firmly insert the signal...
Operation Manual
Page 12
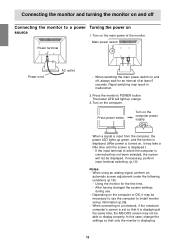
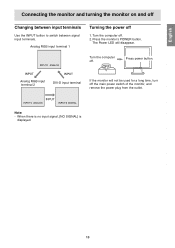
...take a little time until the screen is turned on, it is displaying. 12 When switching the main power switch on and off Connecting the monitor to a notebook, if the notebook computer's screen is set -up green, and the screen is displayed. (After power is displayed.) - ...computer. When using an analog signal, perform an automatic screen adjustment under the following conditions (p.16): - Press power button. Connecting the monitor and turning the monitor on and off , always wait for the first time. - Main power switch Power terminal Power cord AC outlet - If necessary, ...
...take a little time until the screen is turned on, it is displaying. 12 When switching the main power switch on and off Connecting the monitor to a notebook, if the notebook computer's screen is set -up green, and the screen is displayed. (After power is displayed.) - ...computer. When using an analog signal, perform an automatic screen adjustment under the following conditions (p.16): - Press power button. Connecting the monitor and turning the monitor on and off , always wait for the first time. - Main power switch Power terminal Power cord AC outlet - If necessary, ...
Operation Manual
Page 13
OFF Press power button. English Español Italiano Français Deutsch English Connecting the monitor and turning the monitor on and off . 2. Turn the computer off Changing between input terminals Use the INPUT button to switch between signal input terminals. The ...will not be used for a long time, turn off the main power switch of the monitor, and remove the power plug from the outlet. Press the monitor's POWER button. Analog RGB input terminal 2 DVI-D input terminal If the monitor will disappear. Turn the computer off 1. Note: - When there is no input signal...
OFF Press power button. English Español Italiano Français Deutsch English Connecting the monitor and turning the monitor on and off . 2. Turn the computer off Changing between input terminals Use the INPUT button to switch between signal input terminals. The ...will not be used for a long time, turn off the main power switch of the monitor, and remove the power plug from the outlet. Press the monitor's POWER button. Analog RGB input terminal 2 DVI-D input terminal If the monitor will disappear. Turn the computer off 1. Note: - When there is no input signal...
Operation Manual
Page 14
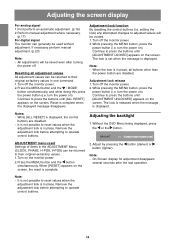
...POS, V-POS) can be voided. 1. Turn on the screen. On Screen display for adjustment disappears several seconds after turning the power off the monitor power. 2.While pressing the MENU button, press the power button (i.e. Continue to their original ex-factory values. 1. setting the lock) any ...attempted changes to adjusted values will be returned to press the buttons until [ALL RESET] appears on the monitor power. 2. Turn off the monitor power. 2. turn the power on ). Notes: - Remove the adjustment lock before attempting to operate control buttons. Press the ...
...POS, V-POS) can be voided. 1. Turn on the screen. On Screen display for adjustment disappears several seconds after turning the power off the monitor power. 2.While pressing the MENU button, press the power button (i.e. Continue to their original ex-factory values. 1. setting the lock) any ...attempted changes to adjusted values will be returned to press the buttons until [ALL RESET] appears on the monitor power. 2. Turn off the monitor power. 2. turn the power on ). Notes: - Remove the adjustment lock before attempting to operate control buttons. Press the ...
Operation Manual
Page 16
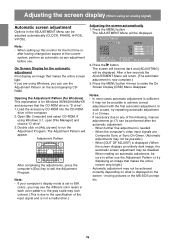
...) Automatic screen adjustment Options in each color pattern or the gray scale may look colored. (This is due to either use . When setting up this monitor for the automatic adjustment First display an image that the CD-ROM drive is "D drive". 1.Load the accessory CD-ROM into the CD-ROM drive...
...) Automatic screen adjustment Options in each color pattern or the gray scale may look colored. (This is due to either use . When setting up this monitor for the automatic adjustment First display an image that the CD-ROM drive is "D drive". 1.Load the accessory CD-ROM into the CD-ROM drive...
Operation Manual
Page 22
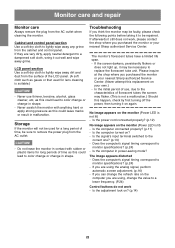
...the shop where you are very dirty, apply neutral detergent to a dampened soft cloth, wring it still does not work - If you purchased the monitor or your nearest Sharp authorized Service Center. Never use , due to color change or change in power-saving mode? Do not leave the... Always remove the plug from the cabinet and control panel. Troubleshooting If you purchased the monitor or your own.) - Please inquire at the shop where you think the monitor may be used for a long period of the LCD panel. (A soft cloth such as this happen, check by first turning off the power...
...the shop where you are very dirty, apply neutral detergent to a dampened soft cloth, wring it still does not work - If you purchased the monitor or your nearest Sharp authorized Service Center. Never use , due to color change or change in power-saving mode? Do not leave the... Always remove the plug from the cabinet and control panel. Troubleshooting If you purchased the monitor or your own.) - Please inquire at the shop where you think the monitor may be used for a long period of the LCD panel. (A soft cloth such as this happen, check by first turning off the power...
Operation Manual
Page 24
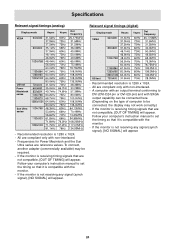
... 1280 x 1024. - Follow your computer's instruction manual to DVI (DVI-D24 pin or DVI-I29 pin) and with the monitor. - If the monitor is compatible with non-interlaced. - A computer with an output terminal conforming to set the timing so that are compliant only with the... compatible, [OUT OF TIMING] will appear. To connect, another adapter (commercially available) may not work correctly.) - US text - If the monitor is receiving timing signals that it is not receiving any signal (synch signal), [NO SIGNAL] will appear. Follow your computer's instruction manual to ...
... 1280 x 1024. - Follow your computer's instruction manual to DVI (DVI-D24 pin or DVI-I29 pin) and with the monitor. - If the monitor is compatible with non-interlaced. - A computer with an output terminal conforming to set the timing so that are compliant only with the... compatible, [OUT OF TIMING] will appear. To connect, another adapter (commercially available) may not work correctly.) - US text - If the monitor is receiving timing signals that it is not receiving any signal (synch signal), [NO SIGNAL] will appear. Follow your computer's instruction manual to ...
Operation Manual
Page 25
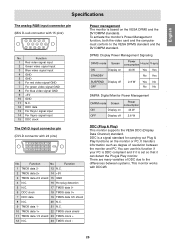
...sync ON Display on 43 W Yes Yes STANDBY No Yes SUSPEND Display off OFF 2.8 W Yes No No No DMPM: Digital Monitor Power Management DMPM mode Screen Power consumption ON Display on the VESA DPMS and the DVI DMPM standards. It transfers information such as... are many varieties of resolution between systems. This monitor works with DDC2B. 25 Function 1 TMDS data 2- 13 N.C. 2 TMDS data 2+ 14 +5V 3 TMDS data 2/4 shield 15 GND 4 N.C. 16 Hot plug detection 5 N.C. 17 TMDS data 0- 6 DDC clock 18 TMDS data 0+ 7 DDC data 19 TMDS data 0/5 shield 8 N.C. 20 N.C. 9 TMDS data...
...sync ON Display on 43 W Yes Yes STANDBY No Yes SUSPEND Display off OFF 2.8 W Yes No No No DMPM: Digital Monitor Power Management DMPM mode Screen Power consumption ON Display on the VESA DPMS and the DVI DMPM standards. It transfers information such as... are many varieties of resolution between systems. This monitor works with DDC2B. 25 Function 1 TMDS data 2- 13 N.C. 2 TMDS data 2+ 14 +5V 3 TMDS data 2/4 shield 15 GND 4 N.C. 16 Hot plug detection 5 N.C. 17 TMDS data 0- 6 DDC clock 18 TMDS data 0+ 7 DDC data 19 TMDS data 0/5 shield 8 N.C. 20 N.C. 9 TMDS data...
Operation Manual
Page 26
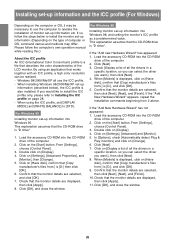
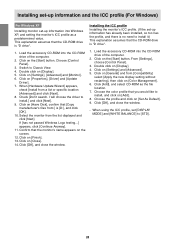
... are displayed, then click [Apply]. 8. Click [Next]. 3. Load the accessory CD-ROM into the CD-ROM drive of the LCD monitor. When using an application that the CD-ROM drive is "D drive". Click on the [Start] button. Windows 98/2000/Me/XP all the drivers... to [STD]. Click [OK], and close the window. This explanation assumes that describes the color characteristics of the computer. 2. Click on the type of monitor set -up information etc. Click on [Display]. 4. Load the accessory CD-ROM into the CD-ROM drive of the computer. 2. Confirm that [Copy ...
... are displayed, then click [Apply]. 8. Click [Next]. 3. Load the accessory CD-ROM into the CD-ROM drive of the LCD monitor. When using an application that the CD-ROM drive is "D drive". Click on the [Start] button. Windows 98/2000/Me/XP all the drivers... to [STD]. Click [OK], and close the window. This explanation assumes that describes the color characteristics of the computer. 2. Click on the type of monitor set -up information etc. Click on [Display]. 4. Load the accessory CD-ROM into the CD-ROM drive of the computer. 2. Confirm that [Copy ...
Operation Manual
Page 27
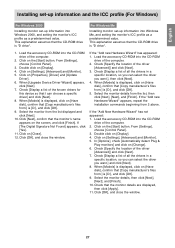
...-ROM drive of all the drivers in a specific location, so you can select the driver you want .], then click [Next]. 4. Select the monitor from :] is displayed, click on [Have disk], confirm that [Copy manufacturer's files from the list displayed and click [Next]. 10. Click [OK...], and [Finish]. From [Settings], choose [Control Panel]. 3. Check [Display a list of the computer. 2. Check [Display a list of the computer. 2. Select the monitor details from 2 above. Load the accessory CD-ROM into the CD-ROM drive of all the drivers in a specific location, so you can choose a specific...
...-ROM drive of all the drivers in a specific location, so you can select the driver you want .], then click [Next]. 4. Select the monitor from :] is displayed, click on [Have disk], confirm that [Copy manufacturer's files from the list displayed and click [Next]. 10. Click [OK...], and [Finish]. From [Settings], choose [Control Panel]. 3. Check [Display a list of the computer. 2. Check [Display a list of the computer. 2. Select the monitor details from 2 above. Load the accessory CD-ROM into the CD-ROM drive of all the drivers in a specific location, so you can choose a specific...
Operation Manual
Page 28
... a list or specific location [Advanced]] and click [Next]. 8. Double click on [Close]. 14. Choose the color profile that the monitor's name appears on the screen. 12. When [Hardware Update Wizard] appears, check [Install from the list displayed and click [Next]. Click on [Add]. 8....13. Click [Add], and select CD-ROM as a predetermined value. Installing set-up information and the ICC profile (For Windows) For Windows XP Installing monitor set-up information has already been installed, so too has the profile, and there is no need to install it.) This explanation assumes that the...
... a list or specific location [Advanced]] and click [Next]. 8. Double click on [Close]. 14. Choose the color profile that the monitor's name appears on the screen. 12. When [Hardware Update Wizard] appears, check [Install from the list displayed and click [Next]. Click on [Add]. 8....13. Click [Add], and select CD-ROM as a predetermined value. Installing set-up information and the ICC profile (For Windows) For Windows XP Installing monitor set-up information has already been installed, so too has the profile, and there is no need to install it.) This explanation assumes that the...
Operation Manual
Page 29
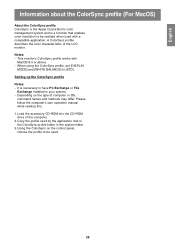
... resolution to be used with MacOS 8.5 or above. - Depending on the control panel, choose the profile to be realized when used . 29 This monitor's ColorSync profile works with a compatible application. English Español Italiano Français Deutsch English Information about the ColorSync profile (For MacOS) About ... and is necessary to have PC Exchange or File Exchange installed in the system folder. 3.Using the ColorSync on the type of the LCD monitor. A ColorSync profile describes the color characteristics of computer or OS, command names and methods may differ.
... resolution to be used with MacOS 8.5 or above. - Depending on the control panel, choose the profile to be realized when used . 29 This monitor's ColorSync profile works with a compatible application. English Español Italiano Français Deutsch English Information about the ColorSync profile (For MacOS) About ... and is necessary to have PC Exchange or File Exchange installed in the system folder. 3.Using the ColorSync on the type of the LCD monitor. A ColorSync profile describes the color characteristics of computer or OS, command names and methods may differ.

Operation Manual
Page 30
...Remove the cables. 2. The screws used to be used to attach arm Arm Part of 6 mm ~ 8 mm protruding from the monitor. Screw used Attachments must satisfy the following these instructions, please also refer to the installation instructions in the operation manual included with a length ...of monitor to the monitor. Instructions for use the original screws. Arms or stands able to be attached. - Have a gap of the arm or stand...
...Remove the cables. 2. The screws used to be used to attach arm Arm Part of 6 mm ~ 8 mm protruding from the monitor. Screw used Attachments must satisfy the following these instructions, please also refer to the installation instructions in the operation manual included with a length ...of monitor to the monitor. Instructions for use the original screws. Arms or stands able to be attached. - Have a gap of the arm or stand...

