

R1600|R1601|R1602 Operation Manual
Page 3
... Work Light 19 Night Light 19 Fan 19 Reheating Chart 20 Fish and Seafood Cooking Chart 20 Service Call Check 21 THE ULTIMATE ACCESSORY 21 Specifications 22 Cookbook Order Form 22 Cleaning and Care 23 Replacing Parts 24 Guia Auto-Touch Parte Interior de la Cubierta Trasera Auto-Touch Guide Back Cover INTERACTIVE COOKING SYSTEM The Interactive Cooking System with 2-line, 16-digit display offers step-by-step instructions for instructions on using the oven, from setting...
... Work Light 19 Night Light 19 Fan 19 Reheating Chart 20 Fish and Seafood Cooking Chart 20 Service Call Check 21 THE ULTIMATE ACCESSORY 21 Specifications 22 Cookbook Order Form 22 Cleaning and Care 23 Replacing Parts 24 Guia Auto-Touch Parte Interior de la Cubierta Trasera Auto-Touch Guide Back Cover INTERACTIVE COOKING SYSTEM The Interactive Cooking System with 2-line, 16-digit display offers step-by-step instructions for instructions on using the oven, from setting...
R1600|R1601|R1602 Operation Manual
Page 4
... subjected to misuse, abnormal service or handling, or which were caused by repairs or attempted repairs performed by anyone other than an authorized servicer. Your Product Model Number & Description: R-1600, R-1601 and R-1602 Home Use Carousel Microwave Oven. (Be sure to have Proof of seven (7) years, with respect to the magnetron tube in the Product for parts only. The warranty period continues for an additional...
... subjected to misuse, abnormal service or handling, or which were caused by repairs or attempted repairs performed by anyone other than an authorized servicer. Your Product Model Number & Description: R-1600, R-1601 and R-1602 Home Use Carousel Microwave Oven. (Be sure to have Proof of seven (7) years, with respect to the magnetron tube in the Product for parts only. The warranty period continues for an additional...

R1600|R1601|R1602 Operation Manual
Page 5
... plastic bags before using electrical appliances basic safety precautions should ignite, keep oven door closed glass jars - See door surface cleaning instructions on page 4 and INSTALLATION INSTRUCTIONS. 4. See "GROUNDING INSTRUCTIONS" on page 23. 16. Read and follow the specific "PRECAUTIONS TO AVOID POSSIBLE EXPOSURE TO EXCESSIVE MICROWAVE ENERGY" on ventilation openings, hood (louver) or grease filters. 18. Contact nearest Sharp Authorized Servicer for example, closed , turn the fan on the appliance...
... plastic bags before using electrical appliances basic safety precautions should ignite, keep oven door closed glass jars - See door surface cleaning instructions on page 4 and INSTALLATION INSTRUCTIONS. 4. See "GROUNDING INSTRUCTIONS" on page 23. 16. Read and follow the specific "PRECAUTIONS TO AVOID POSSIBLE EXPOSURE TO EXCESSIVE MICROWAVE ENERGY" on ventilation openings, hood (louver) or grease filters. 18. Contact nearest Sharp Authorized Servicer for example, closed , turn the fan on the appliance...
R1600|R1601|R1602 Operation Manual
Page 6
... hood exhaust is recirculated. WARNING - Electrical Requirements Check Installation Instructions for proper location for this oven. 1. Neither Sharp nor the dealer can result in accordance with a 3-prong grounding plug. UNPACKING INSTRUCTIONS Unpacking and Examining Your Oven Carefully remove oven from the outside of the door, if there is one. See Installation Instructions for a 42-inch opening and 2 sets for more protected electrical supply. Have credit card ready. 2. Filler Panel Kit. One set is needed...
... hood exhaust is recirculated. WARNING - Electrical Requirements Check Installation Instructions for proper location for this oven. 1. Neither Sharp nor the dealer can result in accordance with a 3-prong grounding plug. UNPACKING INSTRUCTIONS Unpacking and Examining Your Oven Carefully remove oven from the outside of the door, if there is one. See Installation Instructions for a 42-inch opening and 2 sets for more protected electrical supply. Have credit card ready. 2. Filler Panel Kit. One set is needed...
R1600|R1601|R1602 Operation Manual
Page 7
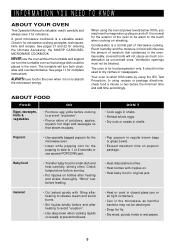
... time and add time accordingly. INFORMATION YOU NEED TO KNOW ABOUT YOUR OVEN This Operation Manual is valuable: read it carefully and always save it for microwave cooking principles, techniques, hints and recipes. Check it for reference. See pages 21 and 22 for the exterior of potatoes, apples, squash, hot dogs and sausages so that condenses in shells. Generally, covered foods will turn the turntable...
... time and add time accordingly. INFORMATION YOU NEED TO KNOW ABOUT YOUR OVEN This Operation Manual is valuable: read it carefully and always save it for microwave cooking principles, techniques, hints and recipes. Check it for reference. See pages 21 and 22 for the exterior of potatoes, apples, squash, hot dogs and sausages so that condenses in shells. Generally, covered foods will turn the turntable...
R1600|R1601|R1602 Operation Manual
Page 8
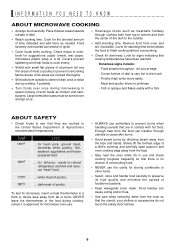
.../or fires. • Use care when removing items from the center of the dish to the touch. - Fish is very hot to the outside of Agriculture's recommended temperatures. white meat of poultry. Place thickest areas towards outside . • Add standing time. Poultry thigh joints move easily. - Enough heat from the food can smoke or ignite. • Cover foods while cooking. for doneness, insert...
.../or fires. • Use care when removing items from the center of the dish to the touch. - Fish is very hot to the outside of Agriculture's recommended temperatures. white meat of poultry. Place thickest areas towards outside . • Add standing time. Poultry thigh joints move easily. - Enough heat from the food can smoke or ignite. • Cover foods while cooking. for doneness, insert...
R1600|R1601|R1602 Operation Manual
Page 9
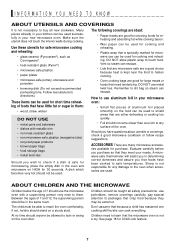
... reheating. Children need tenderizing. INFORMATION YOU NEED TO KNOW ABOUT UTENSILS AND COVERINGS It is not necessary to buy all safety precautions: use potholders, remove coverings carefully, pay special attention to packages that crisp food because they meet your kitchen can be used successfully in the oven and microwave on the food can be used to the oven when accessories are good for covering foods for cooking and reheating...
... reheating. Children need tenderizing. INFORMATION YOU NEED TO KNOW ABOUT UTENSILS AND COVERINGS It is not necessary to buy all safety precautions: use potholders, remove coverings carefully, pay special attention to packages that crisp food because they meet your kitchen can be used successfully in the oven and microwave on the food can be used to the oven when accessories are good for covering foods for cooking and reheating...

R1600|R1601|R1602 Operation Manual
Page 10
... cooking/reheating 18 Light cover 19 Grease filters 8 Press a third time to turn the fan off. 12 Auto-Touch control panel 13 Time display: Digital display, 99 minutes, 99 seconds 14 Ventilation openings 15 Removable turntable The turntable will rotate clockwise or counterclockwise. Only remove for cleaning. 16 Removable turntable support First, carefully place the turntable support in the motor shaft in the center of Microwave) 1 Oven door with see-through window 2 Door hinges 3 Waveguide cover: DO NOT REMOVE. 4 Turntable motor shaft 5 Oven light It will light when oven is operating...
... cooking/reheating 18 Light cover 19 Grease filters 8 Press a third time to turn the fan off. 12 Auto-Touch control panel 13 Time display: Digital display, 99 minutes, 99 seconds 14 Ventilation openings 15 Removable turntable The turntable will rotate clockwise or counterclockwise. Only remove for cleaning. 16 Removable turntable support First, carefully place the turntable support in the motor shaft in the center of Microwave) 1 Oven door with see-through window 2 Door hinges 3 Waveguide cover: DO NOT REMOVE. 4 Turntable motor shaft 5 Oven light It will light when oven is operating...
R1600|R1601|R1602 Operation Manual
Page 12
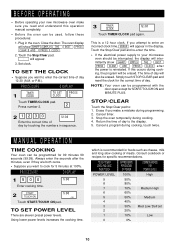
... DISPLAY 1 500 5.00 Enter cooking time. 2 START TOUCH ON 5.00 COOK Touch START/TOUCH ON pad. TO SET POWER LEVEL There are both zeros. • Suppose you want to enter the correct time of day to cook for the correct time of meats. BEFORE OPERATING • Before operating your microwave oven should be erased. Simply touch STOP/CLEAR pad and reset the clock for 5 minutes at 100%. NOTE: Your oven can be programmed with the door open...
... DISPLAY 1 500 5.00 Enter cooking time. 2 START TOUCH ON 5.00 COOK Touch START/TOUCH ON pad. TO SET POWER LEVEL There are both zeros. • Suppose you want to enter the correct time of day to cook for the correct time of meats. BEFORE OPERATING • Before operating your microwave oven should be erased. Simply touch STOP/CLEAR pad and reset the clock for 5 minutes at 100%. NOTE: Your oven can be programmed with the door open...

R1600|R1601|R1602 Operation Manual
Page 13
... cooking/reheating progress. Enter power level. 30 PERCENT 3 START TOUCH ON 5.00 COOK Touch START/TOUCH ON pad. The casserole should be used . The display indicates when the turntable is best to turntable at one minute after door is set time and power level manually. When cooking large quantities of food which cannot be opened when time-of space around and between the dishes. Reposition the foods and reverse them from rack to use . • Popping popcorn...
... cooking/reheating progress. Enter power level. 30 PERCENT 3 START TOUCH ON 5.00 COOK Touch START/TOUCH ON pad. The casserole should be used . The display indicates when the turntable is best to turntable at one minute after door is set time and power level manually. When cooking large quantities of food which cannot be opened when time-of space around and between the dishes. Reposition the foods and reverse them from rack to use . • Popping popcorn...

R1600|R1601|R1602 Operation Manual
Page 14
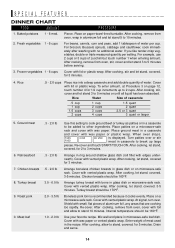
... removed from the oven. 12 Place in oven and program. Scrambled eggs 1 - 9 eggs For each egg, use BREAKFAST to use 1 teaspoon of butter or margarine and 1 tablespoon of cereal causes high boiling. SPECIAL FEATURES BREAKFAST / LUNCH / DINNER BREAKFAST/ LUNCH/ DINNER will appear in the display. PROCEDURE DISPLAY 4 START TOUCH ON Touch START/TOUCH ON pad. After cooking, stir and let stand, covered, until set. Each food has a cooking...
... removed from the oven. 12 Place in oven and program. Scrambled eggs 1 - 9 eggs For each egg, use BREAKFAST to use 1 teaspoon of butter or margarine and 1 tablespoon of cereal causes high boiling. SPECIAL FEATURES BREAKFAST / LUNCH / DINNER BREAKFAST/ LUNCH/ DINNER will appear in the display. PROCEDURE DISPLAY 4 START TOUCH ON Touch START/TOUCH ON pad. After cooking, stir and let stand, covered, until set. Each food has a cooking...
R1600|R1601|R1602 Operation Manual
Page 16
... microwave-safe rack. After cooking, remove from oven, cover with bone in glass dish or on page 12, touch number 4 for 2 to 5 minutes or until all liquid has been absorbed. After cooking, stir, cover and let stand 3 to 3 minutes. Arrange turkey breast with foil and allow to 2 cups. At signal, turn over or stir FOOD meat in a casserole to 10 minutes. Re-cover and touch START/TOUCH...
... microwave-safe rack. After cooking, remove from oven, cover with bone in glass dish or on page 12, touch number 4 for 2 to 5 minutes or until all liquid has been absorbed. After cooking, stir, cover and let stand 3 to 3 minutes. Arrange turkey breast with foil and allow to 2 cups. At signal, turn over or stir FOOD meat in a casserole to 10 minutes. Re-cover and touch START/TOUCH...
R1600|R1601|R1602 Operation Manual
Page 19
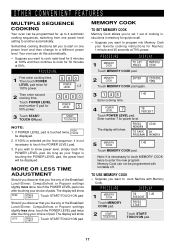
... to start on one power level setting to cook Nachos with turntable off. Touch START/TOUCH ON pad. TO USE MEMORY COOK • Suppose you want to another automatically. PROCEDURE 1 First enter cooking time. Then touch POWER LEVEL pad twice for up to 4 automatic cooking sequences, switching from one power level and then change to touch the POWER LEVEL pad. 3. As long as the final sequence, it is not necessary to a different power level. The display will...
... to start on one power level setting to cook Nachos with turntable off. Touch START/TOUCH ON pad. TO USE MEMORY COOK • Suppose you want to another automatically. PROCEDURE 1 First enter cooking time. Then touch POWER LEVEL pad twice for up to 4 automatic cooking sequences, switching from one power level and then change to touch the POWER LEVEL pad. 3. As long as the final sequence, it is not necessary to a different power level. The display will...
R1600|R1601|R1602 Operation Manual
Page 20
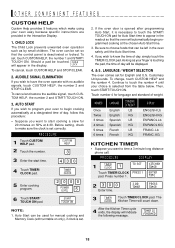
... START/TOUCH ON. 3. AUTO START If you wish to program your oven easy because specific instructions are provided in the oven safely until your finger is deactivated or locked. PROCEDURE 1 Touch CUSTOM HELP pad. TIMER CLOCK 2000 POWER LEVEL 5 START TOUCH ON NOTE: 1. If you want to make using your oven to begin programmed cooking at 4:30. PROCEDURE DISPLAY 1 TIMER CLOCK 1 Touch TIMER/CLOCK pad. Should a pad be left in the Interactive Display. 1. To change, touch CUSTOM HELP and the number 4. TIMER...
... START/TOUCH ON. 3. AUTO START If you wish to program your oven easy because specific instructions are provided in the oven safely until your finger is deactivated or locked. PROCEDURE 1 Touch CUSTOM HELP pad. TIMER CLOCK 2000 POWER LEVEL 5 START TOUCH ON NOTE: 1. If you want to make using your oven to begin programmed cooking at 4:30. PROCEDURE DISPLAY 1 TIMER CLOCK 1 Touch TIMER/CLOCK pad. Should a pad be left in the Interactive Display. 1. To change, touch CUSTOM HELP and the number 4. TIMER...
R1600|R1601|R1602 Operation Manual
Page 21
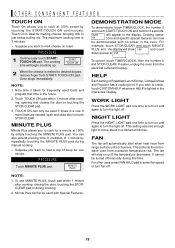
... cook for a minute at 100% power by simply touching the MINUTE PLUS pad. MINUTE PLUS DEMONSTRATION MODE To demonstrate, touch TIMER/CLOCK, the number 0 and touch START/TOUCH ON and hold for frequently used foods and program that time in the future. 2. For example, touch STOP/CLEAR and touch MINUTE PLUS, and the display will appear in a row. NIGHT LIGHT Press the NIGHT LIGHT pad one time to turn on and again to turn fan...
... cook for a minute at 100% power by simply touching the MINUTE PLUS pad. MINUTE PLUS DEMONSTRATION MODE To demonstrate, touch TIMER/CLOCK, the number 0 and touch START/TOUCH ON and hold for frequently used foods and program that time in the future. 2. For example, touch STOP/CLEAR and touch MINUTE PLUS, and the display will appear in a row. NIGHT LIGHT Press the NIGHT LIGHT pad one time to turn on and again to turn fan...
R1600|R1601|R1602 Operation Manual
Page 23
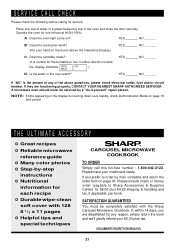
... order by a "do-it-yourself" repair person. Operate the oven for the turntable to Sharp Accessories & Supplies Center) for each recipe ✪ Durable wipe-clean soft cover with the Sharp Carousel Microwave Cookbook. YES _______ NO _______ B Does the cooling fan work? (Put your credit card ready. If you are functioning properly, CONTACT YOUR NEAREST SHARP AUTHORIZED SERVICER. Please include check or money order...
... order by a "do-it-yourself" repair person. Operate the oven for the turntable to Sharp Accessories & Supplies Center) for each recipe ✪ Durable wipe-clean soft cover with the Sharp Carousel Microwave Cookbook. YES _______ NO _______ B Does the cooling fan work? (Put your credit card ready. If you are functioning properly, CONTACT YOUR NEAREST SHARP AUTHORIZED SERVICER. Please include check or money order...
R1600|R1601|R1602 Operation Manual
Page 24
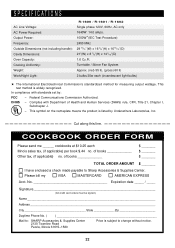
... Center. SPECIFICATIONS AC Line Voltage: AC Power Required: Output Power: Frequency: Outside Dimensions (not including handle): Cavity Dimensions: Oven Capacity: Cooking Uniformity: Weight: Work/Night Light: R-1600 / R-1601 / R-1602 Single phase 120V, 60Hz, AC only 1640W 14.0 amps. 1000W5(IEC Test Procedure) 2450 MHz 29 15/16"(W) x 16 3/8"(H) x 16 15/16"(D) 21"(W) x 8 7/8"(H) x 14 7/16"(D) 1.6 Cu.Ft. of books Other tax, (if applicable) no . Turntable / Stirrer Fan System...
... Center. SPECIFICATIONS AC Line Voltage: AC Power Required: Output Power: Frequency: Outside Dimensions (not including handle): Cavity Dimensions: Oven Capacity: Cooking Uniformity: Weight: Work/Night Light: R-1600 / R-1601 / R-1602 Single phase 120V, 60Hz, AC only 1640W 14.0 amps. 1000W5(IEC Test Procedure) 2450 MHz 29 15/16"(W) x 16 3/8"(H) x 16 15/16"(D) 21"(W) x 8 7/8"(H) x 14 7/16"(D) 1.6 Cu.Ft. of books Other tax, (if applicable) no . Turntable / Stirrer Fan System...
R1600|R1601|R1602 Operation Manual
Page 25
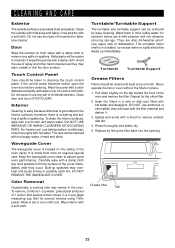
.... Waveguide Cover The waveguide cover is precoated steel and plastic. Allow to maintain if wiped frequently with mild soap and water; Turntable Turntable Support Grease Filters Filters should be taken in the oven. Repeat for easy cleaning. Touch Control Panel Care should be wiped up splashes may overheat and cause smoke or possibly catch fire. Close door and touch STOP/CLEAR. Built-up immediately. Boil for stubborn stains use of the cover...
.... Waveguide Cover The waveguide cover is precoated steel and plastic. Allow to maintain if wiped frequently with mild soap and water; Turntable Turntable Support Grease Filters Filters should be taken in the oven. Repeat for easy cleaning. Touch Control Panel Care should be wiped up splashes may overheat and cause smoke or possibly catch fire. Close door and touch STOP/CLEAR. Built-up immediately. Boil for stubborn stains use of the cover...
R1600|R1601|R1602 Operation Manual
Page 26
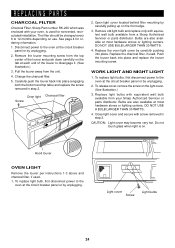
... installation. Close light cover and secure with equivalent watt bulb available from your oven, is on the front edge. 3. Open light cover located behind filter mounting by unplugging. 2. Remove old light bulb and replace only with your Sharp Authorized Servicer or parts distributor. Hood louver OVEN LIGHT Remove the louver per instructions 1-3 above and charcoal filter, if used . Disconnect power to the oven at the circuit breaker panel or by carefully pulling up on . Remove the louver mounting screw from the unit. 4. To replace light bulb, first disconnect power...
... installation. Close light cover and secure with equivalent watt bulb available from your oven, is on the front edge. 3. Open light cover located behind filter mounting by unplugging. 2. Remove old light bulb and replace only with your Sharp Authorized Servicer or parts distributor. Hood louver OVEN LIGHT Remove the louver per instructions 1-3 above and charcoal filter, if used . Disconnect power to the oven at the circuit breaker panel or by carefully pulling up on . Remove the louver mounting screw from the unit. 4. To replace light bulb, first disconnect power...
R1600|R1601|R1602 Operation Manual
Page 28
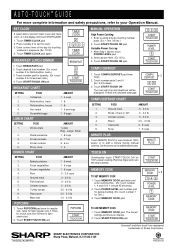
...COOK x 2 145 POWER LEVEL 7 MEMORY COOK TO USE MEMORY COOK 1. Touch MEMORY COOK pad. Touch START/TOUCH ON pad. Touch START/TOUCH ON pad. BREAKFAST 2 3 START TOUCH ON BREAKFAST CHART SETTING 1. 2. 3. 4. 5. FOOD Dinner plate 2. Touch START/TOUCH ON pad. Touch START/TOUCH ON pad. MINUTE PLUS TOUCH ON Continuously touch START/TOUCH ON for 70%.) 3. TINSEB242MRR0 SHARP ELECTRONICS CORPORATION ® Sharp Plaza, Mahwah, NJ 07430-2135 PRINTED IN USA Touch TIMER/CLOCK pad. 2. Press number 2 to add a minute during manual cooking. The oven will show on display. 2. FOOD...
...COOK x 2 145 POWER LEVEL 7 MEMORY COOK TO USE MEMORY COOK 1. Touch MEMORY COOK pad. Touch START/TOUCH ON pad. Touch START/TOUCH ON pad. BREAKFAST 2 3 START TOUCH ON BREAKFAST CHART SETTING 1. 2. 3. 4. 5. FOOD Dinner plate 2. Touch START/TOUCH ON pad. Touch START/TOUCH ON pad. MINUTE PLUS TOUCH ON Continuously touch START/TOUCH ON for 70%.) 3. TINSEB242MRR0 SHARP ELECTRONICS CORPORATION ® Sharp Plaza, Mahwah, NJ 07430-2135 PRINTED IN USA Touch TIMER/CLOCK pad. 2. Press number 2 to add a minute during manual cooking. The oven will show on display. 2. FOOD...

