User Manual
Page 3
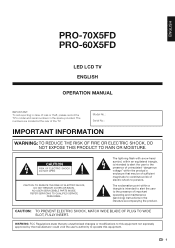
... to alert the user to the presence of uninsulated "dangerous voltage" within an equilateral triangle, is intended to alert the user to persons. ENGLISH PRO-70X5FD PRO-60X5FD LED LCD TV ENGLISH OPERATION MANUAL IMPORTANT: To aid reporting in case of loss or theft, please record the TV's model and serial numbers in the...
... to alert the user to the presence of uninsulated "dangerous voltage" within an equilateral triangle, is intended to alert the user to persons. ENGLISH PRO-70X5FD PRO-60X5FD LED LCD TV ENGLISH OPERATION MANUAL IMPORTANT: To aid reporting in case of loss or theft, please record the TV's model and serial numbers in the...

User Manual
Page 5
... with the cart, stand, tripod, bracket, or table specified by the manufacturer or have the same characteristics as an improper adjustment of your LED LCD TV, please read the Important Safety Instructions carefully before using this can result in proper operating condition. 21) Wall or ceiling mounting-When mounting...
... with the cart, stand, tripod, bracket, or table specified by the manufacturer or have the same characteristics as an improper adjustment of your LED LCD TV, please read the Important Safety Instructions carefully before using this can result in proper operating condition. 21) Wall or ceiling mounting-When mounting...
User Manual
Page 12
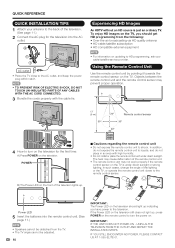
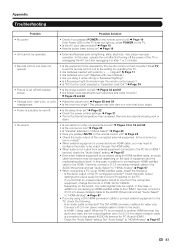
... unit. (See page 11.) • Speakers cannot be detached from the TV. • The TV angle cannot be adjusted. 10 IMPORTANT: The Power LED on the television should light up indicating you should get HD programming from the following: • Over-the-air broadcasting via HD quality antenna •... TV, or operate the remote control unit closer to shock. In addition, do not expose the remote control unit to the television. B) The Power LED on the TV is just an ordinary TV. IF YOU STILL ENCOUNTER NO POWER, PLEASE CONTACT US AT 1-855-ELITE-01. POWER ■ Cautions...
... unit. (See page 11.) • Speakers cannot be detached from the TV. • The TV angle cannot be adjusted. 10 IMPORTANT: The Power LED on the television should light up indicating you should get HD programming from the following: • Over-the-air broadcasting via HD quality antenna •... TV, or operate the remote control unit closer to shock. In addition, do not expose the remote control unit to the television. B) The Power LED on the TV is just an ordinary TV. IF YOU STILL ENCOUNTER NO POWER, PLEASE CONTACT US AT 1-855-ELITE-01. POWER ■ Cautions...
User Manual
Page 14
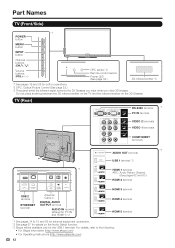
Part Names TV (Front/Side) *1 POWER button MENU button INPUT button Channel buttons (CHU/V) Volume buttons (VOLk/l) OPC sensor *2 Remote control sensor Power LED (See page 34.) 3D infrared emitter *3 *1 See pages 19 and 26 for PC IN and HDMI 1) *2 HDMI 3 terminal HDMI 4 terminal HDMI 5 terminal *1 See pages 14 ...
Part Names TV (Front/Side) *1 POWER button MENU button INPUT button Channel buttons (CHU/V) Volume buttons (VOLk/l) OPC sensor *2 Remote control sensor Power LED (See page 34.) 3D infrared emitter *3 *1 See pages 19 and 26 for PC IN and HDMI 1) *2 HDMI 3 terminal HDMI 4 terminal HDMI 5 terminal *1 See pages 14 ...
User Manual
Page 21
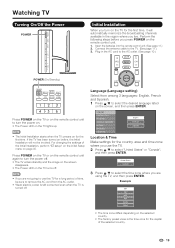
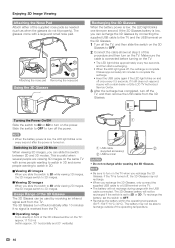
... to use the TV. 2 Press a/b to turn the power off. • The TV enters standby and the image on the screen disappears. • The Power LED on the TV turns off . Watching TV Turning On/Off the Power POWER Initial Installation When you turn on the TV for the first... the first time. For changing the settings of the selected country. 19 Connect the antenna cable to turn the power on. • The Power LED on the TV lights up. • The Initial Installation starts when the TV powers on before you are using the TV, and then press ENTER...
... to use the TV. 2 Press a/b to turn the power off. • The TV enters standby and the image on the screen disappears. • The Power LED on the TV turns off . Watching TV Turning On/Off the Power POWER Initial Installation When you turn on the TV for the first... the first time. For changing the settings of the selected country. 19 Connect the antenna cable to turn the power on. • The Power LED on the TV lights up. • The Initial Installation starts when the TV powers on before you are using the TV, and then press ENTER...
User Manual
Page 29
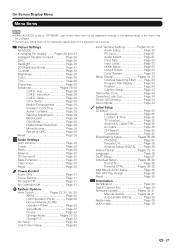
.......... Page 33 Program Title Display Page 33 Position Page 34 Caption Setup Page 34 Game Play Time Page 34 Operation Lock Out Page 34 Power LED Setting Page 34 Demo Mode Page 34 Initial Setup EZ Setup Page 35 Language Page 35 Location & Time Page 35 TV Location Page 35 Antenna... Page 28 OPC Page 28 Backlight Page 28 3D Brightness Boost Page 47 Contrast Page 28 Brightness Page 28 Color Page 28 Tint Page 28 Sharpness Page 28 Advanced Pages 28-29 C.M.S.-Hue Page 28 C.M.S.-Saturation Page 28 C.M.S.-Value Page 28 Color Temp Page 29 Motion Enhancement Page 29 Precision Color...
.......... Page 33 Program Title Display Page 33 Position Page 34 Caption Setup Page 34 Game Play Time Page 34 Operation Lock Out Page 34 Power LED Setting Page 34 Demo Mode Page 34 Initial Setup EZ Setup Page 35 Language Page 35 Location & Time Page 35 TV Location Page 35 Antenna... Page 28 OPC Page 28 Backlight Page 28 3D Brightness Boost Page 47 Contrast Page 28 Brightness Page 28 Color Page 28 Tint Page 28 Sharpness Page 28 Advanced Pages 28-29 C.M.S.-Hue Page 28 C.M.S.-Saturation Page 28 C.M.S.-Value Page 28 Color Temp Page 29 Motion Enhancement Page 29 Precision Color...
User Manual
Page 30
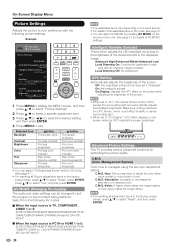
... and then press ENTER. 4 Press MENU to exit. Select from the following picture settings. Intelligent Variable Contrast This function adjusts the LED backlight according to the brightness of the selectable items in each area with the following AV modes. ■ When the input source.... C.M.S.-Value: A higher value makes the image brighter. Off: The brightness is a standard to adjust the color either more reddish or more sharpness • You can select "3D Brightness Boost" while in the displayed image. See page 23 for optimizing the picture quality. C.M.S. (Color ...
... and then press ENTER. 4 Press MENU to exit. Select from the following picture settings. Intelligent Variable Contrast This function adjusts the LED backlight according to the brightness of the selectable items in each area with the following AV modes. ■ When the input source.... C.M.S.-Value: A higher value makes the image brighter. Off: The brightness is a standard to adjust the color either more reddish or more sharpness • You can select "3D Brightness Boost" while in the displayed image. See page 23 for optimizing the picture quality. C.M.S. (Color ...
User Manual
Page 34
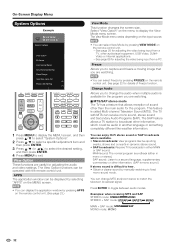
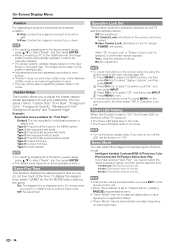
... Menu System Options Example S YSTEM O PTIONS System Options View Option 3D Setup Link Control Setup Input Terminal Setting Menu Design Operation Lock Out [Off] Power LED Setting [On] 1 Press MENU to display the MENU screen, and then press a/b to select "System Options". 2 Press a/b to select a specific adjustment item and then...
... Menu System Options Example S YSTEM O PTIONS System Options View Option 3D Setup Link Control Setup Input Terminal Setting Menu Design Operation Lock Out [Off] Power LED Setting [On] 1 Press MENU to display the MENU screen, and then press a/b to select "System Options". 2 Press a/b to select a specific adjustment item and then...
User Manual
Page 36
... Intelligent Variable Contrast/RGB+Y/Precision Color Plus/Connected TV/Feature Demo/Auto Play If you have selected "Auto Play", you want to turn off the LED, set the playback time. Default: The font specified by moving it up or down. • For resetting adjustments to the factory ... press INPUT. 3 Press CHU/V to select "Off", and then press INPUT. 4 Press MENU to adjust the position while in external input mode. Power LED Setting When this function is set to select "Reset", and then press ENTER. • The default value depends on input signal type or application status...
... Intelligent Variable Contrast/RGB+Y/Precision Color Plus/Connected TV/Feature Demo/Auto Play If you have selected "Auto Play", you want to turn off the LED, set the playback time. Default: The font specified by moving it up or down. • For resetting adjustments to the factory ... press INPUT. 3 Press CHU/V to select "Off", and then press INPUT. 4 Press MENU to adjust the position while in external input mode. Power LED Setting When this function is set to select "Reset", and then press ENTER. • The default value depends on input signal type or application status...

User Manual
Page 45
... the TV. 2 USB terminal This terminal is for recharging and supplying power. 3 3D/2D/OFF switch This button switches between 2D, 3D and OFF modes. 4 LED light Blinks once every second when the battery power is low. 5 Nose pad mount The dedicated nose pad can be mounted here. • Do not...
... the TV. 2 USB terminal This terminal is for recharging and supplying power. 3 3D/2D/OFF switch This button switches between 2D, 3D and OFF modes. 4 LED light Blinks once every second when the battery power is low. 5 Nose pad mount The dedicated nose pad can be mounted here. • Do not...
User Manual
Page 46
... an infrared signal sent from the 3D Glasses. It takes approximately 90 minutes to complete the recharge. • Insert the USB cable again if the LED light blinks on the TV. Slide the switch to OFF to a USB terminal on . The glasses come with a retail dealer or Elite LCD TV ...Authorized Service Center. 3 After the recharge has completed, turn off the power. • When the battery power is low, the LED light blinks once every second after 10 minutes if no signal is complete. If it still does not respond, inquire with a large and small nose...
... an infrared signal sent from the 3D Glasses. It takes approximately 90 minutes to complete the recharge. • Insert the USB cable again if the LED light blinks on the TV. Slide the switch to OFF to a USB terminal on . The glasses come with a retail dealer or Elite LCD TV ...Authorized Service Center. 3 After the recharge has completed, turn off the power. • When the battery power is low, the LED light blinks once every second after 10 minutes if no signal is complete. If it still does not respond, inquire with a large and small nose...

User Manual
Page 62
... at the same time to enter the code registration mode. 3 Press 0-9 to enter the manufacturer code. • Preset mode is finished once the LED no longer lights up. 4 After registering the code, the LED will stop blinking then turn off after one second. (If you perform an incorrect operation, the... LED will blink quickly then turn off.) BD/DVD mode BD Pioneer DVD Pioneer DVR Pioneer LD Pioneer VCR Pioneer SHARP BD/DVD SHARP AUDIO mode AUDIO SHARP SHARP (SOUND BAR) REMOTE CONTROL CODE NUMBER 01, 02 03 04, 05, 06 ...
... at the same time to enter the code registration mode. 3 Press 0-9 to enter the manufacturer code. • Preset mode is finished once the LED no longer lights up. 4 After registering the code, the LED will stop blinking then turn off after one second. (If you perform an incorrect operation, the... LED will blink quickly then turn off.) BD/DVD mode BD Pioneer DVD Pioneer DVR Pioneer LD Pioneer VCR Pioneer SHARP BD/DVD SHARP AUDIO mode AUDIO SHARP SHARP (SOUND BAR) REMOTE CONTROL CODE NUMBER 01, 02 03 04, 05, 06 ...
User Manual
Page 71
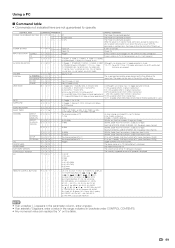
... command rejected. 1 _ _ _ On [RS-232C] The Power On command accepted. 2 _ _ _ On [IP] The Power On command accepted. With the commands in waiting status, the Power LED on the position-setting screen. D C C H * * * _ The channel number of TV (1-135) D A 2 P * * * * (0100-9999) D C 2 U * * * _ (1-999) An input change key) TV I A V D * _ _ _ 1: HDMI 1, 2: HDMI 2, 3: HDMI 3, 4: HDMI 4, 5: HDMI5, 6: COMPONENT...
... command rejected. 1 _ _ _ On [RS-232C] The Power On command accepted. 2 _ _ _ On [IP] The Power On command accepted. With the commands in waiting status, the Power LED on the position-setting screen. D C C H * * * _ The channel number of TV (1-135) D A 2 P * * * * (0100-9999) D C 2 U * * * _ (1-999) An input change key) TV I A V D * _ _ _ 1: HDMI 1, 2: HDMI 2, 3: HDMI 3, 4: HDMI 4, 5: HDMI5, 6: COMPONENT...
User Manual
Page 84
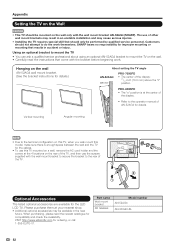
... them at the 4 locations on the wall only with the wall mount bracket AN-52AG4 (SHARP). The use of other wall mount brackets may result in an unstable installation and may be ...bracket. (See the bracket instructions for details.) About setting the TV angle AN-52AG4 0/5°/10° PRO-70X5FD • The center of the display: /25 64 inch (10.0 mm) above the "c" position. ... rear of the TV. 1 2 1 Optional Accessories The listed optional accessories are available for the LED LCD TV. Vertical mounting Angular mounting • Due to the terminal configuration on this TV...
... them at the 4 locations on the wall only with the wall mount bracket AN-52AG4 (SHARP). The use of other wall mount brackets may result in an unstable installation and may be ...bracket. (See the bracket instructions for details.) About setting the TV angle AN-52AG4 0/5°/10° PRO-70X5FD • The center of the display: /25 64 inch (10.0 mm) above the "c" position. ... rear of the TV. 1 2 1 Optional Accessories The listed optional accessories are available for the LED LCD TV. Vertical mounting Angular mounting • Due to the terminal configuration on this TV...
User Manual
Page 85
... room too bright? The picture may cause improper operation. When the TV is connected to "HDMI+Analog". Page 67 83 Page 19 If the Power LED on the TV does not light up, press POWER on the PC. Page 19 • Unit cannot be output through the HDMI cable. • When...
... room too bright? The picture may cause improper operation. When the TV is connected to "HDMI+Analog". Page 67 83 Page 19 If the Power LED on the TV does not light up, press POWER on the PC. Page 19 • Unit cannot be output through the HDMI cable. • When...

Brochure
Page 3
... off of it. It will be nearly impossible to the standard RGB palette. Contrast that challenge even the fastest camera sweeps. And a proprietary full array LED backlight technology that produces a significantly brighter and richer image. You'll experience a superior range of colors, with the addition of yellow pixels to keep your...
... off of it. It will be nearly impossible to the standard RGB palette. Contrast that challenge even the fastest camera sweeps. And a proprietary full array LED backlight technology that produces a significantly brighter and richer image. You'll experience a superior range of colors, with the addition of yellow pixels to keep your...

Brochure
Page 5
... The new Elite LCD TV, with its four pixel technology, enables image processing with greater precision. Since the individual zones of LEDs can be dimmed or brightened independently, the picture quality is what sets Elite LCD TVs apart from conventional LCDs. Coupled with RGB...lighting. This enables extremely high brightness that brings our magic to pass through than 8 million dots on the screen. Black Levels LED backlighting offers higher performance. Conventional Precision RGB Panel Color Plus Smoothness FluidMotion, which allows up to 20% more light to life Built...
... The new Elite LCD TV, with its four pixel technology, enables image processing with greater precision. Since the individual zones of LEDs can be dimmed or brightened independently, the picture quality is what sets Elite LCD TVs apart from conventional LCDs. Coupled with RGB...lighting. This enables extremely high brightness that brings our magic to pass through than 8 million dots on the screen. Black Levels LED backlighting offers higher performance. Conventional Precision RGB Panel Color Plus Smoothness FluidMotion, which allows up to 20% more light to life Built...


