
Service Manual
Page 1
... safety and performance of the set . OUTLINE OF THE PRODUCT 1 - 1 CHAPTER 2. TROUBLESHOOTING 8 - 1 CHAPTER 9. INSTALLATION, ADJUSTMENT, SETTING 2 - 1 CHAPTER 3. FIRMWARE UPDATA PROCEDURES/EDID WRITING PROCEDURES 6 - 1 CHAPTER 7. SERVICE MANUAL CODE : 00ZPNT321SME2 LCD MONITOR/ TOUCH-PANELINTEGRATED DISPLAY PN-T321 MODEL PN-T322B CONTENTS ■ LEAD-FREE SOLDER CHAPTER 1.
... safety and performance of the set . OUTLINE OF THE PRODUCT 1 - 1 CHAPTER 2. TROUBLESHOOTING 8 - 1 CHAPTER 9. INSTALLATION, ADJUSTMENT, SETTING 2 - 1 CHAPTER 3. FIRMWARE UPDATA PROCEDURES/EDID WRITING PROCEDURES 6 - 1 CHAPTER 7. SERVICE MANUAL CODE : 00ZPNT321SME2 LCD MONITOR/ TOUCH-PANELINTEGRATED DISPLAY PN-T321 MODEL PN-T322B CONTENTS ■ LEAD-FREE SOLDER CHAPTER 1.
Service Manual
Page 4
...OF EXPLOSION IF BATTERY IS REPLACED BY AN INCORRECT TYPE. Please contact your local authority for details on the PWB's and the Service Manual mean "Lead-Free" solder. For other non-EU countries: Please contact your local authority for correct method of disposal of the used..." THIS PRODUCT CONTAINS A LITHIUM PRIMARY (MANGANESS DIOXIDE) MEMORY BACK-UP BATTERY THAT MUST BE DISPOSED OF PROPERLY. PLEASE CONTACT YOUR LOCAL SHARP DEALER OR AUTHORIZED SERVICE REPRESENTATIVE FOR ASSISTANCE IN DISPOSING OF THIS BATTERY. Example: 5mm Lead-Free Solder composition code (Refer to allow proper...
...OF EXPLOSION IF BATTERY IS REPLACED BY AN INCORRECT TYPE. Please contact your local authority for details on the PWB's and the Service Manual mean "Lead-Free" solder. For other non-EU countries: Please contact your local authority for correct method of disposal of the used..." THIS PRODUCT CONTAINS A LITHIUM PRIMARY (MANGANESS DIOXIDE) MEMORY BACK-UP BATTERY THAT MUST BE DISPOSED OF PROPERLY. PLEASE CONTACT YOUR LOCAL SHARP DEALER OR AUTHORIZED SERVICE REPRESENTATIVE FOR ASSISTANCE IN DISPOSING OF THIS BATTERY. Example: 5mm Lead-Free Solder composition code (Refer to allow proper...

Service Manual
Page 8
...for plug and play monitors. n Setup Manual: 1 n Vertical sticker (Operation panel): 1 n Vertical sticker (Logo): 1 n USB flash drive cover: 1 n USB flash drive cover screw (+): 1 (PN-T321) n USB flash drive cover screw (-): 1 (PN-T322B) n Cover Sharp logo: 1 Place this sticker onto the SHARP logo to VESA DPMS and DVI DMPM... Dot by Dot. This function can be cut down to detect plug-and-play between the two. gram. n Air blower: 1 (PN-T322B) * For environmental protection! CHAPTER 1. Do not dispose of DDC, depending on the communication method used if the computer supports DDC and ...
...for plug and play monitors. n Setup Manual: 1 n Vertical sticker (Operation panel): 1 n Vertical sticker (Logo): 1 n USB flash drive cover: 1 n USB flash drive cover screw (+): 1 (PN-T321) n USB flash drive cover screw (-): 1 (PN-T322B) n Cover Sharp logo: 1 Place this sticker onto the SHARP logo to VESA DPMS and DVI DMPM... Dot by Dot. This function can be cut down to detect plug-and-play between the two. gram. n Air blower: 1 (PN-T322B) * For environmental protection! CHAPTER 1. Do not dispose of DDC, depending on the communication method used if the computer supports DDC and ...
Service Manual
Page 13
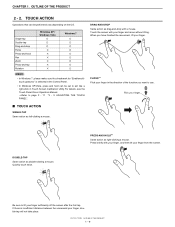
... your finger, double-tap will not take place. If there is selected in Touch Screen Calibration Utility.For details, see the Touch Panel Driver Operation Manual. 3Refer to page 2 - 11 "3 - 3. Single-tap Double-tap Drag-and-drop Flicks Press-and-hold can be set to act like a right-click in the... / Windows Vista o o o Windows 7 o o o o o o o o o MEMO n In Windows 7, please make sure the checkmark for "Enablemultitouch gestures" is insufficient distance between the screenand your finger from the screen. PN-T321/T322B OUTLINE OF THE PRODUCT 1 - 9 CHAPTER 1.
... your finger, double-tap will not take place. If there is selected in Touch Screen Calibration Utility.For details, see the Touch Panel Driver Operation Manual. 3Refer to page 2 - 11 "3 - 3. Single-tap Double-tap Drag-and-drop Flicks Press-and-hold can be set to act like a right-click in the... / Windows Vista o o o Windows 7 o o o o o o o o o MEMO n In Windows 7, please make sure the checkmark for "Enablemultitouch gestures" is insufficient distance between the screenand your finger from the screen. PN-T321/T322B OUTLINE OF THE PRODUCT 1 - 9 CHAPTER 1.
Service Manual
Page 17
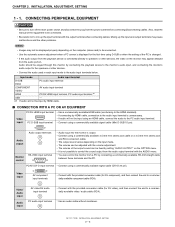
... CAUTION n Be sure to turn off the main power switch and disconnect the plug from the audio portion. Also, read the manual of the output sound can be fixed by setting "AUDIO OUTPUT" on the computer (video card) to mix up the input ... Use an audio cable without resistance. INSTALLATION, ADJUSTMENT, SETTING 1 - 1. Mixing up the input terminal with the output terminal when connecting cables. PN-T321/T322B INSTALLATION, ADJUSTMENT, SETTING 2 - 2 Input mode Audio input terminal D-SUB PC audio input terminal DVI-D COMPONENT AV audio input terminal VIDEO HDMI ...
... CAUTION n Be sure to turn off the main power switch and disconnect the plug from the audio portion. Also, read the manual of the output sound can be fixed by setting "AUDIO OUTPUT" on the computer (video card) to mix up the input ... Use an audio cable without resistance. INSTALLATION, ADJUSTMENT, SETTING 1 - 1. Mixing up the input terminal with the output terminal when connecting cables. PN-T321/T322B INSTALLATION, ADJUSTMENT, SETTING 2 - 2 Input mode Audio input terminal D-SUB PC audio input terminal DVI-D COMPONENT AV audio input terminal VIDEO HDMI ...
Service Manual
Page 19
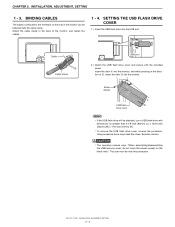
...drive will be fastened with the cable clamp. n To remove the USB flash drive cover, reverse the procedure. CAUTION n The operation manual says, "When assembling/disassembling the USB memory cover, do not touch the screws except for the black ones." Attach the cable clamp to... into the monitor. Insert the claw 1 into the monitor, and while pressing in the direction of 2, insert the claw 3 into the USB port. PN-T321/T322B INSTALLATION, ADJUSTMENT, SETTING 2 - 4 INSTALLATION, ADJUSTMENT, SETTING 1 - 3. BINDING CABLES The cables connected to the back of the monitor can be attached...
...drive will be fastened with the cable clamp. n To remove the USB flash drive cover, reverse the procedure. CAUTION n The operation manual says, "When assembling/disassembling the USB memory cover, do not touch the screws except for the black ones." Attach the cable clamp to... into the monitor. Insert the claw 1 into the monitor, and while pressing in the direction of 2, insert the claw 3 into the USB port. PN-T321/T322B INSTALLATION, ADJUSTMENT, SETTING 2 - 4 INSTALLATION, ADJUSTMENT, SETTING 1 - 3. BINDING CABLES The cables connected to the back of the monitor can be attached...

Service Manual
Page 20
Adjust the screen automatically or manually. 2 - 1. Try manual adjustment if necessary. 4 ) When adjustment is not a malfunction.) 2 - 2. OPENING THE ADJUSTMENT PATTERN The following example is complete in several seconds. 5 ) Press twice to ...computer's CD-ROM drive. 2 ) Open [CD Drive] in the color pattern may appear differently or grayscale may appear to be adjusted properly with e and d.) PN-T321/T322B INSTALLATION, ADJUSTMENT, SETTING 2 - 5 If you are using is 65,000 colors, the color levels in [Computer]. The adjustment pattern will appear. INITIALIZATION (RESET)/...
Adjust the screen automatically or manually. 2 - 1. Try manual adjustment if necessary. 4 ) When adjustment is not a malfunction.) 2 - 2. OPENING THE ADJUSTMENT PATTERN The following example is complete in several seconds. 5 ) Press twice to ...computer's CD-ROM drive. 2 ) Open [CD Drive] in the color pattern may appear differently or grayscale may appear to be adjusted properly with e and d.) PN-T321/T322B INSTALLATION, ADJUSTMENT, SETTING 2 - 5 If you are using is 65,000 colors, the color levels in [Computer]. The adjustment pattern will appear. INITIALIZATION (RESET)/...
Service Manual
Page 50
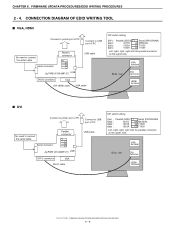
... VGA DVI-D cable USB cable DIP switch setting SW1 : Parallel (EDID) SW2 : AUTO SW3 : 1502A SW4 : 1502A Serial (PROGRAM) MANUAL T1620 T1620 Left, right, right, right with the parallel connector on the upper side. Parallel connector USB cable Serial connector Jig PWB (X1049MP-...connector VGA DVI-HDMI cable VGA cable DIP switch setting SW1 : Parallel (EDID) SW2 : AUTO SW3 : 1502A SW4 : 1502A Serial (PROGRAM) MANUAL T1620 T1620 Left, right, right, right with the parallel connector on the upper side. FIRMWARE UPDATA PROCEDURES/EDID WRITING PROCEDURES 2 - 4. Body rear...
... VGA DVI-D cable USB cable DIP switch setting SW1 : Parallel (EDID) SW2 : AUTO SW3 : 1502A SW4 : 1502A Serial (PROGRAM) MANUAL T1620 T1620 Left, right, right, right with the parallel connector on the upper side. Parallel connector USB cable Serial connector Jig PWB (X1049MP-...connector VGA DVI-HDMI cable VGA cable DIP switch setting SW1 : Parallel (EDID) SW2 : AUTO SW3 : 1502A SW4 : 1502A Serial (PROGRAM) MANUAL T1620 T1620 Left, right, right, right with the parallel connector on the upper side. FIRMWARE UPDATA PROCEDURES/EDID WRITING PROCEDURES 2 - 4. Body rear...

